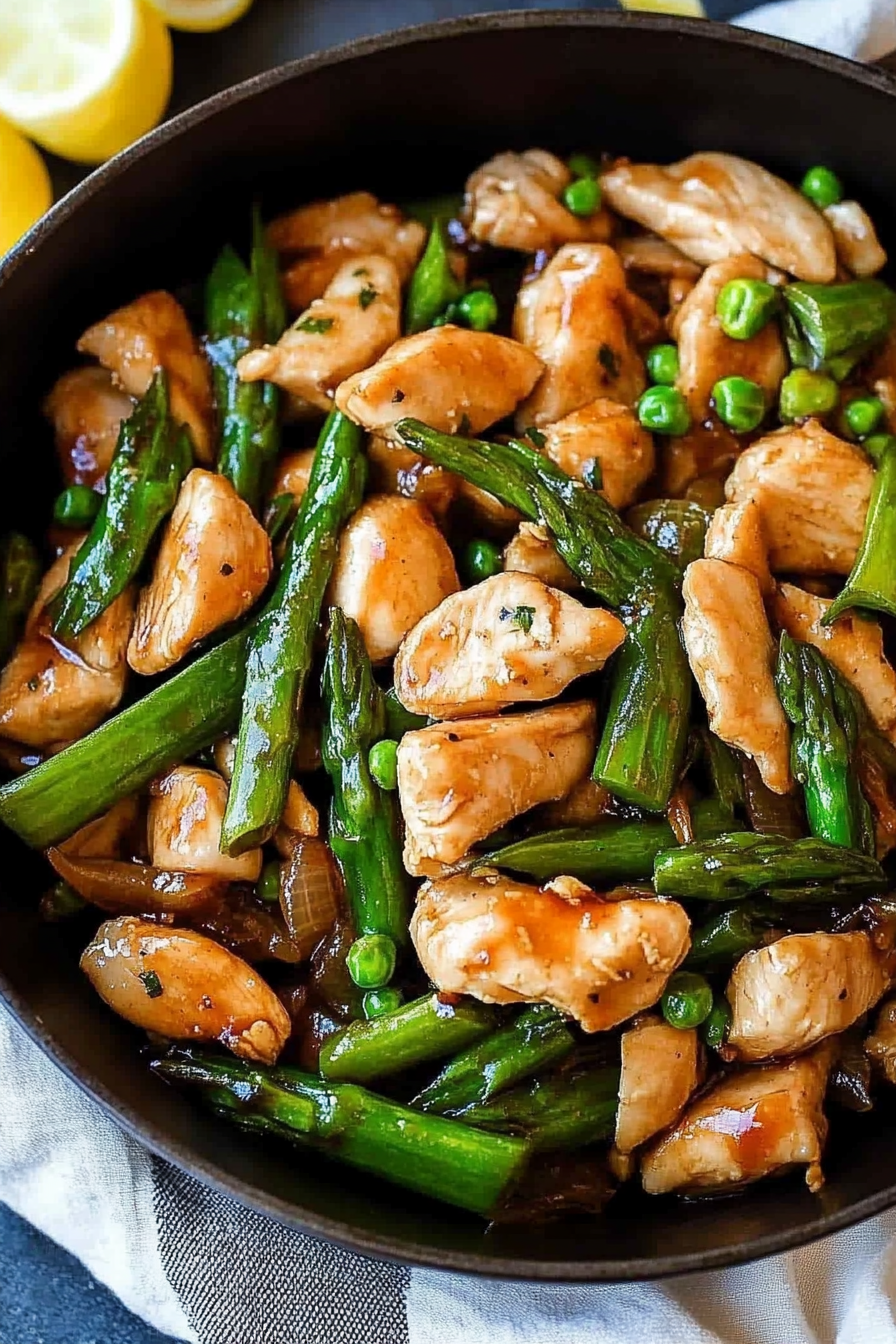
Zesty Chicken Asparagus Stir-Fry Recipe
Scrolling through my recipe box, I always smile when I get to this one. It’s like a warm hug wrapped in a slice of cake—super moist, bursting with chocolate richness, and loaded with just enough zucchini to keep it interesting. I remember the first time I made this; my kids were skeptical at first, “Zucchini in cake? Really?” they asked, eyebrows raised. But then they took that first bite, and their eyes lit up. It’s that perfect blend of wholesome and indulgent, and honestly, I’ve tested this countless times, tweaking ingredients, trying different glazes, and honestly, it never fails to bring a smile. If you’re anything like me—believer in sneaking veggies into treat form—this one’s a lifesaver on busy nights when you want something sweet but also secretly feel good about eating more greens. Trust me, once you make it, it’ll disappear in minutes at your house. It’s easy, forgiving, and, best of all, everyone asks for seconds!
What is gluten free Zucchini Chocolate Swirl Cake?
This cake is a delicious play on the classic zucchini bread, but elevated into a tender, layered cake that’s perfect for sharing. Think of it as a cake that’s secretly sneaky—because no one will guess there’s zucchini hiding inside! It’s essentially a moist, fluffy batter imbued with rich cocoa, with swirls of melted chocolate running through it. The name might sound fancy, but this is a homey, comforting dessert that calls to mind lazy weekend mornings or cozy evenings with a cup of tea. The magic is in how the zucchini keeps everything ultra-soft and adds a subtle earthiness that balances the sweetness of the chocolate. I love how versatile it is—gluten-free, mild enough for kids, and fancy enough for guests. Plus, it’s a sneaky way to get some veg in for anyone who might be turning their nose up at “healthy” stuff. It’s honestly become my go-to whenever I need a cozy bake that I can feel good about—and that proves to everyone that vegetables and chocolate do make the perfect pair.
Why you’ll love this recipe?
There’s so much to love about this gluten-free zucchini chocolate swirl cake—it’s like a secret weapon in your dessert arsenal. First off, the flavor. Imagine a melt-in-your-mouth crumb infused with rich cocoa and sweet, tender zucchini—that’s a flavor combo that keeps earning compliments. What I love most about this is how easy it is to make. No fancy equipment needed, and the batter comes together in minutes. Speaking of minutes, this is perfect when you are short on time but craving something homemade and special. Plus, it’s pretty cost-efficient to whip up; the ingredients are staples—flour alternatives, cocoa, zucchinis from your veggie drawer, and chocolate chips—nothing fancy or expensive. And about versatility? Oh, it’s endless. You can hive off small slices for breakfast, layer it with cream cheese frosting for a celebration, or just dust it with powdered sugar for a simple, elegant touch. I’ve made this for holidays, weeknights, even potlucks, and it always gets rave reviews. The best part? It’s so forgiving—I’ve overmixed, underbaked, and still walked away with a stellar cake every damn time.
What’s funny is how my kids ask for this all the time. It’s become our weekend treat—an anytime cake, really. And here’s a little secret: I tested this with almond milk and it actually made it even creamier! So, if you’re dairy-free, don’t worry. Just swap out the milk, and you’re good. It’s one of those recipes that makes you feel like a baking hero with very little fuss, yet the outcome feels elevated. Truly, this cake has won over every guest I’ve served it to, and honestly, it’s more about the warmth and love baked right in than anything else. And I bet once you try it, it’ll become a staple in your home, too.
How do I make gluten-free Zucchini Chocolate Swirl Cake?
Quick Overview
This cake is all about simple magic—whisk your dry ingredients, mix up the wet, fold together gently, add shredded zucchini, pour into a pan, layer with melted chocolate, swirl, bake, and voila! The trick is to keep things moist and not overmix, so the batter stays tender and the swirl stays beautiful. It’s a straightforward process that anyone can do—perfect for a weeknight treat or an impromptu dinner party. The added step of swirling melted chocolate through the batter creates a stunning visual and bursts of flavor with every bite. Honestly, the hardest part is waiting for it to cool before slicing—patience, I tell ya, is key. Once cooled, the aroma alone invites everyone to the table, and that first slice… well, it’s pure happiness.
Ingredients
For the Main Batter:
- 1 ½ cups gluten-free all-purpose flour (I like almond or oat flour for extra flavor)
- ½ cup cocoa powder (unsweetened, natural is best)
- 1 cup granulated sugar (or coconut sugar for a healthier twist)
- 1 teaspoon baking powder (gluten-free)
- ½ teaspoon baking soda
- ¼ teaspoon salt
- ½ cup olive oil or melted coconut oil
- 3 large eggs (or flaxseed eggs for vegan version)
- 1 teaspoon vanilla extract
- 1 cup shredded zucchini (squeeze out excess moisture)
For the Filling:
- ½ cup semi-sweet chocolate chips or chopped dark chocolate (use dairy-free if needed)
- 2 tablespoons coconut oil (for melting chocolate)
For the Glaze:
- ½ cup powdered sugar
- 1-2 teaspoons milk or almond milk
- Optional: a sprinkle of cocoa powder or lemon zest for flavor
Step-by-Step Instructions
Step 1: Preheat & Prep Pan
Set your oven to 350°F (180°C). Grease a 9-inch round cake pan or line it with parchment paper. This is the step I always do first—nothing worse than forgetting to prep and ending up with a stuck cake. If you like, dust the pan with a little cocoa powder for a non-stick layer that adds flavor.
Step 2: Mix Dry Ingredients
In a large bowl, whisk together the gluten-free flour, cocoa powder, sugar, baking powder, baking soda, and salt. Sifting helps keep everything light and fluffy, so if you have a sifter, give it a quick spin. This step ensures your cake rises nicely and avoids lumps—believe me, this little habit has saved me from fudgy, dense cakes more times than I can count.
Step 3: Mix Wet Ingredients
In another bowl, whisk together the eggs, oil, and vanilla. I always do this right in the same measuring jug—they clean up easier and it’s just quicker. If you’re vegan, flaxseed eggs work like a charm here—just mix 1 tablespoon ground flax with 3 tablespoons water, let sit for 5 minutes, and then use.
Step 4: Combine
Pour the wet into the dry and fold gently—no overmixing! You want just combined, with a few lumps here and there. Overmixing can doom the cake to be heavy and sticky—trust me, I learned this from years of trial and error. Then, fold in the shredded zucchini. It should look kind of thick but moist—if it’s too dry, give it a splash more milk.
Step 5: Prepare Filling
In a small microwave-safe bowl, melt the chocolate chips with coconut oil in 30-second bursts, stirring in between until smooth. Be careful not to overheat, or the chocolate gets grainy. Once melted, set aside—this will be your swirl. If you want more intense chocolate flavor, stir in a teaspoon of instant espresso powder, trust me on this—it amplifies the cocoa like nothing else.
Step 6: Layer & Swirl
Pour half of the batter into your prepared pan. Drizzle half of the melted chocolate over it, then add the rest of the batter. Now, take a skewer or a knife and swirl the chocolate into the batter—don’t overdo it; aim for a marbled look. The goal is to get lovely streaks, not perfectly mixed. It’s like art—you want unpredictable beauty here.
Step 7: Bake
Pop it in the oven for about 40-45 minutes. Check with a toothpick—if it comes out clean, you’re good. If you poke the center and it’s still wet, give it five more minutes. Every oven’s different; I once had to bake mine an extra 5 minutes because my oven runs cold. Cool in the pan for 10 minutes, then transfer to a wire rack to cool completely. Patience is key here; rushing to slice hot cake usually leads to crumbling.
Step 8: Cool & Glaze
Once cooled, whisk together powdered sugar and milk for a simple glaze. Drizzle over the top and let it set for about 10 minutes. The glaze is optional but makes it look pretty and adds a nice sweetness that balances the cocoa. If you’re feeling fancy, sprinkle a little sea salt or crushed nuts on top after glazing—it’s a game-changer.
Step 9: Slice & Serve
Use a serrated knife to get nice clean slices. Serve warm with a dollop of whipped cream or a scoop of vanilla ice cream if you’re feeling decadent. At room temperature, the cake stays moist for days—if it lasts that long! For the prettiest presentation, try stacking slices on a pretty plate and garnish with a sprig of mint or a dusting of cocoa powder. Honestly, it looks like you stepped right out of a bakery, but it’s all from your own kitchen.
What to Serve It With
This cake is incredibly versatile. For a breakfast treat, pair it with a robust cup of coffee or a silky latte—my kids love this with a splash of almond milk in the morning. It’s also a hit at brunch when served with fresh berries and a dusting of powdered sugar—think of it as an elevated zucchini bread on steroids. As a dessert, it pairs beautifully with a glass of cold milk or a cup of dark roast coffee. I’ve even made mini muffin versions for quick snacks; just adjust the baking time to around 20-25 minutes, and they’re perfect for on-the-go. When I want to impress guests, I slice it thin, add a sprig of mint, and serve with a drizzle of caramel or berry compote. My family loves it as a late-night snack, especially when I drizzle a little extra melted chocolate on top. Honestly, it’s become our secret little indulgence that’s still packed with enough healthy goodness to feel good about.
Top Tips for Perfecting Your Gluten-Free Zucchini Chocolate Swirl Cake
Every time I make this, I learn something new. Here are my tried-and-true tips to make sure yours turns out just as lovely:
- Zucchini Prep: Always squeeze out excess moisture. I sometimes use a clean dish towel to wring out the shredded zucchini—it prevents sogginess and helps your cake stay nice and fluffy. Fresh zucchini is best; if yours’s been sitting a day or two, give it a good squeeze.
- Mixing Advice: Resist the urge to overmix once you add the wet ingredients. Mix just until combined; that’s where the magic of a tender crumb happens. Overmixing leads to tough texture, and nobody wants that.
- Swirl Customization: Want more chocolate? Just double the melted chocolate portion or sprinkle chocolate chips before baking. For a prettier swirl, try using a toothpick or skewer to create nice figure-eight patterns, or swirl in different directions for a more artistic look.
- Ingredient Swaps: Besides cocoa, try adding a teaspoon of cinnamon or a dash of chili powder for a spicy kick. Use maple syrup instead of sugar for a natural sweetness. Just remember, if you add more wet ingredients, adjust your flour accordingly to keep it from becoming gooey.
- Baking Tips: Oven temperature can vary—so start checking around the 40-minute mark. To test doneness, insert a toothpick — if it comes out moist but not wet, you’re all set. Keep in mind, a slightly underbaked cake will stay moist and fudgy; overbaking will dry it out.
- Glaze Variations: For a tangy twist, swap powdered sugar with cream cheese icing or drizzle with a dark chocolate ganache. Consider infused glazes—like orange zest, peppermint extract, or espresso powder—for extra flavor pop.
I’ve made lots of tweaks over the years, like adding a pinch of sea salt to the batter or mixing in a handful of crushed nuts—little touches that elevate this humble cake into something special. The key is to trust your senses: smell that cocoa aroma, watch for bubbling batter, and listen for that gentle sizzle when the chocolate hits the hot batter. These little cues help me perfect each batch, and I hope they help you, too. Remember, baking is as much about intuition as following a recipe—so don’t stress if it turns out a little different every time. That’s part of the fun, right?
Storing and Reheating Tips
This cake stays moist and fabulous for days if stored properly. I usually wrap leftovers tightly in plastic wrap or keep them in an airtight container. At room temperature, it’s good for about 2 days—just keep it away from direct sunlight or heat sources. If you want it to last longer, pop it in the fridge for up to 5 days. The coolness actually helps preserve that moist crumb. Just bring it to room temp before slicing, or warm slices gently in the microwave for 15 seconds for that fresh-out-of-the-oven feel.
If you have leftovers and want to freeze them, wrap individual slices in plastic wrap then aluminum foil. They’ll store beautifully for up to 3 months. When ready to eat, thaw in the fridge overnight and warm up in the microwave or oven. The glaze is best added fresh, but if you’re in a pinch, a quick microwave melt of chocolate chips works wonders for a quick drizzle. And a tip—if you’re planning to serve it over a couple of days, wait to glaze until right before serving to keep that glossy, tempting look.
Frequently Asked Questions
Final Thoughts
This gluten-free zucchini chocolate swirl cake is one of those recipes that you’ll find yourself making over and over. It’s endlessly adaptable, surprisingly straightforward, and absolutely delicious—no one will ever guess there’s zucchini hiding inside if you swirl the chocolate just right! I love how it balances the indulgence of chocolate with the wholesome goodness of veggies, making it a win both kids and adults can enjoy. Plus, it’s a perfect way to use up those zucchinis from your garden before they get too big or start to wilt. Every time I bake this, I feel like I’ve created a little magic—I watch the batter turn into a gorgeous, marbled masterpiece, and smelling that rich cocoa baking fills my entire house with comfort. My family asks for it on lazy Sunday afternoons, and I can’t help but share a little slice of happiness. So, grab your zucchinis, melt some chocolate, and get ready for a baking adventure that’s simple, charming, and totally worth every bite. Would love to hear your variations or any twists you try—share in the comments below! Happy baking!
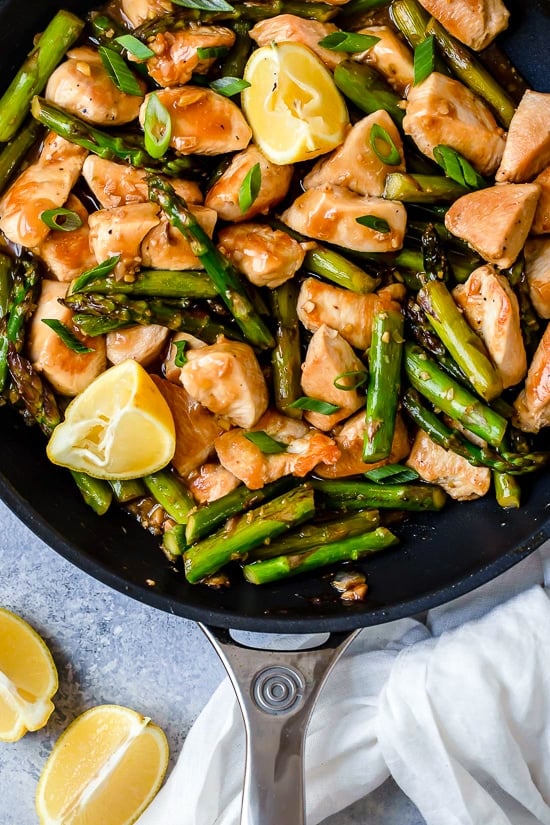
chicken stir-fry
Ingredients
Method
- Lightly season the chicken with salt.
- In a small bowl, combine chicken broth and soy sauce.
- In a second small bowl, combine the cornstarch and water and mix well to combine.
- Heat 1 tablespoon of oil in a large wok or skillet over medium-high heat, then add the chicken and cook until browned, about 5-7 minutes. Remove and set aside.
- Add the remaining tablespoon of oil, garlic, and ginger to the pan, cook for 1 minute until fragrant.
- Add the asparagus and cook until tender-crisp, about 3-4 minutes.
- Return the chicken to the pan. Stir in the soy sauce mixture, bring to a simmer, then add the cornstarch mixture and cook until the sauce thickens, about 1-2 minutes.
- Stir in lemon juice and black pepper, cook for another minute. Serve hot.