Pressure Cooked Corned Beef and Cabbage
There’s just something about baking in the morning that makes the house smell like happiness. I remember my grandma’s kitchen wafting with cinnamon and vanilla, and one thing she’d always have ready was her signature zucchini swirl coffee cake. Yep, zucchini! I know, it sounds a little wild, but hear me out — it’s like sneaking in a little veggie magic into something sweet. My kids ask for this all the time, and honestly, I do too. It’s the kind of treat that’s perfect on a lazy weekend or when friends drop by unexpectedly. I always do this when I want to impress but keep things simple. Plus, it’s surprisingly versatile; you can swap out the glaze for icing if you’re feeling extra decadent. Trust me on this one — it’s become a family favorite and, honestly, a little slice of nostalgia in every bite.
What is Zucchini Swirl Coffee Cake?
Think of zucchini swirl coffee cake as a cozy, comforting baked good that’s a bit like a bread pudding, but way lighter and more breakfast-appropriate. It’s essentially a moist, tender cake layered with a cinnamon-sugar filling that gives it those beautiful marbled swirls — like a little edible art. The name might throw you off because “coffee cake” makes you think of a crumbly topping, but this version is all about the soft, flavorful swirl inside. It’s inspired by classic cinnamon roll fillings but turbocharged with grated zucchini for moisture and a sneaky vegetable boost. The zucchini keeps everything super moist and adds a subtle earthiness, making it a perfect balance to the sweet, spicy filling. It’s a gentle reminder that baking can be simple, satisfying, and have a touch of wow-factor all at the same time.
Why you’ll love this recipe?
What I love most about this zucchini swirl coffee cake is how effortlessly cozy it feels. The smell alone is enough to bring everyone into the kitchen—think warm cinnamon, hint of vanilla, and just a dash of nutty zucchini flavor. It’s a quick hit of comfort that’s perfect for breakfast, brunch, or a laid-back afternoon snack. Plus, it’s budget-friendly—I always keep a stash of zucchini in the fridge, just waiting to be grated and baked into something special. This recipe is so forgiving, too. I’ve tested it with almond milk, and it actually made the cake even creamier, so don’t be shy with your substitutions. I always do this when I want a little extra magic. It’s versatile, too—swap the glaze for cream cheese frosting, or sprinkle with chopped nuts for a crunch. Honestly, what I love most about this is how it’s become our family’s go-to comfort food, especially when I want something homemade that tastes like a warm hug.
How do I make Zucchini Swirl Coffee Cake?
Quick Overview
This coffee cake is a breeze to make on a lazy weekend or even a busy weekday morning. It starts by mixing a simple, soft batter that’s enriched with grated zucchini—so moist and tender. Meanwhile, the filling is just cinnamon, sugar, and a touch of butter — super easy to toss together. Layering the batter and filling is a fun little art, creating those gorgeous marbled swirls. Into the oven it goes, and in about 35-40 minutes, you’ll have a fragrant, golden cake ready to cool slightly before pouring on a simple glaze. The best part? It’s totally adaptable. Wanna make it vegan? Swap the eggs for flaxseed or apple sauce. Feeling like a richer topping? Add cream cheese to the glaze. Basically, it’s a flexible, comforting bake that you’ll want to keep a secret recipe for.
Ingredients
For the Main Batter:
- 2 cups all-purpose flour (I like unbleached for a nuttier flavor)
- 1 cup granulated sugar (or coconut sugar for a slightly caramel touch)
- 1 teaspoon baking powder
- ½ teaspoon baking soda
- ¼ teaspoon salt
- 1 teaspoon ground cinnamon (because why not)
- 1 cup grated zucchini (squeezed dry a bit; I often do this with a clean kitchen towel)
- ½ cup vegetable oil (or melted butter if you’re feeling classic)
- 2 large eggs (or flax eggs for vegan version)
- 1 teaspoon vanilla extract
For the Filling:
- ⅓ cup brown sugar (packed tightly)
- 1 tablespoon ground cinnamon
- 2 tablespoons unsalted butter, melted (or coconut oil)
For the Glaze:
- 1 cup powdered sugar
- 2 tablespoons milk (or almond milk)
- ½ teaspoon vanilla extract
- Optional: a sprinkle of cinnamon or lemon zest for a zing
Step-by-Step Instructions
Step 1: Preheat & Prep Pan
I always start by preheating my oven to 350°F (175°C). Then, I grease a 9-inch round or square baking pan with butter or non-stick spray. Lining with parchment paper is a good idea if you want perfect slices afterward. Setting it aside while the oven warms gives me time to gather everything—it’s all about making the process smooth.
Step 2: Mix Dry Ingredients
In a large mixing bowl, whisk together the flour, sugar, baking powder, baking soda, salt, and cinnamon. This step is crucial because it evenly distributes the leavening agents and spices, ensuring each bite is perfectly fluffy and flavorful. I always do this first, so I don’t end up with clumps or uneven spice in my batter.
Step 3: Mix Wet Ingredients
In a separate bowl, beat the eggs, oil, vanilla, and grated zucchini. I like to squeeze out some excess moisture from the zucchini first—you don’t want the batter to be too wet, or it might turn out more like a pudding. I’ve tested with almond milk, and honestly, it made the cake even more tender and creamy, so feel free to experiment!
Step 4: Combine
Pour the wet mixture into the dry ingredients and gently stir until just combined. Be careful not to overmix; a few lumps are fine. Overmixing can make the cake dense, and no one wants that. This is exactly where patience pays off: a light hand leads to a fluffy, moist cake.
Step 5: Prepare Filling
Mix together the brown sugar, cinnamon, and melted butter to form a crumbly, fragrant mixture. It smells amazing—trust me, your kitchen will be filled with cozy cinnamon scents. Feel free to sprinkle nuts or even a dash of nutmeg if you’re feeling fancy.
Step 6: Layer & Swirl
Pour half the batter into your prepared pan, then sprinkle half the cinnamon sugar evenly over the top. Add the remaining batter on top, smoothing it out gently. Use a skewer or knife to swirl through the layers—this creates those gorgeous marbled swirls that make every slice Instagram-worthy. I’ve found that swirling in a figure-eight pattern gives the best visual look.
Step 7: Bake
Place in the oven and bake for about 35-40 minutes. Test doneness with a toothpick—it should come out clean but moist. Every oven is different, so start checking at 35 minutes. My oven tends to run slightly hot, so I usually check around 33 minutes to prevent overbaking. Once done, let it cool for about 15 minutes—this helps set the swirls and makes slicing easier.
Step 8: Cool & Glaze
While it cools, whisk together the powdered sugar, milk, and vanilla. If the glaze feels too thick, add a tiny more milk; if it’s too runny, sprinkle in a little more powdered sugar. Drizzle it over the slightly warm cake for that glossy finish. The aroma alone is worth the wait—golden cinnamon and sweet glaze.
Step 9: Slice & Serve
Once cooled completely, slice yourself a piece and enjoy with a cup of coffee or your favorite tea. I love to serve it slightly warm, with a dollop of whipped cream or a dusting of extra cinnamon. It’s perfect for breakfast or a lazy afternoon snack. Make sure to use a sharp serrated knife—it helps keep those beautiful swirls intact.
What to Serve It With
This zucchini swirl coffee cake is so versatile, you’ll find yourself craving it morning, noon, and night. For breakfast, serve a warm slice with a strong cup of drip coffee or a frothy cappuccino—trust me, this is the way to start the day! It’s also a showstopper at brunch, paired with fresh fruit and a mimosa or a cinnamon-spiced latte.
As a dessert? Absolutely. Warm a slice and top it with vanilla ice cream or a dollop of whipped cream—my kids ask for this all the time. It’s just the right amount of sweet and spice to finish a cozy dinner. And, if you want a more casual snack, it’s perfect with a mug of hot cocoa or even a glass of cold milk. I’ve found that grandma’s secret trick was always making it versatile enough to enjoy anytime.
Top Tips for Perfecting Your Zucchini Swirl Coffee Cake
Over the years, I’ve picked up a few tricks that make this recipe even better. Here’s what I swear by:
- Zucchini Prep: Always squeeze out excess moisture—otherwise, your cake can turn out a bit soggy. Grate it fresh, then press through a sieve or with a clean towel before adding to the batter.
- Mixing Advice: Be gentle when combining ingredients. Overmixing is the biggest culprit in dense cake disasters. Look for a lumpy but uniformly combined batter—still tender.
- Swirl Customization: Try different patterns for swirl effects—zigzags, figure-eights, or even just a gentle spooning for a more rustic look. Either way, it creates a beautiful marbling effect that makes each slice special.
- Ingredient Swaps: Want to add a nutty crunch? Mix chopped pecans or walnuts into the filling. Prefer a richer flavor? Use brown butter in the filling. It’s all about tailoring it to your taste buds.
- Baking Tips: If your oven is hot spot-prone, rotate the cake halfway through baking. Keep an eye on your toothpick test; every oven is different. When it’s done, a slight golden edge is a good sign it’s ready.
- Glaze Variations: For a citrusy twist, add lemon zest to the glaze. For more richness, blend in cream cheese before pouring. The glaze is your blank canvas, so don’t hesitate to experiment!
It took me a few tries to get it just right, but now I know that patience and gentle handling are key. The first few times, I overmixed or forgot to squeeze out zucchini—small mistakes, but they affect the texture. Learning to layer carefully and swirl just enough creates that beautiful marbled look and soft, moist crumb. Trust me, once you get the hang of it, this cake becomes your new secret weapon for coffee dates or lazy Sunday mornings.
Storing and Reheating Tips
This cake is best enjoyed within a couple of days, but if you’ve got leftovers (which I rarely do!), here’s how to keep it fresh:
- Room Temperature: Wrap it loosely with foil or store in an airtight container for up to two days. I prefer keeping it covered but not airtight—this preserves the flaky crust and keeps it from getting soggy.
- Refrigerator Storage: For longer freshness, pop slices into a sealed container or wrap tightly in plastic wrap. It’ll stay good for 3-4 days. I like to warm it slightly in the microwave for about 20 seconds before serving—that extra cozy factor is worth it.
- Freezer Instructions: Slice and wrap each piece individually in plastic, then tuck into a zip-top bag. It keeps well for up to 2 months. To serve, thaw at room temp and give it a quick warm-up—this restores the soft, moist texture.
- Glaze Timing Advice: If you’re freezing the cake, wait until serving day to add the glaze—it’s fresh and shiny that way. If stored in the fridge, apply the glaze after reheating to keep that pretty glossy look.
I’ve tested all these ways, and honestly, it’s still delicious—moist, flavorful, and just the right sweetness. Plus, it makes your house smell amazing even days later.
Frequently Asked Questions
Final Thoughts
When I first discovered this zucchini swirl coffee cake, I was skeptical about the zucchini. But honestly, it’s just a little secret ingredient that makes every slice so moist and irresistible. It’s one of those recipes I keep coming back to, whether it’s for weekend brunch, a quick breakfast, or even to share with friends—you’ll be surprised how quickly it disappears! The smell mingling cinnamon, vanilla, and fresh zucchini is the signal that something wonderful is happening in the oven. Over the years, I’ve tweaked the recipe a bit; I tested different flours, oils, and glaze options, and I’ve learned that a gentle touch keeps it tender and flavorful. Trust me, once you make this a few times, it’ll become your go-to comfort bake, too. If you love sneaking in veggies into your sweets or just crave something cozy, give this a shot—your kitchen and taste buds will thank you. Can’t wait to hear how yours turns out! Happy baking! And don’t forget—feel free to share your own tips or variations in the comments below. I love swapping ideas with fellow bakers.
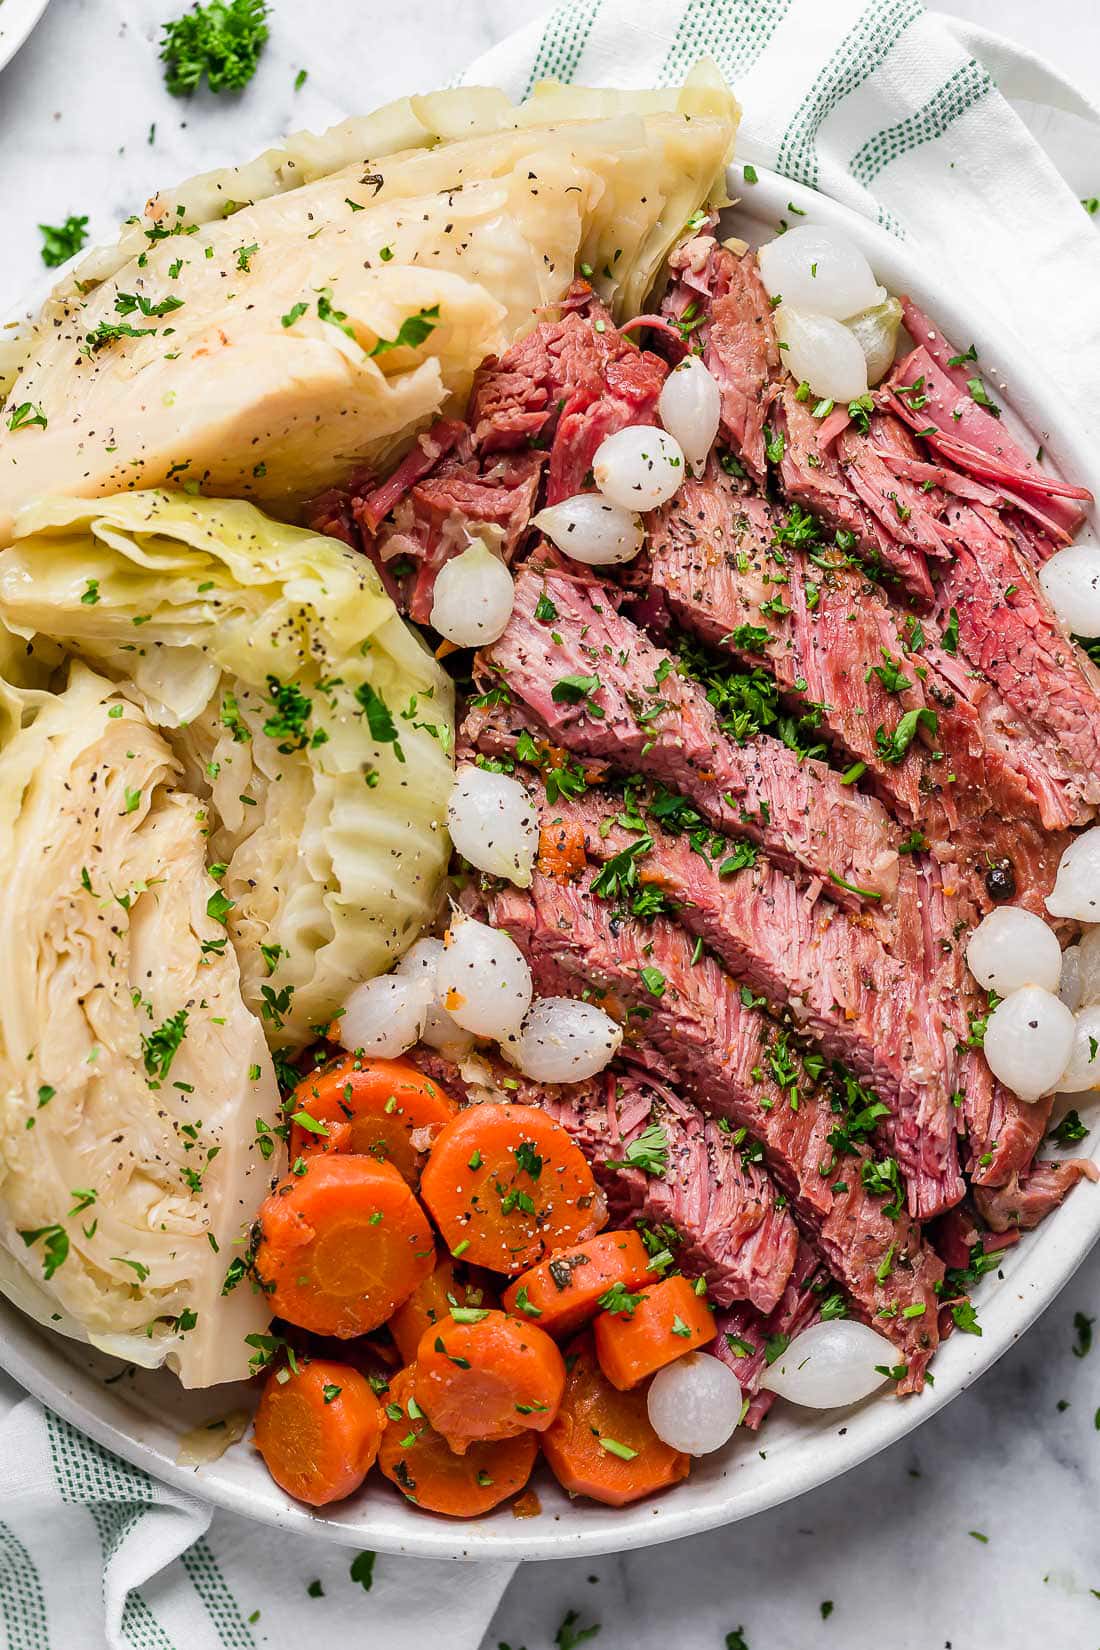
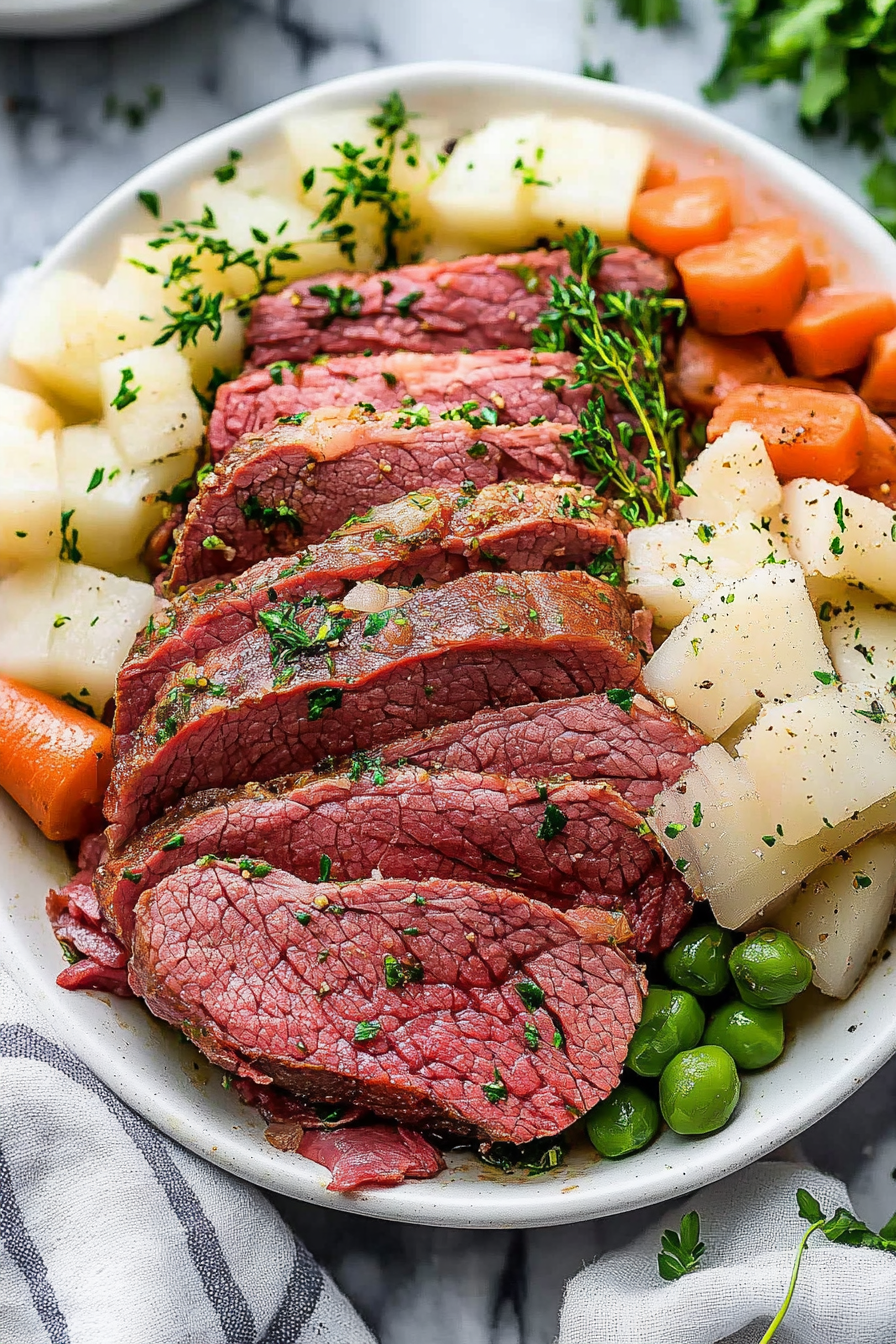
Corned Beef
Ingredients
Method
- Place the corned beef brisket, carrots, pearl onions, parsley, bay leaves, and peppercorns in the Instant Pot. Add 3 cups of water.
- Close the lid and cook on high pressure for 1 hour and 45 minutes. Allow natural pressure release.
- Add the cabbage wedges on top of the cooked beef, close the lid, and cook on high pressure for 3 minutes. Quick release pressure afterward.
- Remove the meat, slice into 6 pieces, and serve with vegetables and broth.