Effortless Air Fryer Turkey Breast
You know those recipes that just feel like a warm hug? The ones that smell like childhood and make your kitchen feel instantly cozier? Well, THIS is one of those for me. It’s my go-to, my absolute favorite, the one that disappears faster than you can say “second slice.” Forget all those other zucchini bread recipes you might have tried; this one is a game-changer. It’s so incredibly moist and flavorful, with just the right amount of sweetness and that lovely spiced aroma. I’ve been making this for years, and it’s the one recipe my family asks for time and time again, especially when they need a little pick-me-up. It’s the perfect balance of comforting and delicious, and honestly, it’s surprisingly easy to whip up, even on a weeknight.
What is Zucchini bread?
Okay, so what exactly *is* zucchini bread? At its heart, it’s a quick bread, meaning it uses chemical leaveners like baking soda or baking powder instead of yeast, so you don’t have to wait for dough to rise. The star ingredient, of course, is zucchini! Don’t worry, it doesn’t taste like a vegetable at all. When baked, the zucchini breaks down and essentially melts into the batter, adding an incredible amount of moisture and a tender crumb. Think of it as a secret weapon for super-soft baked goods. It’s kind of like a muffin meets a cake meets a brownie, all rolled into one glorious loaf. The name is pretty straightforward – it’s a bread that prominently features zucchini. It’s been a favorite for ages because it’s such a fantastic way to use up that garden bounty or those impulse buys at the farmer’s market!
Why you’ll love this recipe?
There are so many reasons why I think you’re going to absolutely adore this zucchini bread. First and foremost, the flavor is just divine. It’s got that perfect blend of warm spices – cinnamon, nutmeg, maybe a touch of cloves if you’re feeling fancy – that make it smell incredible while it’s baking. And the texture? Oh, the texture! It’s unbelievably moist and tender, thanks to the zucchini, and it has a lovely, soft crumb that just melts in your mouth. It’s not dense or heavy at all, which is something I’ve struggled with in other recipes. Another huge win for this recipe is its simplicity. You really don’t need to be a master baker to get amazing results. It comes together in one bowl (well, technically two, but who’s counting when it’s this easy?), and the ingredient list is pretty standard pantry stuff. It’s also super budget-friendly, which is always a plus. And let’s talk versatility! While it’s amazing on its own, it’s also fantastic with a dollop of cream cheese frosting or a simple dusting of powdered sugar. It’s honestly the perfect thing to whip up when you’re craving something sweet at 10 pm but don’t want to bake a whole cake. This recipe is a lifesaver on busy mornings when you need a quick breakfast on the go, too. What I love most about this recipe is that it never fails. Even if I’m a little off on my measurements or a bit rushed, it still turns out perfectly delicious. It’s that reliable friend in the kitchen you can always count on.
How do you make Zucchini bread?
Quick Overview
Basically, you’re going to mix your dry ingredients in one bowl, your wet ingredients in another, then gently combine them. Fold in your grated zucchini, pour it into a prepared loaf pan, and bake until it’s golden and a tester comes out clean. The magic happens when the zucchini softens and infuses the whole loaf with incredible moisture. It’s a straightforward process that yields impressive results, and it’s so forgiving! You really can’t mess this one up.
Ingredients
For the Main Batter:
2 cups all-purpose flour – I usually just use whatever is in my pantry, but a good quality unbleached all-purpose flour is great.
1 teaspoon baking soda – Essential for that lovely lift!
1/2 teaspoon salt – Just a touch to balance out the sweetness.
1 teaspoon ground cinnamon – This is non-negotiable for me; it’s the heart of the flavor.
1/2 teaspoon ground nutmeg – A little warmth goes a long way.
1/4 teaspoon ground cloves (optional) – If you like a bit more spice, this is a nice addition.
1 1/2 cups granulated sugar – You can reduce this slightly if you prefer, but this is the sweet spot for me.
2 large eggs – Room temperature is best, but it’s not the end of the world if they aren’t.
3/4 cup vegetable oil or melted unsalted butter – I’ve used both, and honestly, oil makes it extra moist, but butter gives it a richer flavor. It’s a tough choice!
1 teaspoon vanilla extract – Always use good quality vanilla; it makes such a difference.
2 cups grated zucchini – This is key! Make sure to squeeze out as much excess moisture as you can. See my tips below on how I do that.
For the Filling:
This is where you can get creative! My absolute favorite is a simple cinnamon-sugar swirl.
1/2 cup packed light brown sugar
1 tablespoon ground cinnamon
1/4 cup chopped walnuts or pecans (optional) – My kids love these, so I often add them in!
For the Glaze:
This is totally optional, but it adds a lovely finishing touch.
1 cup powdered sugar
2-3 tablespoons milk (or almond milk for extra creaminess!)
1/2 teaspoon vanilla extract
Step-by-Step Instructions
Step 1: Preheat & Prep Pan
First things first, get your oven preheated to 350 degrees Fahrenheit (175 degrees Celsius). You’ll want a standard 9×5 inch loaf pan. Grease it really well with butter or cooking spray, then lightly flour it. This ensures your beautiful loaf won’t stick. I sometimes even line mine with parchment paper, leaving a little overhang on the sides so I can easily lift the bread out later. It’s a little extra step but totally worth it for easy removal.
Step 2: Mix Dry Ingredients
Grab a medium-sized bowl and whisk together your flour, baking soda, salt, cinnamon, nutmeg, and cloves (if you’re using them). Give it a good whisk to make sure everything is evenly distributed. This prevents little pockets of baking soda or spice in your finished bread. It’s important to do this step thoroughly!
Step 3: Mix Wet Ingredients
In a larger bowl, whisk together the granulated sugar and the eggs until they’re well combined and slightly lighter in color. Then, slowly stream in the vegetable oil (or melted butter) while whisking constantly. Stir in the vanilla extract. You want a smooth, emulsified mixture here.
Step 4: Combine
Now, here’s a crucial part: gradually add the dry ingredients to the wet ingredients. Mix gently with a spatula or wooden spoon, just until *barely* combined. I always say, “When in doubt, under-mix!” Overmixing can develop the gluten too much, leading to a tougher bread. You should still see a few streaks of flour; that’s perfectly fine.
Step 5: Prepare Filling
While your batter is resting for a moment, quickly mix together the brown sugar and cinnamon in a small bowl. If you’re adding nuts, stir them in now. This simple mixture is what will create that gorgeous swirl throughout your bread.
Step 6: Layer & Swirl
Now it’s time to add the grated zucchini to your batter. Fold it in gently until it’s evenly distributed. Don’t overmix here either! Pour about half of the batter into your prepared loaf pan. Sprinkle about half of the cinnamon-sugar mixture evenly over the top. Then, dollop the remaining batter on top, and finish with the rest of the cinnamon-sugar mixture. If you want to get fancy, you can run a knife or a skewer through the batter in a zig-zag pattern to create more of a swirl effect. It looks so pretty!
Step 7: Bake
Pop that loaf pan into your preheated oven. Bake for about 50-65 minutes. The exact time will depend on your oven, so start checking around the 50-minute mark. The bread is done when it’s golden brown on top and a wooden skewer or toothpick inserted into the center comes out clean (or with a few moist crumbs attached, but no wet batter). If the top is browning too quickly, you can loosely tent it with aluminum foil.
Step 8: Cool & Glaze
Once it’s baked, take the loaf out of the oven and let it cool in the pan for about 10-15 minutes. This is important for it to set properly. Then, carefully invert the loaf onto a wire rack to cool completely. If you’re using a glaze, whisk together the powdered sugar, milk, and vanilla extract until smooth. You want it thick enough to coat but still pourable. Drizzle it over the *completely cooled* loaf. If you glaze it while it’s warm, the glaze will just melt off!
Step 9: Slice & Serve
Once the glaze has set (or if you’re skipping the glaze), slice your beautiful zucchini bread. I love using a serrated knife for clean cuts. Serve it at room temperature. It’s perfect on its own, but a little smear of butter never hurt anyone, right?
What to Serve It With
This zucchini bread is so versatile, you can enjoy it any time of day and for any occasion! For a simple **breakfast**, I love it toasted with a little butter or cream cheese. It’s quick, easy, and way more exciting than a plain piece of toast. Pair it with a hot cup of coffee or a glass of milk, and you’re good to go. When we have **brunch**, I like to make it a little more elegant. I’ll serve it on a nice platter, maybe with some fresh berries on the side, and always with a pot of good coffee or some sparkling mimosas. It’s a crowd-pleaser for sure! As a **dessert**, it’s absolutely heavenly. If you’ve added the glaze, it feels a bit more special. I also love serving it with a scoop of vanilla ice cream or a dollop of whipped cream. It’s the perfect ending to a meal when you want something sweet but not too heavy. And for those **cozy snacks**? This is it! It’s perfect for an afternoon treat with tea or a late-night craving. My kids also love it as an after-school snack, and it travels really well. My personal family tradition is to always have a loaf cooling on the rack when friends pop over unexpectedly – it always makes them feel so welcome!
Top Tips for Perfecting Your Zucchini Bread
Over the years, I’ve learned a few things that make this zucchini bread consistently amazing. Here are my top tips:
Zucchini Prep: This is probably the MOST important step. You need to grate your zucchini (I use the medium holes on a box grater) and then squeeze out as much liquid as possible. I like to put the grated zucchini in a fine-mesh sieve set over a bowl and press down with a spoon, or even better, I wrap it in a clean kitchen towel or cheesecloth and wring it out like crazy. This prevents a soggy, dense loaf. Fresh zucchini is always best, but if you have frozen, make sure it’s completely thawed and squeezed dry.
Mixing Advice: Remember what I said about not overmixing? It bears repeating! Mix the wet and dry ingredients *just* until they come together. A few flour streaks are okay; they’ll disappear during baking. Overmixing develops the gluten, which makes quick breads tough and chewy instead of tender and fluffy.
Swirl Customization: The cinnamon-sugar swirl is my favorite, but you can customize it! Try adding a tablespoon of cocoa powder to the brown sugar mixture for a chocolatey swirl, or a pinch of espresso powder for a mocha kick. You can also add finely chopped chocolate chips or dried cranberries to the batter itself for extra texture and flavor.
Ingredient Swaps: I’ve tested this with almond milk in the glaze, and it actually made it even creamier and gave it a subtle nutty flavor! For the oil, you can use melted coconut oil for a slightly different flavor profile, though vegetable oil or butter are classics for a reason. If you don’t have brown sugar for the swirl, granulated sugar mixed with a little molasses will work in a pinch, though it won’t be quite as moist.
Baking Tips: Every oven is different, so get to know yours. Use the toothpick test religiously. If the top is browning too fast but the inside isn’t cooked, loosely tent the loaf pan with aluminum foil. Placing the loaf pan on the center rack usually gives the most even heat distribution.
Glaze Variations: If you’re not a fan of a sweet glaze, a simple dusting of powdered sugar is lovely. Alternatively, you can make a cream cheese frosting – that’s a decadent treat! For a tangier option, mix some lemon zest into the powdered sugar glaze for a bright, zesty finish.
Storing and Reheating Tips
This zucchini bread is so good, you’ll want to make sure you store it properly so you can enjoy it for days! At **room temperature**, it stays wonderfully moist for about 2-3 days. Just wrap the cooled loaf tightly in plastic wrap or store it in an airtight container. If your kitchen is particularly warm, the refrigerator might be a better option, but be aware that refrigeration can sometimes dry out baked goods a bit.
For **refrigerator storage**, make sure the bread is completely cool. Wrap it well in plastic wrap or place it in an airtight container. It should stay fresh and delicious for up to 5 days. When you’re ready to eat it, you can enjoy it cold, or warm it up slightly.
If you want to freeze your zucchini bread, it freezes beautifully! Wait until it’s completely cooled. You can freeze the whole loaf or slice it first. Wrap individual slices or the whole loaf tightly in a layer of plastic wrap, followed by a layer of aluminum foil, or place them in a freezer-safe bag or container. It will keep well in the freezer for up to 3 months. To thaw, remove the bread from the freezer and let it come to room temperature on the counter for a few hours. If you want it warm, you can pop a slice in the toaster oven or microwave for a few seconds after thawing.
Glaze Timing Advice: If you plan to freeze your bread, I highly recommend glazing it *after* thawing. The glaze can sometimes get a little sticky or melty in the freezer. For refrigeration, it’s usually fine to glaze it before storing, but the glaze might become a bit softer.
Frequently Asked Questions
Final Thoughts
Honestly, this zucchini bread recipe is one that I hold really dear. It’s more than just a recipe; it’s a little piece of comfort and joy that I love sharing. It’s proof that you don’t need complicated techniques or fancy ingredients to make something truly spectacular. The way it turns out so moist and flavorful every single time is a testament to how well-balanced this recipe is. It’s perfect for using up that summer zucchini, but I actually make it year-round because it’s just that good. If you love this recipe, you might also enjoy my Best Ever Blueberry Muffins or my Moist Chocolate Chip Banana Bread – they have that same warm, homemade feel!
I really hope you give this a try. I can’t wait to hear how yours turns out! Please leave a comment below and let me know what you think, or if you tried any fun variations. Happy baking!
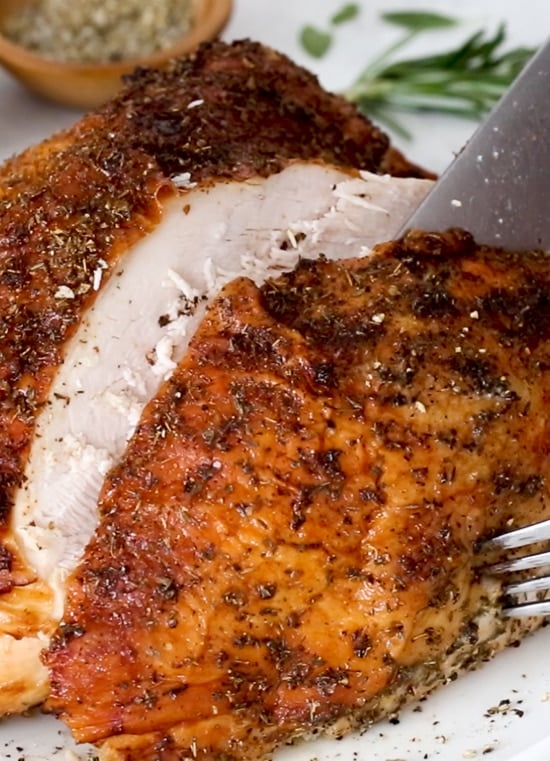
Air Fryer Turkey Breast
Ingredients
Method
- Rub 0.5 tablespoon of oil all over the turkey breast. Season both sides with salt and turkey seasoning then rub in the remaining half tablespoon of oil over the skin side.
- Preheat the air fryer to 350F. Cook skin side down for 20 minutes, then turn over and cook until the internal temperature reaches 160F using an instant-read thermometer. This will take about 30 to 40 minutes more, depending on the size of your breast. Let it rest for 10 minutes before carving.