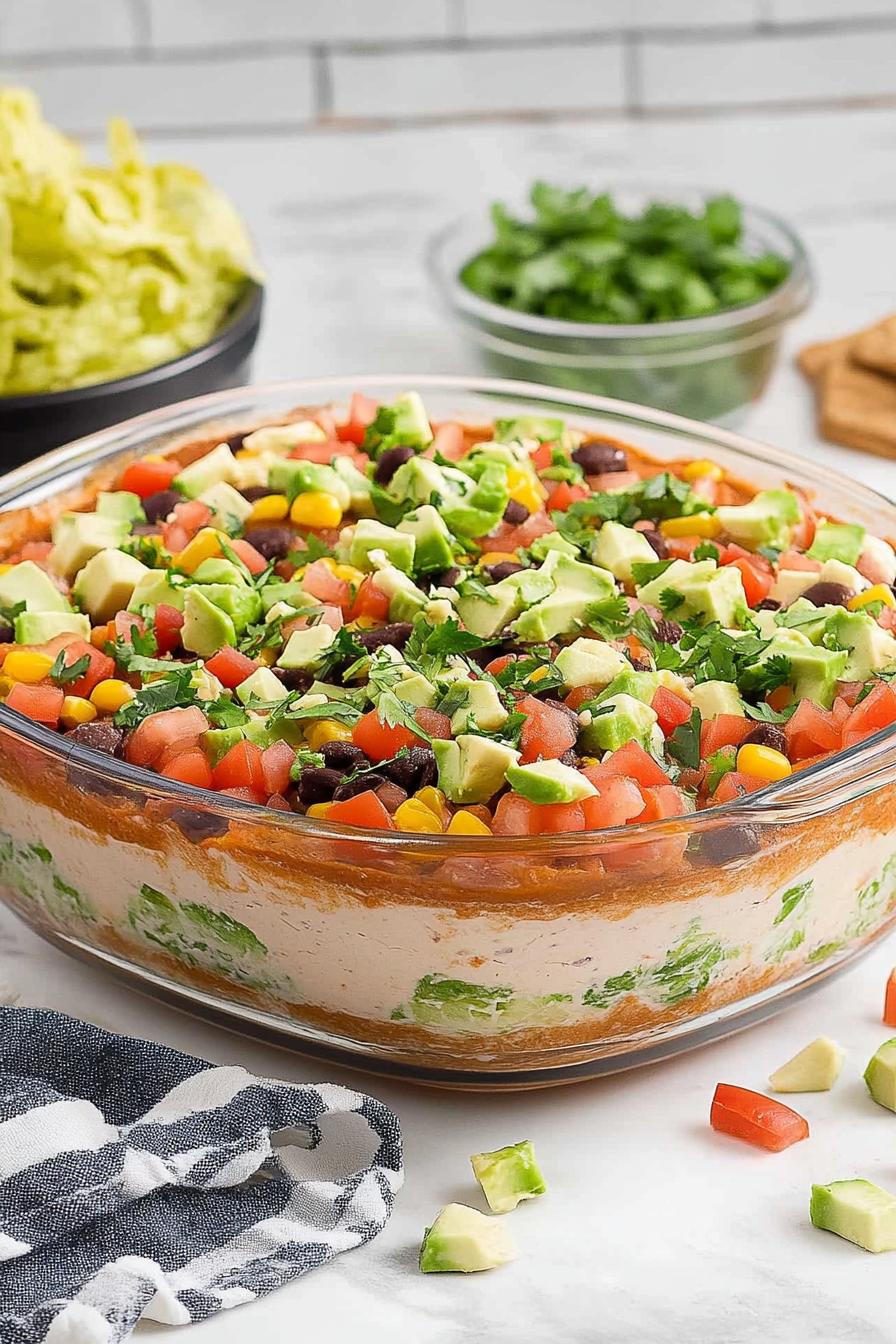
Easy Seven Layer Fiesta Dip Recipe
There’s something about a warm slice of zucchini swirl loaf that instantly takes me back to lazy Sunday mornings at my grandma’s house. The smell of baking zucchini mingling with cinnamon and vanilla, the cozy sound of butter melting into the soft batter — it’s pure comfort. I’ve made this endless times, tweaking it each season, and honestly, it’s become my go-to when I want something sweet but not overly indulgent. This recipe is a bit like that old favorite blanket; it’s familiar, warm, and always hits the spot. Plus, it’s surprisingly easy — I can whip it up on a busy weeknight, and my kids ask for seconds before I even get the glaze on. Trust me, this zucchini swirl loaf will become your new best friend. It’s perfect for breakfast, snack time, or even as a quick dessert. Believe me, it disappears in minutes at my house, so I always do extra to have leftovers for the next day!
What is Zucchini Swirl Loaf?
Think of it as a vegetable “cake,” but so much better — a tender, moist loaf with a beautiful cinnamon-sugar swirl running through it. It’s essentially a quick bread, meaning no fancy yeast fermentation needed, just simple mixing and baking. The name “zucchini swirl loaf” comes from the way fresh zucchini is folded into the batter, then swirled with a cinnamon sugar mixture to create that pretty marbled effect. It’s a clever way to sneak healthy greens into a sweet treat — my kids actually ask for this all the time! This recipe is friendly for home bakers of all levels, and the best part? You can customize the flavors, add nuts, or top it with a whisper of cream cheese frosting if you’re feeling fancy. It’s a little slice of homemade happiness, perfect for cozy mornings or a snack when you need a pick-me-up.
Why you’ll love this recipe?
What I love most about this zucchini swirl loaf is how it manages to be both simple and indulgent at the same time. The flavor is incredible — the moist, slightly dense crumb is packed with that lovely cinnamon spice, balanced by just enough sweetness. And the surprise swirl inside? It’s like a hidden treasure that looks gorgeous when you slice into it. It’s also one of those recipes that’s budget-friendly, too — I usually have all the ingredients in my pantry, and the zucchinis I use are often leftover from dinner prep. This bread is incredibly versatile; serve it warm with a pat of butter for breakfast, or cut thick slices to enjoy as an afternoon snack. I also think it’s perfect for brunch gatherings — looks impressive, tastes even better. Plus, the whole process is pretty forgiving, even if you’re not a seasoned baker. What I love most is how it makes my house smell like a bakery, and my family can’t get enough of it. Honestly, I’ve tried this with almond milk instead of regular, and it made it even creamier — you’ll love experimenting with it!
How do you make Zucchini Swirl Loaf?
Quick Overview
This loaf comes together in just a handful of bowls — no funky equipment needed. You start by mixing the dry ingredients, then whisk together wet ingredients, fold everything gently (to keep it tender), and layer the cinnamon-sugar filling for that gorgeous swirl. The batter is poured into a loaf pan, topped with a sprinkle of additional cinnamon sugar if you like, and baked until golden and a toothpick comes out clean. The magic happens as the zucchini releases moisture, keeps everything perfectly tender, and creates that moist crumb we all love. The swirl adds a touch of cinnamon warmth, and the glaze — if you choose to make one — takes it over the top. Honestly, with minimal effort, you’re left with a show-stopping bread that everyone will ask about!
Ingredients
For the Main Batter:
– 2 cups grated zucchini (about 2 small zucchinis, shredded and drained well)
– 2 cups all-purpose flour (or gluten-free blend for alternatives)
– 1 teaspoon baking powder
– ½ teaspoon baking soda
– ½ teaspoon salt
– 1 teaspoon ground cinnamon
– ½ teaspoon ground nutmeg (optional but adds warmth)
– 1 cup granulated sugar (feel free to reduce if you prefer less sweet)
– ½ cup vegetable or neutral oil
– 2 large eggs (at room temperature)
– 1 teaspoon vanilla extract
For the Filling:
– ¼ cup packed brown sugar
– 2 teaspoons ground cinnamon
– 1 tablespoon melted butter or coconut oil (for mixing with sugar and cinnamon)
For the Glaze:
– ½ cup powdered sugar
– 1–2 tablespoons milk (or almond milk)
– A splash of vanilla extract (optional, but adds flavor)
Step-by-Step Instructions
Step 1: Preheat & Prep Pan
Heat your oven to 350°F (175°C). Grease a standard loaf pan with butter or non-stick spray, then lightly dust it with flour or line it with parchment paper. This helps you remove the loaf easily once baked and keeps it pretty in presentation.
Step 2: Mix Dry Ingredients
In a large bowl, whisk together the flour, baking powder, baking soda, salt, cinnamon, and nutmeg. Doing this first ensures even distribution of the leavening agents and spices. Set aside.
Step 3: Mix Wet Ingredients
In another bowl, whisk the eggs, sugar, oil, and vanilla until smooth. I always do this by hand with a whisk — it’s quick and helps everything come together nicely. If your eggs are cold, just give everything a minute to warm up a bit. Stir in the grated zucchini (make sure it’s well-drained so the batter doesn’t get too watery). Fun fact: I tested this with almond milk once, and it made the loaf even creamier — try it!
Step 4: Combine
Pour the wet mixture into the dry ingredients. Use a spatula or wooden spoon to gently fold everything together — don’t overmix, or the loaf won’t be as tender. Stops you from developing too much gluten, which can make the bread dense.
Step 5: Prepare Filling
In a small bowl, combine the brown sugar, cinnamon, and melted butter. This mixture should be crumbly yet moist enough to sprinkle. If you want more cinnamon punch, sprinkle some extra on top before baking.
Step 6: Layer & Swirl
Pour half the batter into your prepared pan. Sprinkle half the cinnamon sugar filling over it, then add the remaining batter on top. Use a skewer or knife to swirl through the batter gently — don’t overdo it, just enough to create that beautiful marbled effect. It’s kind of like painting with batter!
Step 7: Bake
Pop it into your oven and bake for 50-60 minutes. Check doneness with a toothpick inserted in the center — it should come out clean or with just a few moist crumbs. Every oven is different, so keep an eye after 45 minutes. My oven runs hot, so I always tent it with foil if it’s browning too quickly, but the inside still needs time.
Step 8: Cool & Glaze
Let the loaf cool in the pan for about 10 minutes, then transfer to a wire rack. Wait until it’s just warm to spread your glaze — or skip it if you’re feeling healthy! When the loaf is cool enough, mix powdered sugar with a splash of milk, drizzle over the top, and let it set for a few minutes.
Step 9: Slice & Serve
Use a sharp serrated knife for clean cuts. If it sticks a little, let it sit for a few more minutes — patience is key! I love serving slices warm with a pat of butter or a dusting of powdered sugar. It’s perfect for breakfast, teatime, or a cozy snack with tea or coffee.
What to Serve It With
Honestly, this loaf is so good on its own, but here are some ideas to elevate your experience:
For Breakfast: A dollop of Greek yogurt or a smear of cream cheese, plus a hot cup of coffee or tea. My family loves this with a drizzle of honey for an extra touch of sweetness.
For Brunch: Serve slices alongside fresh fruit or a light salad. It makes a pretty centerpiece, especially when you sprinkle some extra cinnamon sugar or top with whipped cream.
As Dessert: Pair it with vanilla ice cream or a chai latte. Sometimes I warm a slice and add a scoop of ice cream — heavenly. Or, if I want to keep it casual, just a steaming mug of tea and this loaf is all I need.
For Cozy Snacks: Cut thick slices and serve with almond butter or a smear of nutella. It’s like a healthified treat that actually feels indulgent. I always keep a loaf in my freezer for those unexpected friends dropping by or when my kids want something sweet after school. It defrosts beautifully, still moist and flavorful.
Top Tips for Perfecting Your Zucchini Swirl Loaf
Over the years, I’ve picked up a few tricks to make sure this loaf turns out perfect every time:
Zucchini Prep: Always squeeze out excess moisture after shredding. A damp zucchini can make the batter too runny, which means uneven baking. I like to do this with a clean kitchen towel — just press and wring out the water.
Mixing Advice: The secret to tender bread? Don’t overmix after adding the flour. Mix just until no streaks remain. Doing this keeps the crumb light and soft.
Swirl Customization: Feel free to add chopped nuts or a dash of cocoa powder for a different twist. When layering the batter and filling, try to spread it evenly but leave some areas more swirled for dramatic effect.
Ingredient Swaps: Want to make it gluten-free? Use almond or oat flour, but reduce the baking powder slightly to prevent doming or sinking. If you’re out of cinnamon, a pinch of pumpkin pie spice adds cozy flavor.
Baking Tips: Every oven is unique; I suggest checking doneness around the 50-minute mark. Bottom racks can cause over-browning, so position the loaf in the middle when possible.
Glaze Variations: For a richer glaze, mix cream cheese with powdered sugar. Or sprinkle with chopped nuts or coconut flakes before it fully sets for extra crunch. I’ve tested it with maple syrup instead of milk — winners all around!
Honestly, I’ve learned a lot from making this loaf countless times. Sometimes I mess up and forget to drain the zucchini — the batter’s too wet, and it bubbles over! Now I always squeeze out every drop of moisture. Small tweaks make a huge difference. Trust me on this one, playing around with flavors and textures makes it even more special. Don’t be afraid to improvise. The best part is, if it doesn’t turn out perfect the first time, you get to learn and make it better next round. That’s what baking is all about, right?
Storing and Reheating Tips
This loaf stays fresh for a few days if kept properly — it’s just so moist and tender, it won’t dry out easily. Keep it in an airtight container at room temperature for 2-3 days; after that, I pop it in the fridge to keep it fresh longer. Just be sure to cover it tightly so it doesn’t absorb fridge smells.
If you want to enjoy slices later, it’s fantastic reheated in the microwave for about 15-20 seconds — just enough to warm it without drying out. Alternatively, you can warm slices in a low oven (around 300°F) wrapped in foil for about 10 minutes. Freezing is a cinch; wrap slices tightly with plastic wrap or foil, then store in a freezer-safe bag for up to 3 months. Thaw at room temp or gently warm in the microwave for a speedy snack. To keep that gorgeous glaze fresh, I recommend adding it after warming, not before freezing.
Frequently Asked Questions
Final Thoughts
If you’re anything like me, baking is more than just following a recipe — it’s about creating memories, sharing warmth, and indulging in a little sweet escape. This zucchini swirl loaf checks all those boxes. It’s cozy, adaptable, and forgiving — the kind of treat that tastes just as good at the start of the week as it does at the end. My kids love the surprise cinnamon swirl, and I love how straightforward it is to make. Over the years, I’ve played with different fillings, added nuts, and even tried replacing some sugar with honey, and each version was a hit. Every loaf feels special — like a little gift I give to my family—and I hope it becomes yours, too. So go ahead, gather those zucchinis from your garden or fridge, and get baking. Your kitchen’s about to turn into a bakery, and I can’t wait to hear how yours turns out! Feel free to share your variations and tips in comments — I love hearing all the creative spins.
seven layer dip
Ingredients
Method
- Spread refried beans evenly over the bottom of a serving dish.
- Layer the premade guacamole over the beans.
- In a small bowl, whisk sour cream with taco seasoning until smooth. Spread over the guacamole layer.
- Sprinkle shredded cheese blend over the sour cream layer.
- Distribute shredded lettuce over the cheese layer.
- Sprinkle chopped roma tomatoes over the lettuce.
- Add sliced black olives evenly over the tomatoes.
- Finish with thinly sliced green onions on top. Chill for 1 hour before serving with tortilla chips.