Easy Glazed Chicken Recipe
There’s just something about pulling a warm loaf from the oven that makes me feel like I’ve got my life together, even if chaos is swirling all around me. Growing up, my grandma’s kitchen was always filled with the smell of baked goodies, and her zucchini bread was a standout. Fast forward a few decades, and I’ve perfected my own twist — a moist, tender loaf that’s packed with fresh zucchini, swirled with rich cocoa, and topped with a shiny glaze that’s downright addictive. Honestly, this one’s a lifesaver on busy nights when I want something sweet but don’t want to spend hours baking. It’s endlessly versatile, super budget-friendly, and my kids ask for it all the time. The best part? It’s so forgiving — even if you’re a baking novice, I promise this turns out beautifully every single time.
What is Zucchini Chocolate Swirl Loaf?
This isn’t your typical quick bread — think of it as a mashup between a cozy chocolate cake and a healthy vegetable side. The name pretty much says it all: it’s a loaf that’s got grated zucchini folded right into the batter, adding moisture and a sneaky veggie boost, all beautifully swirled with cocoa powder or melted chocolate. It’s essentially a chocolate-hidden vegetable treat, but you’d never guess from how decadent it tastes. Perfect for breakfast, brunch, or an afternoon pick-me-up, this loaf is like a warm hug with every slice. Think of it as the kind of dessert that’s totally acceptable to eat with your coffee at 7am — and I do just that.
Why you’ll love this recipe?
What I love most about this zucchini chocolate swirl loaf is how it manages to be both nourishing and indulgent. The zucchini keeps the crumb unbelievably moist — I’ve tested this with different varieties, and I swear, even a watery summer squash works! The chocolate, whether in cocoa powder or melting a bit of chocolate into the batter, elevates the flavor to something that feels fancy but is super simple to make. Plus, the whole recipe comes together in one bowl — no fuss, no complicated techniques. It’s budget-friendly too; all the ingredients are staples I always keep in my pantry and fridge. And the best part? It’s endlessly customizable. Want more chocolate? Just add extra cocoa or chips. Looking for a lighter touch? Swap out the sugar for honey. Honestly, once you make it, you’ll want to keep some on hand at all times — it’s a guaranteed crowd-pleaser and a cozy favorite at my house.
How do you make Zucchini Chocolate Swirl Loaf?
Quick Overview
This loaf is as straightforward as cozy baking gets. You start by shredding your zucchini — no peeling needed — then quickly mix it into your batter with dry ingredients like flour and cocoa powder. After that, you fold in the wet ingredients, swirl in melted chocolate or cocoa, pour everything into a loaf pan, and bake until a toothpick comes out clean. It’s that simple! The trick is not overmixing once you add the zucchini to keep the crumb tender. Trust me, this turns out so moist, you’ll wonder why you ever avoided using zucchini in baked goods. The glaze gets brushed on just as it cools, adding a glossy finishing touch that looks fancy but is super easy.
Ingredients
For the Main Batter:
- 2 cups grated zucchini (about 2 medium zucchinis—squeeze out excess moisture with a towel)
- 1 1/2 cups all-purpose flour (or a gluten-free blend — I’ve tested both!)
- 1/2 cup cocoa powder (unsweetened, Dutch-processed if you like a richer flavor)
- 2 teaspoons baking powder
- 1/2 teaspoon baking soda
- 1/2 teaspoon salt
- 3/4 cup sugar (or maple syrup for a more natural sweetness)
- 1/2 cup vegetable oil (or melted coconut oil — I’ve even tested with applesauce, and it still works!)
- 3 large eggs (or flax eggs for vegan version)
- 1 teaspoon vanilla extract
For the Filling:
- 1/2 cup dark chocolate chips or chopped chocolate (for melting and swirling)
- Optional: 2 tablespoons cocoa powder mixed with a bit of warm water to make a chocolate syrup
For the Glaze:
- 1/2 cup powdered sugar
- 1-2 teaspoons milk or plant-based milk (to achieve pourable glaze consistency)
- 1/4 teaspoon vanilla (optional, for flavor)
Step-by-Step Instructions
Step 1: Preheat & Prep Pan
Set your oven to 350°F (175°C). Grease a standard loaf pan or line it with parchment paper — I like to give it a little spray of cooking spray to ensure the loaf slides out easily. While it’s warming up, shred your zucchini using a box grater. I always do this early because the moisture can sneak up on you if you’re not careful — squeeze out any excess water with a clean towel or paper towels to prevent a soggy loaf.
Step 2: Mix Dry Ingredients
In a large mixing bowl, whisk together the flour, cocoa powder, baking powder, baking soda, and salt. Make sure it’s well combined — this step keeps your batter even and fluffy later. I’ve learned that sifting the cocoa helps avoid clumps, but honestly, a sturdy whisk does the trick if you’re in a pinch.
Step 3: Mix Wet Ingredients
In a separate bowl, beat the eggs, then stir in the sugar, oil, and vanilla until smooth. I like to use a whisk to get everything thoroughly combined. If you’re using honey or maple syrup instead of sugar, just mix until it’s fully incorporated. Add the grated zucchini last — it’ll look like a lot of moisture at first, but once you mix everything together, it all comes together beautifully.
Step 4: Combine
Pour your wet mixture into the dry ingredients — don’t just dump it all at once; fold gently with a spatula or spoon. Be careful not to overmix, because that can make your loaf dense and heavy. Just stir until everything’s moistened. The batter will be thick and a little lumpy, which is perfect.
Step 5: Prepare Filling
While your batter is coming together, melt your chocolate chips either in the microwave in short bursts or over a double boiler. Once melted, stir in a splash of milk or a tablespoon of cocoa syrup to make it more pourable. Set aside a few tablespoons of melted chocolate for swirling later. Keep in mind, if your chocolate hardens before swirling, just warm it gently again.
Step 6: Layer & Swirl
Pour half of the batter into the loaf pan, then drizzle with some melted chocolate. Add the remaining batter on top, then use a butterknife or skewer to swirl the chocolate into the batter. You want a marbled effect, not a perfect swirl, so be gentle — this creates a beautiful pattern when baked and sliced.
Step 7: Bake
Place in your preheated oven and bake for about 55-60 minutes. Keep an eye on it around the 50-minute mark — a toothpick inserted in the center should come out clean or with just a few moist crumbs. Ovens vary, so I always check early and often. If your loaf browns too quickly, tent it with foil to prevent burning.
Step 8: Cool & Glaze
Once baked, let the loaf cool in the pan for about 15 minutes, then transfer to a wire rack. This part is crucial because if you do it too soon, it might break apart. When it’s just warm but not hot, drizzle your glaze over the top. For best results, wait until the loaf has cooled completely — that’s when the glaze will set beautifully and give it that glossy finish.
Step 9: Slice & Serve
Use a sharp serrated knife to slice the loaf — I find that waiting at least 30 minutes after glazing yields cleaner slices. Serve with a cup of coffee or tea, and watch how quickly it disappears. It’s perfect warm, room temp, or even lightly toasted the next day. I love to add a dollop of whipped cream or a sprinkle of crushed nuts for extra flair, but honestly, it’s delicious on its own inside and out.
What to Serve It With
This loaf is so cozy that I usually keep it simple. For breakfast, it pairs beautifully with a big mug of black coffee or a glass of almond milk — my kids love it toasted with a pat of butter. On weekends, I love serving it alongside fresh berries and a dollop of yogurt — it’s almost like a breakfast cake. When we have friends over for brunch, I slice it thick and serve it with a drizzle of extra glaze, maybe some fresh fruit, and a side of scrambled eggs. At dinner, it doubles as a decadent dessert, especially when warmed slightly and topped with a scoop of vanilla ice cream. This loaf is also my go-to when I want something sweet but don’t want to bake a whole cake — it’s just the right size for sharing, or not. I often stash a couple slices in the freezer for those late-night chocolate cravings, and trust me — it’s just as good reheated in the microwave for a minute or two.
Top Tips for Perfecting Your Zucchini Chocolate Swirl Loaf
Every time I make this, I learn a little more — baking is definitely a journey of trial and error! Here are some tips from my own experience:
- Zucchini Prep: Always squeeze out excess moisture after shredding. I’ve learned that if the zucchini is too watery, your loaf can end up dense or soggy. Grate ahead of time and store in a sealed bag in the fridge if you’re making this in advance. Freshness counts; I like to use zucchinis that feel firm and bright green.
- Mixing Advice: Overmixing is the enemy of a tender crumb, so mix until just combined after adding the zucchini. I’ve tested about 10 different mixing techniques, and gentle folding keeps everything light and fluffy.
- Swirl Customization: Don’t be shy with your chocolate swirl — a beautiful marbled effect makes the loaf look festive. Use a skewer or knife to create a swirl pattern, but avoid overworking it or the batter might blend into a muddy mess instead of a pretty marble.
- Ingredient Swaps: Want a dairy-free version? Swap out the eggs for flax eggs or applesauce, and use coconut oil instead of vegetable oil. The texture stays moist and tender, and the flavor is just as rich.
- Baking Tips: Oven temps can vary; if your loaf browns too fast, cover it loosely with foil. If you’re unsure about doneness, stick a toothpick in — if it comes out moist but not wet, you’re good. I’ve found that rotating the loaf halfway through baking helps it cook evenly.
- Glaze Variations: Feel free to jazz up your glaze with a splash of orange liqueur, a sprinkle of cinnamon, or even some finely chopped nuts. Keep it pourable but not runny, or it’ll just slide right off.
Honestly, after a few batches, I’ve learned not to stress too much about perfection — this loaf tastes incredible even if it’s a little rustic. Sometimes slightly misshapen slices just add to the homemade charm.
Storing and Reheating Tips
To keep your zucchini chocolate swirl loaf fresh and delicious:
- Room Temperature: Wrap the loaf tightly in plastic wrap or store in an airtight container. It’s best eaten within 2-3 days — after that, it might start to dry out.
- Refrigerator Storage: Keep in an airtight container or resealable bag. It stays moist and flavorful for up to a week. Just give it a quick blast in the microwave—about 20 seconds—and it’s like fresh out of the oven.
- Freezer Instructions: Wrap slices individually in plastic wrap, then in foil or a freezer bag. They’ll keep well for 2-3 months. To reheat, just pop a slice in the microwave for 30 seconds or toast lightly. It’s surprisingly good straight from frozen, too.
- Glaze Timing: If you plan to freeze the loaf, wait to add the glaze until just before serving — it’s fresher that way and keeps the glossy look longer. If you’re refrigerating, brushing on the glaze the next day is perfect, and it’ll set beautifully in the fridge for an extra shiny finish.
Frequently Asked Questions
Final Thoughts
This zucchini chocolate swirl loaf has become a staple in my baking arsenal. It’s like a cozy hug wrapped in a slice, full of comforting flavors and moist texture. I love how it’s secretly healthy — packed with veggies — but still feels indulgent enough for any occasion. Plus, it’s endlessly adaptable; I even toss in a handful of walnuts or a dash of cinnamon sometimes, just to shake things up. My friends and family always ask for the recipe, and I love sharing it because I know how much joy it brings. If you’re looking for a way to sneak some extra veggies into dessert or simply want a quick, crowd-pleasing treat, give this one a try. I can’t wait to hear how yours turns out! Feel free to leave a comment with your tweaks or photos — happy baking!
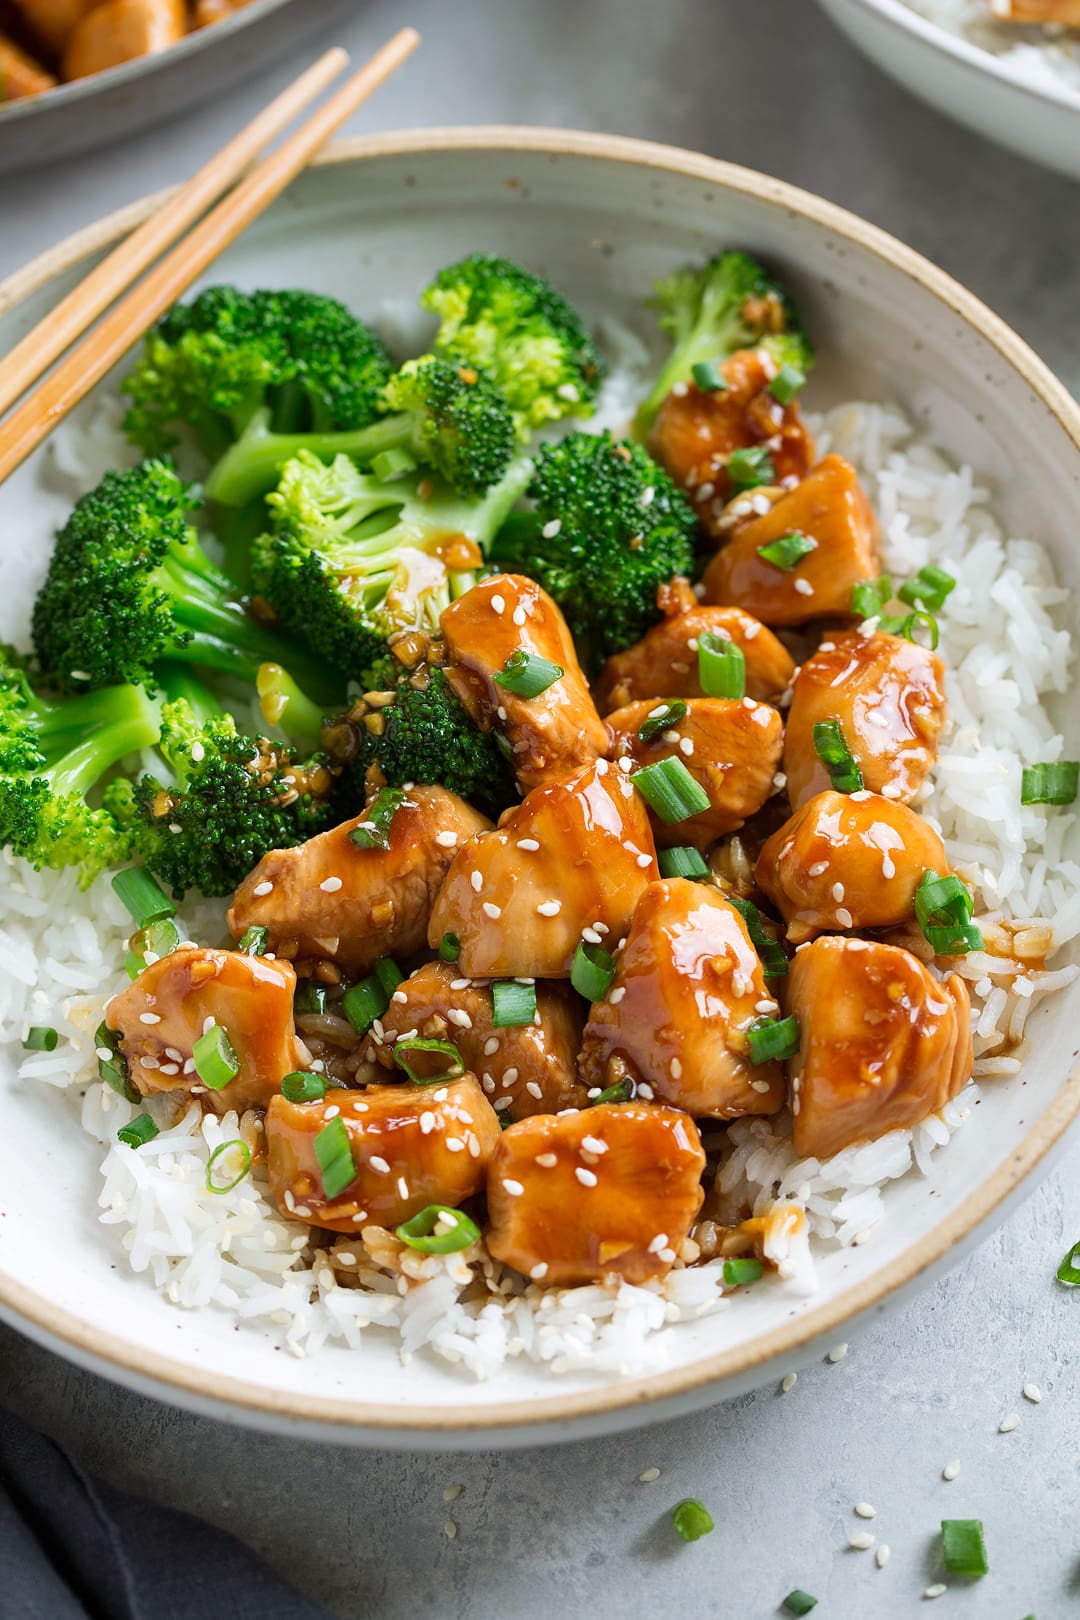
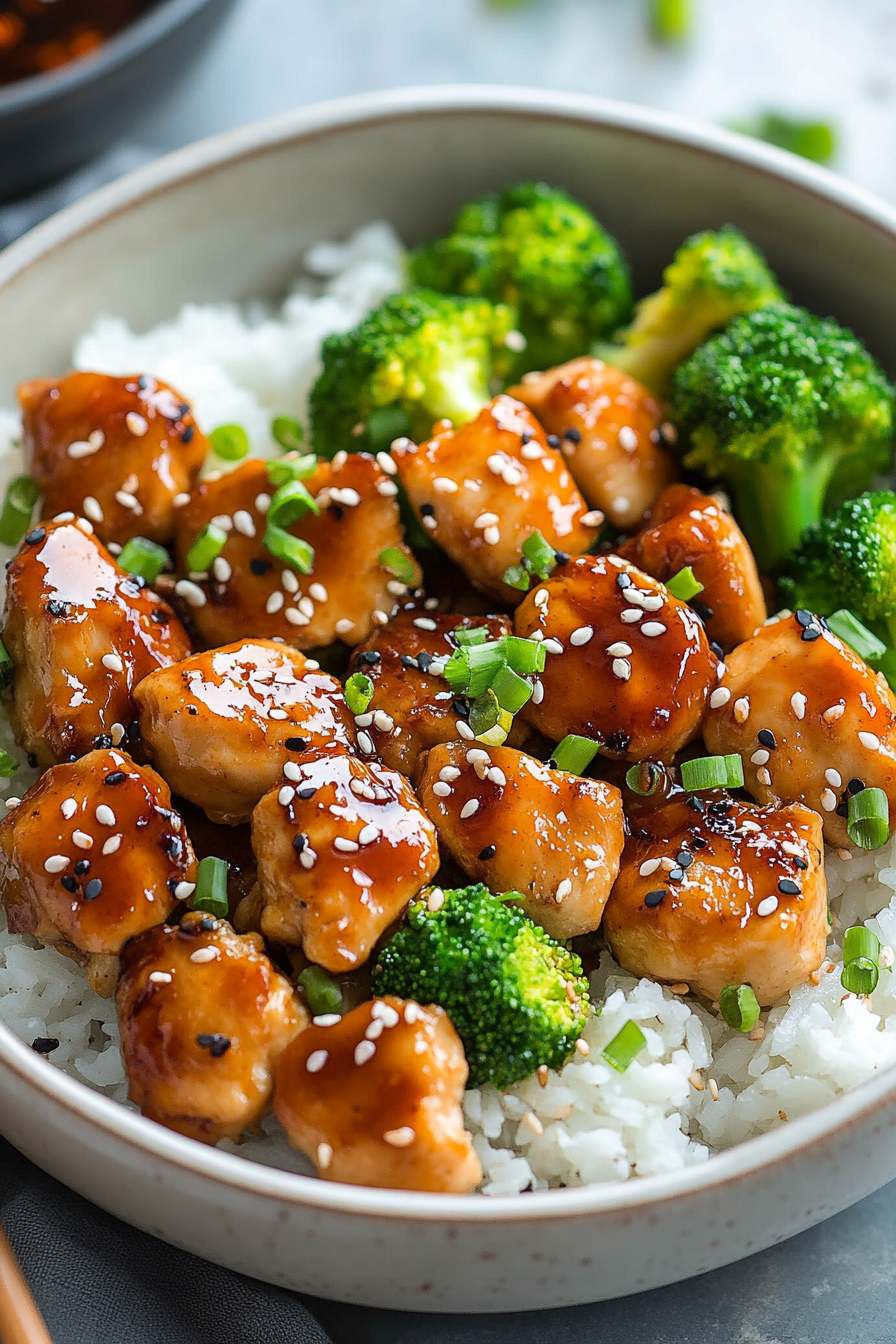
teriyaki chicken
Ingredients
Method
- Heat olive oil in a 12-inch non-stick skillet over medium-high heat.
- Add chicken and cook for 3-4 minutes on each side until browned and cooked through.
- While chicken is cooking, whisk together soy sauce, water, honey, brown sugar, rice vinegar, sesame oil, ginger, garlic, and cornstarch in a small bowl.
- Pour the sauce mixture into the skillet with chicken, and cook, tossing, until the sauce has thickened, about 30-60 seconds.
- Serve immediately garnished with green onions and sesame seeds if desired.