Bursting Blueberry Cake A Simple Treat
You know those days when you just need a little something sweet, something comforting, something that smells like pure happiness wafting from the oven? Yeah, me too. And that’s precisely when this incredible zucchini bread comes to the rescue. It’s not just any zucchini bread; it’s *the* zucchini bread. The one that has my family begging for more, the one that disappears from the cooling rack in mere minutes, and the one I’ve probably made more times than I can count. Seriously, if you’ve ever felt a little intimidated by baking with vegetables, let me tell you, this recipe is your new best friend. It’s so forgiving and surprisingly simple, and the result is a moist, flavorful loaf that’s miles better than any store-bought mix could ever dream of being. Think of it as a warm hug in edible form, a little slice of sunshine on a plate, and honestly, it’s my go-to when I’m craving something decadent but still want to sneak in a bit of goodness. It’s that perfect middle ground, you know?
What is Zucchini bread?
Okay, so when I say “zucchini bread,” what usually comes to mind? Maybe something a little… well, healthy tasting? Like it’s trying *too* hard to be good for you? Forget all that! This zucchini bread is pure indulgence. It’s a moist, tender quick bread, meaning it uses chemical leaveners like baking soda and baking powder instead of yeast, which is why it’s so wonderfully easy and fast to whip up. The ‘zucchini’ part is where the magic happens. Grated zucchini might sound a little odd in a sweet bread, but trust me, it’s the secret ingredient that makes this loaf unbelievably moist and tender without making it taste like, well, zucchini. It basically disappears into the batter, leaving behind nothing but pure, deliciousness. Think of it as a fantastic vehicle for cinnamon, a perfect canvas for walnuts or chocolate chips, and a delightful surprise for anyone who’s never tried it before. It’s less of a ‘health food’ and more of a brilliantly crafted dessert or snack that just happens to have a little veggie power packed inside.
Why you’ll love this recipe?
Where do I even start with why you’ll absolutely adore this zucchini bread? First off, the flavor is just out of this world. It’s perfectly spiced with warm cinnamon and a hint of nutmeg, making it incredibly comforting. But the real star is the texture – it’s unbelievably moist and tender, almost like a cake, thanks to that clever use of zucchini. I’ve even tested this with a splash of almond milk instead of regular milk, and it actually made it even creamier, which was a delightful surprise! Beyond the taste, the simplicity of this recipe is a lifesaver, especially on busy weeknights. You can have it mixed and in the oven in under 15 minutes, and then all you have to do is wait for that amazing aroma to fill your kitchen. It’s also surprisingly budget-friendly, using everyday pantry staples that most of us already have on hand. And the versatility? Oh, it’s a chameleon! I love adding a handful of chocolate chips for a special treat, or toasted walnuts for a delightful crunch. It’s perfect for breakfast, a delightful afternoon snack, or even as a not-too-heavy dessert. It really stands out because it’s not just a recipe; it’s a feeling. It’s that reliable bake that never fails to impress, no matter who you’re serving it to. It’s the kind of recipe that becomes a family heirloom, passed down through generations.
How do you make Zucchini bread?
Quick Overview
The process for making this divine zucchini bread is ridiculously straightforward. You’ll mostly be whisking and folding! We start by combining our dry ingredients, then our wet ingredients separately, and then gently bring them together. A quick swirl of the filling, a short bake, and then a drizzle of glaze – that’s it! The beauty lies in its simplicity; it’s designed to be foolproof, ensuring even novice bakers can achieve bakery-worthy results. It’s the kind of recipe that makes you feel like a baking wizard, even if you’re just starting out.
Ingredients
For the Main Batter:
Here’s what you’ll need to get that gorgeous base going. I always try to use fresh, vibrant zucchini for the best flavor and moisture. You’ll want about 2 cups of finely grated zucchini, and I’ve found that medium-grated is just perfect – not too chunky, not too mushy. Make sure to squeeze out most of the excess liquid after grating; this is a crucial step for avoiding a soggy loaf! For the flour, all-purpose is your best friend here. I’ve played around with other flours, but honestly, the classic works wonders for this recipe. And don’t skimp on the leaveners – they’re what give us that lovely rise and airy texture. You’ll also need granulated sugar for sweetness, some eggs to bind everything together, melted butter for that rich, satisfying flavor and moisture, milk (or your favorite plant-based alternative like almond or oat milk for extra creaminess!), vanilla extract for that classic warmth, and of course, plenty of cinnamon and a pinch of nutmeg to make it smell like home.
For the Filling:
This is where you can really personalize your loaf! My absolute favorite is a simple swirl of brown sugar and cinnamon, maybe with some chopped walnuts or pecans thrown in for crunch. You can also go for chocolate chips – mini or regular, it doesn’t matter! For the filling, you’ll typically want about half a cup of packed brown sugar, a tablespoon or two of cinnamon, and any mix-ins you love, like nuts or chocolate chips. Just mix them all up in a small bowl.
For the Glaze:
This is entirely optional, but oh-so-worth-it! It adds a lovely sweetness and a beautiful finish. It’s super simple: powdered sugar, a splash of milk (or lemon juice for a tangier twist!), and a hint of vanilla extract. You want it to be thick enough to drizzle, not run off. I usually aim for a consistency like pancake batter, maybe just a tiny bit thicker.
Step-by-Step Instructions
Step 1: Preheat & Prep Pan
First things first, let’s get that oven ready. Preheat it to 350 degrees Fahrenheit (175 degrees Celsius). Grab a standard 9×5 inch loaf pan. You can grease it well with butter or cooking spray, and then I like to go an extra step and flour it too. This ensures your beautiful bread slides right out without any drama. You can also line it with parchment paper, leaving a little overhang on the sides for easy lifting later – that’s my personal preference these days, fewer stuck bits to scrub!
Step 2: Mix Dry Ingredients
In a large bowl, whisk together your all-purpose flour, granulated sugar, baking soda, baking powder, cinnamon, and nutmeg. Whisking them thoroughly ensures that all the leavening agents and spices are evenly distributed. This step is super important because it prevents pockets of baking soda or salt, which can lead to an uneven bake or an off-taste. You’re looking for a uniform, pale sandy mixture.
Step 3: Mix Wet Ingredients
In a separate medium bowl, whisk together your eggs until they’re lightly beaten. Then, stir in the melted butter (make sure it’s not piping hot, just warm!), milk, and vanilla extract. Give it a good stir until everything is nicely combined. If you’re using almond milk or another plant-based option, this is where you’d add it. I’ve found that using slightly cooled melted butter prevents the eggs from scrambling, which is a mistake I definitely learned from early on!
Step 4: Combine
Now, pour the wet ingredients into the bowl with the dry ingredients. Using a rubber spatula or a wooden spoon, gently fold them together until *just* combined. Seriously, do not overmix! A few streaks of flour are perfectly fine. Overmixing develops the gluten too much, which can lead to a tough, dense bread. We want tender and moist, remember? Then, gently fold in your grated and squeezed zucchini. It might seem like a lot of zucchini, but it will all come together.
Step 5: Prepare Filling
While your batter is getting cozy, quickly mix together the filling ingredients in a small bowl: brown sugar, cinnamon, and any nuts or chocolate chips you’re using. Just stir until it’s well combined and crumbly. This is your flavor explosion waiting to happen!
Step 6: Layer & Swirl
Spoon about half of the batter into your prepared loaf pan and spread it evenly. Now, sprinkle about half of your filling mixture over the top. Dollop the remaining batter over the filling, making sure to cover it as much as possible. Finally, sprinkle the rest of the filling over the top of the batter. If you want a more incorporated swirl, you can gently drag a knife or skewer through the batter in a zig-zag motion a couple of times. Don’t overdo it, or you’ll mix everything together too much. You just want those beautiful ribbons of cinnamon and sugar.
Step 7: Bake
Pop that beautiful loaf into your preheated oven. Bake for about 50-65 minutes. Now, ovens can be tricky beasts, so start checking around the 50-minute mark. The best way to tell if it’s done is to insert a toothpick or a thin knife into the center of the loaf. If it comes out clean or with just a few moist crumbs attached, it’s ready! If it comes out with wet batter, give it a few more minutes and check again. If the top starts to brown too quickly, you can loosely tent it with foil. The smell that will fill your kitchen during this time is simply heavenly.
Step 8: Cool & Glaze
Once it’s baked to perfection, carefully remove the loaf pan from the oven. Let the bread cool in the pan for about 10-15 minutes. This is important because it allows the loaf to set up a bit, making it easier to remove without breaking. After that initial cooling, invert the loaf onto a wire rack to cool completely. Now, for the glaze! Whisk together your powdered sugar, a little milk (or lemon juice!), and vanilla until smooth. You want a drizzle-able consistency. Once the bread is completely cool (this is key, otherwise the glaze will melt off!), drizzle it all over the top. Let the glaze set for about 15-20 minutes before slicing.
Step 9: Slice & Serve
Ah, the moment of truth! Use a serrated knife for the cleanest slices. This bread is phenomenal served slightly warm, but it’s also fantastic at room temperature. You can serve thick slices on their own, or with a dollop of cream cheese or a pat of butter. Enjoy that incredible, moist, spiced goodness!
What to Serve It With
This zucchini bread is so versatile, it fits into almost any meal or occasion! For a quick and easy breakfast, I love just grabbing a slice with my morning coffee. It’s perfectly sweet and satisfying without being too heavy. On weekend mornings, when we have a bit more time, I’ll often serve it as part of a larger brunch spread. It pairs beautifully with scrambled eggs, crispy bacon, and a fresh fruit salad. The sweetness of the bread is a lovely contrast to savory breakfast items. As a dessert, it’s a winner. A warm slice served with a scoop of vanilla bean ice cream is pure bliss, or perhaps a drizzle of caramel sauce. For those moments when you just need a little something to tide you over in the afternoon, it’s the ultimate cozy snack. I’ve even found myself craving a slice at 10 pm, and this recipe is perfect because you don’t have to bake a whole cake. My kids specifically ask for this when they want a “special treat,” which tells me everything I need to know about its crowd-pleasing power!
Top Tips for Perfecting Your Zucchini Bread
Over the years, I’ve picked up a few tricks that make this zucchini bread consistently fantastic. For the zucchini prep, the most critical step is to grate it finely and then squeeze out as much moisture as you possibly can. You can do this by hand, or I find wrapping it in a clean kitchen towel or cheesecloth and twisting it works wonders. This prevents a soggy loaf and ensures that perfect tender crumb. When it comes to mixing, remember that gentle is key! Overmixing is the enemy of tender quick breads. Just fold until you no longer see large streaks of flour. A few small ones are perfectly fine. For the swirl customization, don’t go crazy with the knife; a few gentle passes are enough to create those beautiful marble effects. You want distinct layers of filling, not a muddy mess. If you’re feeling adventurous with ingredient swaps, I’ve successfully used applesauce instead of some of the butter for a lighter version, though it can change the texture slightly. For baking, always trust the toothpick test. Ovens vary, so knowing your own oven’s quirks is helpful. If the top is browning too fast, a piece of foil can be your best friend. And for the glaze, don’t be afraid to play with it! A little lemon juice in place of milk adds a delightful tang that cuts through the sweetness beautifully. I learned that one during a particularly spontaneous baking session!
Storing and Reheating Tips
This zucchini bread is wonderfully forgiving when it comes to storage, and it’s always a joy to have a slice ready to go. At room temperature, it stays delightfully moist for about 2-3 days, provided it’s stored properly. I usually just wrap the cooled loaf tightly in plastic wrap or place it in an airtight container. It’s best to wait until it’s completely cool before wrapping, otherwise, you’ll trap steam, which can make it soggy. If you need it to last a bit longer, the refrigerator is your friend. Stored in an airtight container in the fridge, it can last up to a week. It might firm up slightly, but don’t worry, you can easily revive it. For longer-term storage, freezing is fantastic! I like to slice the bread first, then wrap each slice individually in plastic wrap, followed by a layer of aluminum foil or a freezer bag. This prevents freezer burn. You can freeze it for up to 3 months this way. When you’re ready to enjoy a frozen slice, you can either let it thaw at room temperature for an hour or two, or gently warm it in the microwave for 15-30 seconds. If you’ve glazed your bread, I generally recommend adding the glaze *after* reheating or thawing, especially if you’re freezing slices, to prevent it from becoming sticky or melting off. For loaves stored at room temperature or in the fridge, the glaze usually holds up pretty well.
Frequently Asked Questions
Final Thoughts
So there you have it – my absolute favorite zucchini bread recipe! I truly believe this is one of those recipes that will become a staple in your kitchen, just like it has in mine. It’s that perfect combination of comforting, delicious, and surprisingly easy to make. Whether you’re looking for a way to use up that garden zucchini haul or just a delightful treat for yourself and your loved ones, this bread delivers every single time. It’s a testament to how a simple vegetable can transform into something truly magical. If you love this recipe, you might also enjoy my [link to another related recipe, e.g., “Spiced Apple Crumble”] or my [link to another related recipe, e.g., “Lemon Blueberry Scones”]. I can’t wait to hear what you think! Please let me know in the comments below how your zucchini bread turns out, and if you have any fun variations or tips of your own. Happy baking, friends!
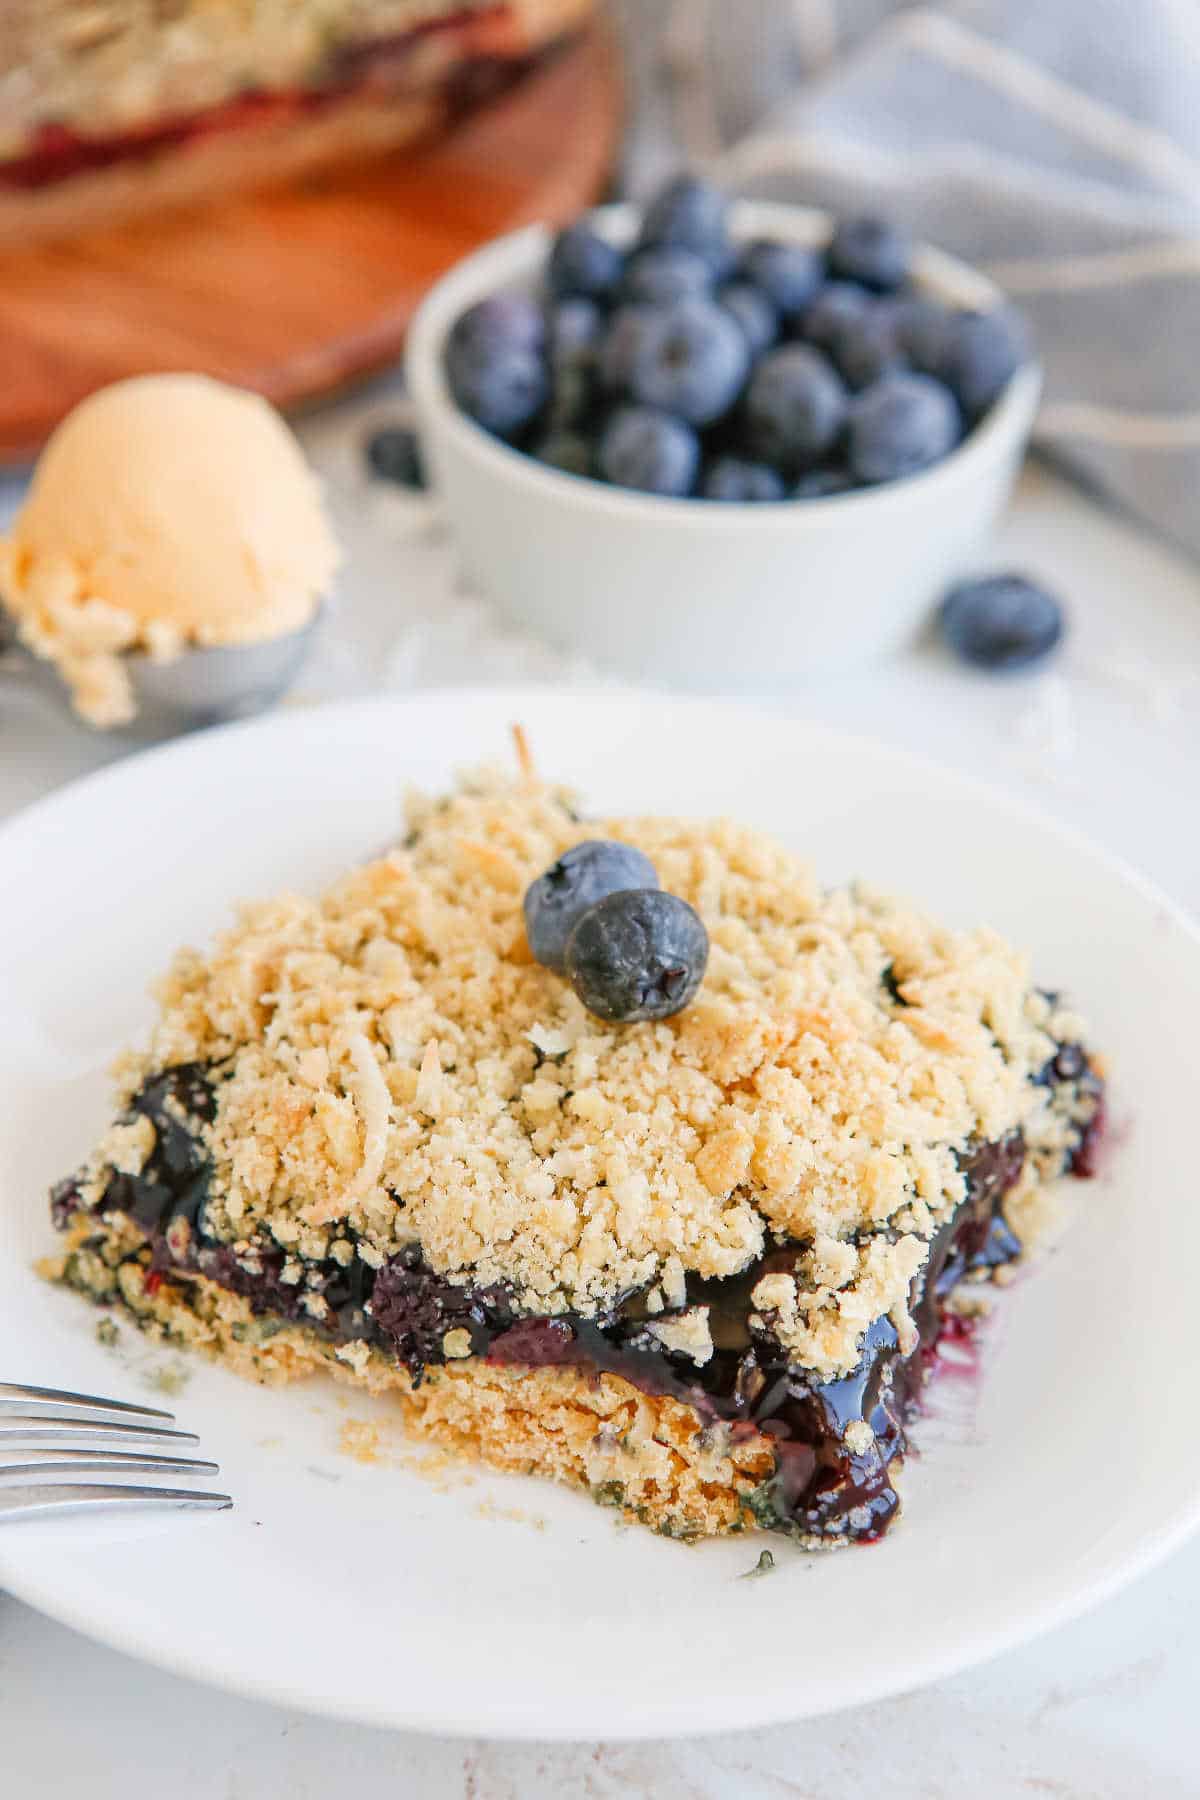
Blueberry Crackle Cake
Ingredients
Method
- Preheat oven to 350°F.
- Add soda crackers, brown sugar, flour, and baking soda to a bowl and stir to combine. Mix in butter and coconut.
- Press 3/4 of the cracker mixture into a greased 8-inch baking pan. Spread blueberry pie filling on top. Cover with the remaining cracker mixture.
- Bake for 30 minutes. Let cool before serving.