Easy Slow Cooker Peruvian Stew
Okay, so you know how some recipes just stick with you? The ones that feel like a warm hug on a chilly day, or the smell that instantly takes you back to grandma’s kitchen? This zucchini bread is one of those for me. It’s not just *a* zucchini bread recipe; it’s *the* zucchini bread recipe. I’ve lost count of how many loaves have come out of my oven, golden brown and utterly irresistible. It’s the kind of thing my kids beg for, and honestly, I’m usually sneaking a slice myself before dinner. If you’ve ever been a little hesitant about baking with zucchini – maybe you’re worried about it tasting… well, like vegetables – let me tell you, this recipe is a game-changer. It’s so moist, so flavorful, and you’d never even guess the secret healthy ingredient. It’s seriously the perfect antidote to a busy afternoon, a quick treat with your morning coffee, or even a surprisingly elegant dessert when you dust it with a little powdered sugar.
What is Zucchini bread?
So, what exactly *is* zucchini bread? At its heart, it’s a quick bread, meaning it doesn’t rely on yeast for leavening like traditional bread. Instead, it uses baking soda and baking powder to get that lovely fluffy texture. The star ingredient, of course, is zucchini. But don’t let that fool you! When you bake zucchini, it breaks down and releases moisture, which is exactly what makes this bread incredibly tender and moist. It’s not like biting into a raw slice; it just adds this amazing, almost pudding-like quality to the crumb. Think of it as a wonderfully moist, subtly sweet cake that just happens to be packed with goodness. It’s often spiced with cinnamon and sometimes nutmeg, giving it that comforting aroma that fills your whole house. It’s the kind of treat that feels both wholesome and indulgent, all at once. My friends always ask for the recipe, and I love seeing their surprised faces when I tell them the secret ingredient!
Why you’ll love this recipe?
Let me count the ways! First off, the flavor is just out of this world. It’s perfectly sweet, with a warmth from the cinnamon that’s just *chef’s kiss*. The texture is where this recipe truly shines – it’s unbelievably moist and tender, thanks to the zucchini. Seriously, it melts in your mouth. And the best part? It’s ridiculously easy to make. You don’t need any fancy equipment or complicated techniques. It’s the kind of recipe you can whip up on a weeknight when you need a little pick-me-up. Plus, it’s surprisingly budget-friendly. Zucchini is usually pretty affordable, and the other ingredients are pantry staples. I’ve even found that using slightly overripe zucchini, the ones you might be tempted to toss, actually works beautifully here. What I love most about this is its versatility. It’s fantastic on its own, but it also pairs wonderfully with a simple cup of coffee or tea. It’s a step up from a basic quick bread, but still totally approachable for beginners. I’ve made it with chopped walnuts and chocolate chips, and both are incredible, but I’ll always have a soft spot for the classic version.
How do you make Zucchini bread?
Quick Overview
This recipe is all about simple steps that come together in a flash. We’ll start by prepping our pan and oven, then whisking together the dry ingredients, followed by the wet. The magic happens when we combine them, being careful not to overmix. Then comes the fun part of preparing a simple, delicious filling – a swirl of cinnamon-sugar goodness that takes it to the next level. We’ll layer this filling in the batter, bake it until golden, and finish with a light glaze. It’s truly a no-fuss process that yields incredible results. The whole thing comes together in under an hour of active time, making it a lifesaver on busy days.
Ingredients
For the Main Batter:
You’ll need about 3 cups of grated zucchini. Don’t worry about peeling it, just give it a good wash. I always find that medium-sized zucchinis have the best flavor and texture. For the flour, 2 cups of all-purpose flour is perfect. Make sure it’s fresh! I also use 1 teaspoon of baking soda and ½ teaspoon of baking powder for that lovely lift. A pinch of salt, about ½ teaspoon, really balances out the sweetness. Then comes the spice: 1 teaspoon of ground cinnamon. If you’re feeling adventurous, a ¼ teaspoon of nutmeg is lovely too! For sweetness, ¾ cup of granulated sugar is just right, but you can adjust this slightly based on your preference. And for moisture and richness, ½ cup of vegetable oil (or any neutral oil you have on hand) and 2 large eggs, lightly beaten, are essential. Oh, and a splash of vanilla extract, about 1 teaspoon, really rounds out the flavor.
For the Filling:
This is what gives our zucchini bread that irresistible swirl. You’ll need ¼ cup of packed light brown sugar, 1 tablespoon of ground cinnamon, and a pinch of salt. Some people add chopped nuts here, like pecans or walnuts, and that’s delicious, but I like to keep it simple for the classic version.
For the Glaze:
This is totally optional but so worth it! You’ll need about 1 cup of powdered sugar. To get it nice and smooth, ½ teaspoon of vanilla extract and 2-3 tablespoons of milk (or almond milk, which I’ve found makes it extra creamy!) is all you need. You want it pourable but not too thin.
Step-by-Step Instructions
Step 1: Preheat & Prep Pan
First things first, get your oven preheated to 350 degrees Fahrenheit (175 degrees Celsius). This is super important because you want the oven nice and hot when your batter is ready. Next, grab a standard 9×5 inch loaf pan. Grease it really well with butter or cooking spray, and then dust it with a little flour. This helps make sure your beautiful bread doesn’t stick. You can even line it with parchment paper, leaving some overhang on the sides – this makes lifting it out a breeze!
Step 2: Mix Dry Ingredients
In a large bowl, whisk together your all-purpose flour, baking soda, baking powder, salt, and cinnamon (and nutmeg if you’re using it). Whisking them together ensures everything is evenly distributed, which is key to getting a consistent rise and flavor throughout your loaf. You’ll want to make sure there are no clumps of baking soda or powder.
Step 3: Mix Wet Ingredients
In a separate medium bowl, combine the granulated sugar, vegetable oil, beaten eggs, and vanilla extract. Whisk these together until they’re well combined and the mixture looks smooth and uniform. I like to make sure the eggs are fully incorporated; it helps create a better texture in the final bread.
Step 4: Combine
Now, pour the wet ingredients into the bowl with the dry ingredients. Using a spatula or a wooden spoon, gently fold them together until *just* combined. I can’t stress this enough: do NOT overmix! Overmixing develops the gluten in the flour too much, which can make your bread tough. A few streaks of flour remaining are perfectly fine; they’ll disappear as you add the zucchini. So, mix until you don’t see large pockets of dry flour. This is a lesson I learned the hard way early on!
Step 5: Prepare Filling
While your batter is resting for a moment, quickly mix together the brown sugar and cinnamon for the filling in a small bowl. That’s literally it! If you’re adding nuts, stir them in now. It’s so simple but adds so much deliciousness.
Step 6: Layer & Swirl
Pour about half of your batter into the prepared loaf pan and spread it out evenly. Sprinkle about half of the cinnamon-sugar filling over the batter. Then, spoon the remaining batter on top, followed by the rest of the filling. Now for the fun part! Grab a knife or a skewer and gently swirl the filling into the batter. Don’t go too crazy, just a few gentle passes will create those beautiful ribbons of cinnamon-sugar goodness throughout your loaf.
Step 7: Bake
Pop the loaf pan into your preheated oven. Bake for about 50-65 minutes. Now, ovens can be finicky, so the best way to check for doneness is to insert a toothpick or a thin knife into the center of the loaf. If it comes out clean (or with just a few moist crumbs attached, not wet batter), it’s ready! If it’s still gooey, give it another 5-10 minutes and check again. I usually start checking around the 50-minute mark.
Step 8: Cool & Glaze
Once it’s baked, take the loaf pan out of the oven and let it cool in the pan on a wire rack for about 10-15 minutes. This allows it to set up a bit. Then, carefully invert the pan to remove the loaf and let it cool completely on the wire rack. This is crucial for the glaze; you don’t want it melting off! Once it’s completely cool, whisk together your powdered sugar, vanilla, and milk until you get a smooth, pourable consistency for the glaze. Drizzle it over the top and let it set slightly.
Step 9: Slice & Serve
Once the glaze has set (or if you skipped the glaze!), use a serrated knife to slice the bread. This type of knife is best for getting clean slices without squishing your beautiful loaf. Serve it at room temperature. The smell alone will make everyone gather around!
What to Serve It With
This zucchini bread is a champion on its own, but it also plays really well with other things! For a simple breakfast, a thick slice is perfect alongside a hot cup of coffee or a steaming mug of tea. I love how the warmth of the bread and the coffee just complement each other perfectly. For a more elegant brunch spread, I’ll slice it a little thinner and arrange it on a nice platter, maybe with a dollop of cream cheese or a light berry compote on the side. It’s a wonderful addition to a buffet, offering a touch of sweetness without being too heavy. As a dessert, it’s fantastic. A generous dusting of powdered sugar is elegant enough, or you can serve it slightly warmed with a scoop of vanilla bean ice cream – talk about decadent! And for those cozy, no-reason-to-celebrate evenings when you just need a little something sweet, a slice with a glass of milk is pure comfort. My family also loves it crumbled over yogurt or even as a base for French toast bake!
Top Tips for Perfecting Your Zucchini Bread
I’ve definitely learned a thing or two over the years of making this, so let me share some of my best tips to ensure your loaf turns out perfectly every single time. First, about the zucchini itself: you *don’t* need to wring out all the moisture! That liquid is your friend; it’s what makes the bread so incredibly moist. Just grate your zucchini and add it straight into the batter. I’ve tried grating it finely and coarsely, and both work, but I find a medium grate gives a lovely texture without being stringy. For mixing, seriously, resist the urge to overmix. As soon as you don’t see large dry flour pockets, stop! A few little lumps are fine. Overmixing is the quickest way to a tough, dense loaf, and we don’t want that. When it comes to the swirl, don’t feel pressured to make it perfect. Rustic swirls are part of the charm! A few gentle passes with a knife are all you need to create those lovely ribbons. For ingredient swaps, if you don’t have vegetable oil, melted butter works, but it might make the bread slightly less moist. I’ve tested this with almond milk for the glaze, and it actually made it even creamier and more luscious! For baking, if you notice the top is browning too quickly before the inside is cooked, you can loosely tent it with aluminum foil for the last 15-20 minutes. And for the glaze, if it’s too thick, add milk a teaspoon at a time until it reaches your desired consistency. If it’s too thin, add more powdered sugar.
Storing and Reheating Tips
Keeping this amazing zucchini bread fresh is pretty straightforward. At room temperature, it’s best to store it in an airtight container or wrap it tightly in plastic wrap and then foil. It will stay wonderfully moist for about 2-3 days. If you live in a warmer climate or just want it to last a bit longer, the refrigerator is your friend. Wrap it well, just like you would for room temperature storage, and it should keep well for up to a week. The texture might firm up a bit in the fridge, but don’t worry! For longer storage, freezing is a fantastic option. You can freeze the whole loaf, or even better, freeze individual slices wrapped tightly in plastic wrap and then placed in a freezer-safe bag. It will keep its quality for up to 3 months. To reheat, you can simply let a frozen slice thaw at room temperature for about an hour, or pop it in the toaster oven for a few minutes until warmed through. If you plan to glaze your bread, it’s always best to add the glaze *after* it has completely cooled and just before serving, especially if you’re not going to eat it all right away. If you’re freezing, I recommend glazing after thawing or just dusting with powdered sugar.
Frequently Asked Questions
Final Thoughts
So there you have it – my absolute favorite zucchini bread recipe. It’s more than just a recipe to me; it’s comfort, it’s nostalgia, and it’s proof that simple ingredients can create something truly spectacular. The moistness, the subtle spice, and that irresistible swirl of cinnamon sugar make it a winner every single time. It’s perfect for when you want a treat that feels a little bit special but doesn’t require a lot of fuss. If you love this recipe, you might also enjoy my moist blueberry muffins or my easy banana bread. I really hope you give this zucchini bread a try. It’s a recipe I’ve made countless times and it never fails to bring smiles to faces. I can’t wait to hear how yours turns out! Let me know in the comments if you added any fun mix-ins or made any tweaks – I love hearing your kitchen adventures!
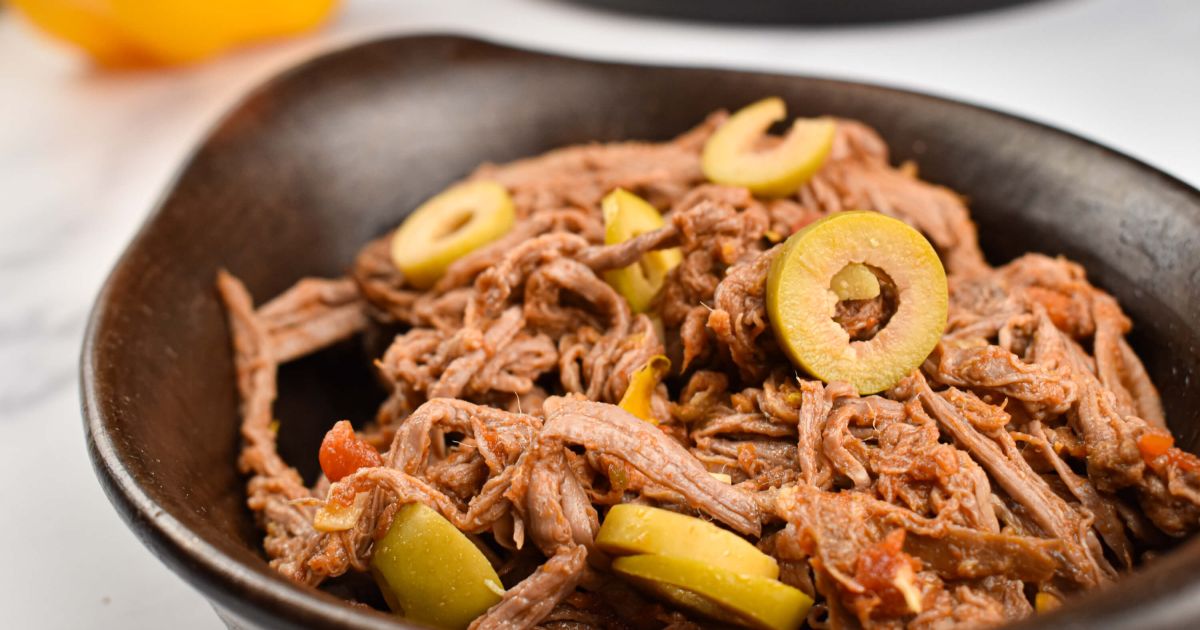
Slow Cooker Ropa Vieja
Ingredients
Method
- Place the flank steak in the slow cooker.
- Top with the sliced onion, green bell pepper, and red bell pepper.
- Add the minced garlic, diced tomatoes (undrained), beef broth, tomato paste, cumin, oregano, salt, and pepper.
- Cover and cook on low for 8-10 hours, or on high for 3-4 hours, until the steak is tender and shreds easily with a fork.
- Remove the steak from the slow cooker and shred it using two forks. Return the shredded beef to the sauce in the slow cooker.
- Stir in the sliced olives, if using.
- Serve hot, garnished with fresh cilantro.