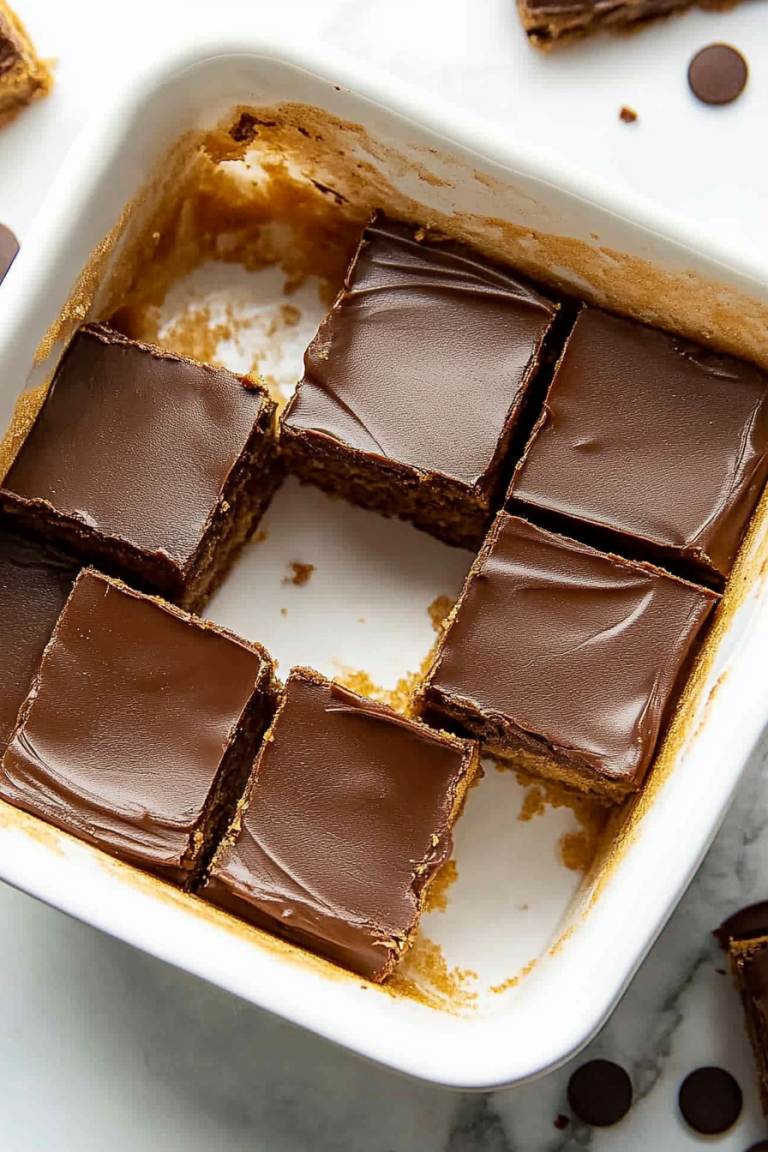
Easy Dehydrated Fruit Snacks Recipe
Oh my goodness, where do I even begin with this Lemon Blueberry Zucchini Bread? It’s one of those recipes that just feels like a warm hug, you know? I swear, the moment the aroma starts wafting from the oven, my whole house perks up. My kids, who can be notoriously picky sometimes, actually ask for this when I make it, which is practically a miracle in itself! It’s the perfect balance of sweet and zesty, with these bursts of juicy blueberries that are just divine. Honestly, if you’ve ever had a great zucchini bread but wished it had a little more sparkle, this is it. It’s like a sunny day in cake form, and it’s my go-to whenever I’m craving something incredibly comforting but also ridiculously easy to whip up. Forget those complicated desserts; this one’s a lifesaver on busy afternoons!
What is blueberry zacchini bread?
So, what exactly is this magical creation? Think of it as your classic, comforting zucchini bread, but with a serious upgrade. We’re talking about a moist, tender loaf packed with fresh, bright blueberries and a delightful zing from fresh lemon zest. It’s not overly sweet, which I love, allowing the natural flavors of the zucchini, blueberries, and lemon to really shine. The “zucchini” part might sound a little strange if you’re not used to it in baking, but trust me on this one – it’s the secret to that incredible moisture and tenderness that makes this bread so irresistible. It’s essentially a subtly sweet, slightly tangy, fruit-filled quick bread that feels both wholesome and like a decadent treat all at once. The name itself just sounds like sunshine and happy baking, doesn’t it?
Why you’ll love this recipe?
Okay, let’s talk turkey – or rather, let’s talk zucchini bread! There are so many reasons why this particular recipe has earned a permanent spot in my baking rotation, and I just know you’ll fall in love with it too. Firstly, the FLAVOR is out of this world. That bright, fresh lemon zest cuts through the sweetness of the blueberries and the subtle earthiness of the zucchini, creating this amazing symphony of tastes. It’s not just lemon-y or just blueberry-ish; it’s a perfect harmony. Secondly, the SIMPLICITY of this recipe is a game-changer. I can honestly whip this up on a weeknight after the kids are finally in bed, and have a fresh loaf ready for breakfast. The ingredient list is pretty standard, and there’s no fancy equipment needed. Plus, it’s incredibly COST-EFFICIENT. Zucchini is often abundant (especially if you have a garden!), and blueberries can be bought on sale or even frozen, making this a budget-friendly indulgence. What I love most about this recipe is its VERSATILITY. It’s perfect on its own, but I also love it toasted with a smear of cream cheese or a dollop of Greek yogurt. It’s a fantastic way to use up those extra zucchinis from your garden before they go to waste, and it feels so much more special than a plain loaf. It’s truly one of those recipes that makes you feel like a baking pro without breaking a sweat.
How do I make blueberry zucchini bread?
Quick Overview
Get ready for the easiest, most satisfying bake! In a nutshell, we’re going to whisk together some dry ingredients, then mix our wet ingredients, combine them gently, fold in our beautiful blueberries and grated zucchini, and bake it all up until it’s golden brown and incredibly fragrant. It’s a straightforward process that yields a remarkably moist and flavorful loaf every single time. The beauty of this recipe is that it’s incredibly forgiving, so even if you’re new to baking, you’ll nail it.
Ingredients
For the Main Batter:
You’ll need all-purpose flour, baking soda, baking powder, a pinch of salt to balance the sweetness, and ground cinnamon for a little warmth. Make sure your baking soda and baking powder are fresh – they’re key to a good rise! I always opt for good quality flour; it just makes a difference. If you’re feeling fancy, you can use half all-purpose and half whole wheat for a slightly nuttier flavor.
For the Wet Ingredients & Zucchini:
Here’s where the magic happens for moisture! We’ll use granulated sugar for sweetness, a couple of large eggs to bind everything, melted unsalted butter (or a neutral oil like canola or vegetable oil for an even moister crumb!), and pure vanilla extract for that classic comforting aroma. And of course, the star of the show for moisture: grated zucchini. Make sure you squeeze out some of the excess liquid before adding it to the batter – this is super important! And the lemon zest! You’ll want the zest from about two medium lemons; it really adds that bright, happy flavor.
For the Blueberry Burst:
Fresh or frozen blueberries work beautifully here. If you’re using frozen, don’t thaw them completely; just give them a quick rinse and a light dusting of flour to prevent them from sinking to the bottom of the loaf. I always tend to overdo it with the blueberries because I love that pop of juicy goodness in every bite!
For the Optional Lemon Glaze:
This is totally optional, but oh-so-worth it if you have an extra minute. It’s just powdered sugar mixed with a little bit of fresh lemon juice until you reach a drizzly consistency. It adds a lovely extra punch of lemon and a pretty finish.
Step-by-Step Instructions
Step 1: Preheat & Prep Pan
First things first, let’s get your oven preheated to 350 degrees Fahrenheit (175 degrees Celsius). While the oven is warming up, grab a standard 9×5 inch loaf pan. Grease it really well with butter or non-stick spray, and then I like to dust it with a little bit of flour. Some people like to line it with parchment paper, and that’s a great option too for easy removal. This step is crucial to prevent any sticking, which would be a tragedy!
Step 2: Mix Dry Ingredients
In a large bowl, whisk together your all-purpose flour, baking soda, baking powder, and salt. Give it a good whisk to make sure everything is evenly distributed. This helps ensure an even rise and prevents pockets of leavening agents.
Step 3: Mix Wet Ingredients
In a separate, medium-sized bowl, whisk together the granulated sugar, eggs, melted butter (or oil), vanilla extract, and the grated lemon zest. Make sure everything is well combined and looks nice and smooth. If you’re using oil, you might notice it looks a bit more emulsified, which is perfectly fine!
Step 4: Combine
Now, pour the wet ingredients into the bowl with the dry ingredients. Using a spatula or a wooden spoon, gently fold them together until *just* combined. It’s really important not to overmix here. A few streaks of flour are totally okay. Overmixing develops the gluten too much, which can make your bread tough instead of tender. We want tender, remember?
Step 5: Prepare Filling
Grate your zucchini using the large holes of a box grater. Then, take a clean kitchen towel or cheesecloth and squeeze out as much of the excess liquid as you possibly can. This is a critical step for a moist but not soggy loaf! Once squeezed, gently fold the grated zucchini and the blueberries (floured if frozen) into the batter. Again, be gentle and don’t overmix!
Step 6: Layer & Swirl
Spoon the batter into your prepared loaf pan, spreading it evenly. If you’re feeling fancy and want that beautiful swirled effect, you can reserve a small portion of the batter, mix in a little more lemon zest and maybe even a tiny bit of blue food coloring (if you’re feeling adventurous!), and then swirl it into the top of the main batter with a toothpick or skewer. This is totally optional, but it looks so pretty when it bakes!
Step 7: Bake
Pop the loaf pan into your preheated oven. Bake for about 50-65 minutes. The exact time will depend on your oven, but you’ll know it’s done when a toothpick inserted into the center comes out clean or with just a few moist crumbs attached. The top should be golden brown and the loaf should feel firm to the touch.
Step 8: Cool & Glaze
Once baked, let the loaf cool in the pan for about 10-15 minutes before carefully inverting it onto a wire rack to cool completely. Patience is key here; if you try to glaze it while it’s hot, the glaze will just melt off! Once it’s completely cool, whisk together the powdered sugar and lemon juice for the glaze. Start with a tablespoon of juice and add more, a teaspoon at a time, until you get a nice, drizzly consistency. Drizzle it over the top of the cooled bread.
Step 9: Slice & Serve
Once the glaze has set a bit, it’s time to slice and enjoy! Use a serrated knife for the cleanest cuts. This bread is delicious at room temperature, but I absolutely adore it slightly warm with a smear of butter or cream cheese. It’s perfect for breakfast, a snack, or even dessert!
What to Serve It With
This Lemon Blueberry Zucchini Bread is so versatile, it practically goes with everything! For a simple, beautiful BREAKFAST, I love it toasted and served with a big mug of coffee or a steaming cup of tea. Sometimes, I’ll add a dollop of Greek yogurt on the side for extra creaminess. For a special BRUNCH, it’s a star. I’ll arrange slices on a pretty platter, maybe with some fresh berries scattered around, and serve it alongside some scrambled eggs or quiche. It feels fancy but takes zero effort! As a DESSERT, it’s a lighter option than a heavy cake. I like to serve it with a scoop of vanilla bean ice cream or a light fruit compote. It’s just delightful! And for COZY SNACKS, especially on a rainy afternoon, a thick slice of this bread with a glass of cold milk is pure comfort. My family tradition is to have it as a “welcome home” treat when someone’s been away; the smell alone is so inviting.
Top Tips for Perfecting Your Lemon Blueberry Zucchini Bread
Over the years, I’ve learned a few little tricks that really make this Lemon Blueberry Zucchini Bread sing. So, let’s dive into some of my tried-and-true tips!
Zucchini Prep is Crucial: I can’t stress this enough – squeeze out that moisture! Zucchini is basically a water balloon. If you don’t get most of that liquid out, your bread will be dense and heavy, almost gummy. I like to use a clean tea towel or a piece of cheesecloth for this. Grating it on the larger holes of the grater also helps break it down nicely without making it too watery.
Don’t Overmix the Batter: This is a big one for any quick bread. Once you combine the wet and dry ingredients, mix only until there are no dry streaks of flour left. A few lumps are actually a good thing! Overmixing develops the gluten, making your bread tough and chewy instead of light and tender. Embrace that slightly lumpy batter!
Blueberry Tactics: If you’re using frozen blueberries, and I often do because they’re more budget-friendly, toss them in a tablespoon of the flour mixture *before* adding them to the batter. This helps prevent them from bleeding their color into the batter too much and also stops them from sinking to the bottom. Don’t thaw them completely; just a quick rinse and flouring is perfect.
Lemon Zest Power: Don’t be shy with the lemon zest! It’s what really gives this bread its bright, fresh personality. Use a microplane for the best results – it zests the fine, flavorful oils without grating the bitter white pith. I’ve found that using the zest from two medium lemons is the sweet spot for that lovely, vibrant lemon flavor.
Baking Temperature and Doneness: Ovens can be finicky! If you find your bread browns too quickly on top before it’s cooked through, try loosely tenting it with aluminum foil during the last 15-20 minutes of baking. For checking doneness, the toothpick test is your best friend. It should come out clean or with just a few moist crumbs clinging to it. If it comes out with wet batter, it needs more time.
Glaze Consistency: For the glaze, it’s all about starting with a little liquid and adding more gradually. You want it thick enough to coat the bread but thin enough to drizzle easily. Too much liquid, and it’ll be watery; too little, and it’ll be difficult to spread. I always start with just a tablespoon of lemon juice and add more, a teaspoon at a time, until it’s just right. If you accidentally make it too thin, just whisk in a little more powdered sugar.
Storing and Reheating Tips
Keeping your Lemon Blueberry Zucchini Bread fresh and delicious is super easy, and I’ve got a few methods that work like a charm. For best results, always let the bread cool completely before storing it. If you try to store it warm, condensation can form, leading to a soggy loaf.
Room Temperature Storage: This is my preferred method for bread that will be eaten within 2-3 days. Simply wrap the cooled loaf tightly in plastic wrap or place it in an airtight container. It will stay wonderfully moist and flavorful on your counter. I’ve found it’s usually gone within a day or two at my house, so this is perfect!
Refrigerator Storage: If you know you won’t finish it within a few days, or if your kitchen tends to be quite warm, storing it in the refrigerator is a good option. Wrap it tightly as you would for room temperature storage, and it should keep well for about 5-7 days. The texture might be slightly firmer when cold, but it’s still delicious!
Freezer Instructions: This bread freezes beautifully, making it a great option for make-ahead baking! Once the loaf is completely cooled, wrap it very tightly in a layer of plastic wrap, followed by a layer of aluminum foil or a freezer-safe bag. It can be stored in the freezer for up to 3 months. To thaw, unwrap it and let it sit at room temperature for a few hours, or gently warm it in a low oven (around 300°F or 150°C) for about 10-15 minutes.
Glaze Timing Advice: If you plan to store the bread at room temperature or in the refrigerator, you can apply the glaze once it’s fully cooled. If you’re freezing the loaf, I highly recommend waiting to add the glaze until *after* it has thawed. This prevents the glaze from cracking or becoming sticky during the freezing and thawing process. You can always whip up a fresh batch of glaze once it’s thawed if needed.
Frequently Asked Questions
Final Thoughts
So there you have it – my absolute go-to Lemon Blueberry Zucchini Bread! It’s more than just a recipe for me; it’s a little piece of comfort and joy that I love sharing. The way the tart blueberries burst against the tender, zesty bread is just pure bliss, and the fact that it sneaks in some veggies is a bonus I always appreciate. If you’re someone who loves a good quick bread but wants something a bit more exciting and flavorful, you absolutely have to give this a try. It’s the perfect sweet treat that feels both indulgent and wholesome, and it’s surprisingly simple to make. I truly hope it brings as much happiness to your kitchen as it does to mine!
If you love this recipe, you might also enjoy my Classic Banana Bread or my Cranberry Orange Scones. They have that same cozy, homemade feel!
I can’t wait to hear what you think! Drop a comment below and let me know how your Lemon Blueberry Zucchini Bread turns out, or share any of your own favorite variations. Happy baking, everyone!
Homemade Fruit Leather
Ingredients
Method
- Prepare the fruit by washing it and removing any large seeds or pits. Remove seeds from pears and apples, and pits from plums, peaches, and apricots. Small seeds in berries can be left in. Skins do not need to be removed.
- Cut any larger fruit into halves or quarters to help the blender process them.
- Place the fruit and lemon juice in the jar of your blender. Blend until very smooth. If the fruit is too thick to blend, add water or fruit juice, 1 tablespoon at a time, until it processes smoothly. The less liquid added, the shorter the drying time.
- Taste the fruit puree and add sugar if desired. Blend in the sugar until fully incorporated.
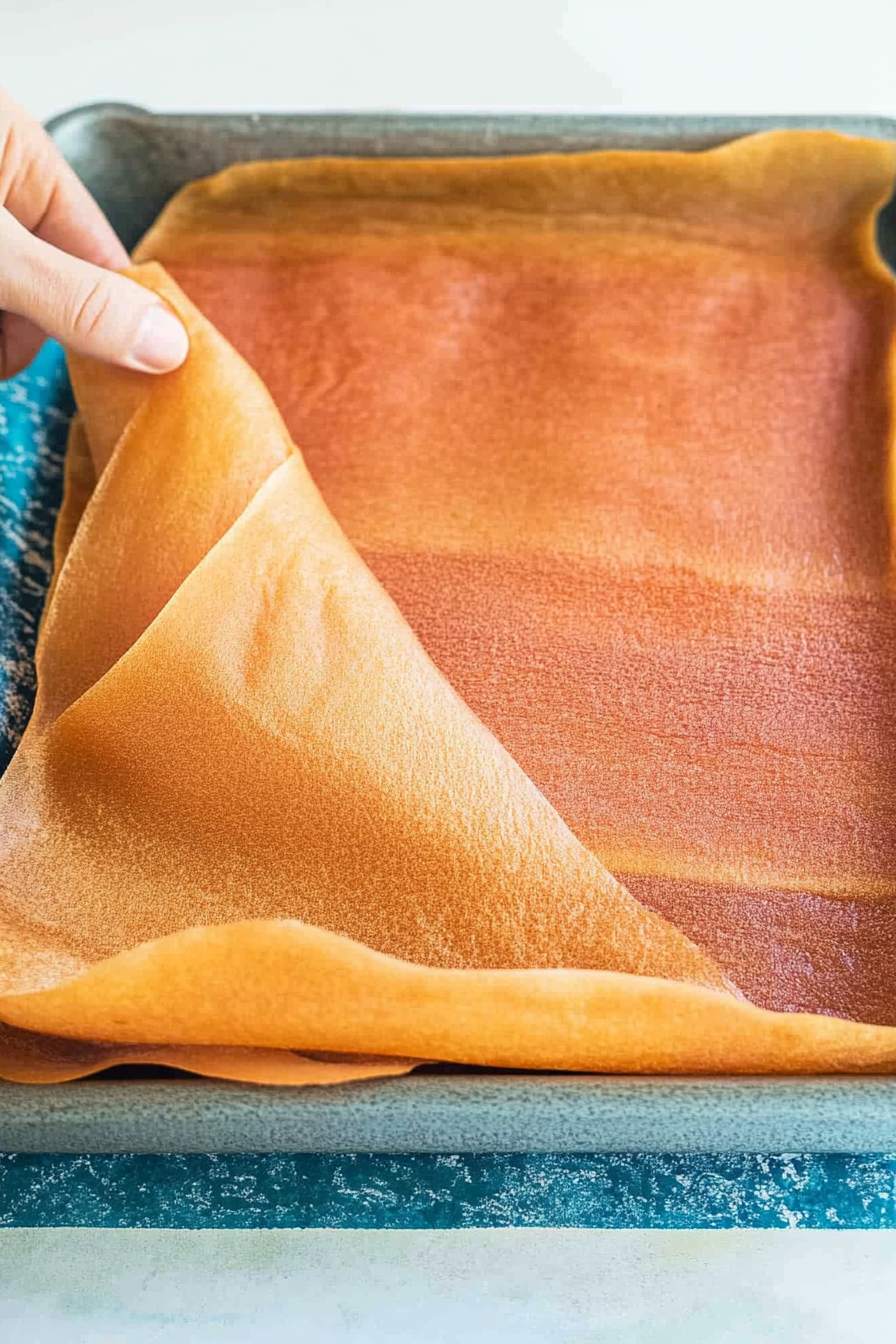
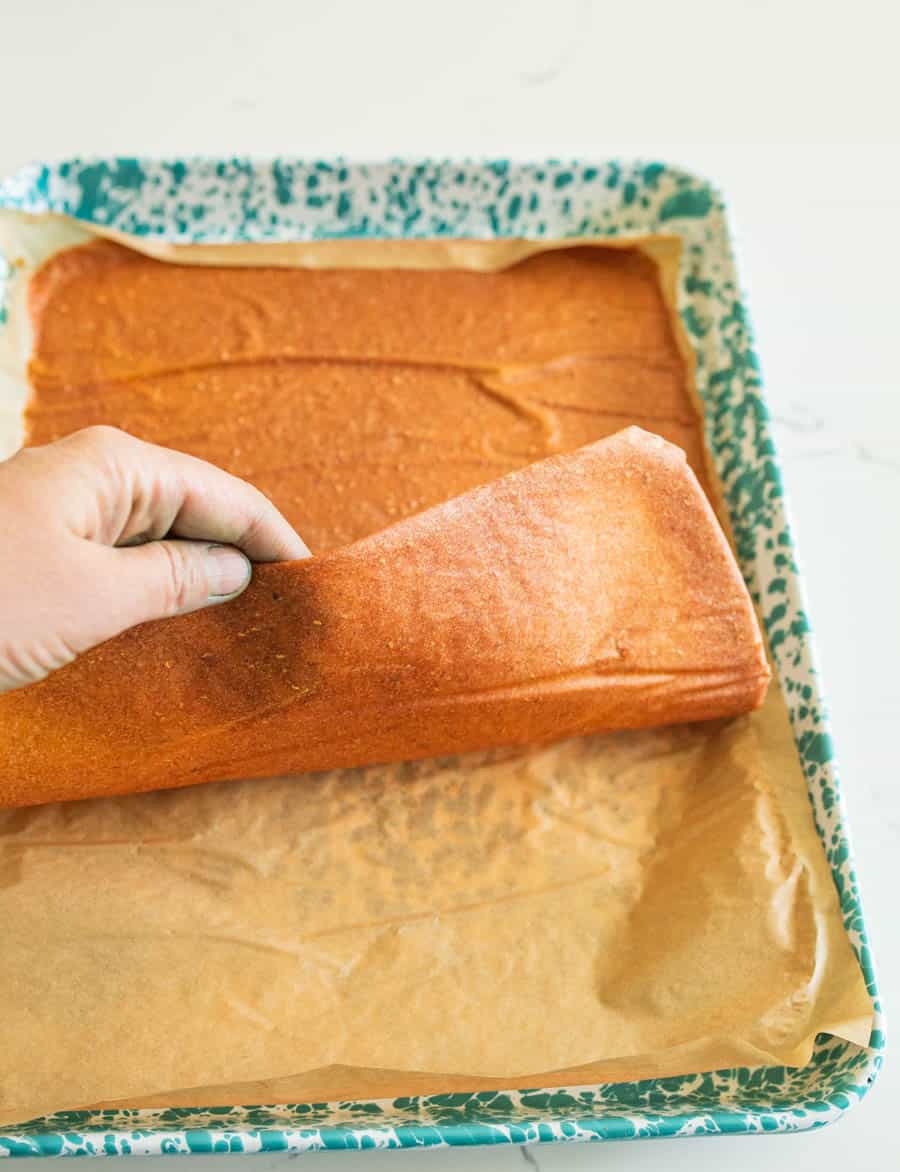
- Line the bottom of the baking sheets with baking mats or parchment paper.
- Divide the fruit mixture evenly between the two baking sheets, pouring it into the center.
- Use a spatula to evenly spread the fruit mixture over the baking mats or parchment paper, ensuring an even layer and avoiding the edges.
- Adjust oven racks to the upper middle and lower middle positions.
- Place the baking sheets into the oven and preheat to the lowest possible temperature (around 170°F or 75°C).
- Bake for 3-6 hours, or until the fruit leather is no longer tacky to the touch. You can open the oven door briefly to allow steam to escape and rotate the pans occasionally for even cooking.
- Allow the pans to cool completely before removing the fruit leather.
- If using parchment paper, cut the parchment and fruit leather together into strips. If using baking mats, peel the fruit leather off the mat and cut into strips. Roll the strips for storage.