Summer’s Best Corn Tomato Avocado Salad
Have you ever had that moment where you’re craving something sweet but don’t want to go all-in on a big batch of cake? That’s pretty much me on any lazy afternoon when the kids are napping and I just want a little something that hits all the right notes—moist, flavorful, and with a touch of nostalgia. That’s when I turn to my beloved zucchini swirl cake. It’s soft, tender, and bursting with a subtle veggie goodness that makes you feel just a little healthier—although, let’s be honest, it’s just downright delicious! The best part? It’s super easy to whip up, even on those busy weeknights when I need comfort fast. I’ve tested this with different kinds of zucchinis, almond milk instead of regular, and even swapped the glaze for a dusting of powdered sugar—trust me, you can make it your own. It’s gone in minutes at my house, and my kids ask for seconds every single time. I love how this cake balances that cozy home-baked feel with a surprising twist—who knew zucchini could be this irresistible? Get ready for a recipe that quickly becomes a staple—because once you try it, you’ll be hooked for good.
What is Zucchini Swirl Cake?
Think of zucchini swirl cake as a marriage between a classic sponge cake and a sweet surprise scattered throughout—like treasure hidden in soft, buttery layers. It’s essentially a fluffy, moist cake that gets a special boost from shredded zucchini, which adds moisture and a gentle sweetness without overpowering the flavor. The term “swirl” comes from the way I layer a sweet cinnamon-spiced filling into the batter and then swirl it beautifully before baking. This technique creates lovely marbled effects, but more importantly, every bite has that little hint of richness combined with fresh veggie flavor. I like to say it’s a cake that’s as inviting as your favorite Sunday brunch, but it’s also the kind you want to snack on late at night when you’re craving something special. The name might sound fancy, but I promise, it’s simple enough for even a beginner baker—think of it as a cozy, homemade treat that feels a little more elevated and a lot more fun to make. Plus, who doesn’t love sneaking veggies into dessert? Your secret’s safe with me.
Why you’ll love this recipe?
Honestly, I could go on and on about what makes this zucchini swirl cake a household favorite, but I’ll start with what really matters: flavor. This cake is a balance of sweetness with just a hint of earthiness from the zucchini, and the cinnamon-spiced swirls add an aromatic warmth that makes the house smell like heaven. It’s not overly complicated, which means I can whip this up quickly, even with my crazy schedule. I’ve made this countless times, and I never get tired of the way the batter stays impossibly tender with each slice. Plus, it’s budget-friendly—most of the ingredients are pantry staples, and you probably already have zucchini in your fridge right now. The versatility is another thing I love—serve it for breakfast with coffee, turn it into an afternoon snack, or serve it as a cozy dessert with a scoop of vanilla ice cream. My kids ask for this all the time—sometimes I hide an extra slice just for myself! It’s such a forgiving recipe, too; I’ve tested it with almond milk, coconut oil, and even brown sugar—each variation brought a little magic of its own. What I love most about this is how it feels like a hug in cake form—comforting, nourishing, and just a little indulgent all at once.
How do I make Zucchini Swirl Cake?
Quick Overview
This cake comes together in three simple steps: prepare your zucchini and filling, mix the batter, and then layer it all before baking. The secret to its moistness is definitely the shredded zucchini—don’t skip squeezing out excess moisture! The swirl technique is just a matter of layering and gently swirling the filling into the batter – no fancy tools needed. What makes this process especially lovely is how forgiving it is; even if you’re a certifiable amateur, you’ll end up with something truly impressive. The aroma alone will make your kitchen feel like a bakery, and trust me—your family will be calling dibs before it even comes out of the oven.
Ingredients
For the Main Batter:
– 2 cups all-purpose flour (or a mix of your favorite GF blend, if you prefer)
– 1 teaspoon baking powder
– ½ teaspoon baking soda
– ½ teaspoon salt
– 1 teaspoon ground cinnamon
– 1 cup granulated sugar (or honey/maple syrup for a natural touch)
– ½ cup vegetable oil or melted butter
– 3 large eggs (or applesauce for a lighter, vegan option)
– 1 teaspoon vanilla extract
– 1 cup grated zucchini (squeeze out excess moisture for the best results)
For the Filling:
– ¼ cup brown sugar
– 1 teaspoon cinnamon
– 1 cup chopped pecans or walnuts (optional but totally worth it!)
– ½ cup cream cheese or softened mascarpone (for extra creaminess)
– 2 tablespoons softened butter
– 1 tablespoon maple syrup (or honey)
For the Glaze:
– ½ cup powdered sugar
– 1-2 teaspoons milk or cream
– A splash of vanilla
– Lemon zest or cinnamon for added flavor
Step-by-Step Instructions
Step 1: Preheat & Prep Pan
Set your oven to 350°F (175°C). Grease a standard loaf pan or round cake pan with butter or non-stick spray, then lightly dust with flour. Lining the bottom with parchment paper makes removal even easier. I do this every time because sticky cakes are no fun, and it’s worth a few extra minutes in the prep. While the oven heats, grate your zucchini and squeeze out all the excess moisture—this step prevents your cake from turning into a soggy mess, and trust me, I’ve learned this the hard way. Having all your ingredients pre-measured and ready makes the whole process much smoother. Plus, the smell of the raw batter mixed with cinnamon is already making your kitchen cozy.
Step 2: Mix Dry Ingredients
In a large bowl, whisk together the flour, baking powder, baking soda, salt, and cinnamon. This ensures everything’s evenly distributed and your cake bakes uniformly. Incorporate a little extra cinnamon if you’re a cinnamon lover—because who isn’t? This step helps avoid clumps and guarantees every bite is flavorful. I always do this first, so my dry ingredients are perfectly combined before I move to the wet stuff. It’s like setting the base for a good story.
Step 3: Mix Wet Ingredients
In a separate bowl, beat the eggs with sugar until light and slightly frothy. Then add the oil (or butter), vanilla, and your grated zucchini. I find that using a hand whisk is enough—no fancy gadgets needed. The batter should look smooth and creamy, with specks of green zucchini giving it a sneaky health boost. I tested this with almond milk once, and honestly, it made the cake even more tender and moist. The smell at this point is divine—almost like cinnamon toast or fresh-baked cookies.
Step 4: Combine
Pour the wet ingredients into the dry and fold gently until just combined. Don’t overmix! Overmixing can make the cake dense—that’s a rookie mistake I learned after my first try. It’s okay if there are a few lumps; they’ll bake out. The batter should be slightly thick but pourable. If it feels too stiff, stir in a splash of milk. This is the moment to taste the batter—trust me, I’ve done it, and it’s a revelation. Basically, you want a batter that’s thick enough to hold the swirl layers but soft enough to pour easily.
Step 5: Prepare Filling
Mix together the brown sugar, cinnamon, chopped nuts, and softened cream cheese or mascarpone. You want a slightly thick, spreadable consistency. I love adding chopped pecans because they add crunch and complement the cinnamon-sweetness perfectly. If you’re feeling adventurous, try mixing in some orange zest or a splash of bourbon—trust me on this one. I do a quick taste test here to make sure the filling isn’t too sweet or bland. This filling is what gives the cake those gorgeous marbled swirls, so take your time to get it just right.
Step 6: Layer & Swirl
Pour half of the batter into your prepared pan, then evenly spread the filling over the top. Pour the rest of the batter over the filling, then take a butter knife or a skewer to swirl the filling into the batter—just a few gentle motions. You want a marbled effect, not a muddled mess. The key is to create contrasting ribbons of filling that bake into beautiful streaks. If you’re feeling creative, try making swirling patterns or even a heart shape—kids love that! This step always makes me smile because it’s like painting dessert art.
Step 7: Bake
Pop your cake in the oven and bake for 40–50 minutes. The top should turn a lovely golden brown, and a toothpick inserted in the center comes out clean. Ovens vary, so start checking around 40 minutes. If the top browns too quickly, tent it with foil and let it finish baking. I love sticking a cake tester or toothpick in; if it comes out moist but not batter-y, you’re good. The smell during baking is intoxicating—warm cinnamon, vanilla, and that slight vegetable undertone that totally works.
Step 8: Cool & Glaze
Let the cake cool in the pan for 10–15 minutes before transferring to a wire rack. Patience is key here—I used to rush and ended up breaking my favorite slices! Once cooled, drizzle with your prepared glaze. If the glaze feels too runny, add a little more powdered sugar; if it’s too thick, stir in a splash of milk. The glaze is optional but adds a beautiful glossy finish and a little extra sweet kick. When I make this for a party, I often sprinkle some toasted nuts or a dusting of cinnamon on top for presentation.
Step 9: Slice & Serve
Use a serrated knife for clean slices—this cake has a tender crumb, so patience is a virtue. Serve it slightly warm or at room temperature. I love pairing it with a strong cup of coffee or a dollop of whipped cream. If you want to make it extra special, serve with a scoop of vanilla ice cream or a drizzle of caramel. Remember, the best part about this cake is how forgiving it is—if it breaks a little, just call it rustic and call it a day. It’s perfect for sharing with friends, family, or just yourself on a cozy night.
What to Serve It With
Honestly, this cake is a chameleon. It’s great at breakfast, paired with a hot cup of coffee, especially if you add a dash of cinnamon or nutmeg on top. For brunch, serve slices with fresh berries and a dollop of yogurt or whipped cream—such a pretty sight. As a dessert, it’s a cozy finale with a scoop of vanilla ice cream or a drizzle of honey. I also love cutting thick slices and wrapping them for packed lunches or picnics; the moistness keeps really well. Sometimes I sprinkle a little powdered sugar or cinnamon sugar on top when serving to give it that cafe-style touch. My family’s favorite tradition is having a slice with our weekend tea while catching up—this cake feels like a warm hug after a busy week.
Top Tips for Perfecting Your Zucchini Swirl Cake
After making this cake dozens of times, I’ve picked up a few tricks that help turn a good cake into a great one. First, the zucchini—always squeeze out as much moisture as you can. I use a clean kitchen towel and give it a good squeeze; it’s worth the extra effort for a soft, fluffy crumb. I tested this with a variety of zucchinis from my garden; thicker ones need more squeezing. Next, be gentle when folding the batter—overmixing ruins that tender crumb we’re aiming for. When layering, make sure the filling is evenly distributed; I actually use a small spatula to spread it out so each bite gets a bit of that cinnamon goodness. Swirling takes practice—try making figure eights or zigzags for interesting patterns. You can swap the nuts for dried fruit or even chocolate chips—just remember: balance is everything. Baking times can vary depending on your oven, so keep an eye on the cake and don’t be afraid to test for doneness a few minutes early. Lastly, plan ahead on glazing; I prefer glazing the cake once it’s fully cooled—this helps the glaze set beautifully without melting away too quickly. If you’re feeling creative, add a splash of orange juice to the glaze for a citrus twist! Patience and practice are your best friends here, and trust me, it’s worth every minute.
Storing and Reheating Tips
This cake keeps beautifully for a few days—score! Cover it tightly with plastic wrap or keep it in an airtight container at room temperature for up to 2 days. After that, move it to the fridge to preserve freshness—just make sure it’s well wrapped. I find that refrigerating it overnight actually lets the flavors meld even better. When reheating slices, a quick 10-15 seconds in the microwave does the trick, but I prefer just letting it sit out for a bit at room temp—you get that freshly baked feel. If you’re planning to freeze leftovers, wrap individual slices tightly in plastic wrap and then place in a freezer-safe bag or container. They’ll last up to 3 months, but trust me, it’s usually gone by then! To serve, thaw at room temp or warm gently. I avoid glazing beforehand if I plan to freeze—wait to add the glaze until just before serving to keep that glossy finish perfect. Transparency and a little planning make your leftovers taste just as fantastic as the first day.
Frequently Asked Questions
Final Thoughts
This zucchini swirl cake is more than just a dessert; it’s a little slice of comfort and versatility that I keep coming back to. It’s perfect when you want something homemade but don’t have hours to spare, and the flavor combination is simply addictive. I love how easy it is to adapt—whether I swap the nuts for dried cranberries or add a splash of orange zest to the batter. Every time I bake it, it feels like a warm hug, and my family always asks for seconds. Honestly, if you haven’t tried zucchini in dessert before, this recipe might just change your mind—because it’s proof that sometimes, the most unexpected ingredients turn into the most treasured treats. Go ahead, give it a try, and I can’t wait to hear how yours turns out! Don’t forget to leave a comment or share your own twists—I love hearing your stories in the kitchen. Happy baking!
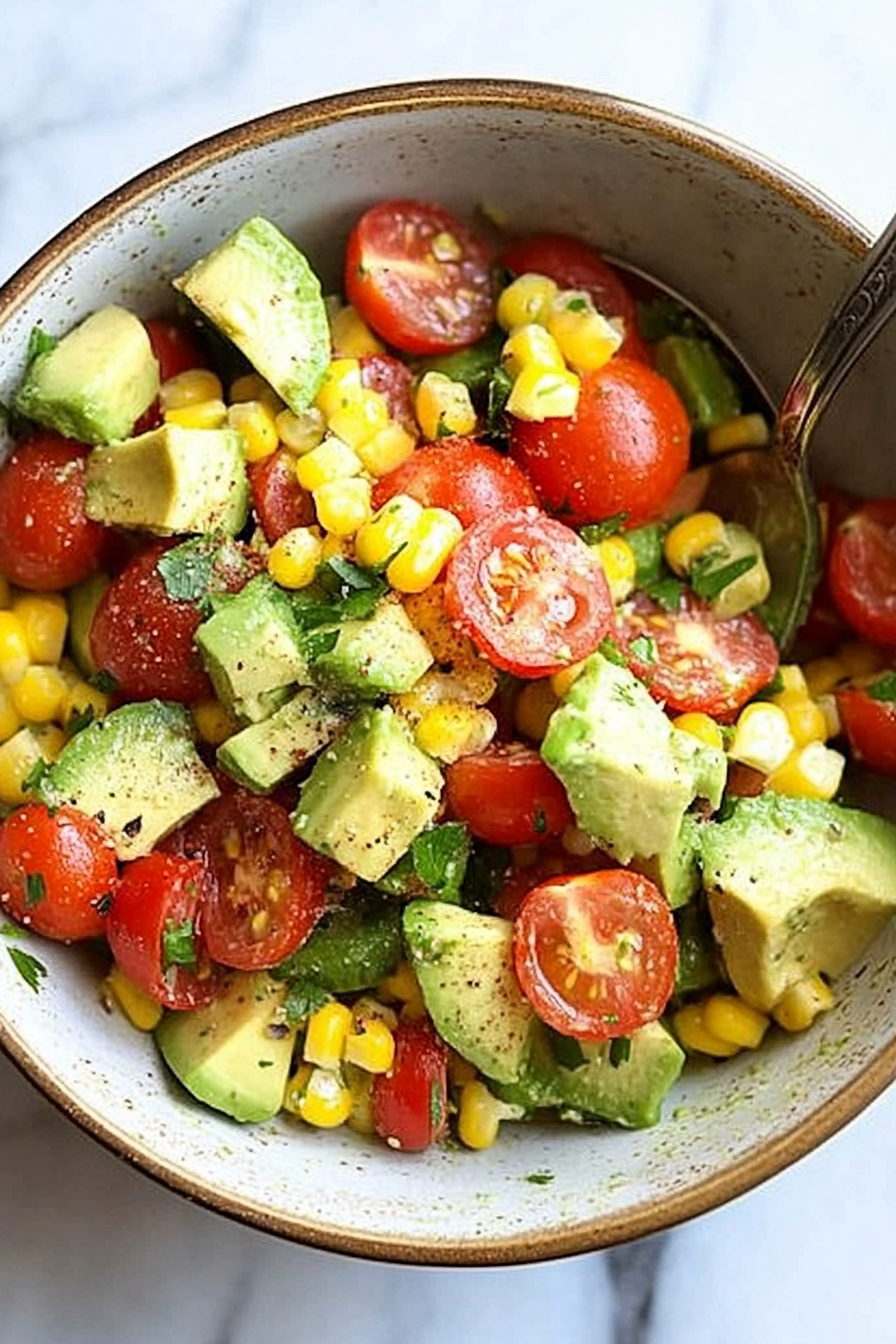
corn tomato avocado salad
Ingredients
Method
- Steam the corn kernels in a microwave or on the stove until tender, about 5 minutes. Let cool.
- Combine the cooked corn, diced avocado, cucumbers, cherry tomatoes, and red onion in a large bowl.
- Drizzle with olive oil and lemon juice, then season with salt and black pepper. Toss gently to combine and serve immediately.