Webby Rice Krispie Treats Recipe
If you ask my kids what’s their favorite treat I make, this zucchini coffee cake is always at the top of the list. I know, it sounds a little funny—zucchini in a coffee cake? But trust me, that sneaky veggie makes the crumb incredibly moist and tender, while the cinnamon swirl adds such a cozy, comforting flavor. I actually discovered this recipe during one of those busy weekends when I had a bunch of zucchinis from my garden and wanted to whip up something sweet that wouldn’t take hours. It’s become a household staple ever since! My best trick is to grate the zucchini really finely and squeeze out any extra moisture — it just keeps the cake from getting soggy. My kitchen smells like cinnamon and warm vanilla the entire time it’s baking, and honestly, it’s the one dessert I always get compliments on. Whether it’s for breakfast, brunch, or just when I need a sweet pick-me-up, this zucchini coffee cake never disappoints. I promise, once you try it, it’ll become part of your regular rotation too.
What is Zucchini Coffee Cake?
This zucchini coffee cake is essentially a moist, tender cake layered with a cinnamon sugar swirl, then topped with a glossy glaze. Think of it as a cross between a classic coffee cake and a quick breakfast bread, but with a sneaky vegetable twist. The name “coffee cake” comes from its perfect pairing with a hot cup of coffee or tea, making it a cozy treat for mornings or lazy weekends. It’s a take that’s a little more wholesome because of the zucchini — but don’t worry, it’s sweet enough that you’ll never taste the veggies, just the richness and spice. The cake itself is fluffy, studded with cinnamon-sugar goodness, and the swirl creates beautiful marbled patterns when sliced. Honestly, this one’s a lifesaver on busy nights when you want something comforting and delicious but don’t want to fuss too much. Plus, it’s a great way to use up those zucchinis hiding in the fridge that might otherwise go to waste!
Why you’ll love this recipe?
What I love most about this zucchini coffee cake is how versatile and forgiving it is — trust me, I’ve made it a dozen times, and it always works out. The flavor? Pure cinnamon warmth that makes your whole house smell like a bakery. And the texture? So moist that I always do a double batch because it disappears in minutes at my house! It’s also super budget-friendly: just basic pantry staples, and you probably have most of them already. My kids ask for this all the time, especially when I sprinkle extra cinnamon on top before baking — it gives the crust a little bit of magic. And here’s a little secret: I sometimes swap out the glazed topping for a dusting of powdered sugar if I’m running low on time, and it’s just as good. This recipe is perfect for pretty much any occasion — breakfast, brunch, or even a cozy dessert with a scoop of vanilla ice cream. Plus, with the sweet swirl running through every slice, it’s almost too pretty to eat — almost. It’s honestly a crowd-pleaser, so I always keep the ingredients stocked for when I need a quick breakfast or a sweet snack that’s healthier than a cookie but just as satisfying.
How do I make Zucchini Coffee Cake?
Quick Overview
This zucchini coffee cake comes together in just a few simple steps. You start by grating and squeezing out moisture from the zucchini — a step that makes all the difference in keeping the cake tender and moist. While the oven preheats, you mix up the basic batter with flour, sugar, eggs, and a touch of vanilla. Then, you swirl cinnamon sugar right into the batter, layer it in a baking pan, and bake until golden and fragrant. The finishing touch is a shiny glaze that drapes over the warm cake, making each piece irresistible. It’s one of those recipes where you throw everything together, pop it into the oven, and wait with a cozy mug in hand. The cleanup’s minimal, the prep’s straightforward, and the result? A sticky, flaky, cinnamon-spiced masterpiece that’s perfect for sharing.
Ingredients
For the Main Batter:
– 2 cups all-purpose flour (or gluten-free blend)
– 1 cup sugar (white or 50/50 with brown for deeper flavor)
– 1 teaspoon baking powder
– ½ teaspoon baking soda
– ½ teaspoon salt
– 1 teaspoon cinnamon (plus more for swirl and topping)
– 2 large eggs
– ½ cup vegetable oil (or melted butter for richer flavor)
– 1 teaspoon vanilla extract
– 1 cup freshly grated zucchini (squeeze out excess moisture)
For the Filling:
– ½ cup packed brown sugar
– 2 teaspoons cinnamon
– 2 tablespoons melted butter
– ¼ cup chopped nuts or chocolate chips (optional, for added fun)
For the Glaze:
– 1 cup powdered sugar
– 1-2 tablespoons milk or cream (add more for desired consistency)
– ½ teaspoon vanilla extract
– A pinch of cinnamon (optional)
Step-by-Step Instructions
Step 1: Preheat & Prep Pan
Set your oven to 350°F (180°C). Grease a 9-inch round or square baking pan or line it with parchment paper. I like to give the pan a quick spray of cooking spray and then dust it with a little flour — that’s my secret for easy cleanup. Also, grate your zucchini now and set it aside, squeezing out as much moisture as possible. This is crucial — I learned the hard way that watery zucchini can turn your cake into a sad, soggy mess if you don’t drain it well!
Step 2: Mix Dry Ingredients
In a large bowl, whisk together the flour, sugar, baking powder, baking soda, salt, and cinnamon. This ensures everything is evenly distributed, which helps the batter rise beautifully and gives you that lovely cinnamon flavor throughout. Take your time here — it’s a simple step, but skipping it can lead to uneven spots in your cake.
Step 3: Mix Wet Ingredients
In a separate bowl, beat the eggs, then whisk in the oil and vanilla. Now, add the grated zucchini and stir until well combined. The zucchini might look a little chunky at first, but it’ll blend nicely once you add the dry ingredients. If your eggs are cold, don’t worry — the batter will come together once you mix everything. Pro tip: I gently warm my eggs before cracking if I want a slightly fluffier cake.
Step 4: Combine
Pour the wet mixture into the dry ingredients, using a spatula or spoon to fold everything gently together. Be careful not to overmix — just fold until there are no streaks of flour. Overmixing can make the cake dense, and that’s not what we want! The batter should be thick but still spreadable, with no pockets of flour remaining.
Step 5: Prepare Filling
In a small bowl, mix together the brown sugar, cinnamon, and melted butter until crumbly. If you’re feeling festive, toss in some chopped nuts or chocolate chips for extra texture. I love sprinkling a little extra cinnamon over the top before baking to amp up that cozy cinnamon flavor.
Step 6: Layer & Swirl
Pour half the batter into your prepared pan, then sprinkle half the cinnamon sugar mixture over it. Repeat with the rest of the batter and filling, then use a butter knife or skewer to swirl gently through the layers to create a marbled effect. Don’t overdo it — just a few gentle swirls for that beautiful, bakery-style look. Watching the swirl happen is just as fun as eating it!
Step 7: Bake
Pop it into your preheated oven and bake for about 35-40 minutes. Keep an eye on it — it should be golden on top and a toothpick inserted in the center should come out clean. Every oven is different, so start checking around 35 minutes. If it’s golden but still wiggles a little, give it a few more minutes, but resist the temptation to open the oven too early.
Step 8: Cool & Glaze
Let the cake cool in the pan for about 15 minutes. Then transfer it to a wire rack or carefully lift it out of the pan if you lined it with parchment. Warm your glaze ingredients, whisk until smooth, and pour over the slightly cooled cake. The glaze will set slightly as it cools, giving that perfect shiny finish. I love drizzling the glaze in interesting patterns — it makes the cake almost too pretty to slice!
Step 9: Slice & Serve
Using a sharp serrated knife, cut into squares or wedges. Serve warm or at room temperature with a cup of coffee or tea. I find that the leftovers are just as good the next day, especially if you reheat slices for a few seconds in the microwave. For an extra indulgence, serve with a scoop of vanilla ice cream or a dollop of whipped cream — it’s the ultimate cozy treat.
What to Serve It With
This zucchini coffee cake is just as happy at a lazy breakfast as it is at a weekend brunch or an after-dinner treat. I often serve it with a steaming mug of coffee or hot tea — the cinnamon and zucchini are just enough to make you feel cozy for early mornings or weekend lazyness. For brunch, I love pairing it with fresh fruit like berries or sliced apples, and maybe a dollop of yogurt for extra creaminess. My family always asks me to dust a little powdered sugar or add extra cinnamon on top before serving—totally up to your mood! If you want to make it a special dessert, add a scoop of vanilla or caramel ice cream next to it, and you’ll have a seriously indulgent moment. Sometimes, I slice it into smaller pieces for a tea party with friends, and everyone always asks for the recipe. It’s simple, comforting, and just a little bit fancy — perfect for making homemade moments special.
Top Tips for Perfecting Your Zucchini Coffee Cake
Over the years, I’ve learned a few tricks to make this cake turn out even better. First, squeeze out as much moisture as possible from the zucchini — I use a clean dish towel or cheesecloth and give it a good squeeze. Moisture is the enemy of a fluffy cake! When mixing the batter, I always fold gently to keep it airy — overmixing tends to make it dense, and no one wants that. For the swirl, I use a toothpick to drag through the batter in broad circles — that way, each slice gets a lovely marbled pattern and a burst of cinnamon flavor. You can really customize this part — I’ve played around with adding chopped nuts, chocolate chips, or even shredded apple for different flavors. When baking, keep an eye on the clock, and remember that every oven varies—use a toothpick test instead of relying solely on time. For the glaze, I like to add a pinch of cinnamon or vanilla extract—it enhances the warm, cozy flavor profile. My biggest lesson, though? Don’t skip squeezing out the zucchini — it’s the key to that melt-in-your-mouth texture I love. I’ve tested this with different sweeteners and found that a mix of brown and white sugar balances sweetness and depth. Trust me, this cake is all about the small details that make a big difference!
Storing and Reheating Tips
This cake taste better on the day it’s baked, but if you have leftovers, don’t worry. Store it in an airtight container at room temperature for up to 2 days — it stays moist and delicious that way. If you want to keep it longer, pop it in the refrigerator for up to a week, just make sure to cover it tightly so it doesn’t dry out. I recommend waiting to add the glaze until just before serving if you’re storing it for a day or two — the glaze can become a little soggy if it sits too long. To freeze, wrap slices individually in plastic wrap, then place in a freezer-safe container or bag for up to 3 months. Thaw at room temperature or gently warm in the microwave for 15-20 seconds. If you’re reheating, I usually microwave a slice for about 20 seconds, so it’s just warm and gooey again without drying out. For the glaze, I keep it separate and drizzle fresh over each slice as I serve—this keeps it shiny and lovely and adds that freshly baked feel every time.
Frequently Asked Questions
Final Thoughts
Honestly, this zucchini coffee cake has become a favorite in my home because it’s simple, wholesome, and utterly irresistible. The combination of moistness from the zucchini, warmth from the cinnamon swirl, and that shiny glaze—seriously, it hits all the right notes. Every time I bake it, I feel like I’m giving my family a hug in dessert form. Plus, it’s so flexible — I’ve swapped ingredients, added nuts, or even replaced the glaze with a dusting of powdered sugar, and it always turns out great. If you’re looking for a way to make veggies exciting or need a crowd-pleaser that’s easier than you think, give this a try. I can’t wait to hear how yours turns out! And hey, if you’re feeling adventurous, I’d love to see your tweaks or additions. Drop a comment or share your pics — happy baking, friends!
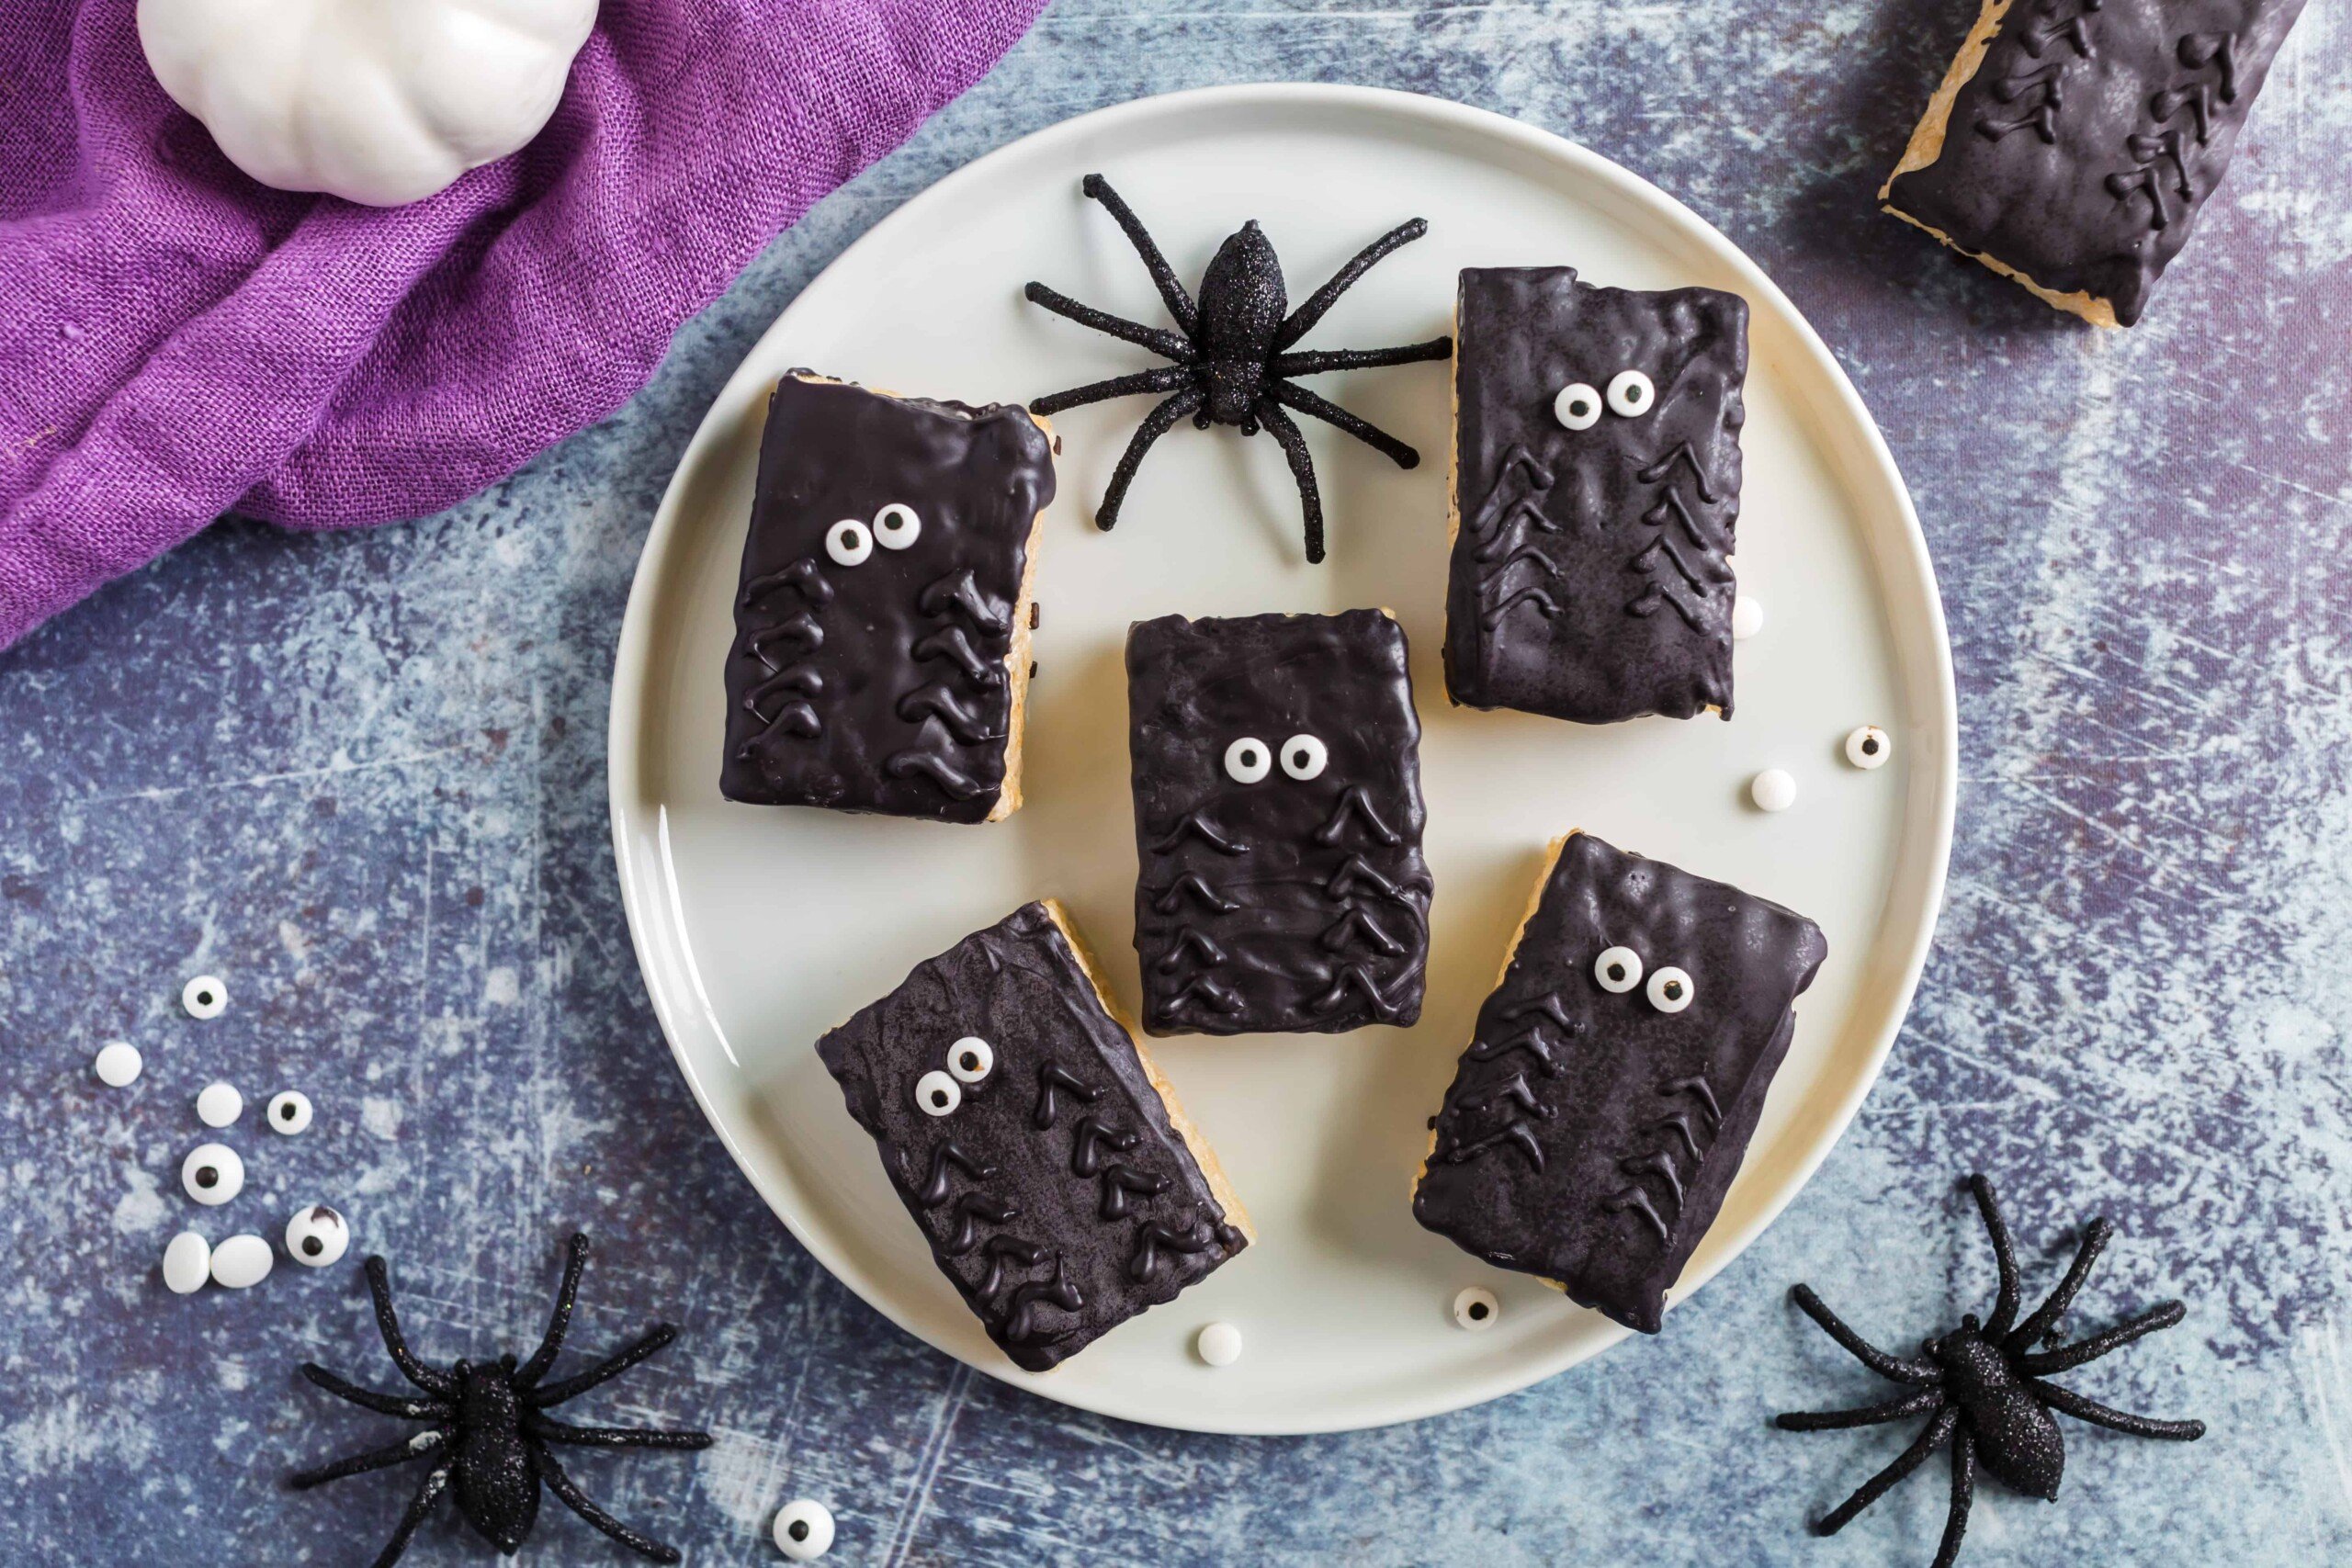
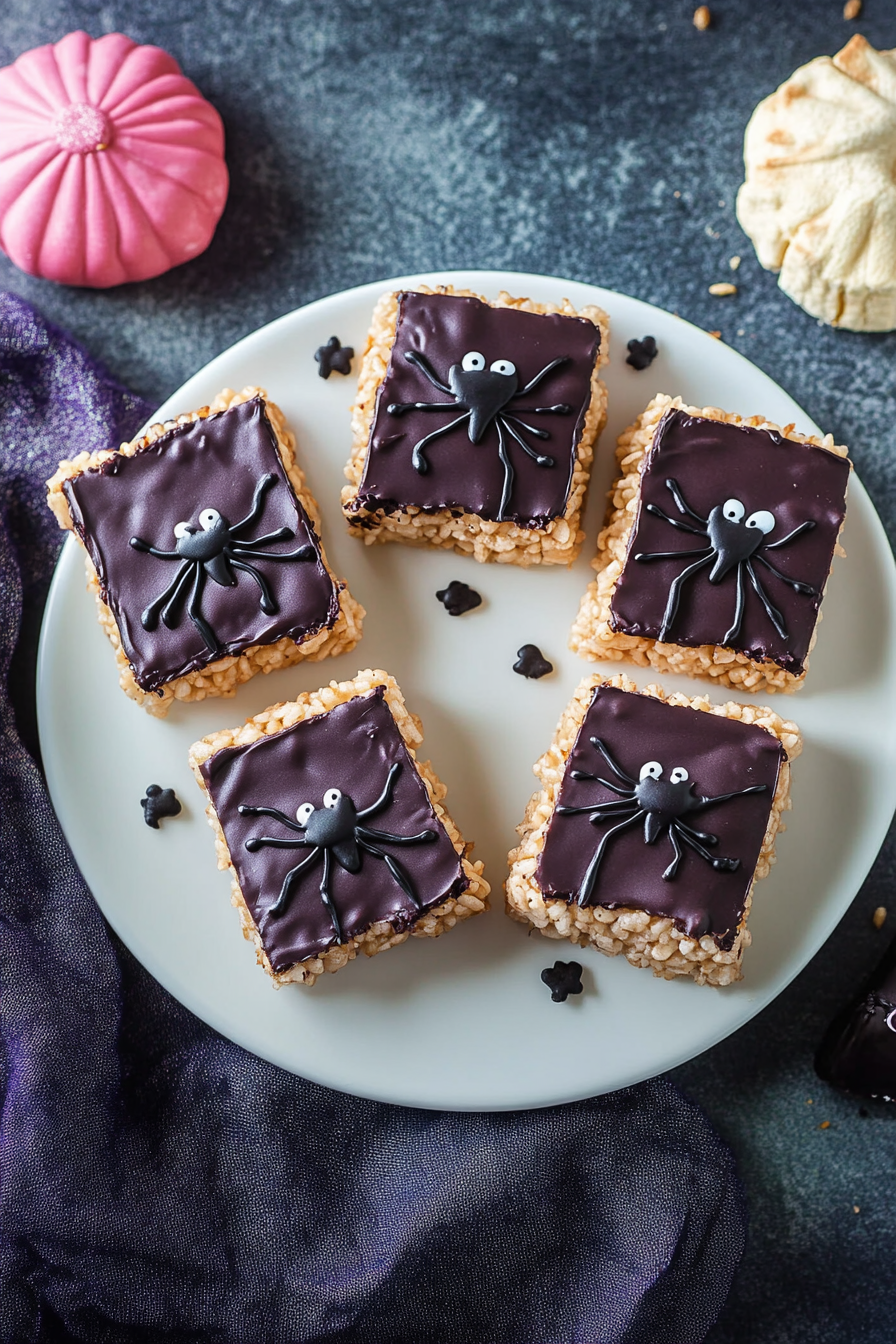
Spider Rice Krispie Treats
Ingredients
Method
- Prepare a batch of Rice Krispie Treats, or unwrap individual store bought treats. Make treats in a 9-inch square baking dish and cut into 8 large rectangles, or 16 small.
- Melt dark chocolate wafers in a glass bowl in the microwave for one minute. Stir until smooth. Add an additional 15-30 seconds if needed.
- Dunk the top of each rice krispie treat square into the melted chocolate, spreading smooth with an offset spatula as needed.
- Immediately place a pair of candy eyes onto each treat while the chocolate is still soft. Allow to set, about 10-15 minutes.
- Once chocolate has set onto the rice krispie treats, spoon remaining chocolate from the bowl into a small Ziploc bag. Snip off the corner of the bag and pipe 8 legs onto each treat. Allow to set. ENJOY!