Easy Cranberry Walnut Swirls Recipe
I have to admit, I’ve got a soft spot for homemade cakes that don’t require hours in the kitchen, especially when they sneak in something sneaky like zucchini. This zucchini snacking cake is one of those recipes I keep coming back to—my kids ask for it all the time, and honestly, I do too. It’s like a little piece of summer sunshine — moist, tender, sweet but not overly sugary, and packed with flavor. Plus, it’s perfect for those nights when I want something sweet but don’t feel like making a fancy dessert. Trust me, this one’s a lifesaver on busy weeknights or lazy weekends. The smell alone, as it bakes, is enough to bring everyone into the kitchen, asking when it’s ready. I’ve tested this with almond milk and even added a dash of cinnamon—both ways worked beautifully. What I love most about this is how flexible it is—you can tweak the ingredients or toppings to suit whatever mood you’re in. Honestly, it’s become a bit of a family tradition, and I can’t wait to share it with you.
What is Zucchini Snacking Cake?
Think of this as a mash-up between a fluffy quick bread and your favorite snack cake—but with a healthy twist. It’s essentially a moist, tender cake made with shredded zucchini — yes, zucchini! — which keeps it unbelievably moist without making it heavy. The name is pretty straightforward: it’s a zucchini-based cake you can snack on anytime, perfect for breakfast, a mid-afternoon treat, or even dessert. The idea came from those old-school zucchini bread recipes, but I decided to dress it up a bit with a simple glaze and some fun mix-ins. The zucchini acts like a secret ingredient that makes the cake so lush and tender, almost like eating a sweet, vegetable-laden cloud. Think of it as the lovechild of a muffin and a bundt cake—easy to slice, easy to serve, and just the right amount of sweet. It’s a comfort food that’s so unassuming, yet so addictive, and I promise, once you make it, you’ll be hooked too.
Why you’ll love this recipe?
Honestly, what I love most about this zucchini snacking cake is how it beautifully balances flavor and simplicity. The aroma that fills my kitchen when it’s baking? Pure magic. It’s got a delicate sweetness, a hint of spice if you add cinnamon, and that gorgeous moist crumb that makes each bite almost melt in your mouth. Plus, it’s one of those recipes you can whip up in under an hour—no fancy equipment needed, just a mixing bowl and a whisk. That’s a huge win on busy mornings or when unexpected guests show up.
And, budget-wise, it’s super friendly. Most of us have zucchini and pantry staples lying around, so it’s like sneaking a vegetable into dessert — guilt-free. I’ve also tested it with different ingredients, like swapping out some all-purpose flour for almond or oat flour, and every variation turned out beautifully. The versatility is what makes it a staple for me. My kids ask for leftovers in their lunchboxes, and I have to hide the last piece because, honestly, I occasionally sneak a corner myself when no one’s watching. It’s moist, subtly sweet, and not overly complicated—what’s not to love?
So whether you’re browsing for a quick snack, needing a treat for your brunch table, or just craving something sweet that’s comfortingly familiar, this recipe has your back. I think what I love most is how it feels like a warm hug in cake form—effortless, cozy, and totally customizable.
How do I make Zucchini Snacking Cake?
Quick Overview
This cake is actually shockingly easy to make, especially once you’ve gathered your ingredients. You start by shredding fresh zucchini — don’t forget to give it a good squeeze to remove excess moisture so it doesn’t turn the batter into a soggy mess. Mix your dry ingredients, then your wet ingredients, and fold them together gently—no overmixing here! Pour half the batter into your prepared pan, layer in your filling (more on that soon), then top with the remaining batter, swirling for that beautiful marbled look. Into the oven it goes, baking until a toothpick comes out clean. Once out, I like to let it cool in the pan for a few minutes before transferring it to a wire rack. Then, drizzle on the simple glaze while it’s still slightly warm, so it seeps in just right. It’s honestly such a straightforward process, and the reward is a slice of heaven on a plate.
Ingredients
For the Main Batter:
- 2 cups grated zucchini (about 2 small zucchinis) — I always do this right after shopping, and I like to grate it finely for an even crumb.
- 1 ½ cups all-purpose flour — I use unbleached for richer flavor, but plain works fine too.
- ¾ cup sugar — or a little less if you prefer it less sweet.
- 1 teaspoon baking powder
- ½ teaspoon baking soda
- ½ teaspoon salt
- 1 teaspoon cinnamon (optional but recommended)
- ½ cup vegetable oil or melted butter — I tested both, and butter makes it even richer!
- 3 large eggs
- 1 teaspoon vanilla extract
For the Filling:
- ½ cup cream cheese, softened (optional, but adds a lovely tang)
- ½ cup powdered sugar
- ½ teaspoon vanilla
- Chopped nuts or chocolate chips (for extra texture, totally optional)
For the Glaze:
- 1 cup powdered sugar
- 2-3 tablespoons milk or lemon juice (for flavor and perfect consistency)
- A dash of vanilla or citrus zest if you’re feeling fancy
Step-by-Step Instructions
Step 1: Preheat & Prep Pan
I always start by preheating my oven to 350°F (175°C). Then, I grease and line my loaf pan or cake pan with parchment paper—that way, nothing sticks, and cleanup’s a breeze. A quick tip: I also like to sprinkle a little flour on the greased pan for extra non-stick magic.
Step 2: Mix Dry Ingredients
In a large bowl, I whisk together the flour, sugar, baking powder, baking soda, salt, and cinnamon. It’s important to do this first because it ensures everything’s evenly distributed—no tiny pockets of baking soda while others are empty. The flour should look uniformly mixed, which helps give the cake that nice rise and fluffy crumb.
Step 3: Mix Wet Ingredients
In a separate bowl, I whisk the eggs, then add the oil or melted butter, vanilla, and a pinch of salt. When I add the grated zucchini (giving it a good squeeze to drain out excess moisture), it adds a bright, fresh flavor. I test the temperature to make sure the eggs aren’t too cold (that can cause curdling), and I whisk everything until well combined.
Step 4: Combine
Next, I pour the wet mixture into the dry ingredients – gently folding instead of vigorously mixing—to avoid toughening the batter. Remember, overmixing can make the cake dense. You want it just combined and smooth, with a slightly streaky look, and that’s when the magic happens.
Step 5: Prepare Filling
If you’re making a layered or swirled cake, whip the cream cheese with powdered sugar and vanilla until smooth. I love to sprinkle in some chopped nuts or mini chocolate chips here for added crunch and flavor, but it all depends on what mood I’m in. This filling is optional, but it adds a lovely tang and richness.
Step 6: Layer & Swirl
Pour half of the batter into your pan. Then dollop the cheese filling on top (if using), and spread it out slightly without pressing too hard. Cover with the remaining batter, then take a toothpick or skewer and swirl through the batter to create a marbled effect. It’s a bit of art—trust me, it’s fun, and it looks pretty once baked.
Step 7: Bake
Pop it into your preheated oven. Bake for about 45-50 minutes, or until a toothpick inserted into the center comes out clean. Every oven is different, so start checking at around 45 minutes. The top should be golden and slightly cracked—just perfect!
Step 8: Cool & Glaze
Let the cake cool in the pan for about 10 minutes, then transfer to a wire rack. While it’s still warm, drizzle your glaze all over. The heat helps it seep into the cake for maximum flavor and sweetness. I like my glaze a little thicker so it stays on top and creates a shiny top layer.
Step 9: Slice & Serve
Once cooled completely—preferably after about 30 minutes—I slice it with a sharp knife. A gentle sawing motion helps keep the slices neat. Serve them as is, or with a dollop of whipped cream or extra chopped nuts. I promise, this cake cuts beautifully and stays moist for days, so it’s great for making ahead or sharing with friends.
What to Serve It With
This cake is versatile enough to shine at all sorts of occasions. For breakfast, it pairs wonderfully with a steaming cup of coffee or tea—think of a slice alongside a latte, and you’re set for a cozy morning. My family loves it for brunch, topped with a smear of butter or a drizzle of honey, along with fresh berries for a burst of flavor.
As dessert, it’s perfect on its own, or dressed up with extra glaze, whipped cream, or even a scoop of vanilla ice cream. I’ve served it after Sunday dinners, and it disappears in minutes! For a casual snack, I like cutting small squares and packing them in lunchboxes—kids just love the tender crumb and sweet glaze. Every time I bake this, it feels like giving a little gift to my family; everyone leaves with a smile, and sometimes I even sneak a piece just for myself. It’s comfort baking at its best, with a healthy dose of nostalgia and love baked right in.
Top Tips for Perfecting Your Zucchini Snacking Cake
Every time I make this, I learn something new. First, always squeeze out the excess moisture from the grated zucchini. Moisture is the enemy of a fluffy cake—trust me on this one. I’ve used a clean dish towel or even a cheesecloth to wring out every bit of water, and that keeps the batter just right.
When mixing the wet and dry ingredients, gentle folding is key. Overmixing ruins the lightness, and that’s the worst part—I lose the tender crumb. I sometimes use a spatula instead of a whisk for this, just to be gentle. Also, don’t skip on the cinnamon—it adds depth and warmth that really elevates the flavor profile. Feel free to experiment with nutmeg or even a splash of orange zest if you’re feeling bright.
Swirling the batter with the filling takes a delicate hand. Use a skewer or chopstick to create beautiful marbled patterns—you don’t want to overdo it, or the filling gets muddled. For the glaze, start with less liquid and add more until you get that perfect pourable but not runny consistency. Trust me, a good glaze makes all the difference—shine and an extra hint of sweetness.
In my years of making this, I’ve learned that timing really matters. Check the cake at 45 minutes; if the edges are golden and a toothpick comes out moist but not batter-y, you’re good. Cool it completely before slicing—patience pays off with a moist, neat cut. Also, don’t be afraid to adapt—the recipe responds well to tweaks, so feel free to add chopped nuts, chocolate, or even shredded coconut if you want a different twist. Every batch teaches me something new, and I love that about baking—there’s always room for creativity.
Storing and Reheating Tips
This cake keeps beautifully sliced and stored in an airtight container at room temperature for up to 2 days. Just keep it out of direct sunlight—it tends to dry out if left uncovered or in too much heat. For longer storage, I pop slices into the fridge for up to 5 days, wrapped tightly or in a sealed container. The coolness actually helps the flavors meld and keeps it soft. If you want to make it ahead, freezing slices is super easy—wrap individual pieces with plastic wrap and tin foil, then stash in a resealable freezer bag. They last about 3 months, and I just let them thaw at room temp or warm briefly in the microwave.
Adding the glaze after reheating keeps it fresh and shiny. If the cake feels a little dry, a quick microwave blast (15-20 seconds) and a drizzle of glaze can bring it back to life. You’d be surprised how forgiving this recipe is, even after a day or two. Just trust your senses—if it smells good and looks moist, it’s still a winner.
Frequently Asked Questions
Final Thoughts
There’s something truly special about this zucchini snacking cake. It’s a humble, unassuming treat that our family adores—moist, bursting with flavor, and just the right amount of sweetness. Every time I bake it, I feel like I’m sharing a little piece of summer, even if it’s mid-winter. It’s become the cake I turn to when I want something comforting but don’t want the fuss of complicated baking. Plus, sneaking zucchini into something so delicious feels like a sneaky little win for my veggie-loving heart. Whether you serve it for breakfast, brunch, or as a cozy dessert, I know this will soon become a favorite in your house too. Don’t forget to tell me how it turns out—I love hearing your tweaks and tips! Happy baking, and enjoy every sweet, moist bite.
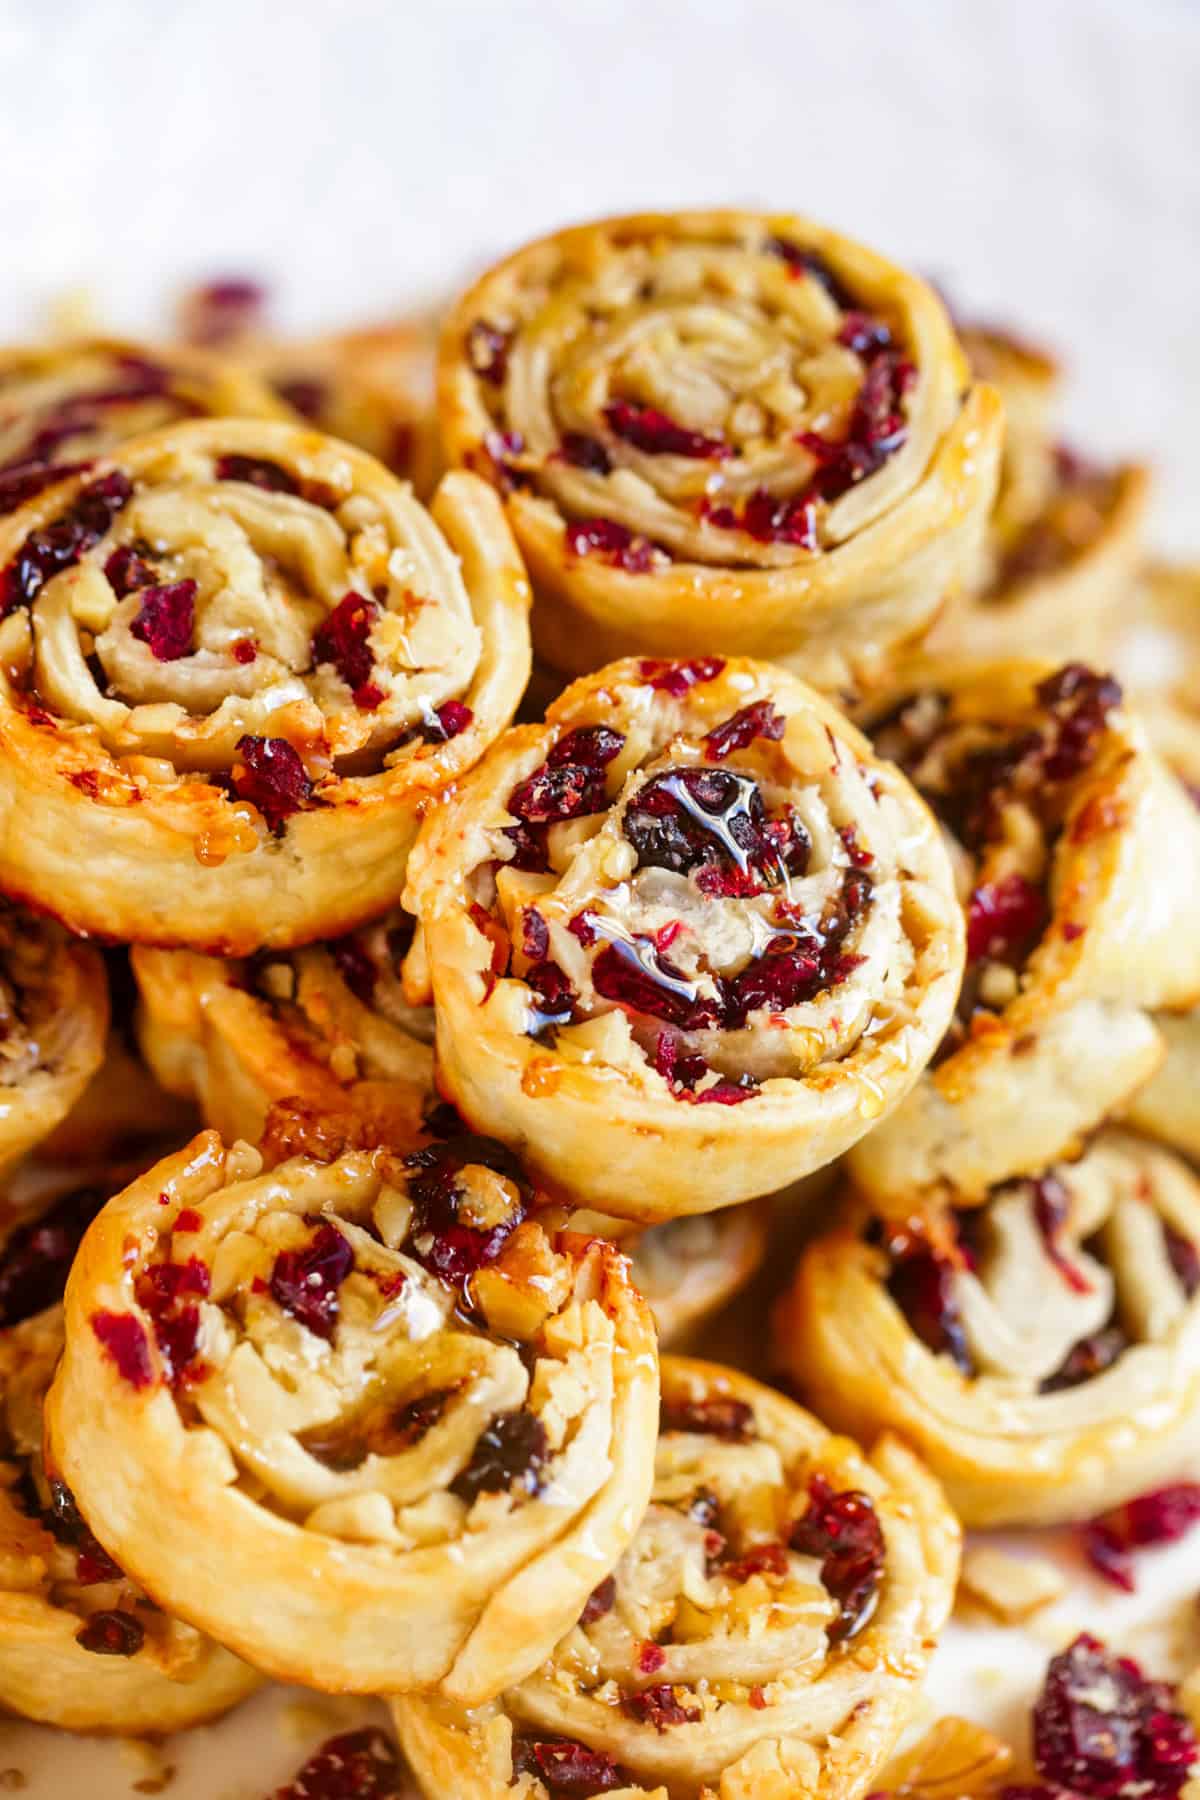
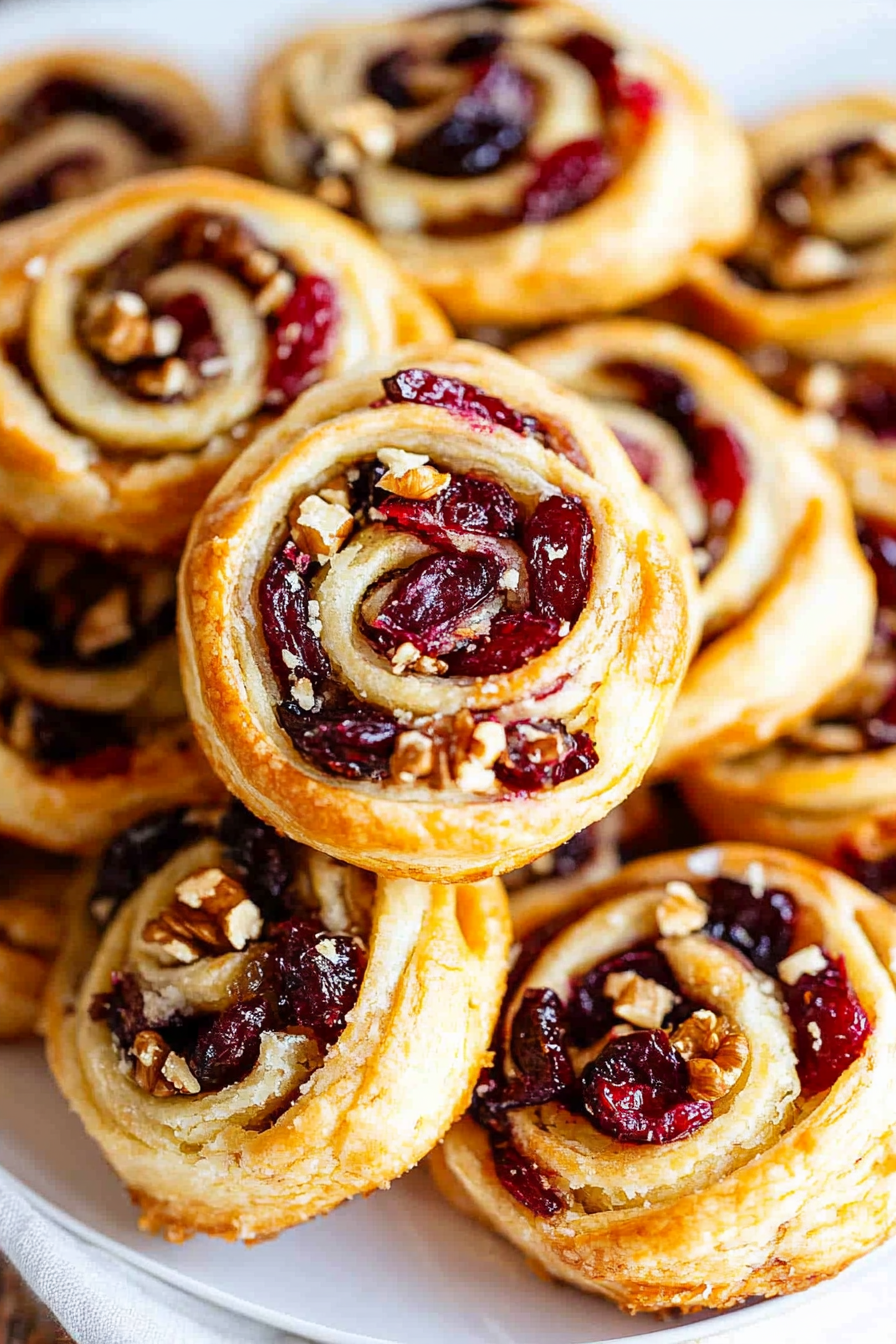
cranberry walnut pinwheels
Ingredients
Method
- Preheat the oven to 400°F. Line a baking sheet with parchment paper.
- In a bowl, combine cranberries, walnuts, sugar, and orange zest. Mix thoroughly.
- Roll out each pie crust into a square on a floured surface. Brush with melted butter.
- Spread the cranberry mixture evenly over the pie crusts.
- Roll each crust into a log, pinch the edges to seal, and freeze for 20 minutes.
- Mix egg and water to create an egg wash. Remove logs from freezer and brush with egg wash.
- Slice each log into 10 equal pieces. Arrange on the baking sheet.
- Bake for 11 to 14 minutes or until golden brown.
- Remove from oven, drizzle with honey, and cool before serving.