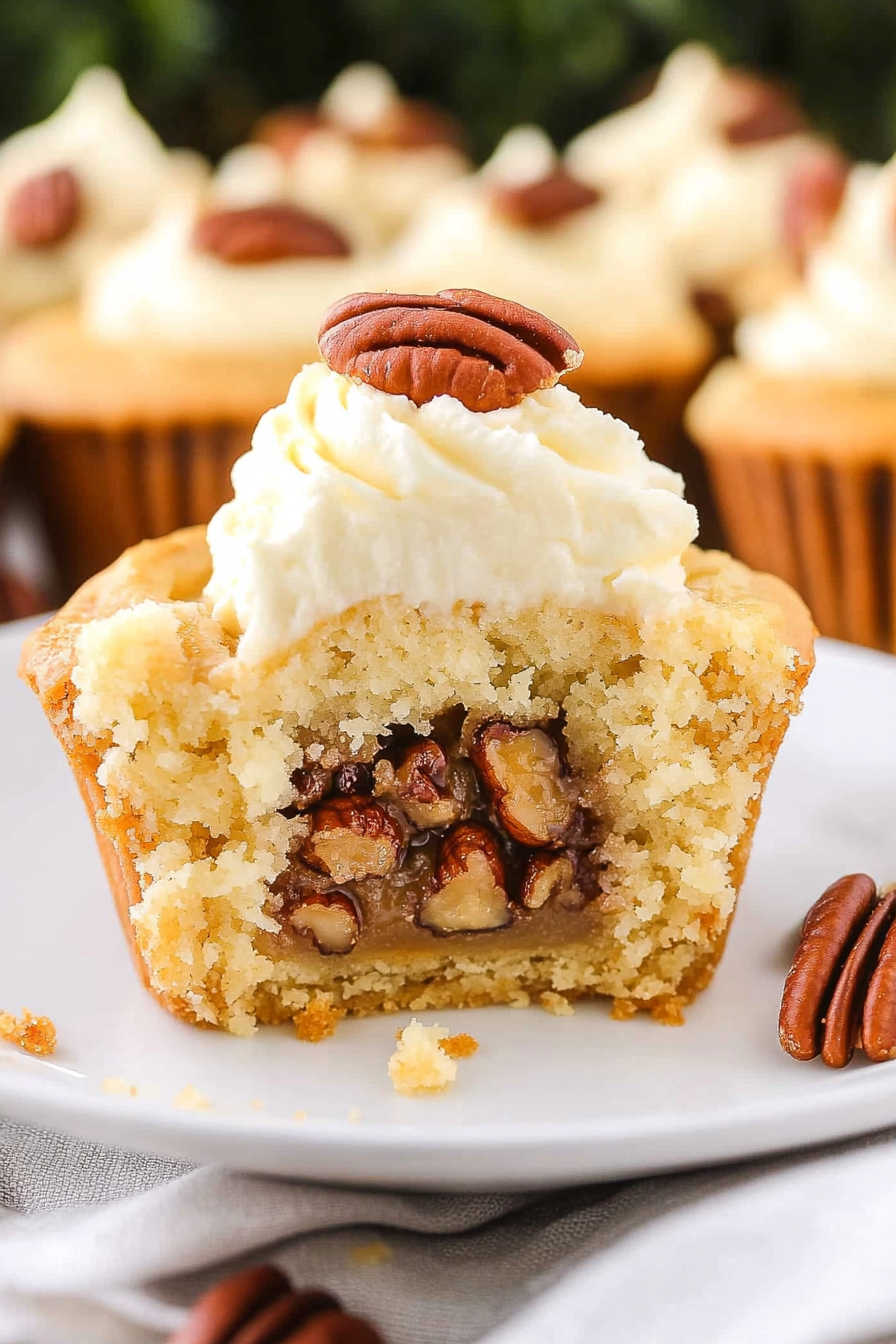
How to Bake Nutty Pie Cupcakes
If I’m honest, I never thought I’d fall head over heels for a zucchini-based cake. I mean, zucchinis are supposed to be for savory dishes, right? But then I tasted this incredible zucchini chocolate swirl cake at a friend’s brunch, and it was like a love story unfolding in my mouth. Moist, rich, and with just the right touch of sweetness, I realized that hidden veggies can actually be a real treat. This cake is my go-to on busy weekends when I want to whip up something homemade, but I don’t want hours in the kitchen. It’s surprisingly simple — I’ve made it countless times, and it never fails to impress. Plus, my kids ask for this all the time, and secretly, I love that it sneaks in a veggie or two. Seriously, this one’s a lifesaver when the craving for something chocolatey hits late at night, and I don’t want to bake a full layer cake. Trust me on this — once you try it, it’ll become a staple in your recipe lineup too.
What is Zucchini Chocolate Swirl Cake?
This cake is basically a marriage between a tender, moist zucchini bread and luscious chocolate. Think of it as a “hidden vegetable dessert” that’s so good, no one will guess zucchini is part of the mix. The concept is simple: you grate fresh zucchini into your batter, which keeps the cake super moist and adds a subtle earthiness. Then, a rich chocolate batter is swirled through, creating beautiful marbling and that irresistible chocolate hit. The name pretty much explains itself — it’s a cake, made with zucchini, with a chocolate swirl that makes every bite a little bit of heaven. It’s the kind of recipe I love because it combines practicality with indulgence. It’s not overly sweet — just the right balance — and the smell alone when baking will have everyone rushing to the kitchen. My favorite part? The texture. It’s the perfect balance of dense and light, with little pockets of gooey chocolate that make each slice so special. Think cozy, homemade, and full of wholesome goodness — all wrapped up in one slice.
Why you’ll love this recipe?
What I love most about this zucchini chocolate swirl cake is that it’s so versatile and forgiving. Honestly, I’ve tested this with all sorts of tweaks, and it’s never let me down. The flavor? Oh, it’s incredible. The zucchini keeps it moist and tender, while the chocolate swirl adds just enough richness to satisfy those sweet cravings. Plus, the balance isn’t overly sweet — it’s just perfect for any time of day. This one’s a lifesaver on busy nights when I need something homemade but don’t want to spend forever in the kitchen. It’s budget-friendly, too — the ingredients are simple pantry staples you probably already have. I also love how adaptable it is — I’ve added nuts, used dark chocolate, or even swapped in some coconut oil for extra flavor. What I really cherish about this cake is that it feels like a little victory every time I make it. My kids ask for seconds, and friends always ask for the recipe. Honestly, it’s become a family favorite, and I think it will be for you too!
And let me tell you — the best part? The way it smells while baking. That warm, chocolaty aroma fills the whole house and brings everyone into the kitchen, noses glued to the oven window. I’ve made this countless times, and it always feels like a warm hug. It’s a little weekend ritual I treasure, and I hope it becomes one of yours too. The bonus? It’s surprisingly forgiving — I’ve overmixed a few times, added extra zucchini, or swapped in different chocolates, and it still turns out beautifully. Once you get the hang of it, you’ll realize how cozy and satisfying baking with fresh zucchini can be — especially in dessert form!
How do I make Zucchini Chocolate Swirl Cake?
Quick Overview
This cake starts with a simple batter, where grated zucchini gets folded into a tender mix of flour, eggs, and butter. Half of the batter remains plain, while the other half gets mixed with melted chocolate — usually dark or semi-sweet. Dollops of chocolate batter are dropped into the zucchini base, then swirled through with a skewer or knife — creating beautiful marbling with every layer. Bake until a toothpick comes out clean, cool slightly, then drizzle with a shiny glaze or dust with powdered sugar before serving. It’s fuss-free, mess-friendly, and totally adaptable. The best part? It’s ready in about an hour, with barely any complicated steps — just mix, layer, swirl, and bake. Trust me, once you try this, it’ll become your go-to treat that’s both indulgent and sneaky healthy.
Ingredients
For the Main Batter:
– 2 cups all-purpose flour (can swap for gluten-free flour if needed)
– 1 ½ teaspoons baking powder
– ½ teaspoon baking soda
– ¼ teaspoon salt
– 1 teaspoon ground cinnamon (optional, but adds warmth)
– 1 cup sugar (or honey/maple syrup for natural sweetness)
– ½ cup melted unsalted butter or neutral oil (I prefer butter for richness)
– 3 large eggs (fresh and at room temp)
– 1 teaspoon vanilla extract
– 1 cup grated zucchini (squeeze out excess moisture — trust me, this makes all the difference!)
For the Filling:
– ½ cup chopped dark chocolate or chocolate chips (for richness)
– 1-2 tablespoons butter or coconut oil (to melt into the chocolate)
– Optional: 1 tablespoon of espresso powder for a mocha twist
For the Glaze:
– ½ cup powdered sugar
– 1-2 teaspoons milk or cream (adjust to get a smooth consistency)
– A splash of vanilla or a dash of cocoa powder for extra flavor
Step-by-Step Instructions
Step 1: Preheat & Prep Pan
Set your oven to 350°F (175°C). Grease a standard 9-inch round cake pan or line it with parchment paper — I always do this to save myself from disaster later. Give the pan a light spray of non-stick spray and dust it with flour for good measure. While the oven heats up, grate the zucchini — I use the fine side of my box grater, and then I squeeze out as much moisture as I can with a clean kitchen towel. This step is a game-changer for a moist cake that’s not soggy or dense.
Step 2: Mix Dry Ingredients
In a large bowl, whisk together the flour, baking powder, baking soda, salt, and cinnamon if using. This ensures an even distribution of leavening agents and spices. I find that sifting the dry ingredients can help create a lighter batter, but honestly, a good whisk works just fine for me — I want fluffy, not clumpy.
Step 3: Mix Wet Ingredients
In a separate bowl, beat the eggs, sugar, and vanilla until combined and slightly frothy. Then, add in your melted butter or oil — I always do this when it’s still a little warm to help the eggs incorporate smoothly. Gently fold in the grated zucchini, making sure it’s evenly distributed. The smell at this point? Heaven. Green and chocolatey all at once.
Step 4: Combine
Pour the wet mixture into the bowl with dry ingredients. Gently fold them together — don’t overmix, or you’ll end up with a dense cake. Just stir until most of the flour disappears — it’s okay if there are a few lumps; that’s what keeps it tender. This step is where I usually sneak a taste and secretly hope my kids don’t discover I added extra zucchini!
Step 5: Prepare Filling
In a small bowl, melt the chocolate and butter together — I do this carefully in short bursts in the microwave, stirring in between, so it doesn’t seize up. Once smooth, set aside. If you’re feeling adventurous, toss in a teaspoon of espresso powder for a mocha flavor boost. The chocolate should be shiny, silky, and ready to swirl.
Step 6: Layer & Swirl
Step 7: Bake
Pour your batter into the prepared pan. Smooth the top lightly, then pop it into your preheated oven. Bake for about 40-45 minutes. Check for doneness with a toothpick — it should come out clean, with a few moist crumbs okay. Every oven is different, so start checking around 38 minutes. The smell alone will have everyone’s mouths watering!
Step 8: Cool & Glaze
Let the cake cool in the pan for about 10 minutes, then transfer to a wire rack to cool completely. This helps the structure set and keeps it from collapsing. When it’s cool, whisk the powdered sugar with milk and vanilla until smooth — then drizzle over the cake or spread evenly. If you want a shinier glaze, add a tiny splash of lemon juice or extra vanilla.
Step 9: Slice & Serve
Use a sharp serrated knife to cut clean slices. I like to let the cake sit at room temperature for about 15 minutes before slicing — it makes a big difference in texture. Serve with whipped cream, a dusting of cocoa powder, or just on its own with a hot cup of coffee. Trust me, this cake is best enjoyed slightly warm or at room temp, and leftovers refrigerate well for up to 3 days.
What to Serve It With
This cake is super versatile. For breakfast, I love pairing it with a strong coffee or a glass of cold milk — a little tangy from the zucchini and a lot of chocolate, it’s a comfort. On weekends, I sometimes serve slices with a dollop of mascarpone or a drizzle of caramel sauce. It’s also a showstopper after dinner — warmed slightly and served with vanilla ice cream or a dusting of powdered sugar makes it feel fancy but still family-friendly. When my kids have friends over, I cut it into smaller squares — it’s perfect for sharing. Personally, I find this cake is my little secret weapon for quick celebrations or casual afternoons, and I’m pretty sure it’ll become a stash favorite for you too!
Top Tips for Perfecting Your Zucchini Chocolate Swirl Cake
Over the years, I’ve picked up a few tricks for making this cake even better. First, always squeeze out as much moisture as you can from the zucchini — wet zucchini can make the batter too loose or soggy. I’ve tried shredding zucchini the night before and storing it in a colander with a little salt — it helps draw out excess water. When mixing, be gentle — overmixing can lead to a dense cake, so fold carefully. The swirls are my favorite part — to get a pretty pattern, I drop spoonfuls of the chocolate batter and swirl with a plastic pick or skewer, but I’ve learned that swirling in one direction creates a more artistic look. Substituting ingredients? You bet. I’ve made this with coconut sugar for a slightly caramel hint, and it still loved the texture. Using dark chocolate instead of semi-sweet adds depth, and trust me — even if you swap out the flour for almond or gluten-free blends, it remains tender and delicious. Baking? Always rotate your pan if your oven has hot spots, and start checking for doneness a few minutes early. The toothpick test is your friend — no one wants a gummy cake! And the glaze? Sometimes I add a splash of coffee or orange zest for an unexpected flavor kick. The key is to taste as you go and keep your eye on that perfect balance of moist, chocolatey, and not-too-sweet.
Storing and Reheating Tips
This cake keeps surprisingly well. For short-term storage, keep it in an airtight container at room temperature for up to two days — but if it’s hot or humid, I recommend refrigerating it to keep it fresh. Just make sure it’s wrapped tightly or in a cake container so it doesn’t dry out. For longer storage, pop slices in a zip-top bag or cover tightly and refrigerate for up to 4 days, or freeze it for up to 3 months. To reheat, microwave a slice for about 15 seconds — just enough to warm the center without drying it out. If you’ve glazed the cake, I recommend adding the glaze after reheating, as it tends to get a little dull if stored too long. For best flavor and texture, bring it to room temp before serving — the richness and chocolate smell will be at their peak. If you’re making the glaze ahead of time, keep it in the fridge and give it a quick stir before drizzling. Trust me, with proper storage, every slice remains just as moist and sweet as day one — and the chocolate swirl stays beautifully defined.
Frequently Asked Questions
Final Thoughts
This zucchini chocolate swirl cake is more than just a dessert — it’s a little miracle in your kitchen. It combines the wholesome goodness of zucchini with the decadence of chocolate in a way that feels both indulgent and healthy (ish!). Over the years, I’ve made this for spontaneous gatherings, lazy Sunday afternoons, and even as a quick gift for friends — and it’s always met with cheers. The best part? It’s almost foolproof. I’ve learned from my mistakes — like underbaking or overmixing — but mostly, I’ve just come to appreciate how forgiving and cozy this recipe is. Whether you’re a seasoned baker or just starting out, I promise you’ll love the process and the reward. Plus, it’s a sneaky way to get your family or kids to eat more veggies — they never see it coming! So go ahead, give it a try. I’d love to hear how yours turns out. Happy baking!
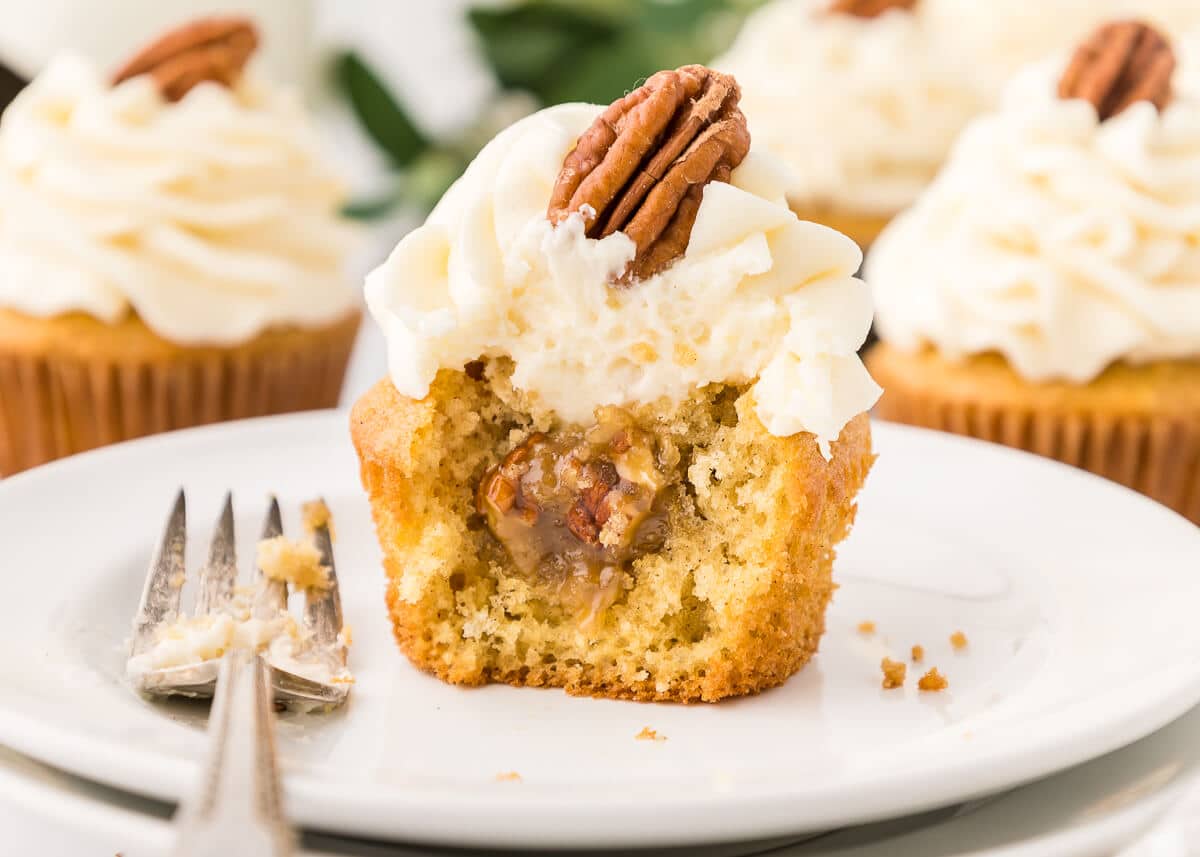
pecan pie
Ingredients
Method
- Preheat the oven to 350℉. Place pie crust in a pie dish and set aside.
- In a mixing bowl, whisk together eggs, milk, vanilla, brown sugar, honey, and melted butter until well combined.
- Stir in chopped pecans to the mixture.
- Pour the filling into the prepared pie crust.
- Bake for 45 minutes until golden brown and set.
- Remove from oven and cool before serving.