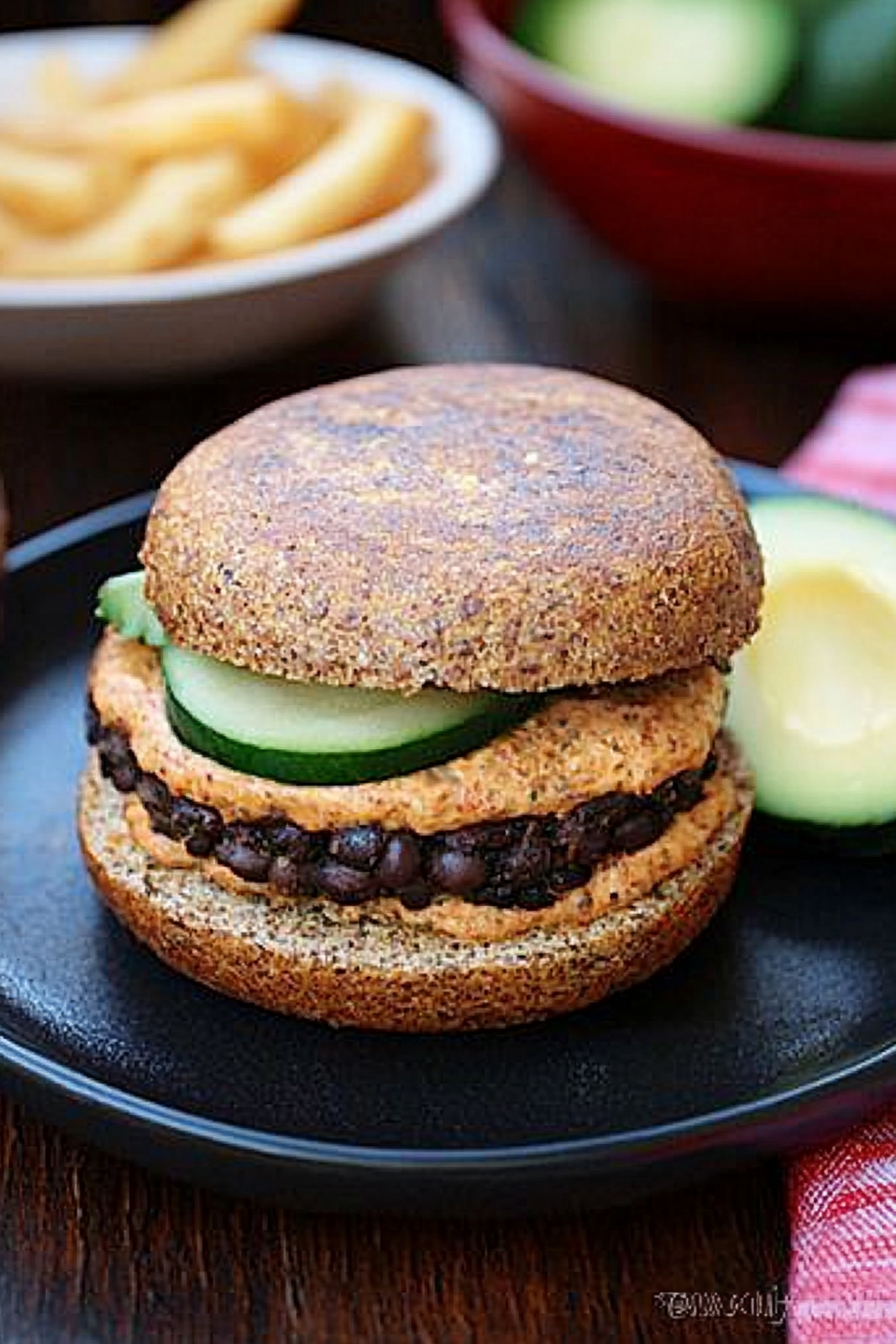
Zesty Black Bean Burgers A Simple Delight
There’s nothing quite like pulling a fresh batch of zucchini swirl cake out of the oven on a lazy weekend afternoon. The smell alone is enough to make everyone in the house follow their noses straight to the kitchen, and before you know it, there’s a slice on each plate, juice dripping down your fingers. I always do this when I want something comforting but not overly fussy — it’s basically love baked into a cake. I still remember the first time I made this—my kids asked if I’d snuck extra sugar in, but nope, it’s all about the luscious swirl of spiced zucchini and that sweet, tender crumb. Honestly, this one’s a lifesaver on busy nights when I need a little something special but don’t have hours to spend. And trust me, it disappears in minutes at my house! Whether you’re baking for family, friends, or just yourself with a good cup of coffee, this zucchini swirl cake is a keeper. I can’t wait for you to try it—I know it’ll become one of your go-to recipes too.
What is Zucchini Swirl Cake?
Think of zucchini swirl cake as a cross between a classic quick bread and a lovely layered cake, with a hint of nostalgia. The name says it all: it’s a moist, tender cake featuring a generous swirl of grated zucchini—kind of like the secret ingredient that keeps everything super juicy and flavorful. This cake’s concept is pretty simple: you grate fresh zucchini into your batter, mix up a few basic ingredients, and then swirl a cinnamon-spiced, sugary layer through the middle before baking. The result? A soft, slightly dense crumb, bursting with flavor, and layered with those gorgeous marbled streaks of zucchini goodness. It’s essentially like capturing the essence of summer’s bounty and turning it into something you look forward to every time you bake. I love that it’s not intimidating; anyone can make this, and it’s a clever way to use up extra zucchini from your garden or farmer’s market. Plus, it’s a countertop hero when you’re craving a treat that feels special but only involves pantry staples.
Why you’ll love this recipe?
What I love most about this zucchini swirl cake is how it checks all the boxes—delicious flavor, ease, and versatility. First, the flavor profile is just dreamy. There’s the natural sweetness of zucchini complemented by warm spices like cinnamon and a hint of vanilla. It’s like a cozy hug wrapped in cake form. The swirl adds an elegant visual touch, making it perfect for a weekend brunch or a casual dinner dessert. But the best part? It’s so simple to make. I’ve tested this with no fancy ingredients—just pantry staples—and it still comes out incredible every time. The batter comes together in minutes, and the swirl is a fun little artistic touch that makes you feel like a baking superstar without much effort. Budget-wise, it’s perfect because you probably already have everything you need lurking in the back of your fridge or pantry. And because of its moist texture, it’s fantastic for breakfast, snack time, or dessert—it’s a real all-in-one. My family actually asks for this all the time, especially when I’m looking for a quick but homemade treat. What sets it apart from other zucchini recipes? The layered swirl—it’s like a mini work of art in every slice. Plus, it keeps well and stays moist for days, which is a huge win in my book.
How do I make Zucchini Swirl Cake?
Quick Overview
This cake comes together quickly because the batter is straightforward, and the swirl process is so fun—you just layer and create a marbled pattern. The trick is grating the zucchini finely and squeezing out some moisture so it doesn’t make the batter too wet. I love to mix the ingredients by hand because overmixing can make the crumb dense, but don’t worry, it’s foolproof. Once the batter is ready, you pour half into your prepared pan, spread the cinnamon-sugar filling over the top, then layer the remaining batter and gently swirl with a butter knife. Bake until golden and a toothpick inserted comes out clean. That’s it! It smells amazing while baking, and the entire process takes about an hour, including prep and rest time. It’s perfect for cozy mornings, weekend baking, or whenever you want to turn simple ingredients into a show-stopping treat.
Ingredients
For the Main Batter:
– 2 cups all-purpose flour (I like using unbleached for extra flavor)
– 1 cup granulated sugar (or a little less if you’re counting carbs)
– 1 teaspoon baking powder
– 1/2 teaspoon baking soda
– 1/2 teaspoon salt
– 1 teaspoon ground cinnamon
– 1/2 teaspoon vanilla extract
– 1/2 cup vegetable oil or melted butter (trust me, butter makes everything richer!)
– 3 large eggs
– 1 cup grated zucchini (peeled or unpeeled, depending on your preference, but I always leave the peel on for a bit of color and nutrients)
For the Filling:
– 1/4 cup brown sugar (or coconut sugar for a healthier twist)
– 1 teaspoon ground cinnamon
– 2 tablespoons melted butter or coconut oil (for that sticky, sweet layer)
For the Glaze:
– 1/2 cup powdered sugar
– 1-2 teaspoons milk or cream (add a splash at a time for perfect drizzle consistency)
– A dash of vanilla or lemon zest for extra flavor (optional, but highly recommended)
Step-by-Step Instructions
Step 1: Preheat & Prep Pan
Set your oven to 350°F (180°C). Grease a 9-inch round or square cake pan, or line it with parchment paper—trust me, this makes removing it a breeze later. I always do this first so I’m not scrambling last-minute once the batter is ready. If you notice your zucchini is extra watery, I suggest giving it a quick squeeze with a clean dish towel to remove moisture; otherwise, your batter might be a little too loose, and that’s not ideal.
Step 2: Mix Dry Ingredients
In a large bowl, whisk together the flour, sugar, baking powder, baking soda, salt, and cinnamon. Mixing these thoroughly is key to a nice, even crumb. I always do this first so I don’t forget once I start adding wet ingredients. The smell of cinnamon right now? Heaven. This step keeps your batter light and fluffy, not dense or gummy.
Step 3: Mix Wet Ingredients
In a separate bowl, beat the eggs, then stir in the oil, vanilla, and grated zucchini. A quick whisk is all it takes. The mixture should look slightly frothy and bright green—pretty fun, huh? I tested this with almond milk once, and it actually made the final cake even creamier, so feel free to experiment!
Step 4: Combine
Pour the wet into the dry and gently fold with a spatula until just combined. Don’t overmix — that’s how you end up with a dense cake. A few lumps are fine. I’ve learned that patience here results in a lighter texture, so take your time.
Step 5: Prepare Filling
Mix together the brown sugar, cinnamon, and melted butter to create your delicious cinnamon swirl. Set aside. Sometimes I add a pinch of nutmeg or a sprinkle of crushed walnuts for extra texture, but honestly, just the cinnamon sugar is perfect by itself.
Step 6: Layer & Swirl
Spread half of the batter evenly into your prepared pan. Dollop the cinnamon filling over, then add the remaining batter on top. Use a butter knife or skewer to gently swirl through the batter—don’t overdo it or you’ll lose the marbled effect, but a few gentle zigzags look so pretty once baked. If you want a more dramatic swirl, add a bit more cinnamon in the filling!
Step 7: Bake
Pop into the oven and bake for 45-50 minutes. Check for doneness by inserting a toothpick: it should come out with a few moist crumbs but not wet batter. Ovens vary, so start checking at 45 minutes. If the top is browning too quickly, tent it with foil and keep baking.
Step 8: Cool & Glaze
Let the cake cool in the pan for about 15 minutes, then transfer to a wire rack. A full cooling helps set the layers and makes slicing neater. While it cools, whisk together your glaze ingredients. Drizzle over the cake once it’s just barely warm or fully cooled—either way, it adds that lovely sweet shine.
Step 9: Slice & Serve
Use a serrated knife for clean slices, especially through those swirled patterns. Serve with a splash of tea or coffee, or even a dollop of whipped cream if you’re feeling fancy. My family loves a big warm slice with a teaspoon of butter melting on top. Trust me, every bite is moist, flavorful, and just a little bit nostalgic.
What to Serve It With
This zucchini swirl cake is like a multi-tasker — it works beautifully across different occasions. For a casual breakfast, serve it with a steaming mug of coffee or tea, maybe topped with a smear of cream cheese or butter for that extra richness. My kids ask for this all the time, especially when I make it on a lazy Sunday morning. It’s great at brunch too—think a table full of fresh fruit, yogurt, and a big pot of your favorite brew. When it’s dessert time, pair it with vanilla ice cream or a dollop of whipped cream, and perhaps a drizzle of caramel or extra cinnamon sprinkle to make it feel even more special. And if you’re craving a cozy snack, I find it’s perfect served warm, maybe with a glass of cold milk or a cup of spiced chai. This cake really is versatile, and I love how it fills the kitchen with warmth and sweet aroma. Honestly, it’s perfect for any occasion where you want to share something homemade and heartfelt.
Top Tips for Perfecting Your Zucchini Swirl Cake
The secret to this cake’s success is in the details. Over the years, I’ve picked up a few tips to make sure yours turns out just as good—or better—than mine. First, grate the zucchini finely; I use a box grater on the smallest holes. Make sure to squeeze out excess moisture because wet zucchini can water down the batter, making the cake dense or watery. After squeezing, I always toss the grated zucchini with a teaspoon of lemon juice or some extra cinnamon to prevent browning and add flavor. When mixing the batter, don’t overmix—fold gently, and stop as soon as ingredients are just combined; this keeps the crumb tender. For the swirl, I like to use a skewer or a fork to make zigzag patterns — this creates a beautiful marbled look and ensures the swirl isn’t just a flat layer. You can really customize it by adding chopped nuts, dried fruit, or even a splash of orange zest in the batter. If you want to make it gluten-free, swap in almond or rice flour, but keep an eye on moisture levels and baking time, as they might change slightly. I learned that rotating the cake halfway through baking prevents uneven browning, especially in older ovens. With a few simple tweaks, your cake will be a show-stopper every time.
Storing & Reheating Tips
This cake stays wonderfully moist for days, so don’t feel like you have to gobble it all up immediately. For best freshness, store leftovers in an airtight container at room temperature for up to 2 days—just cover loosely with foil or plastic wrap. If you want to keep it longer, pop it in the refrigerator for up to 5 days. I recommend letting it come to room temperature before slicing so it’s not too firm. For freezing, wrap slices individually in plastic wrap and store in a zip-top bag for up to 3 months. Thaw at room temperature or warm slices in the microwave for a quick treat—trust me, the smell alone will make you smile. If you added glaze, it’s best to add that just before serving to keep that shiny, sweet look. For the best experience, reheat slices gently and avoid overheating, which can dry out the cake. I’ve learned that a little patience here results in slices that taste as fresh as the day they were baked. No matter how you store it, this zucchini swirl cake always feels like a warm, comforting hug, just waiting to be enjoyed.
Frequently Asked Questions
Final Thoughts
I can’t tell you how many times I’ve made this zucchini swirl cake and watched my family’s eyes light up at the first bite. It’s one of those recipes that feels like a little bit of magic—simple ingredients transformed into something charming and delicious. The texture is tender, the flavor is rich yet fresh, and the swirl makes each slice unique. Every time I bake it, I think about how versatile and forgiving it is—great for brunch, an afternoon snack, or last-minute guests. I hope you give it a try and add your own twist—maybe some nuts, a squeeze of lemon, or a dash of nutmeg. Honestly, once you master the swirl, you’ll want to make it all the time. Happy baking! And I’d love to hear how yours turns out—leave a comment below or share your photos. Nothing makes me happier than a kitchen full of happy eaters with a slice in hand.
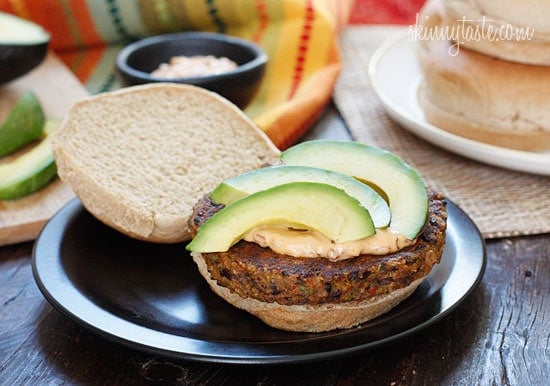
Black Bean Burgers
Ingredients
Method
- Combine mayonnaise and chipotle, set aside.
- Drain and rinse the black beans; mash them in a medium bowl until thick and pasty.
- Finely chop cilantro, scallions, and garlic, then add to the mashed beans along with oats and spices.
- Mix everything thoroughly, then divide into four patties and shape with oiled hands.
- Wrap each patty in wax paper and freeze for at least 2 hours.
- Heat a skillet over medium heat, lightly spray with cooking spray, and cook frozen patties about 7 minutes per side.
- As an alternative, grill or bake in preheated oven at 375°F for about 20 minutes until browned.
- Serve on buns with sliced avocado and a dollop of chipotle mayo.