Tropical Chicken Salad How to Make It
There’s something about baking that instantly makes me feel like I’m back in my grandma’s kitchen, especially when I make this moist zucchini chocolate swirl cake. The smell alone—warm cocoa, fresh zucchini, a hint of vanilla—fills the house and pulls everyone closer. I make this whenever I want a treat that’s indulgent but not overly decadent, and it’s become a family favorite I’m almost afraid to share because it disappears so fast. Honestly, my kids ask for this all the time, and my husband always comments that it’s the perfect balance of sweetness and moistness. It’s one of those recipes that’s surprisingly simple but feels like a little bit of magic—like you’re turning humble ingredients into something special. And the best part? It’s so versatile, I can bake it in muffin tins for a quick snack or serve it as a stunning dessert after dinner. Trust me, once you try this, it’s going to be one of those recipes you keep on repeat. Ready to get baking?
What is Zucchini Chocolate Swirl Cake?
This moist zucchini chocolate swirl cake is essentially a tender, summer-like loaf that hides a secret: shredded zucchini baked right into the batter. Think of it as a love child between a rich chocolate cake and a wholesome veggie muffin. It’s called “swirl” because of the beautiful marbling of cocoa and plain batter, making each slice a little visual delight. The zucchini adds moisture without numbness—no strange texture here—just a really soft crumb that stays fresh for days. I like to think of it as a sneaky way to get extra veggies into my kids’ day while indulging in a slice of something sweet. The name might sound fancy, but it’s super homey—think of it as your new standby when you need something comforting but a little special. Plus, it’s perfect for snack time, breakfast, or a cozy dessert. Think of it as a cross between a coffee cake and a quick bread, but with a rich chocolate surprise. My favorite part? The swirl pattern—so easy to do but looks totally impressive!
Why you’ll love this recipe?
First off, the flavor. Oh my gosh—this cake is a chocolate lover’s dream with just a hint of fruity, fresh zucchini peeking through. The cocoa gives it that deep, satisfying richness, while the zucchini keeps it unbelievably moist and tender. It’s honestly one of those recipes I tested with a handful of tweaks—like substituting a bit of apple sauce for oil—and it turned out even more amazing, thanks to how the zucchini keeps everything so luscious. And what I love most about this is how simple it is—mostly mixing, swirling, and baking, no fancy techniques needed. This is perfect when you’re short on time but still want homemade, cozy comforts. And budget-wise? So cheap since the main ingredients are pantry staples—flour, sugar, cocoa, and zucchini from your garden or grocery bag. Versatility-wise, it’s incredible—slice it thin for tea, serve it as a loaf, or even bake in muffin tins if you’re craving individual portions. Honestly, once I whipped up this batch, I was thinking about making it again immediately—I’ve made this countless times and it never fails to impress. Plus, it’s a treat that feels wholesome enough for breakfast but decadent enough for dessert. That’s a win in my book!
How do I make Zucchini Chocolate Swirl Cake?
Quick Overview
This cake comes together in just a few simple steps. First, you grate the zucchini and squeeze out some excess moisture—no one wants a watery batter! Meanwhile, you mix your dry ingredients, then your wet ones. The key here is not overmixing; you want a light, airy crumb. After pouring the plain batter into your pan, you dollop the cocoa mixture on top, then swirl it around with a skewer or knife to create those gorgeous marbled patterns. A quick bake, cool, then drizzle with a simple chocolate glaze or dust with powdered sugar. It’s honestly one of those recipes that feels fancy but is really just about two bowls, a spoon, and a little patience. My secret tip? I’ve tested with almond milk and it actually made it even creamier—try that if you’re dairy-free. And don’t skip the cool-down; this cake benefits from resting so the flavors meld and the texture firm up just right.
Ingredients
For the Main Batter:
– 2 cups all-purpose flour (or gluten-free blend, see tips below)
– 1 ½ cups granulated sugar
– ½ cup unsweetened cocoa powder (Dutch-process or natural)
– 1 teaspoon baking soda
– ½ teaspoon baking powder
– ½ teaspoon salt
– ½ cup vegetable oil or melted coconut oil
– 3 large eggs, room temp
– 1 teaspoon vanilla extract
– 1 cup grated zucchini (squeeze out excess moisture)
For the Filling (Chocolate Swirl):
– ⅓ cup unsweetened cocoa powder
– ¼ cup sugar (adjust based on your sweetness preference)
– ¼ cup hot water or warm milk
– 2 tablespoons oil or melted butter
For the Glaze (Optional but recommended):
– ½ cup chocolate chips or chopped chocolate
– 2 tablespoons heavy cream or coconut milk
– Splash of vanilla
Step-by-Step Instructions
Step 1: Preheat & Prep Pan
Set your oven to 350°F (180°C). Grease a loaf pan or line it with parchment paper—trust me, this helps with the clean slices later. I usually spray with nonstick spray and dust lightly with flour. While waiting, grate the zucchini—you want about a cup, avoiding the watery core. Toss the grated zucchini in a towel and squeeze out extra moisture; I’ve learned that this step keeps the cake from becoming soggy. If you’re in a rush, using pre-grated zucchini from the store works, just make sure it isn’t overly wet.
Step 2: Mix Dry Ingredients
In a large bowl, whisk together the flour, sugar, cocoa powder, baking soda, baking powder, and salt. The dry mix should be quite uniform—this sets the foundation for a fluffy cake. I always do this first so I can add the wet ingredients right afterwards without overmixing.
Step 3: Mix Wet Ingredients
In a separate bowl, whisk the eggs until frothy. Add the oil, vanilla, and milk or almond milk, mixing until smooth. When I test with almond milk, it makes the cake even more tender and moist. Then, fold in the grated zucchini — don’t stir too vigorously; gentle folding helps keep the batter airy. Mix until just combined, thick but with some lumps, just like making muffin batter.
Step 4: Combine
Pour the wet into the dry and stir with a spatula just until everything is combined—no overmixing! Overmixing can lead to dense cake, and we want light and fluffy. It’s okay if some lumps remain. Now, take about a third of the batter and set aside for the plain layer.
Step 5: Prepare Filling
In a small bowl, whisk together the cocoa powder, sugar, hot water, and oil to make the chocolate swirl mixture. It should be smooth, glossy, and pourable. If it’s too thick, add a splash more hot water or milk—this will help with swirling later. You can also add a pinch of cinnamon or espresso powder here if you want a flavor boost.
Step 6: Layer & Swirl
Pour the plain batter into your prepared pan. Dollop spoonfuls of the chocolate mixture on top in irregular spots. Then, using a skewer or butter knife, gently swirl through the batter to create a marbled effect. Don’t overdo it—your goal is a beautiful swirl, not mixing it completely. I usually do a few zig-zag motions, rotating the pan for even swirls. It’s really satisfying to see how pretty it looks at this stage.
Step 7: Bake
Pop it into your preheated oven and bake for 45-50 minutes. Check for doneness with a toothpick inserted in the center—it should come out with a few moist crumbs but no wet batter. Ovens vary, so keep an eye on the start of the 45-minute mark. If the top starts to crack or looks too dark, loosely tent it with foil for the remaining minutes.
Step 8: Cool & Glaze
Once baked, let the cake cool in the pan for about 15 minutes, then carefully transfer to a wire rack. I like to let mine cool completely before glazing—this prevents the glaze from melting and sliding off. Melt the chocolate chips with the cream, stirring until glossy and smooth. Drizzle over the cooled cake with a spoon or spatula. For an extra touch, sprinkle with a little sea salt or crushed nuts.
Step 9: Slice & Serve
Use a sharp serrated knife to cut neat slices—especially if you’ve added the glaze on top. The swirl pattern looks especially stunning in cross-section. I suggest waiting at least 20 minutes after glazing; this helps the glaze set just enough so it doesn’t make a mess when you cut. Serve slices on a pretty plate, pair with a cup of coffee or milk, and enjoy that warm, chocolaty goodness. This cake is best enjoyed fresh but keeps well in an airtight container for up to three days—if it lasts that long!
What to Serve It With
This cake is so versatile, I love pairing it with different things depending on the occasion. For breakfast, a strong cup of coffee or a glass of almond milk makes the perfect match. I often serve smaller slices at brunch alongside fresh berries and whipped cream—looks gorgeous and feels fancy but is actually super easy. As a dessert, it’s lovely served with a scoop of vanilla ice cream or a dollop of Greek yogurt for added creaminess. My kids love this warm, especially with a drizzle of caramel sauce on the side. And for cozy snacks, I cut thick slices and toast them lightly for a crispy treat. It’s become a staple in my household because everyone loves how moist and flavorful it is—plus, the chocolate swirl makes it visually appealing without extra fuss. It’s one of those recipes that kinda brings the family together, and I always get compliments on how lovely it looks and tastes. I swear, nothing beats the feeling of pulling this out of the oven and seeing everyone gathered around, eager for a slice.
Top Tips for Perfecting Your Zucchini Chocolate Swirl Cake
Over the years, I’ve learned a few tricks that take this cake from good to wow. First, regarding zucchini prep—make sure to squeeze out as much excess moisture as possible. I use a clean kitchen towel or cheesecloth for this, and I’ve found that the drier the zucchini, the better the cake’s texture. If you forget, you might end up with a slightly denser loaf, and nobody wants that. When mixing the wet ingredients, don’t overbeat—just combine until smooth. Overmixing the batter can lead to a tougher crumb, and I prefer my cake soft and tender. For the swirl, I like to use a toothpick or skewer to make gentle, figure-eight motions; it creates those lovely marbled lines without mixing everything into a muddy mess. Want to customize? Swap dark chocolate for white or use a flavored cocoa powder like peppermint cocoa around the holidays. I’ve also tested with coconut sugar, which gives it a caramel note—delicious! When baking, keep an eye on it after 45 minutes—ovens are different, and you don’t want overbaking that dries out the cake. The toothpick test is your best friend here. As for the glaze, I sometimes add a splash of peppermint or orange extract to make it festive. Personal lesson? I once poured too much cocoa into the batter, making it very dark and slightly bitter—less is more with that rich cocoa flavor. Sometimes, I just spoon more of the chocolate mixture on top and swirl again on the cooled cake for an extra chocolate punch. Trust me, experimenting a little helps you find your perfect version!
Storing and Reheating Tips
This cake keeps surprisingly well. If you’re not serving it right away, store it in an airtight container at room temperature for up to two days—just cover loosely with foil or a cloth to prevent it from drying out. I find that wrapping it tightly with plastic wrap or in a good cake dome extends freshness for about three days, especially if kept in the fridge—though I prefer it at room temp for the best moistness. Reheating in the microwave for about 10-15 seconds warms it up nicely, making it taste almost freshly baked. If freezing, wrap slices individually in plastic wrap then foil, and store for up to three months. Thaw at room temp or warm gently in the microwave. If you’re adding glaze, it’s better to do so after reheating, as it will melt and look pretty again. For leftover cake, I find that a quick warm-up with a drizzle of more glaze or melted chocolate makes it feel just as special. Honestly, this cake is forgiving and stays moist—so enjoy it over a few days, and don’t worry if it sits a bit. It only gets better with time, really! Just keep everything well covered, and it’ll stay delicious.
Frequently Asked Questions
Final Thoughts
Honestly, this moist zucchini chocolate swirl cake has become a bit of a family treasure in my home. It’s proof that baking doesn’t have to be complicated or fancy to be impressive—sometimes, the simplest ingredients put together with a little love and patience create something truly special. I love that it hides a vegetable and still manages to taste like a rich, indulgent chocolate treat. Every time I make it, I feel like a little bit of my childhood—baking with my mom or grandma—carries through every moist bite. Plus, it’s so forgiving; even if you forget to squeeze out every drop of zucchini or overbake just a tad, it still turns out delicious. For me, the secret is in the swirl—each slice is like a little piece of art that tastes just as gorgeous as it looks. I hope you give this recipe a try because I honestly think it’ll become one of your go-to bakes, too. Happy baking, and I can’t wait to hear how yours turns out!

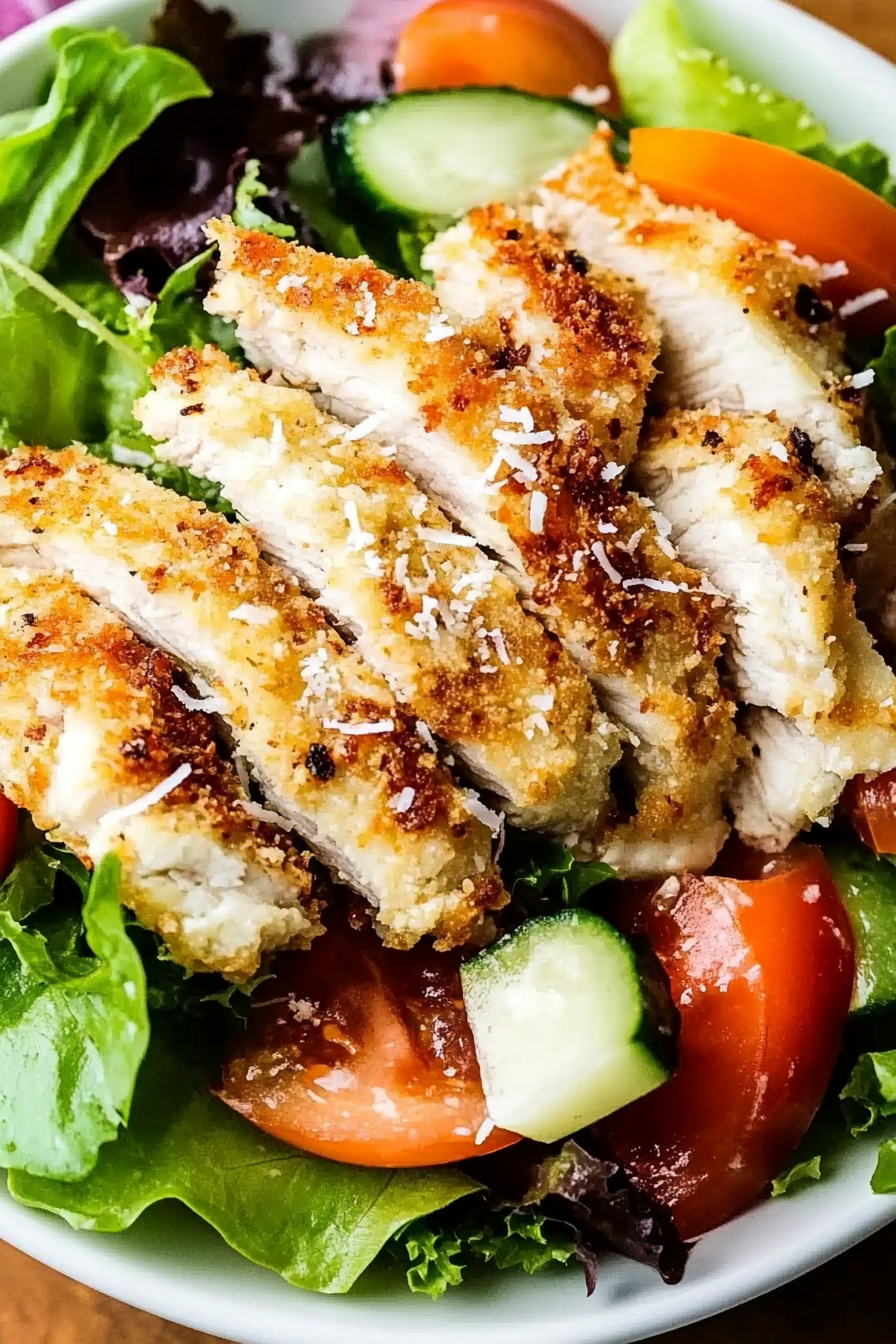
Coconut Chicken Salad
Ingredients
Method
- Whisk all vinaigrette ingredients; set aside.
- Preheat oven to 375°F.
- Combine coconut flakes, panko, cornflake crumbs and salt in a bowl.
- Put egg whites in another bowl.
- Season chicken with salt, dip in the egg whites, then in the coconut crumb mixture.
- Place chicken on a parchment-lined baking sheet. Spray with olive oil and bake for 25-30 minutes, turning halfway, until cooked through.
- Arrange 2 cups of baby greens on each plate. Distribute carrots, cucumber, and tomato evenly.
- Slice chicken diagonally and place on greens.
- Warm dressing briefly in microwave and divide over salads.