Tangy Citrus Cheesecake Recipe
Oh, friend, do I have a treat for you today! You know how sometimes you stumble upon a recipe that just *clicks*? A recipe that feels like a warm hug, tastes like sunshine, and becomes an instant family classic? Well, this Zucchini Swirl Bread is exactly that for me. It takes me right back to my grandma’s kitchen during those long summer days when the zucchini plants were overflowing, and she’d always find a new, delicious way to use up the bounty. This isn’t just *any* zucchini bread; it’s like banana bread’s sophisticated, yet equally comforting cousin, with a secret weapon: a beautiful, sweet cinnamon swirl running right through the middle. The aroma alone when it’s baking is enough to make everyone in the house abandon whatever they’re doing and drift towards the kitchen. It’s incredibly moist, perfectly spiced, and just makes you want to curl up with a slice and a cup of coffee. I promise, once you try this Zucchini Swirl Bread, it’ll be on your regular rotation, too!
What is Zucchini Swirl Bread?
So, what exactly is this magical loaf I’m raving about? Simply put, Zucchini Swirl Bread is a quick bread that champions the humble zucchini, transforming it into something truly irresistible. Think of it as your classic, beloved zucchini bread – full of moisture and subtle flavor from the grated zucchini – but with an exciting, aromatic twist. We’re talking about a luscious ribbon of cinnamon-sugar goodness swirled right into the batter before baking. It’s essentially a spiced, sweet bread that cleverly hides a vegetable, making it a win-win for everyone, especially the picky eaters! The zucchini ensures the bread stays incredibly moist, while the warm spices like cinnamon and nutmeg just sing together. That swirl? It’s a delightful surprise in every slice, adding an extra layer of sweetness and spice that elevates it far beyond a simple loaf.
Why you’ll love this recipe?
There are so many reasons why this Zucchini Swirl Bread has become a permanent fixture in my recipe box, and I just know it’ll win your heart too. What I love most about this is how it manages to be both incredibly comforting and exciting at the same time.
- Flavor that Sings: What is the flavor that sings? The taste is just divine. You get that wonderfully moist, tender crumb from the zucchini, kissed with warm spices, and then BAM! You hit that incredible, caramelized cinnamon-sugar swirl. It’s sweet, but not overly so, and the spices create a cozy warmth that’s just perfect for any time of year. It truly stands out from other quick breads like my favorite Pumpkin Streusel Bread: What are some good recipes for pumpkin bread? or a classic Banana Nut Loaf because of that unique swirl.
- Surprising Simplicity: Don’t let the “swirl” intimidate you! Honestly, it comes together quicker than you’d think. It’s a quick bread, meaning no yeast, no kneading, and minimal fuss. You’re mostly just mixing wet and dry ingredients, layering, and swirling. It’s incredibly forgiving, making it perfect for both seasoned bakers and total newbies. I’ve made this countless times and it never fails.
- Budget-Friendly & Garden-Friendly: If you’ve got a garden, you know zucchini can take over! This Zucchini Swirl Bread is a fantastic way to use up those abundant summer squash without feeling like you’re eating zucchini for every meal. Most of the other ingredients are pantry staples, so it’s quite economical to make.
- Incredible Versatility: This isn’t just a breakfast bread! While it’s absolutely dreamy with your morning coffee, I’ve served it with coffee, as an afternoon pick-me-up, and even as a light dessert with a scoop of vanilla bean ice cream. My kids ask for this all the time for an after-school snack, and frankly, I can’t blame them. It’s one of those rare treats that genuinely works for any occasion.
This Zucchini Swirl Bread genuinely has it all – amazing flavor, surprising ease, and the ability to bring a little bit of joy to any moment. Trust me on this one; you’re going to adore it!
How to Make Zucchini Swirl Bread
Quick Overview
Alright, let’s get down to business! Making this Zucchini Swirl Bread is honestly so much simpler than you might imagine. You’ll start by grating and prepping your zucchini, which is the most “involved” part (and even that’s easy!). Then, it’s just a matter of whisking your dry ingredients, combining your wet ones, and gently folding them together. The magic really happens when you create that beautiful cinnamon swirl by layering batter and filling, then using a knife to create a stunning pattern. Pop it in the oven, let it bake to golden perfection, cool, and then glaze. You’ll be surprised how straightforward this is, and the payoff is absolutely worth every tiny step!
Ingredients
Here’s what you’ll need to gather to whip up this amazing Zucchini Swirl Bread. Most of these are likely already in your pantry!
For the Main Batter:
- All-Purpose Flour: About 2 cups. I always use unbleached for a slightly better texture.
- Granulated Sugar: 1 cup. Balances the spices and zucchini beautifully.
- Large Eggs: 2, at room temperature. They bind everything together.
- Vegetable Oil: 1/2 cup. Any neutral oil works! This is key for that incredible moistness.
- Grated Zucchini: 1 ½ cups, packed and *squeezed dry*. This is CRUCIAL, don’t skip it!
- Vanilla Extract: 1 teaspoon. Use the good stuff, it makes a difference!
- Baking Soda: 1 teaspoon. Helps our bread rise.
- Salt: 1/2 teaspoon. Enhances all the flavors.
- Ground Cinnamon: 1 teaspoon. For that signature warm spice.
- Ground Nutmeg: 1/4 teaspoon. A little touch goes a long way.
For the Cinnamon Swirl Filling:
- Brown Sugar: 1/4 cup, packed. For that deep, molasses-y sweetness.
- Ground Cinnamon: 1 tablespoon. Yes, a whole tablespoon! It’s the star of the swirl.
For the Simple Glaze (Optional, but highly recommended!):
- Powdered Sugar: 1 cup. For a smooth, sweet finish.
- Milk (or cream/water): 2-3 tablespoons. Start with less and add more to get your desired consistency.
- Vanilla Extract: 1/2 teaspoon. Because more vanilla is always a good idea!
Step-by-Step Instructions
Step 1: Preheat & Prep Pan
First things first, let’s get the oven ready. Preheat your oven to 350°F (175°C). Then, grab a 9×5-inch loaf pan. I like to grease it really well, then dust it lightly with flour. For extra peace of mind, especially with quick breads, I often line the bottom with a strip of parchment paper, leaving an overhang on the longer sides. This creates “handles” that make it super easy to lift the baked loaf right out of the pan. It’s a little trick I picked up years ago, and it’s a lifesaver!
Step 2: Mix Dry Ingredients
In a large mixing bowl, whisk together your flour, granulated sugar, baking soda, salt, cinnamon, and nutmeg. Make sure to whisk them really well for about 30 seconds. This step isn’t just about combining; it’s about aerating the flour and ensuring those leavening agents and spices are evenly distributed throughout. This helps prevent pockets of unmixed ingredients and gives you a beautifully consistent Zucchini Swirl Bread.

Step 3: Mix Wet Ingredients
In a separate, medium bowl, whisk your eggs until they’re light and frothy. Then, pour in the vegetable oil and vanilla extract. Whisk these together until they’re fully combined and the mixture looks uniform. The liquid gold of the vanilla just makes everything smell so good already!
Step 4: Combine
Now, it’s time to bring them together! Pour the wet ingredients into the dry ingredients. Add your grated, *squeezed-dry* zucchini (we’ll talk more about this crucial step in the tips section!). Using a spatula or wooden spoon, gently fold everything together until just combined. A few lumps are totally okay – actually, they’re a good sign! This is where you want to be careful not to overmix. Overmixing develops the gluten too much, and we want a tender Zucchini Swirl Bread, not a tough one. Stop as soon as you don’t see streaks of dry flour anymore.
Step 5: Prepare Filling
In a small bowl, quickly mix together your brown sugar and 1 tablespoon of ground cinnamon for the glorious swirl. Give it a good stir to ensure the cinnamon is evenly distributed. This is the simple secret to that incredible flavor ribbon!
Step 6: Layer & Swirl
Spoon about half of your Zucchini Swirl Bread batter into your prepared loaf pan, spreading it evenly. Then, sprinkle about half of your cinnamon-sugar filling over the batter. Now, dollop the remaining batter over the cinnamon layer, spreading it gently to cover the filling. Finally, sprinkle the remaining cinnamon-sugar mixture on top. Take a butter knife or a skewer and gently swirl it through the top layer, making a figure-eight pattern or just gentle arcs. Don’t go all the way to the bottom – just through the top layer of batter and filling. This creates those beautiful marbling patterns!

Step 7: Bake
Place your loaf pan into the preheated oven. Bake for 50-60 minutes, or until a wooden skewer or toothpick inserted into the center of the loaf comes out clean (a few moist crumbs are fine, but no wet batter!). Keep an eye on it after about 40 minutes. If the top starts to brown too quickly, you can loosely tent it with foil. Remember, every oven is a little different, so your baking time might vary slightly.
Step 8: Cool & Glaze
Once baked, let the Zucchini Swirl Bread cool in the pan for about 10-15 minutes on a wire rack. This helps it firm up before you move it. Then, use those parchment paper handles (if you used them!) or gently invert the pan to remove the loaf entirely. Transfer it to the wire rack to cool completely. This part is important: don’t glaze a warm loaf, or the glaze will just melt right off! Once it’s cool, whisk together your powdered sugar, milk, and vanilla extract until smooth. Add milk a tiny bit at a time until you reach your desired drizzling consistency. Drizzle generously over the cooled bread.
Step 9: Slice & Serve
Once the glaze is set (or even if it’s still a little wet, I won’t tell!), slice into thick, generous pieces. This Zucchini Swirl Bread is best served slightly warm or at room temperature. It’s absolutely heavenly, and I can’t wait for you to try it!

What to Serve It With
The beauty of this Zucchini Swirl Bread is just how versatile it is! It truly shines in so many different settings. Here are some of my favorite ways to enjoy it:
For Breakfast: Honestly, a slice of this Zucchini Swirl Bread with your morning coffee or a steaming cup of tea is pure bliss. It’s sweet enough to feel like a treat but hearty enough to get you started. I often serve it alongside a simple fruit salad for a light, balanced morning meal. My family always grabs a slice with their morning coffee, especially on weekends – it disappears in minutes at our house!
For Brunch: If you’re hosting brunch, this bread is an absolute showstopper. It looks beautiful on a platter and complements savory dishes wonderfully. Try serving it with scrambled eggs, crispy bacon, or even a yogurt parfait. A mimosa or a sparkling cider would be the perfect beverage pairing to an elegant brunch spread featuring this Zucchini Swirl Bread.
As Dessert: Yes, you heard that right! While it’s fantastic on its own, a slightly warmed slice of Zucchini Swirl Bread with a scoop of vanilla bean ice cream or a dollop of freshly whipped cream is an unforgettable simple dessert. The warmth of the bread and the spices with the cold creaminess of ice cream? Absolute perfection.
For Cozy Snacks: This one’s a lifesaver on busy nights or when you’re craving something sweet at 10 pm but don’t want to bake a whole cake. It’s the ultimate afternoon pick-me-up with a glass of milk or a mug of hot chocolate. It’s my go-to for a comforting, easy snack, and I always keep some on hand because it’s so satisfying.
This is a Sunday afternoon staple at our house, and I bet it will be at yours too!
Top Tips for Perfecting Your Zucchini Swirl Bread
I’ve made this Zucchini Swirl Bread countless times over the years, and I’ve picked up a few tricks and learned from a few mistakes along the way. Here are my best tips to ensure your loaf turns out absolutely perfect every single time:
Zucchini Prep is Key: This is the single most important tip I can give you for an incredibly moist (but not soggy!) Zucchini Swirl Bread. After you grate your zucchini, place it in a clean kitchen towel or several layers of paper towels and squeeze out as much moisture as humanly possible. You’ll be amazed how much liquid comes out! Skipping this step will result in a dense, wet bread that might not bake through properly. Don’t worry about peeling the zucchini; the skin softens completely during baking and adds a lovely fleck of green.
Mixing Advice: Don’t Overmix! I really can’t stress this enough for quick breads. Once you combine the wet and dry ingredients, mix only until no streaks of dry flour remain. A few small lumps are perfectly fine and actually preferable to overmixing. Overmixing develops the gluten in the flour, which can lead to a tough, rubbery Zucchini Swirl Bread instead of that wonderfully tender crumb we’re after. A gentle hand is best here!
Swirl Customization: Get creative with your swirl! While a butter knife or skewer works great for creating the marbled effect, you can experiment with how much you swirl. For a more defined ribbon, make fewer, deeper passes. For a subtle marble, do more shallow, quicker swirls. You can also adjust the amount of cinnamon-sugar filling – use a little less for a milder swirl, or a bit more if you’re a cinnamon fiend like me!
Ingredient Swaps for Your Pantry:
- Oil: While vegetable oil keeps the Zucchini Swirl Bread super moist, you can swap it for an equal amount of melted unsalted butter for an even richer flavor.
- Flour: You can experiment with replacing up to half of the all-purpose flour with whole wheat pastry flour for a slightly nuttier, healthier twist, though it might make the bread a tiny bit denser.
- Sugar: If you prefer a less sweet bread, you can reduce the granulated sugar in the batter by ¼ cup, especially if you plan on using the glaze.
- Add-ins: Feel free to fold in ½ cup of chopped walnuts or pecans for some added crunch, or even ½ cup of mini chocolate chips for an extra treat. My kids love it when I sometimes throw in a handful of walnuts.
Baking Tips: Keep an eye on your oven! Every oven is a little different, so your bread might bake slightly faster or slower. After about 40-45 minutes, check the loaf. If the top is browning too quickly, you can lightly tent it with aluminum foil to prevent burning. The toothpick test is your best friend here – it should come out clean when inserted into the center. Also, make sure your loaf is fully cooled before slicing, especially if you want nice, clean cuts, and absolutely before glazing!
Glaze Variations: The simple vanilla glaze is delicious, but don’t be afraid to experiment! I’ve tested this with almond milk in the glaze, and it actually made it even creamier and added a lovely subtle nuttiness. For an even richer glaze, swap some of the milk for cream cheese (softened) for a tangy cream cheese frosting. A squeeze of lemon juice in the glaze can also add a nice bright note that contrasts beautifully with the warm spices.
These little insights should help you bake the most amazing Zucchini Swirl Bread that will impress everyone!
Storing and Reheating Tips
Alright, so you’ve baked this incredible Zucchini Swirl Bread, and maybe, just maybe, you have some left over (a rarity in my house, I’ll admit!). Knowing how to store it properly will keep it tasting fresh and delicious for days. This one’s a lifesaver on busy nights when I need a quick breakfast or a comforting snack for the kids.
Room Temperature: This Zucchini Swirl Bread will stay wonderfully fresh at room temperature for about 2-3 days. Make sure to store it in an airtight container or wrapped tightly in plastic wrap. If it’s glazed, I usually let the glaze set completely before covering it to prevent it from sticking.
Refrigerator Storage: If you want to extend its freshness, you can pop it in the refrigerator for up to a week. Again, an airtight container or tight plastic wrap is your best friend here. Chilling can sometimes alter the texture slightly, making it a bit firmer, but it will still taste fantastic. Just bring it back to room temperature before serving for the best experience.
Freezer Instructions: This bread freezes beautifully, which makes it perfect for meal prep or if you want to always have a slice on hand!
- Whole Loaf: Wrap the cooled, unglazed loaf tightly in several layers of plastic wrap, then an additional layer of aluminum foil. This double-wrapping protects against freezer burn. It will last for up to 3 months.
- Individual Slices: For ultimate convenience, slice the cooled loaf first. Place parchment paper between each slice to prevent sticking, then wrap the stack tightly in plastic wrap and foil.
To thaw, simply unwrap the Zucchini Swirl Bread (or slices) and let it sit at room temperature for a few hours, or overnight in the refrigerator. You can gently warm individual slices in the microwave for 15-30 seconds for that “fresh from the oven” feel.
Glaze Timing Advice: If you plan on freezing the Zucchini Swirl Bread, it’s best to freeze it *without* the glaze. You can easily whip up a fresh batch of glaze once the bread has thawed and is ready to be served. This ensures the glaze has the perfect consistency and doesn’t get watery or sticky after thawing.
Following these tips means you can enjoy this delightful Zucchini Swirl Bread whenever a craving strikes!
Frequently Asked Questions
Final Thoughts
And there you have it, my friends! My absolute favorite Zucchini Swirl Bread recipe, straight from my heart to your kitchen. This loaf isn’t just about using up garden zucchini; it’s about creating moments, filling your home with incredible aromas, and sharing something truly special with the people you love. The moist, tender crumb, that comforting blend of spices, and of course, that irresistible cinnamon swirl – it’s a recipe that just keeps giving. I’ve made this countless times, and it never, ever disappoints. It truly disappears in minutes at my house!
I can’t wait for you to try this Zucchini Swirl Bread and make it your own. Please, let me know in the comments below how yours turns out, or if you make any fun variations! Happy baking, my friends!
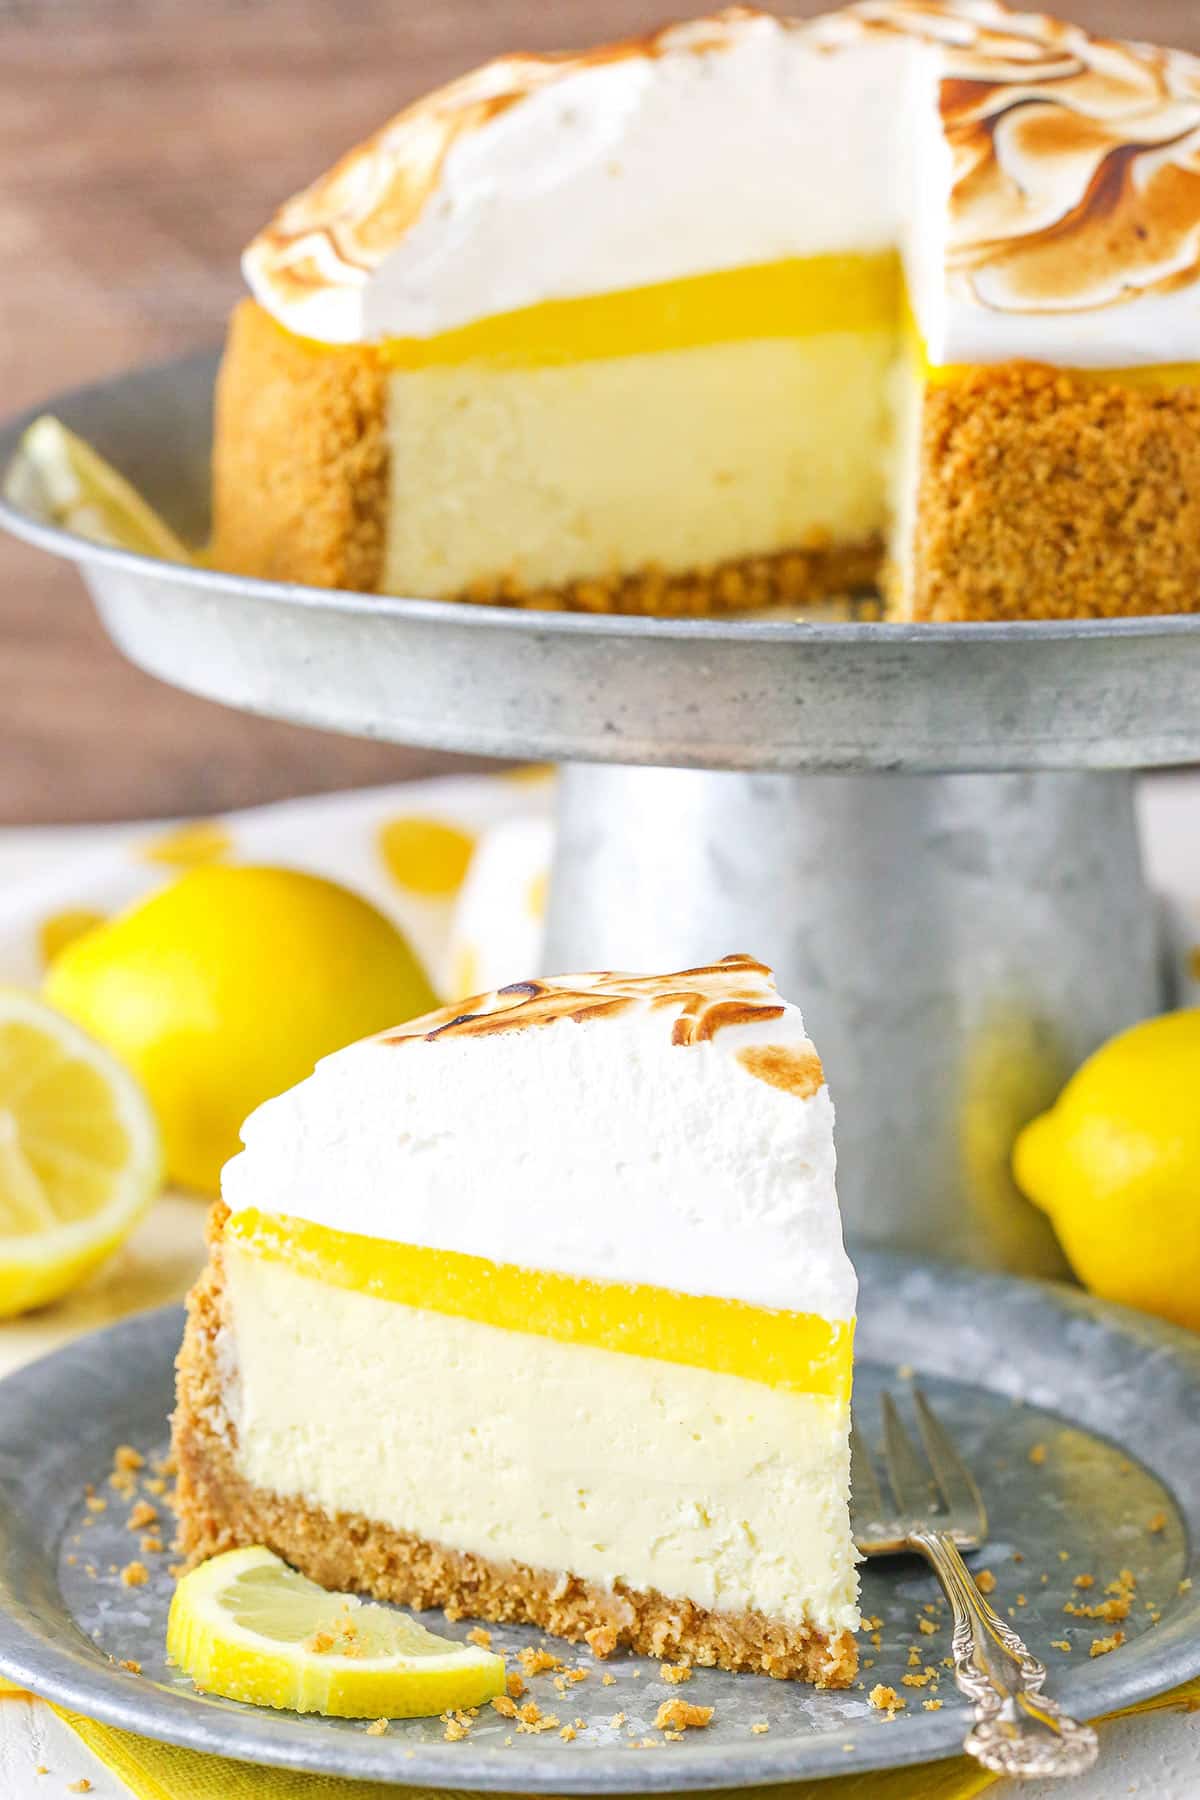
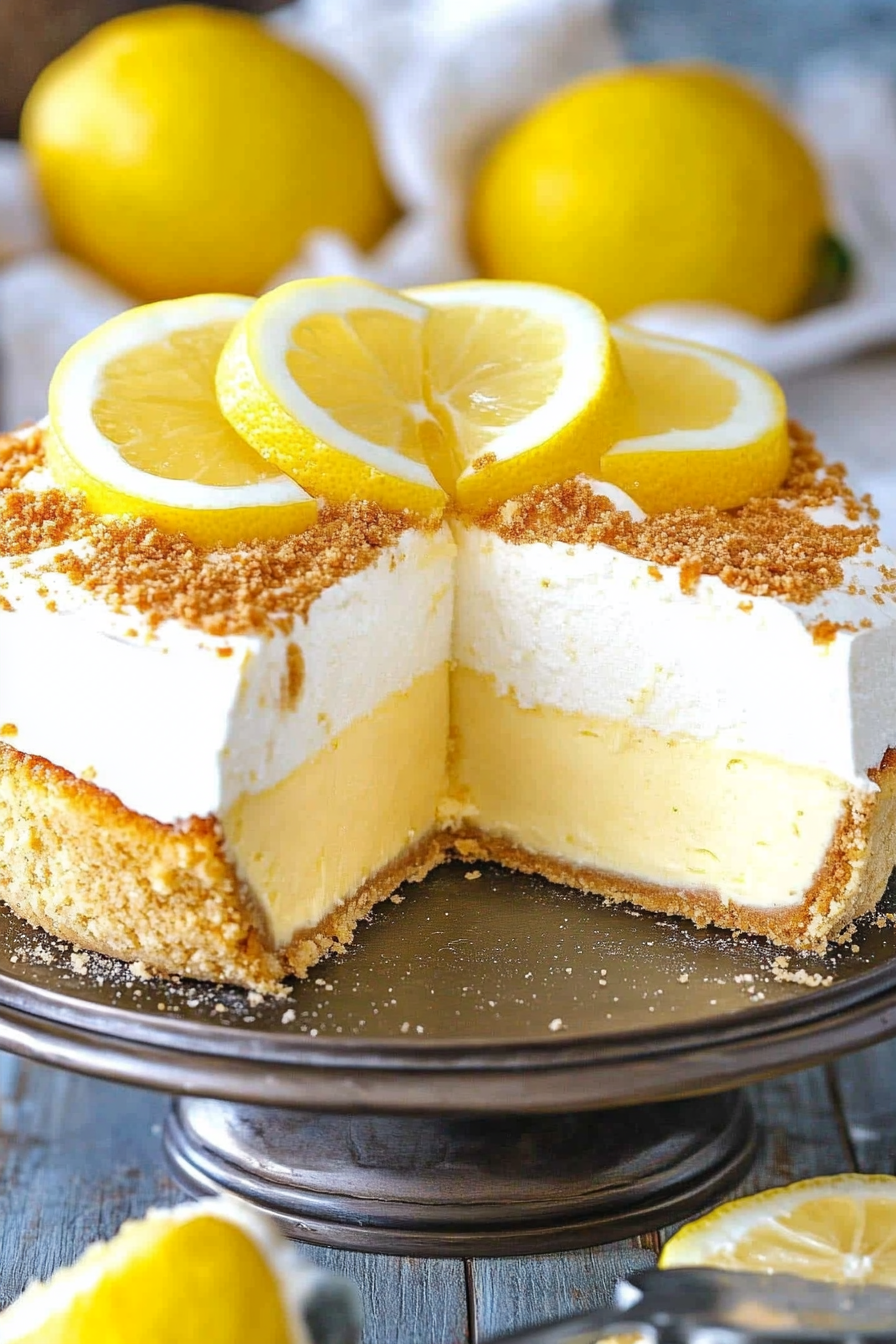
lemon cheesecake
Ingredients
Method
- Preheat oven to 325°F (163°C). Line a 9-inch (23cm) springform pan with parchment paper in the bottom and grease the sides.
- Combine the graham cracker crumbs, melted salted butter, and 3 tbsp sugar in a small bowl.
- Press the mixture evenly into the bottom and up the sides of the springform pan.
- Bake the crust for 10 minutes, then set aside to cool.
- Cover the outsides of the pan with aluminum foil so that water from a water bath cannot get in. Set prepared pan aside.
- Reduce oven temperature to 300°F (148°C).
- In a large bowl, beat the cream cheese, 1 cup sugar, and all purpose flour on low speed until well combined and smooth. Be sure to use low speed to reduce the amount of air added to the batter, which can cause cracks. Scrape down the sides of the bowl.
- Add the sour cream, vanilla extract, and 1 tbsp lemon zest and mix on low speed until well combined.
- Add the eggs one at a time, mixing slowly to combine after each addition. Scrape down the sides of the bowl as needed to make sure everything is well combined.
- Pour the cheesecake batter into the prepared crust.
- Place the springform pan inside another larger pan. Fill the outside pan with enough warm water to go about halfway up the sides of the springform pan. The water should not go above the top edge of the aluminum foil on the springform pan.
- Bake for 1 hour 15 minutes. The center should be set, but still jiggly.
- Turn off the oven and leave the door closed for 30 minutes. The cheesecake will continue to cook, but slowly begin to cool as well.
- Crack the door of the oven for 30 minutes to allow the cheesecake to continue to cool slowly. This process helps prevent cracking.
- Remove the cheesecake from the oven and let it sit at room temperature while you make the lemon curd.
- To make the lemon curd, combine 8 tbsp lemon juice, 4 tsp grated lemon zest, 0.5 cup sugar, egg yolks, and 0.25 cup salted butter in a double boiler (or in a metal bowl over a pot of simmering water).
- Heat while whisking constantly until the mixture thickens and reaches 170-180 degrees F. You’ll notice it has already started to thicken nicely and it’ll continue to thicken quickly.
- Add the lemon curd to the top of the cheesecake quickly, before it cools and thickens.
- Place the cheesecake back in the fridge until completely cool and firm, 5-6 hours.
- To make the meringue, combine 1 cup sugar, cream of tartar, vanilla extract, and egg whites in a large mixer bowl. Place the bowl over a saucepan or pot of simmering water. You can also use a double boiler.
- Whisk constantly until sugar is dissolved and egg whites are warm, at 160 degrees F on a thermometer, about 4-6 minutes. Remove from heat.
- Using the whisk attachment, beat the egg white mixture on low speed, gradually increasing to high, until stiff, glossy peaks form, 5 to 7 minutes.
- Add the meringue to the top of cheesecake in a slight dome shape.
- Use a kitchen torch to toast the outside of the meringue.
- Refrigerate the cheesecake until ready to serve. Cheesecake is best if eaten within 3-4 days.