Sweet Georgia Peaches Cobbler Recipe
You know those recipes that just feel like home? The ones that smell incredible as they bake, fill your kitchen with warmth, and disappear in minutes the second you put them down? This zucchini bread is *that* recipe for me. It’s not just a quick bread; it’s a memory maker. I remember my Grandma’s version, always perfectly moist and studded with walnuts, and I’ve been tinkering with it for years to get it just right. It’s the kind of thing I whip up when I have a surplus of zucchini from the garden, or when a serious craving hits and I need something comforting that doesn’t involve an hour in the kitchen. Honestly, compared to a full-on cake, this is a lifesaver on busy weeknights when the sweet tooth monster decides to pay a visit. It’s incredibly forgiving, delightfully moist, and the subtle sweetness is just *chef’s kiss*. If you’ve ever loved a classic chocolate chip cookie or a dense banana bread, I promise you, this zucchini bread is going to be your new best friend. It’s the humble, yet magnificent, star of my baking repertoire.
What is Zucchini bread?
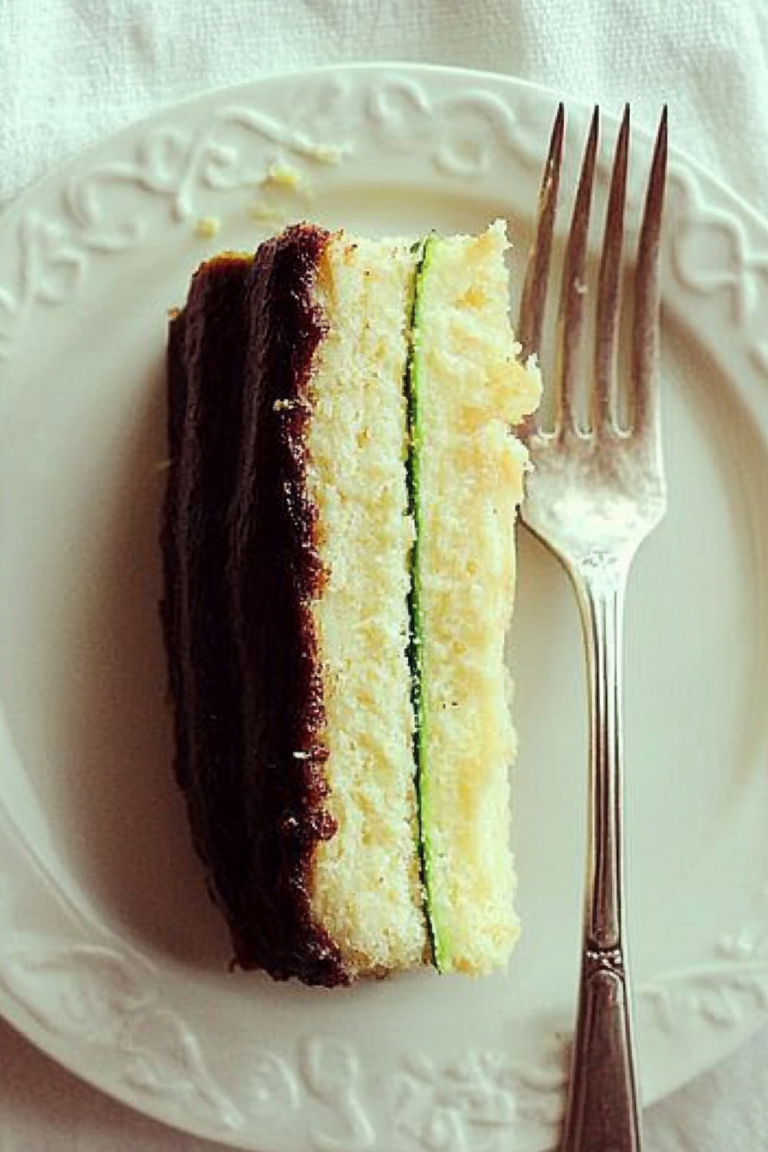
So, what exactly *is* zucchini bread, and why does it sound so… well, *vegetable-y*? Don’t let the zucchini fool you! Think of it as a super moist, subtly sweet cake or muffin batter that just happens to have shredded zucchini mixed in. That zucchini is the secret weapon, folks. It melts away during baking, contributing incredible moisture and tenderness without adding any noticeable “green” flavor. It’s essentially a vehicle for deliciousness, often enhanced with warm spices like cinnamon and nutmeg, and sometimes loaded with delightful add-ins like chocolate chips, nuts, or even cream cheese swirl. The name comes directly from the star ingredient, but trust me, you’d never guess it was in there unless you were told. It’s a classic American quick bread, meaning it doesn’t rely on yeast and comes together in a jiffy. It’s a brilliant way to use up those garden zucchini that seem to multiply overnight, turning them into something truly special that everyone will devour.
Why you’ll love this recipe?
There are so many reasons why this zucchini bread recipe holds such a special place in my heart, and I’m betting it will in yours too! First and foremost, the flavor is just out of this world. It’s perfectly sweet without being cloying, with those cozy notes of cinnamon and nutmeg that just wrap around you like a warm blanket. The texture is where it truly shines – it’s incredibly moist and tender, never dry or crumbly, thanks to the magic of zucchini. And speaking of magic, the simplicity is another huge win! You can have this mixed up and in the oven in under 15 minutes. No fancy equipment, no complicated steps, just pure baking joy. It’s also incredibly budget-friendly, using pantry staples you likely already have on hand. This makes it a fantastic everyday treat. Plus, its versatility is a major bonus. I love it plain, but adding chocolate chips? Oh, that’s a game-changer for my kids! Nuts add a lovely crunch, and I’ve even experimented with a hint of orange zest for a brighter flavor. Honestly, what I love most about this recipe is how it consistently turns out perfectly. Even if you’re new to baking, you can achieve amazing results. It’s far superior to a dry, bland muffin, and way less fuss than a full-blown layer cake for a quick sweet fix. It’s that perfect bite when you’re craving something sweet at 10 pm but don’t want to bake a whole cake!
How do I make Zucchini bread?
Quick Overview
This recipe is all about speed and simplicity, delivering maximum flavor with minimal fuss. You’ll basically whisk together your wet and dry ingredients separately, then combine them gently. Shredded zucchini gets stirred in, followed by any delicious add-ins you fancy. Then, it’s into a loaf pan and off to the oven! The result? A wonderfully moist, fragrant, and utterly delicious zucchini bread that’s perfect for breakfast, snacks, or even dessert. It’s designed to be foolproof, so don’t stress – it’s going to be amazing.
Ingredients
For the Main Batter:
Here’s what you’ll need to get started. I always try to use *freshly grated* zucchini; it just makes a world of difference in texture and moisture. You’ll need about 2 cups, packed. For the flour, all-purpose works perfectly, but if you’re feeling adventurous, I’ve had great results with a good quality gluten-free blend (just make sure it has xanthan gum). Brown sugar is my secret weapon for that lovely moisture and caramel-y depth; you could use all granulated sugar, but I find a mix gives the best results. And please, use *real* vanilla extract – it makes such a difference! For the eggs, room temperature ones incorporate much more smoothly.
For the Filling (Optional, but highly recommended!):
This is where you can really make it your own. My absolute favorite is a generous amount of chocolate chips – dark or semi-sweet are best. For a little crunch and nutty flavor, chopped walnuts or pecans are fantastic. Some people love a swirl of cream cheese in the center, which adds a lovely tanginess. If you’re going the chocolate chip route, make sure they are good quality ones that melt nicely!
For the Glaze (The Crown Jewel!):
This is totally optional, but I honestly think it elevates the whole experience. A simple powdered sugar glaze, made with just powdered sugar and a splash of milk (or even lemon juice for a little zing), drizzled over the top while it’s still slightly warm is pure perfection. It adds that extra touch of sweetness and visual appeal. You can adjust the consistency by adding more or less liquid.
Step-by-Step Instructions
Step 1: Preheat & Prep Pan
First things first, get that oven preheating to 350°F (175°C). This is crucial for an even bake. While it’s heating up, grab a standard 9×5 inch loaf pan. I like to grease it really well with butter or baking spray, and then dust it with a little flour, tapping out any excess. This ensures your beautiful loaf slides right out without any sticking. You can also line it with parchment paper if you prefer, leaving some overhang to lift it out easily later.
Step 2: Mix Dry Ingredients
In a large bowl, whisk together your all-purpose flour, granulated sugar, brown sugar, baking soda, baking powder, cinnamon, nutmeg, and salt. Give it a good whisk – you want everything evenly distributed. This step is important because it ensures your leavening agents (baking soda and powder) are spread throughout, giving you a nice, even rise. No one wants a dense spot in their zucchini bread!
Step 3: Mix Wet Ingredients
In a separate medium bowl, whisk together your eggs until they’re lightly beaten. Then, stir in the melted butter (or oil, if you prefer – I’ve tested both and melted butter gives a richer flavor), milk, and vanilla extract. Make sure everything is well combined. Using room temperature eggs and milk helps everything emulsify beautifully, leading to a smoother batter.
Step 4: Combine
Now, pour the wet ingredients into the bowl with the dry ingredients. Using a spatula or wooden spoon, gently fold them together until *just* combined. It’s really important not to overmix here! A few streaks of flour are okay. Overmixing develops the gluten in the flour, which can lead to a tough, dense bread. We want tender, we want moist, we don’t want tough!
Step 5: Prepare Filling
If you’re adding chocolate chips or nuts, gently fold them into the batter now. I usually reserve a tablespoon or two to sprinkle on top before baking for extra visual appeal. If you’re doing a cream cheese swirl, make sure your cream cheese is softened, and you’ll add it in the layering step.
Step 6: Layer & Swirl
Pour about half of the batter into your prepared loaf pan. If you’re using a cream cheese swirl, dot spoonfuls of softened cream cheese over this layer. Then, add the rest of the batter. If you used cream cheese, you can now gently swirl it down into the batter using a knife or skewer, creating pretty patterns. I always sprinkle those reserved chocolate chips or nuts on top at this stage too.
Step 7: Bake
Slide the pan into your preheated oven. Bake for about 50-65 minutes. The exact time will vary depending on your oven, so start checking around the 50-minute mark. The best way to tell if it’s done is to insert a toothpick or a thin knife into the center of the loaf. If it comes out clean, or with just a few moist crumbs attached (especially if you added chocolate chips!), it’s ready. If it comes out with wet batter, give it a few more minutes.
Step 8: Cool & Glaze
Once it’s baked, let the zucchini bread cool in the pan for about 10-15 minutes. This allows it to firm up a bit before you try to remove it. Then, carefully invert it onto a wire rack to cool completely. While it’s still warm (but not piping hot), you can drizzle over your glaze. I like to make a simple glaze with powdered sugar and a tiny bit of milk until it’s pourable. It hardens slightly as it cools, giving you that perfect finishing touch.
Step 9: Slice & Serve
Once the glaze has set a bit, it’s time to slice and enjoy! Use a serrated knife for clean cuts. Serve it at room temperature for the best flavor and texture. It’s absolutely delicious on its own, but a little smear of butter is never a bad idea!
What to Serve It With
Oh, the possibilities! This zucchini bread is a true culinary chameleon. For a lovely start to your day, I love a thick slice with my morning coffee. It’s not overly sweet, so it pairs beautifully with that rich, slightly bitter brew. The aroma alone is enough to make getting out of bed worth it! For a more relaxed brunch spread, it’s a fantastic addition alongside some fresh fruit salad, maybe some scrambled eggs, and a mimosa. It adds that comforting, homemade touch that everyone adores. As a dessert, it’s surprisingly elegant. Serve a warm slice with a dollop of whipped cream or a scoop of vanilla bean ice cream, maybe even a drizzle of raspberry sauce. It’s that perfect end to a meal when you want something sweet but not too heavy. And for those cozy, rainy afternoons or late-night cravings, it’s simply divine with a glass of milk. My kids practically inhale it this way. I’ve also found it’s incredible with a warm cup of herbal tea. Honestly, it’s so versatile that it fits into almost any occasion or craving!
Top Tips for Perfecting Your Zucchini Bread
I’ve made this countless times, and through a few kitchen mishaps and triumphs, I’ve picked up a few tricks that I think are absolute game-changers. When it comes to the zucchini prep, really give it a good squeeze after grating. If you don’t, you can end up with a soggy loaf, and nobody wants that! I learned this the hard way after a few loaves that were just… too wet. For mixing, remember my advice: gentle is key! Overmixing is the enemy of tender baked goods. You want to combine, not pulverize. Trust me on this one, it makes a huge difference. For those swirls, whether it’s cream cheese or a cinnamon-sugar mix, don’t be afraid to get creative! You can make simple patterns or more intricate designs; it’s all part of the fun and the visual appeal. When it comes to ingredient swaps, I’ve played around a lot. If you don’t have brown sugar, you can use all granulated sugar, but you might want to add a tablespoon of molasses to mimic that depth of flavor. I’ve also tested almond milk and other dairy-free milks, and they work beautifully, often making it even creamier! Baking is always a bit of an art, so don’t be alarmed if your oven runs a little hot or cool. Keep an eye on it, and use that toothpick test religiously. And for the glaze, if it’s too thick, add milk a teaspoon at a time; if it’s too thin, add more powdered sugar. It’s very forgiving!
Storing and Reheating Tips
This zucchini bread is pretty forgiving when it comes to storage, which is another reason I love it so much. For room temperature storage, I usually keep it wrapped tightly in plastic wrap or in an airtight container on the counter for up to 3 days. It stays wonderfully moist. If I know I won’t get through it that quickly, or if the weather is particularly warm, I’ll pop it in the refrigerator. Stored in an airtight container in the fridge, it can last for up to a week, though I find the texture is best within the first 4-5 days. My absolute favorite trick, though, is freezing! If I’ve baked a double batch (which I often do because it freezes so well!), I’ll let the loaf cool completely, then wrap it tightly in plastic wrap, followed by a layer of aluminum foil. It can last in the freezer for up to 3 months. When you’re ready to enjoy a slice, you can either thaw it at room temperature for a few hours, or, for a truly delightful treat, reheat a slice in a toaster oven or a regular oven at around 300°F (150°C) for about 5-10 minutes. It comes out almost as good as freshly baked! If you’ve glazed it, I usually recommend glazing it *after* reheating if you’ve frozen it, or just being mindful that the glaze might soften a bit during reheating. Honestly, it’s so good, it rarely lasts long enough for me to worry too much about long-term storage!
Frequently Asked Questions
Final Thoughts
This zucchini bread is more than just a recipe to me; it’s a warm hug in slice form. It’s the result of years of tweaking, a little bit of my grandma’s magic, and a whole lot of love. It’s that perfect balance of comforting, slightly sweet, and incredibly moist that just makes you feel good. It’s a lifesaver on busy days and a delightful treat for any occasion. If you’re someone who enjoys a good banana bread or a moist chocolate chip cookie, I have a feeling you’re going to fall head over heels for this zucchini bread. It’s proof that simple ingredients, treated with a little care, can create something truly extraordinary. I can’t wait for you to try it and experience that same sense of cozy satisfaction I feel every time I bake a loaf. If you give this recipe a go, please let me know how it turns out in the comments below! I’d love to hear about your favorite add-ins or any personal twists you put on it. Happy baking!

Southern Peach Cobbler
Ingredients
Method
- Preheat oven to 425°F. Place a large baking sheet covered in foil on the lowest rack in the oven. This cobbler overflows a bit almost every time I make it. The baking pan will catch the drips and prevent a mess in the oven.
- In a large bowl, combine the peaches and the lemon juice and then add the rest of the filling ingredients. Stir to coat and then pour into a 9x13 baking dish.
- Bake the peach mixture in the preheated oven for 10 minutes. While the peaches are baking, combine the dry topping ingredients and whisk to combine. Toss the grated butter in the flour mixture. Stir in the boiling water, just until combined, leaving plenty of little lumps of butter.
- Remove the peaches from the oven and drop the topping over them in spoonfuls. (I like to use my smallest cookie scoop to do this.) Sprinkle the cobbler topping with the cinnamon sugar topping. Bake until the crust is golden and a toothpick inserted into the crust comes out clean, about 28 minutes. Serve warm or at room temperature. Enjoy!