Sweet Caramel Apple Cookie Cups How To
You know those days? The ones where you just need a little something to make everything feel right? Maybe the kids are being extra, or maybe work decided to throw a curveball, or perhaps it’s just a dreary Tuesday and the world feels a bit muted. For me, on days like those, there’s nothing quite like the aroma of freshly baked zucchini bread wafting through the house. It’s more than just a baked good; it’s a little piece of comfort, a warm hug in edible form. This isn’t just any zucchini bread, though. This is my go-to, the one I’ve tweaked and tested over the years, the one that always disappears faster than I can restock the pantry. It’s got a little something extra, a secret I’ll be spilling in a bit, that makes it unbelievably moist and flavorful. Think of it as a love letter to your taste buds, and a lifesaver for those moments when you crave something sweet but don’t want to spend hours in the kitchen. It’s my absolute favorite way to use up those garden zucchinis that seem to multiply overnight, and honestly, it’s so good, nobody ever guesses what the magic ingredient is!
What is Zucchini bread?
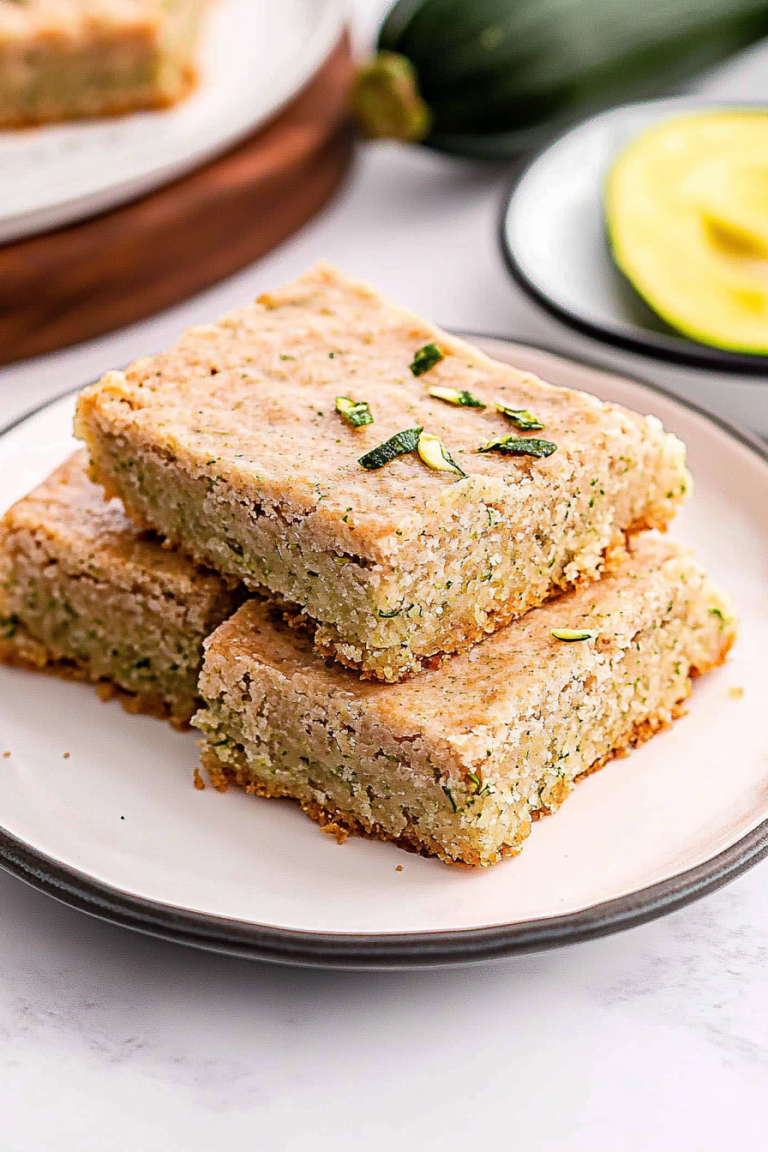
So, what exactly *is* this magical zucchini bread? Well, at its heart, it’s a classic quick bread, meaning it uses chemical leaveners like baking soda and baking powder instead of yeast, so you don’t have to wait around for dough to rise. It’s packed with shredded zucchini, which sounds a little odd if you’ve never tried it, but trust me, it’s a total game-changer for moisture and texture. The “secret ingredient” part? It’s actually pretty simple, but it elevates this bread from “nice” to “oh-my-goodness-I-need-another-slice.” I’ll give you a hint: it’s not another vegetable! It’s something that adds a subtle richness and depth without overpowering the sweet, cinnamon-spiced goodness. Essentially, it’s your favorite comforting quick bread, but with a secret weapon that makes it incredibly tender, moist, and just plain irresistible. It’s the kind of thing you can whip up on a Saturday morning and have for breakfast, snacks, or even dessert all week long.
Why you’ll love this recipe?
Let me count the ways you’re going to adore this zucchini bread! First and foremost, the FLAVOR. Oh, the flavor! It’s perfectly sweet, with just the right amount of warm cinnamon spice that makes you feel cozy no matter the weather. The zucchini, while not a dominant flavor itself, contributes to an unbelievably moist crumb that’s never dry or crumbly. Seriously, I’ve tried other zucchini breads that felt like sawdust, but this one? It’s like biting into a soft, flavorful cloud. Then there’s the SIMPLICITY. I am all about recipes that don’t demand a culinary degree or a full day in the kitchen. This bread comes together in one bowl for the batter, and the filling is a quick mix-and-swirl situation. It’s genuinely one of the easiest things I bake, and that makes it a lifesaver on busy weeknights or when unexpected guests pop over. Plus, it’s incredibly COST-EFFECTIVE. Zucchini is often super affordable, especially when it’s in season, and the other ingredients are pantry staples. You don’t need fancy, expensive items to make this truly special. And let’s talk VERSATILITY! You can have this for breakfast with a smear of butter, pack it into lunchboxes, serve it as a delightful dessert with a dollop of whipped cream, or just grab a slice for a satisfying afternoon snack. It’s the kind of recipe that adapts to your life, not the other way around. What I love most about this recipe, though, is the reaction it gets. People are always amazed by how moist and flavorful it is, and when I finally reveal the secret ingredient, they’re usually shocked! It’s a simple addition that makes a huge difference, and that’s the kind of magic I live for in my kitchen. If you’re a fan of my Easy Banana Bread or my Moist Blueberry Muffins, you are going to absolutely fall in love with this zucchini bread. It’s in that same category of comforting, reliable, and ridiculously delicious baked goods.
How do I make Zucchini bread?
Quick Overview
This recipe is all about simple steps that yield maximum flavor and moisture. You’ll start by whisking together your wet and dry ingredients separately, then gently combine them. While that’s happening, you’ll prepare a quick, delicious filling with my secret ingredient! The magic really happens when you swirl that filling into the batter before baking. It creates beautiful ribbons of flavor throughout the loaf, making every bite interesting and delicious. It’s straightforward enough for a beginner baker, but satisfying enough for even the most seasoned home cooks. You’ll be amazed at how quickly this comes together – it’s truly a one-bowl wonder for the batter, and the rest is just as easy.
Ingredients
For the Main Batter:
2 cups all-purpose flour (I always use a good quality all-purpose, nothing fancy needed here!)
1 teaspoon baking soda (Make sure it’s not expired – I learned that the hard way once!)
1/2 teaspoon baking powder
1/2 teaspoon salt
1 teaspoon ground cinnamon (Don’t skimp on this; it’s crucial for that cozy flavor!)
1/4 teaspoon ground nutmeg (Just a pinch, but it really rounds out the cinnamon)
3/4 cup granulated sugar (You can adjust slightly, but this is the sweet spot for me)
1/2 cup packed light brown sugar (This adds a lovely caramel note and extra moisture)
2 large eggs, at room temperature (Room temp eggs incorporate much better!)
1/2 cup vegetable oil (Or another neutral oil like canola or melted coconut oil)
1/4 cup unsweetened applesauce (This is a fantastic secret weapon for moisture, and it’s part of the ‘secret’!)
1 teaspoon vanilla extract
1 1/2 cups grated zucchini (About 1 medium-large zucchini. Squeeze out most of the excess water, but not all! You want some moisture left.)
For the Filling:
1/2 cup packed light brown sugar
1 tablespoon all-purpose flour
1 teaspoon ground cinnamon
1/2 teaspoon unsweetened cocoa powder (Here it is! The secret ingredient! It adds a subtle depth and richness that’s just *chef’s kiss*!)
1/4 cup chopped pecans or walnuts (Optional, but oh-so-good for crunch! My kids love them in here.)
For the Glaze (Optional, but highly recommended!):
1 cup powdered sugar
2-3 tablespoons milk (Or buttermilk for a tangier glaze!)
1/2 teaspoon vanilla extract
Step-by-Step Instructions
Step 1: Preheat & Prep Pan
First things first, let’s get your oven ready. Preheat it to 350°F (175°C). Now, grab a standard 9×5 inch loaf pan. I like to grease it really well with butter or cooking spray, and then lightly flour it. This ensures your beautiful loaf slides right out without any sticking. You can also line it with parchment paper, leaving a little overhang on the sides – that makes lifting the cooled loaf out super easy. I usually go with the grease-and-flour method; it’s a classic for a reason!
Step 2: Mix Dry Ingredients
In a large bowl, whisk together your flour, baking soda, baking powder, salt, cinnamon, and nutmeg. Whisking them together ensures everything is evenly distributed, so you don’t end up with a bite that’s too heavy on the baking soda or salt. Give it a good whisk until it all looks uniform. This step might seem small, but it’s key to an evenly baked and delicious loaf.
Step 3: Mix Wet Ingredients
In a separate medium bowl, whisk together the granulated sugar, brown sugar, eggs, vegetable oil, applesauce, and vanilla extract. Whisk until everything is well combined and smooth. The applesauce is my secret for extra moisture, and you’ll barely taste it! Make sure your eggs are at room temperature; they’ll blend much better into the batter. I usually just let them sit on the counter for about 30 minutes while I gather my other ingredients.
Step 4: Combine
Now, pour the wet ingredients into the large bowl with the dry ingredients. Using a spatula or a wooden spoon, mix until *just* combined. Be careful not to overmix! Seriously, this is probably the most important rule for tender quick breads. A few streaks of flour are totally okay; they’ll disappear as you gently fold in the zucchini. Overmixing develops the gluten too much, and that can lead to a tough, dense loaf. We want tender, we want moist, we don’t want tough!
Step 5: Prepare Filling
In a small bowl, stir together the 1/2 cup brown sugar, 1 tablespoon flour, 1 teaspoon cinnamon, and the cocoa powder. This is where the magic happens! The cocoa powder adds this wonderful, subtle richness that complements the cinnamon and zucchini perfectly. It’s my little twist that nobody ever guesses. If you’re using nuts, stir them in here too. Give it a good stir to make sure the cocoa is well incorporated and there are no dry clumps.
Step 6: Layer & Swirl
Now for the fun part! Pour about half of the batter into your prepared loaf pan. Sprinkle half of the filling mixture evenly over the batter. Then, spoon the remaining batter over the filling. Finally, sprinkle the rest of the filling over the top. If you’re feeling fancy, you can use a knife or a skewer to gently swirl the filling into the batter. Just a few twists and turns are all you need – don’t overdo it, or you’ll lose the pretty marbled effect. Aim for nice ribbons of the chocolatey, cinnamon-spiced filling.
Step 7: Bake
Pop that beautiful loaf into your preheated oven. Bake for 50-65 minutes. Now, ovens can be tricky, so start checking around the 50-minute mark. The best way to tell if it’s done is to insert a toothpick or a thin skewer into the center of the loaf. If it comes out clean or with a few moist crumbs attached (not wet batter!), it’s ready. If it comes out with wet batter, give it another 5-10 minutes and check again. Keep an eye on the top; if it’s browning too quickly, you can loosely tent it with foil.
Step 8: Cool & Glaze
Once it’s baked, take the loaf out of the oven and let it cool in the pan for about 10-15 minutes. This allows it to set up properly. After that, carefully invert the loaf onto a wire rack to cool completely. Resist the urge to cut into it while it’s hot – it’s tempting, I know! If you’re making the glaze, whisk together the powdered sugar, milk, and vanilla extract in a small bowl until smooth. You want it thick enough to drizzle but thin enough to spread. Once the bread is completely cool, drizzle the glaze over the top. It hardens slightly as it sits, giving you that perfect sweet finish.
Step 9: Slice & Serve
Once the glaze has set (or if you skipped it), slice your glorious zucchini bread. I like to use a serrated knife for clean cuts. Serve it at room temperature for the best texture and flavor. A slice of this is pure perfection on its own, or you can serve it with a cup of coffee, tea, or a cold glass of milk. Enjoy every single bite!
What to Serve It With
This zucchini bread is so versatile, it’s basically ready for any occasion! For breakfast, it’s wonderful on its own with a steaming mug of your favorite coffee. I sometimes toast a slice lightly and add a tiny smear of butter, and it’s just heavenly. It pairs beautifully with a strong black coffee or a creamy latte. If you’re hosting brunch, this bread is a total star. Serve thick slices on a pretty platter, maybe alongside some fresh fruit salad and a quiche. It’s a bit more substantial than a plain muffin but still feels light and approachable. For a dessert situation, especially if you’ve added the glaze, it’s a fantastic treat. A small scoop of vanilla bean ice cream on the side, or a dollop of lightly sweetened whipped cream, makes it feel extra special. My kids absolutely love it after dinner when they’re craving something sweet but not *too* heavy. And for those cozy snack times, when you just need a little something to take the edge off? It’s perfect. Grab a slice, curl up with a good book or put on your favorite show, and enjoy. My family traditions often involve this bread appearing on our picnic blankets in the park during the summer, or being the centerpiece of our holiday cookie platters (yes, it counts as a cookie in my house!).
Top Tips for Perfecting Your Zucchini Bread
Over the years, I’ve learned a few tricks that make this zucchini bread consistently amazing. Here are my top tips:
Zucchini Prep: The key is to grate your zucchini using the medium holes of a box grater. After grating, I place it in a fine-mesh sieve and press down firmly with a spoon to get rid of a good amount of the excess water. Don’t wring it out completely dry, though! A little moisture is good for the final texture. If you’ve ever made zucchini bread that ended up dense or gummy, it was likely too much moisture. My kids actually help with the grating and squeezing – it’s a fun kitchen activity!
Mixing Advice: I can’t stress this enough: do NOT overmix the batter once you combine the wet and dry ingredients. Mix until *just* combined. A few small streaks of flour are perfectly fine. Fold in the zucchini gently. The less you work the batter at this stage, the more tender and light your bread will be. It’s a fine balance, and I’ve definitely overmixed it in the past, resulting in a tougher loaf. Learn from my mistakes!
Swirl Customization: The swirling is where you can get creative! Don’t over-swirl, or you’ll just end up with a brown bread. Aim for distinct ribbons of the chocolate-cinnamon filling. You can use a butter knife or a skewer for this. Insert it into the batter and make a few gentle S-shaped motions. You can also experiment with different fillings! A cream cheese swirl or a jam swirl would also be delicious, though I’m partial to my cocoa-based one.
Ingredient Swaps: If you don’t have applesauce, you can substitute it with an equal amount of plain yogurt or sour cream for extra moisture and tenderness. For the oil, melted coconut oil works well, but it might impart a slight coconut flavor. You can also reduce the granulated sugar slightly if you prefer a less sweet bread, but remember, the applesauce and zucchini don’t add much sweetness on their own.
Baking Tips: Every oven is different, so getting to know yours is important. If you find your loaves tend to brown too quickly on top, loosely tenting with aluminum foil for the last 15-20 minutes of baking usually does the trick. I also recommend placing your loaf pan in the center of the oven to ensure even heat circulation. To test for doneness, a wooden skewer inserted into the thickest part of the loaf should come out clean or with a few moist crumbs. Don’t rely solely on the timer!
Glaze Variations: If you’re not a fan of sweet glazes, you can simply dust the cooled bread with a little powdered sugar or cinnamon sugar. A lemon zest glaze would also be a lovely, bright alternative for a slightly different flavor profile. For a richer glaze, use heavy cream instead of milk, or add a touch of melted butter.
Storing and Reheating Tips
Keeping your zucchini bread fresh and delicious is super simple. For optimal texture, I always recommend storing it properly.
Room Temperature: Once the bread has completely cooled (this is crucial, especially if it has glaze!), you can store it at room temperature for up to 3 days. I usually wrap it tightly in plastic wrap, or place it in an airtight container. It stays wonderfully moist this way. If I’ve sliced it and won’t finish it quickly, I’ll just cover the cut end with plastic wrap to prevent it from drying out.
Refrigerator Storage: If you live in a warmer climate or want to extend its shelf life a bit longer, you can store it in the refrigerator. Wrap it tightly in plastic wrap, then in aluminum foil, or place it in an airtight container. It should stay good for about 5-7 days. Just a heads-up, though, refrigeration can sometimes slightly alter the texture, making it a tad denser. I find it’s best reheated slightly if refrigerated.
Freezer Instructions: This bread freezes beautifully! Once it’s completely cooled and you’ve decided on your slicing preference (whole loaf, half loaf, or individual slices), wrap it tightly in plastic wrap, then in a layer of aluminum foil, and finally place it in a freezer-safe bag or container. It will keep for up to 3 months. To thaw, simply unwrap it and let it come to room temperature on the counter. For a whole loaf, this might take a few hours. Individual slices can be thawed much faster.
Glaze Timing Advice: If you plan to freeze the loaf, I highly recommend glazing it *after* thawing. The glaze can sometimes get a little sticky or weep in the freezer. So, freeze the bread plain, thaw it completely, and then whip up a fresh batch of glaze to add. If you’re just storing at room temperature or in the fridge, add the glaze once the bread is fully cool.
Frequently Asked Questions
Final Thoughts
There you have it, my friends! My tried-and-true recipe for what I call my Secret Ingredient Zucchini Bread. It’s more than just a recipe to me; it’s a little bit of culinary magic that brings comfort and joy. I love how it takes something as humble as zucchini and transforms it into something so incredibly moist, flavorful, and utterly irresistible, all thanks to a little trick with cocoa powder and applesauce. It’s the perfect testament to how simple ingredients can create something truly spectacular in your own kitchen. If you’re looking for a recipe that’s easy, budget-friendly, and guaranteed to impress, this is it. It’s the kind of thing that makes your home smell amazing and your family ask for seconds (and thirds!). I hope you give this recipe a try and that it becomes a beloved staple in your kitchen too. I can’t wait to hear what you think, and I’d absolutely love to see your creations! If you try it, please leave a comment below and tell me how it turned out, or share any fun variations you discover. Happy baking, and may your kitchens always be filled with wonderful aromas!

Caramel Apple Cookie Cups
Ingredients
Method
- Spray a cupcake pan with non-stick cooking spray. Preheat oven to 350 degrees F.
- In a medium sized bowl, combine the flour, baking soda, cinnamon, cornstarch and salt. Set aside.
- Add the butter and sugars to a large mixer bowl and beat for 2-3 minutes, until light in color and fluffy in texture.
- Add the egg and vanilla and beat until well combined.
- Add the dry ingredients to the wet ingredients and mix until well combined, but don’t over mix. The cookie dough will be thick.
- Makes balls of about 2 tablespoons of dough. Press cookie dough in bottom and about 1/2 way up the sides of each cupcake cup, forming a cup shape.
- Bake for 10-12 minutes, or until cookie cups are lightly golden around the edges.
- Remove from oven and allow to cool for about 5 minutes, then remove to a cooling rack to finish cooling. If the centers aren’t cupped enough to add filling, use the end of a wooden spoon or the bottom of a tablespoon to press the center down a bit while they are still warm and fresh out of the oven.
- While the cookies bake and cool, make the caramel sauce according to the instructions. Allow to cool to about room temperature.
- When the cookies and caramel sauce have cooled, make the apples. Add the apples, cinnamon, nutmeg, brown sugar and butter to a pan and cook for about 10 minutes, or until just fork tender. Remove from heat to cool for about 5-10 minutes.
- To assemble the cookie cups, add about half a tablespoon of caramel sauce to each cookie cup.
- Divide the apples between the cookie cups, about a large tablespoon of apples per cookie. Drizzle additional caramel sauce on top, if desired. Serve.