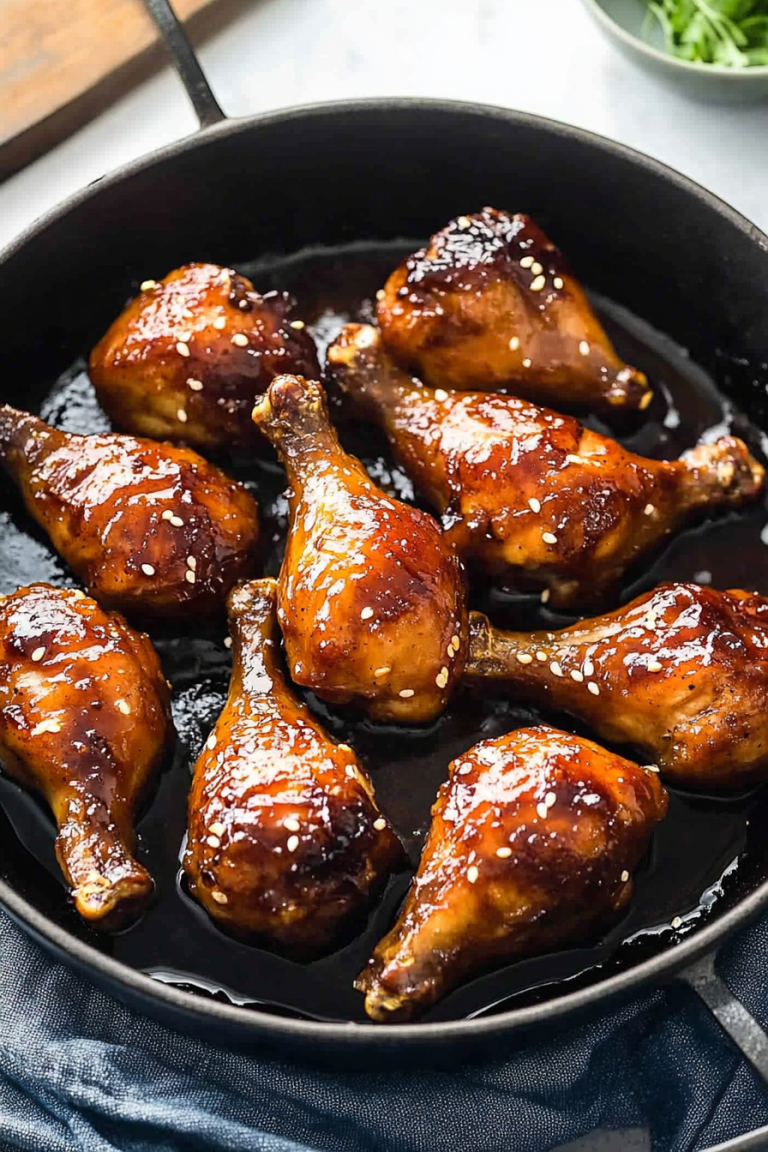
Spicy Chicken Skillet Recipe
There’s something about turning everyday vegetables into secretly delicious treats that just gets me. I remember my mom sneaking grated zucchini into my chocolate cake when I was a kid, and I’d be none the wiser—just a moist, rich bite of heaven. Now, as a grown-up, I do the same, but with these zucchini swirl brownies. They’re a total game-changer: dense, fudgy, with just a hint of healthy sneaky veggies tucked inside. Trust me, this one’s a lifesaver on busy nights or when you want something sweet but don’t want to feel guilty. Plus, my kids actually ask for seconds of these, which is saying a lot! The best part? It’s so easy to whip up, even if you’re not a baker. The smell alone will bring everyone to the kitchen, and I always do this when I need a quick chocolate fix that feels a little virtuous. Grab your zucchini, and let’s get baking—your taste buds will thank you!
What is Zucchini Swirl Brownies?
Think of these brownies as a love letter to chocolate lovers who want to sneak in some greens without sacrificing flavor. They’re basically fudgy brownies with a fun, marbled swirl of grated zucchini running through the batter. The name might sound fancy, but it’s just a playful way to highlight the gorgeous visual effect the zucchini gives—like a dark, glossy marble cake, but in brownie form. It’s essentially a three-in-one treat: rich chocolate, moist crumb, and a little veggie boost, making it perfect for kids and adults alike. Originating from my kitchen where I was trying to make a dessert that combines health and indulgence, these brownies are a testament to how versatile zucchini can be. Think of it as a culinary hug that feels indulgent but secretly packs a nutritional punch. I’ve tested this with different types of chocolate, and honestly, dark chocolate chips make it even more irresistible. It’s a recipe I keep coming back to because it’s simple, forgiving, and just plain delicious.
Why you’ll love this recipe?
What I love most about these zucchini swirl brownies is how they manage to be both decadent and a little healthy—without anyone needing to guess what’s hiding inside. The flavor? Oh, it’s all rich chocolatey goodness; you get a deep cocoa taste that’s not overly sweet, perfect for those moments when you want a little something dark and satisfying. The texture? Total perfection—a fudge-like center with slightly crisp edges, just how brownies should be. And the best part? They’re insanely easy to make. No fancy ingredients, no complicated techniques—just a simple mix and swirl, and you’re good to go.
Budget-wise, these are a win, too. You probably already have everything in your pantry—a bit of flour, cocoa powder, eggs, and a humble zucchini. I’ve tested this with almond milk, and honestly, it made the brownies even creamier and more tender. Plus, the method is so forgiving—overmix, undermix, it still turns out great! I love that you can customize the swirl—add a sprinkle of sea salt, a dash of vanilla, or even a handful of chopped nuts for crunch. It’s such a versatile recipe that adapts to whatever mood or ingredients you’ve got on hand. Basically, these brownies are my go-to when I want a guaranteed crowd-pleaser that’s secretly wholesome—and I promise, once you try them, they’ll become your new favorite too.
How do I make Zucchini Swirl Brownies?
Quick Overview
This recipe is foolproof. You start by grating your zucchini and squeezing out as much moisture as possible—trust me, this keeps your brownies from turning into a soggy mess. Then, you mix together your dry ingredients—flour, cocoa, baking powder. In a separate bowl, whisk up your eggs, sugar, and oil until smooth, and gently fold in the zucchini. Pour half of the batter into your prepared pan, add a few chocolate chips if you like, then carefully dollop the remaining batter on top. Using a toothpick or skewer, swirl through the batter to create those pretty marbled streaks of green and chocolate. Bake until just set—this part is crucial because overbaking makes them dry. Let them cool fully before slicing, and if you’re feeling fancy, drizzle with a quick homemade glaze. Super simple, really gratifying, and absolutely addictive.
Ingredients
For the Main Batter:
- 1 cup all-purpose flour (or a gluten-free blend, see tips below)
- 1/2 cup unsweetened cocoa powder (preferably Dutch-processed for richness)
- 1 tsp baking powder
- 1/4 tsp salt
- 1/2 cup granulated sugar (or coconut sugar for a healthier twist)
- 1/2 cup brown sugar or honey (adds moisture and depth)
- 2 large eggs, room temperature
- 1/2 cup vegetable oil or melted butter (I’ve tested olive oil and it works too)
- 1 tsp vanilla extract
For the Filling:
- 1 medium zucchinin, grated and squeezed dry
- Optional: a handful of chocolate chips or chopped nuts
For the Glaze (optional but pretty):
- 1/2 cup powdered sugar
- 1-2 tsp milk or almond milk
- 1/4 tsp vanilla extract
Step-by-Step Instructions
Step 1: Preheat & Prep Pan
Set your oven to 350°F (175°C). Line a 9×9-inch square baking pan with parchment paper or lightly grease it. This makes removal so much easier—and keeps things tidy! I always do this first so I don’t forget later. Plus, parchment paper helps you get perfect, clean slices.
Step 2: Mix Dry Ingredients
In a large bowl, whisk together the flour, cocoa powder, baking powder, and salt. Sifting is optional but helps break up lumps and aerates the mix—trust me, it makes a difference in the final texture. Set aside.
Step 3: Mix Wet Ingredients
In another bowl, whisk the eggs, sugars, and oil until smooth and slightly fluffy—about a minute. Then, stir in the vanilla. If your eggs come straight from the fridge, warming them slightly in hot water first helps them blend better.
Step 4: Combine
Add the dry ingredients to the wet and fold gently—no overmixing! Overmixing can cause dense brownies instead of the fudgy crumb we’re aiming for. Once just combined, fold in the grated zucchini. You want to distribute it evenly without knocking out all the air. The zucchini should be incorporated but not overtaking the batter.
Step 5: Prepare Filling
Take your grated zucchini and squeeze out as much moisture as you can using a clean kitchen towel or paper towels. Moisture is the enemy here—too Much water and the brownies won’t set properly. For a little extra decadence, sprinkle some chocolate chips into the batter or reserve them for topping.
Step 6: Layer & Swirl
Pour half of the batter into your prepared pan, smoothing the surface with a spatula. Then dollop spoonfuls of the remaining batter on top. Using a knife or skewer, swirl through the batter in a figure-eight pattern to create beautiful marbled streaks. The key is to do it gently—this is where the magic happens, with little streaks of zucchini peeking through.
Step 7: Bake
Pop it into the oven and bake for about 25-30 minutes. Check doneness by inserting a toothpick in the center—if it comes out with a few moist crumbs, you’re perfect. If it’s wet, give it a few more minutes. Every oven is different, so start checking around the 25-minute mark.
Step 8: Cool & Glaze
Let the brownies cool completely in the pan for at least 15 minutes before lifting them out. This keeps the slices intact. If you’re adding a glaze, mix powdered sugar, vanilla, and a splash of milk until smooth, then drizzle over the cooled brownies. The glaze adds a lovely sweetness and a shiny finish.
Step 9: Slice & Serve
Use a sharp knife to slice into squares. Wipe the blade between cuts for clean edges. Serve with a glass of milk or a hot cup of coffee, and watch everyone go back for seconds. These brownies are best enjoyed the day they’re made, but they still hold up beautifully for a few days stored in an airtight container.
What to Serve It With
This brownie is so versatile, I usually have a couple of ideas in mind before I even start baking. For breakfast or brunch, it pairs beautifully with a dollop of Greek yogurt and a drizzle of honey—yes, I sometimes cheat at brunch but who’s judging? It also makes a lovely finishing touch for a cozy afternoon tea, especially if you serve it warm with a little scoop of vanilla ice cream or a dusting of powdered sugar.
As a dessert, add a splash of whipped cream or a spoonful of berry compote on the side, and suddenly it’s a fancy treat. For those “I need comfort” moments, warm a slice and serve with a cup of herbal tea or hot chocolate. My family loves these brownies cut into small, manageable squares—they’re perfect for sharing at picnics or packable treat for school lunches, too. Honestly, I’ve made these for bake sales, potlucks, and just because I needed a break from traditional chocolate chips—every time, they’re a hit.
Top Tips for Perfecting Your Zucchini Swirl Brownies
Over the years, I’ve learned a few tricks to keep these brownies absolutely perfect every time. First, squeezing out as much moisture from the zucchini is key. I used to skip this step and wonder why my brownies turned out a little soggy—big mistake. Trust me, a dry zucchini helps keep the crumb fudgy and dense, not wet and heavy.
Mixing is another vital step. I used to overmix, thinking it would make the batter smooth, but that actually made the texture tough. Now, I fold the ingredients gently—just until they’re combined and no streaks remain. It’s a subtle change, but it makes all the difference.
The swirl—oh, the swirl—is my favorite part. I like to keep some batter aside to top with extra chocolate chips or nuts for extra texture. When swirling, I prefer a toothpick or skewer to create medium-width streaks—you want a good marbling without mixing the two batters into one uniform color. And don’t forget to bake just until a toothpick inserted in the center has a few moist crumbs—this keeps them fudgy, not dry.
In terms of ingredient swaps, I’ve experimented with coconut sugar, and it adds a subtle caramel note that’s divine. I’ve also tried dark chocolate chunks instead of chips, which elevates the richness. The key is balancing the moisture: if you use a different flour or sweetener, adjust the zucchini quantity slightly. And finally, don’t skip cooling before slicing—hot brownies tend to crumble, and you want clean, pretty squares.
From the first batch to the dozens I’ve made since, I’ve found that patience and gentle handling are the secrets to success. These brownies are forgiving, but a bit of finesse makes them truly spectacular. Trust your nose and watch for that shiny crackly top—that’s your sign they’re just right. I’ve tested these with little variations, and one thing’s for sure: they disappear fast at my house. So, be prepared for hungry mouths and lots of compliments!
Storing and Reheating Tips
These brownies are best enjoyed fresh, but if you’ve got leftovers (which is rare!), here’s how to keep them perfect. At room temperature, store in an airtight container for up to two days—cover tightly with plastic wrap or a cake dome. I like to lay a sheet of parchment between layers if stacking to prevent sticking. For longer storage, refrigerate for up to a week; make sure they’re sealed well to keep moistness.
If you really want to hold onto them, freezing is the way to go. Wrap individual pieces tightly in plastic wrap, then place in a freezer-safe container or bag. They’ll keep well for up to three months. When ready to eat, thaw at room temperature or warm slightly in the microwave for about 10 seconds—just enough to melt that fudgy center again.
Regarding the glaze—if you’re adding it, I recommend only doing so when serving slices immediately or within a day. Glaze can soften after a while, losing its glossy finish. So, if you like a shiny top, drizzle right before serving or reheat the whole brownie slightly to revive that look and texture.
Frequently Asked Questions
Final Thoughts
This zucchini swirl brownie recipe has definitely earned a permanent spot in my dessert rotation. It combines the indulgence of fudgy, chocolatey goodness with a sneaky veggie twist—what’s not to love? Every time I bake these, I feel like a kitchen wizard, turning humble ingredients into something that feels special but is so easy you’ll wonder why you didn’t start sooner. Plus, the kids’ reactions are priceless—they’re genuinely surprised about the zucchini, but honestly, I think they secretly love the texture and the rich chocolate flavor.
If you’re trying to keep dessert a little healthier or just want a new twist on a classic, give these brownies a go. They’re perfect for sharing, gifting, or just keeping all to yourself—trust me, I won’t tell! And I’d love to hear your versions or any tweaks you try. Drop a comment below, rate the recipe if you love it, and tag me on social media if you post your results. Happy baking, my friend—your taste buds are in for a treat!
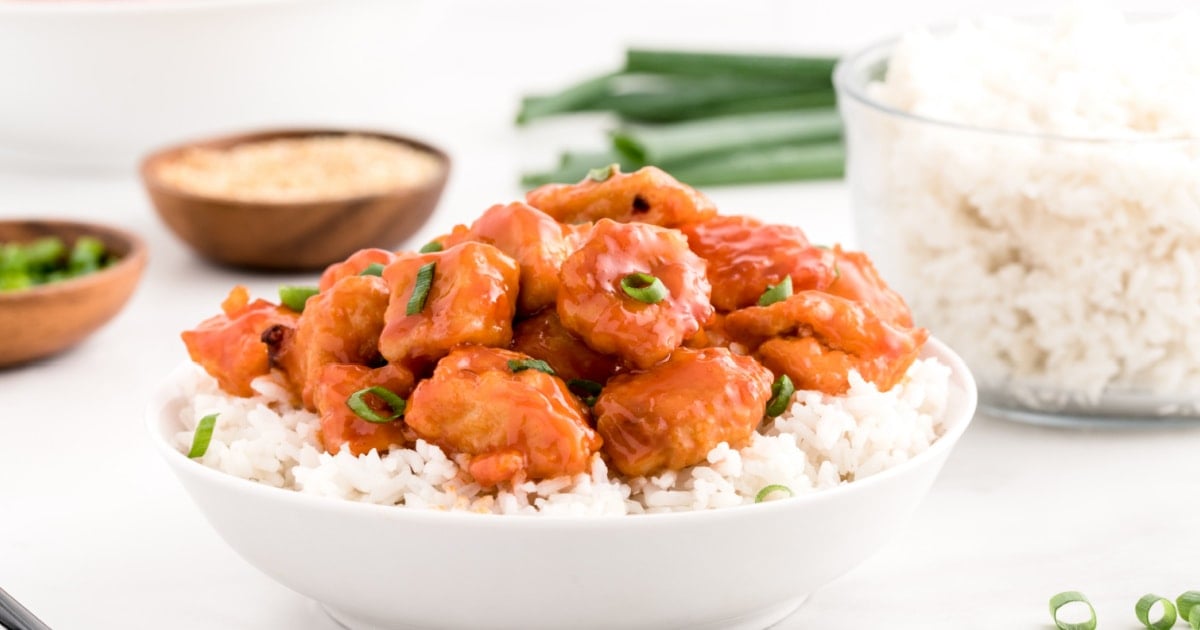
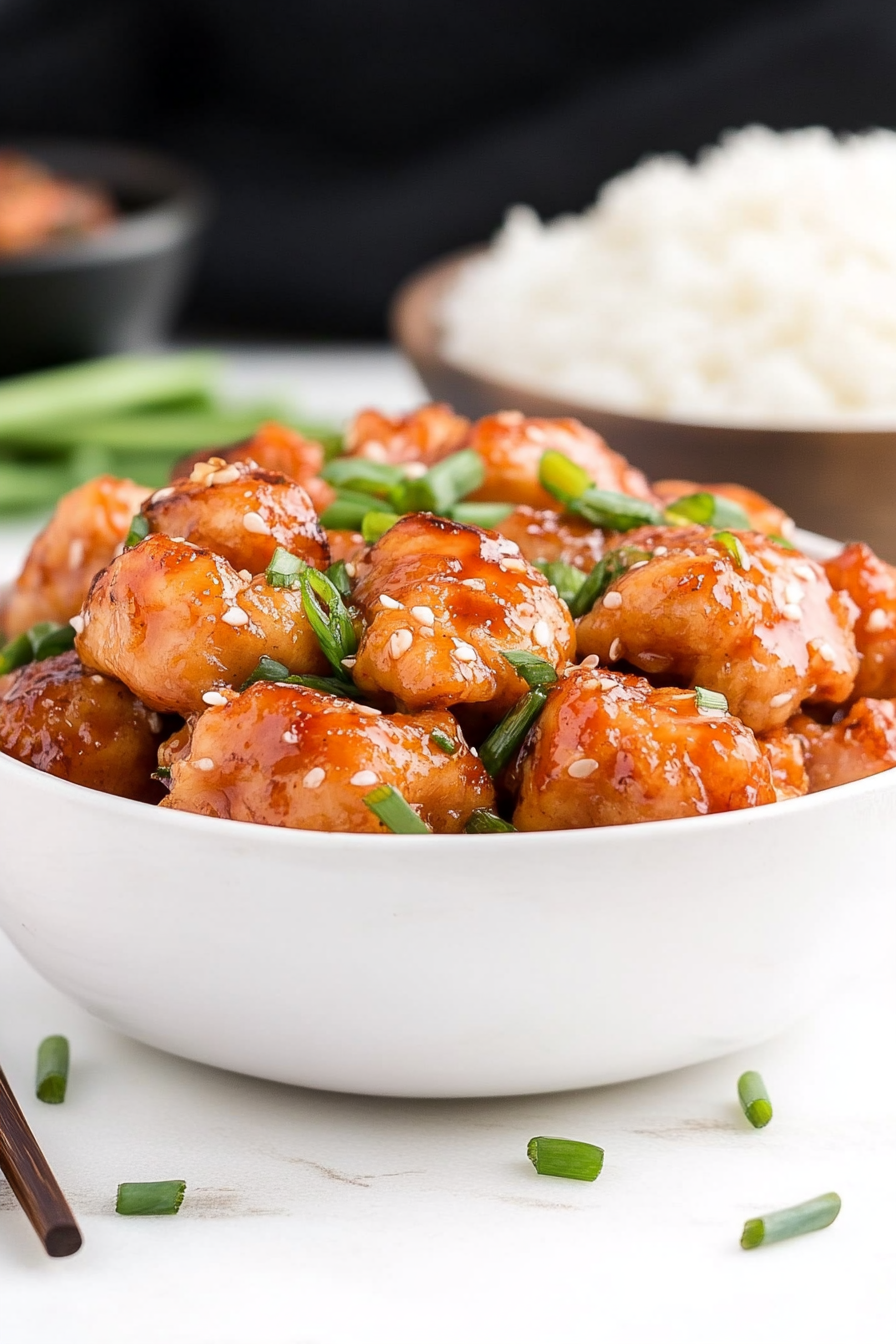
Firecracker Chicken
Ingredients
Method
- Preheat oven to 400°F. Line a large rimmed baking tray with foil and spray with cooking spray. Set aside.
- Cut chicken breasts into 1-inch pieces and place them in a large shallow dish.
- Sprinkle the chicken pieces with cornstarch and toss to evenly coat all sides. Set aside.
- In a small bowl, whisk the eggs. Working in batches of 3-4 pieces at a time, shake off excess cornstarch, then gently toss the chicken in the beaten eggs. Place coated chicken pieces onto a large plate. Repeat until all chicken is coated.
- In a very large skillet, heat vegetable oil over medium-high heat until it reaches about 350°F. Gently place half of the coated chicken pieces into the hot oil in a single layer, ensuring they do not touch and the skillet is not overcrowded. You may need to cook in 2-4 batches.
- Fry the chicken for 1-2 minutes on the first side, then flip and cook for another minute. The goal is to lightly fry the chicken so the coating holds the sauce, not to cook it through.
- Remove the lightly fried chicken to a paper towel-lined tray. Repeat with remaining chicken.
- In a small bowl, whisk together the buffalo wing sauce, sugar, apple cider vinegar, kosher salt, and red pepper flakes to make the sauce.
- Transfer the fried chicken pieces to the prepared baking tray, ensuring they are in a single layer.
- Slowly and evenly pour the prepared sauce over the chicken pieces and gently toss to coat.
- Bake the sauce-coated chicken for 20-25 minutes. After baking, give the chicken another toss on the tray to ensure all pieces are coated. The sauce will thicken slightly as it cools.
- Transfer the cooked chicken to a large serving dish, pour any extra sauce from the tray over the top, and garnish with chopped green onions and sesame seeds.