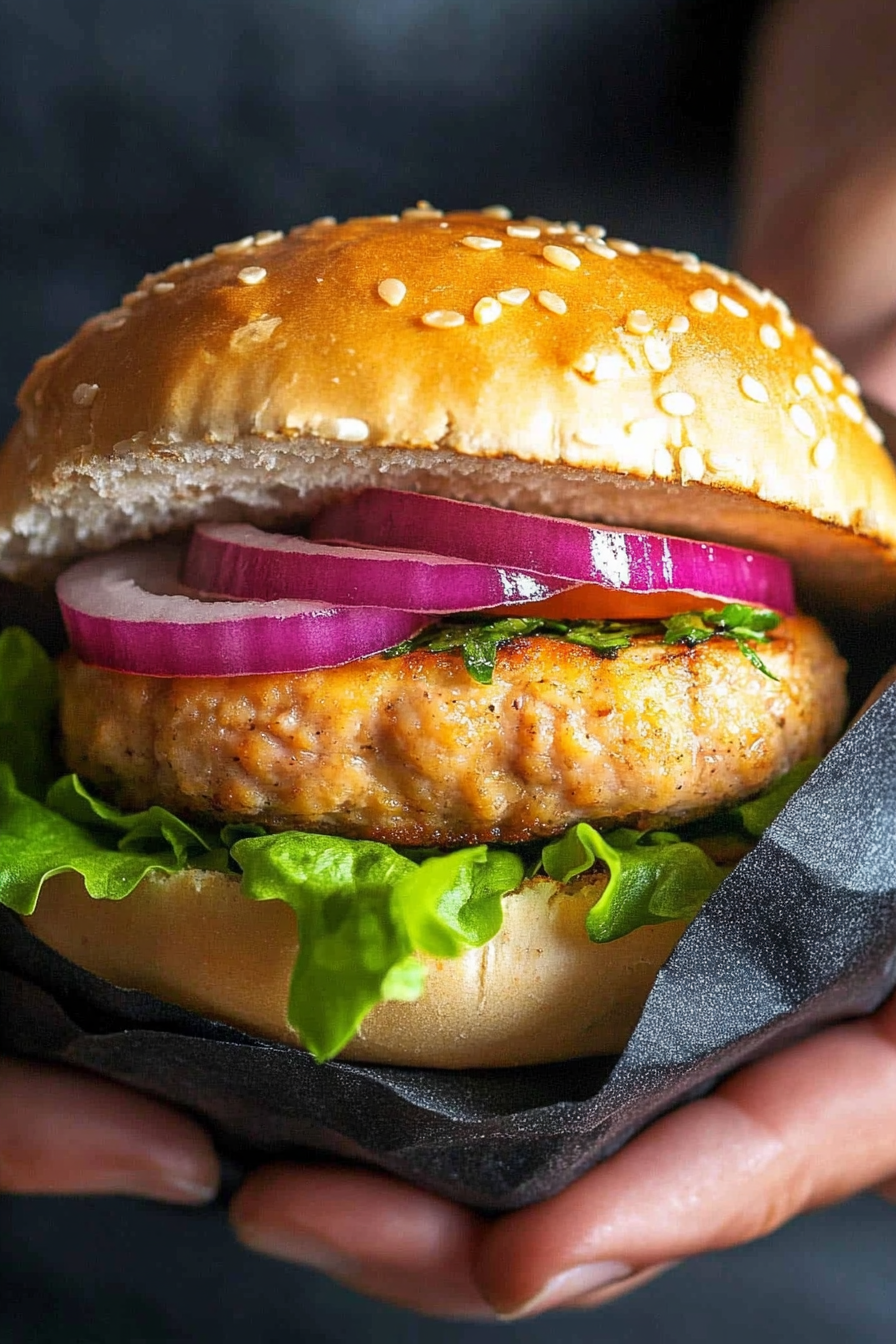
Savory Turkey Burgers A Simple Southwestern Twist
There’s something magic about pulling a warm slice of zucchini swirl cake out of the oven, especially when there’s a little drizzle of glaze on top. I still remember the first time I made this—my grandma’s old recipe, a secret family treasure, was a bit more rustic, but I’ve tweaked it over the years to really make the zucchini shine without overwhelming the sweet, tender crumb. Honestly, I can’t count how many times this has disappeared in minutes at my house. It’s the kind of dessert that doubles as a cozy snack—perfect when you want something sweet but also crave a little vegetable goodness sneaking in. My kids actually ask for this all the time, especially when they’re craving a treat that doesn’t feel totally indulgent. Whether it’s for brunch, afternoon coffee, or a last-minute dinner party, this zucchini swirl cake is my go-to. And trust me, the smell alone when it’s baking is a total mood booster. It’s simple, crowd-pleasing, and honestly, kind of addictive. I always do this when I want to impress without breaking a sweat—just bake, swirl, and enjoy the compliments flooding in.
What is Zucchini Swirl Cake?
Think of zucchini swirl cake as a happy marriage between a moist, tender cake and a lively little surprise of zucchini hidden within. It’s essentially a soft, sweet batter with a generous swirl of zucchini mixture that creates beautiful, marbled patterns when baked. The name “swirl” hints at how the vibrant green zucchini streaks peek through the batter, making each slice look like a work of art. It’s inspired by those rustic loaves and crumb cakes from Grandma’s kitchen—trust me, it’s a comforting, homey dessert. The zucchini keeps the cake moist and adds a subtle earthiness, balancing out the sweetness perfectly. I love how versatile this is—great for breakfast with coffee, a sweet treat after dinner, or even packed in lunchboxes (if you can resist eating it all!). The best part? It’s one of those recipes that feels fancy but is actually super straightforward. Think of it as a delicious, sneaky way to get some greens into dessert without anyone realizing!
Why do you love this movie?
What I love most about this zucchini swirl cake is how it combines so many good things in one bite: tender crumb, just the right sweetness, and a little veggie surprise that makes it feel healthier—well, almost! The flavor profile is subtly fruity with a hint of earthiness from the zucchini, complemented by the sweet, vanilla-scented batter. Plus, it’s incredibly simple to make, which is a lifesaver on busy nights or when unexpected guests show up. The ingredients are budget-friendly, too—most of us have everything lying around in the pantry and fridge. And the versatility? Oh, it’s a game changer. You can serve it warm with a dollop of whipped cream or dust it with powdered sugar for a more casual look. Or skip the glaze altogether if you’re feeling minimalist. I’ve tested this with a few variations—substituting honey for sugar, or adding a splash of almond extract—and honestly, it’s always delicious. It’s the kind of recipe that gets better with time, and I find myself making it on repeat because it always ’satisfies that craving for something cozy and sweet.
Plus, it’s a perfect way to clean out your fridge stash of zucchini during those summer months when it grows like weeds. My kids ask for this all the time, especially when I’ve grated a bunch and need to use it up. They say it tastes like a muffin and a dessert had a beautiful baby, and honestly, I couldn’t agree more. It’s that kind of recipe that makes you feel like a kitchen hero, whether you’re a seasoned chef or a desperate beginner trying to impress someone special. And trust me—once you make it a couple of times, you’ll have your own little tweaks and secrets to share, which makes cooking even more fun.
How do I make Zucchini Swirl Cake?
Quick Overview
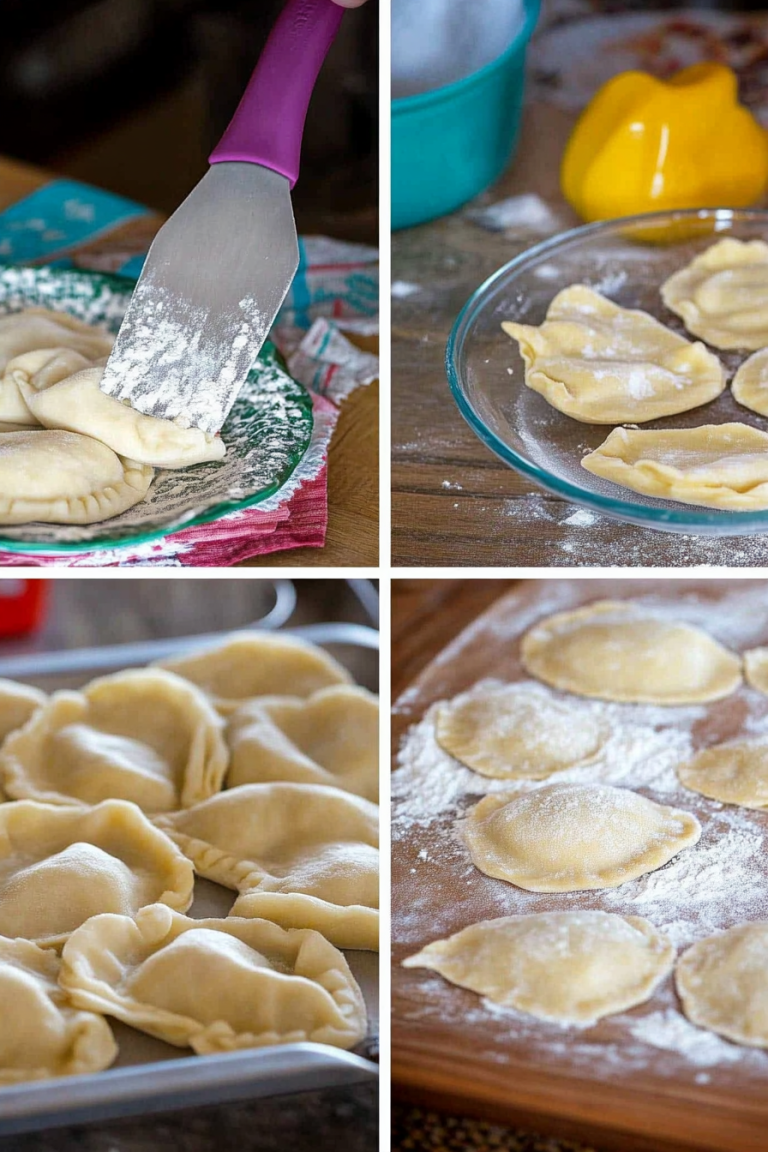
This cake is all about simple steps and cozy flavors. You start by preparing your zucchini—grating it finely and squeezing out excess moisture, because soggy zucchini can mess with the texture. While you do that, you mix up your basic batter with flour, sugar, eggs, butter (or oil if you prefer), vanilla, and a pinch of baking powder and soda to give it lift. Then, you fold the wet ingredients into the dry, careful not to overmix—trust me, this keeps the cake super tender. The fun part comes with the filling: mix a bit of grated zucchini with sugar, cinnamon, and a splash of lemon juice for brightness. Swirl that into your batter in a zig-zag pattern, then bake until golden and fragrant. Once out of the oven, I love drizzling a simple glaze over the top while it’s still warm to let it soak in. It’s quick, straightforward, and really satisfying when you see that beautiful marbled effect appear in every slice.
Ingredients
For the Main Batter:
– 2 cups all-purpose flour (I always use unbleached for better flavor)
– 1 cup sugar (white or a mix of brown and white for richness)
– 1/2 teaspoon baking powder
– 1/2 teaspoon baking soda
– 1/4 teaspoon salt
– 1 teaspoon vanilla extract
– 3 large eggs
– 1/2 cup unsalted butter, melted (you can swap with oil for a lighter version)
– 1/2 cup milk (dairy or almond milk works equally well)
– 1 cup grated zucchini (squeezed dry for best texture)
For the Filling:
– 1 cup grated zucchini (again, well-squeezed)
– 2 tablespoons sugar
– 1 teaspoon cinnamon
– 1 teaspoon lemon juice or zest (optional but adds brightness)
For the Glaze:
– 1/2 cup powdered sugar
– 1-2 teaspoons lemon juice or milk (adjust for desired consistency)
– A dash of vanilla or almond extract (optional)
Step-by-Step Instructions
Step 1: Preheat & Prep Pan
Heat your oven to 350°F (175°C). Grease a 9-inch round or square baking pan—I like lining it with parchment paper for easy removal. Make sure you get every corner—this cake’s moist enough to stick if you don’t prep properly. Set aside, and get your ingredients ready—you’ll want everything within reach to keep the process smooth.
Step 2: Mix Dry Ingredients
In a large bowl, whisk together the flour, sugar, baking powder, baking soda, and salt. This step is important because it evenly distributes the leavening agents and prevents lumps. I’ve learned that using a sifter first makes a fluffier cake, especially if your flour is a bit clumpy. It’s a small thing, but it really makes a difference in the final texture.
Step 3: Mix Wet Ingredients
In another bowl, beat the eggs, melted butter, vanilla, and milk until well combined. The mixture should be smooth and slightly frothy—like a creamy sunrise. I usually do this with a whisk because it blends everything beautifully without overmixing.
Step 4: Combine
Pour the wet ingredients into the bowl of dry ingredients. Gently fold just until combined—don’t overmix, or you’ll end up with a dense, rubbery texture. A few lumps are okay; it’s better to have a slightly lumpy batter than a deflated cake.
Step 5: Prepare Filling
In a small bowl, mix the grated zucchini with sugar, cinnamon, and lemon juice. Let it sit for a few minutes while you prep your batter—this lets the flavors meld and moisture come out, making it easier to swirl into the batter without sinking to the bottom.
Step 6: Layer & Swirl
Pour half of the batter into your prepared pan, then evenly distribute the zucchini mixture over it. Cup your hand and spoon small dollops of the remaining batter on top. Use a toothpick or skewer to swirl through the batter in figure-eight motions. The goal: create beautiful marbled streaks without overmixing. The visual effect is almost as satisfying as the taste!
Step 7: Bake
Pop it into the oven and bake for about 45-50 minutes, or until a toothpick comes out clean. The top should be golden, and your kitchen will fill with an irresistible aroma. Keep an eye on it in the last 10 minutes—oven temps vary, and you don’t want it to overbrown or dry out.
Step 8: Cool & Glaze
Let the cake cool in the pan for about 15 minutes, then transfer to a wire rack. While it cools, whisk together your glaze ingredients. Pour it over the cake while it’s still warm so it seeps into the cracks, adding a lovely sweetness and a shiny look. You can also sprinkle chopped nuts or extra cinnamon on top—my little finishing touch.
Step 9: Slice & Serve
Use a sharp knife to cut through the marbled slices, wiping between cuts for clean lines. Serve warm or at room temperature, maybe with a cup of coffee or tea. This cake is just as good the next day, wrapped tightly, and even tastes fantastic a few days later—if it lasts that long! Honestly, I think the secret is cooling it well before slicing, so the swirl pattern stays perfect.
What to Serve It With
This zucchini swirl cake goes well with so many things, depending on your mood and occasion. I love to serve it alongside a steaming cup of black coffee or a chai latte in the morning—think of it as a breakfast muffin with a little extra sweetness. For brunch, try stacking slices with fresh berries and a dollop of whipped cream or Greek yogurt; it’s like a humble indulgence with a bit of elegance. In the evening, a piece with vanilla ice cream and a drizzle of caramel makes for a decadent dessert that won’t weigh you down. And on lazy weekends, I often just grab a slice with a glass of cold milk or herbal tea—simple, satisfying, and perfect for unwinding. My family’s tradition is to have this on weekend mornings when everyone wakes up a little groggy but craving something homemade and comforting. It’s become a little ritual we all look forward to. Honestly, I think this cake is one of those recipes that tastes even better just sitting on the counter, waiting to be enjoyed at the next moment of quiet happiness.
Top Tips for Perfecting Your Zucchini Swirl Cake
After making this dozens of times, I’ve picked up a few tricks to get it just right every time. Here are my best tips:
- Zucchini prep: Always squeeze out as much moisture as you can after grating. I use a clean kitchen towel to wring out the excess—you’ll avoid a watery batter and a dense cake. Also, pick fresh zucchinis, ideally firm and bright green; older ones tend to be watery and might compromise texture.
- Mixing advice: Overmixing is the enemy here. When combining wet and dry, stir until just barely blended. If you see lumps, that’s fine—this keeps your cake tender.
- Swirl technique: Don’t overthink it—just zig-zag your spoon or skewer through the batter gently. The goal is a marbled pattern, not an exact design, so relax and enjoy the process!
- Ingredient swaps: Want it gluten-free? Swap out all-purpose flour for a 1:1 gluten-free blend. Replacing sugar with honey or maple syrup adds moisture and depth—just decrease the liquid slightly. Feel free to add chopped nuts or chocolate chips to vary the texture.
- Baking tips: Always test with a toothpick—it’s the most reliable indicator. Oven temps differ, so start checking around the 45-minute mark. If it’s golden but not done, cover with foil to prevent overbrowning and continue baking.
- Glaze variations: For a citrus twist, add a splash of orange juice or zest to your glaze. For a richer flavor, mix in a teaspoon of vanilla or almond extract. Adjust the consistency with more powdered sugar or liquid until it’s pourable but not too runny.
Honestly, the biggest lesson I’ve learned is to trust your instincts and keep it simple. The first time I overthought the swirl or added too many complex ingredients, it lost that cozy charm. Now, I embrace the imperfect marbling and focus on the cozy, homey flavor—because that’s what makes it special.
Storing and Reheating Tips
This cake keeps surprisingly well, which makes it perfect for making ahead or leftovers. Store it at room temperature in an airtight container for up to 2 days—just be sure it’s covered well to keep it moist. If you want it to stay fresh longer, pop it in the refrigerator for about 4 days. I recommend wrapping it tightly to prevent it from drying out. To reheat, heat slices gently in the microwave for about 15-20 seconds or warm in a low oven (around 300°F) for 10 minutes. If you’ve added glaze, wait until it’s completely cooled before glazing to prevent it from becoming soggy. Freezing is also an option—wrap slices tightly in plastic and store for up to 3 months. Thaw at room temperature or in the fridge and warm slightly before serving. The glaze can be added after reheating, or you can drizzle a fresh layer on top.
My tip? If you’re planning to freeze, don’t add the glaze until just before serving—glaze is all about that fresh, shiny kick. And if you want to keep the cake feeling as close to freshly baked as possible, store slices separately, so you can just warm up what’s needed without thawing the whole thing. This way, every piece feels like a little slice of comfort, whenever you need it.
Frequently Asked Questions
Final Thoughts
If you’re looking for a cozy, versatile, and unexpectedly delicious way to enjoy zucchini, this swirl cake is your new best friend. It combines the humble vegetable with a tender, flavorful batter that’s simple enough for a weeknight treat but special enough to serve to guests. Over the years, I’ve made this with different variations—adding a handful of chopped walnuts, swapping in coconut sugar, even experimenting with different citrus zests—and every version is a hit. It’s one of those recipes that feels like a warm hug, the kind of thing that makes your kitchen smell incredible and everyone gather around wanting a slice. Plus, it’s endlessly adaptable—you can make it lower sugar, gluten-free, or even vegan with some tweaks. Whatever version you settle on, I promise it’ll become a family favorite. Happy baking, and I can’t wait to hear how yours turns out! Don’t forget to leave a comment or share your own twists—I love hearing your stories and suggestions.
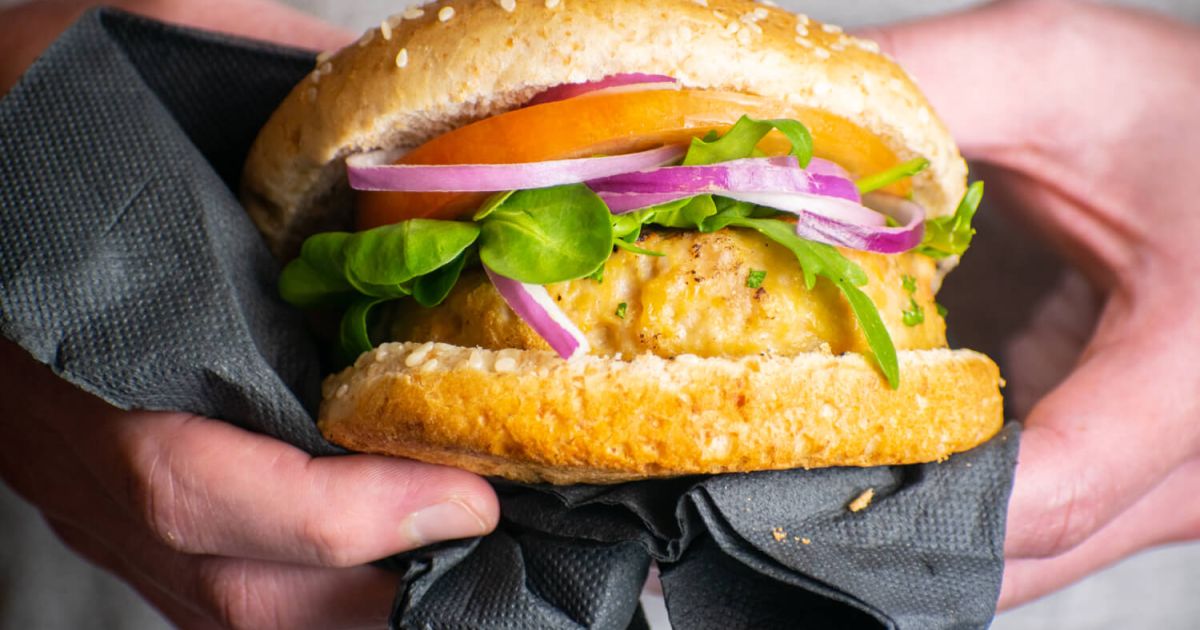
turkey burgers
Ingredients
Method
- Preheat the grill to medium-high heat. In a large bowl, combine ground turkey, bread crumbs, egg, chopped onion, garlic powder, salt, and black pepper. Mix until well combined.
- Divide the mixture into 4 equal portions and shape each into a patty.
- Grill the patties for 6-8 minutes per side or until cooked through and internal temperature reaches 165°F.
- Serve the turkey burgers on buns with desired toppings.