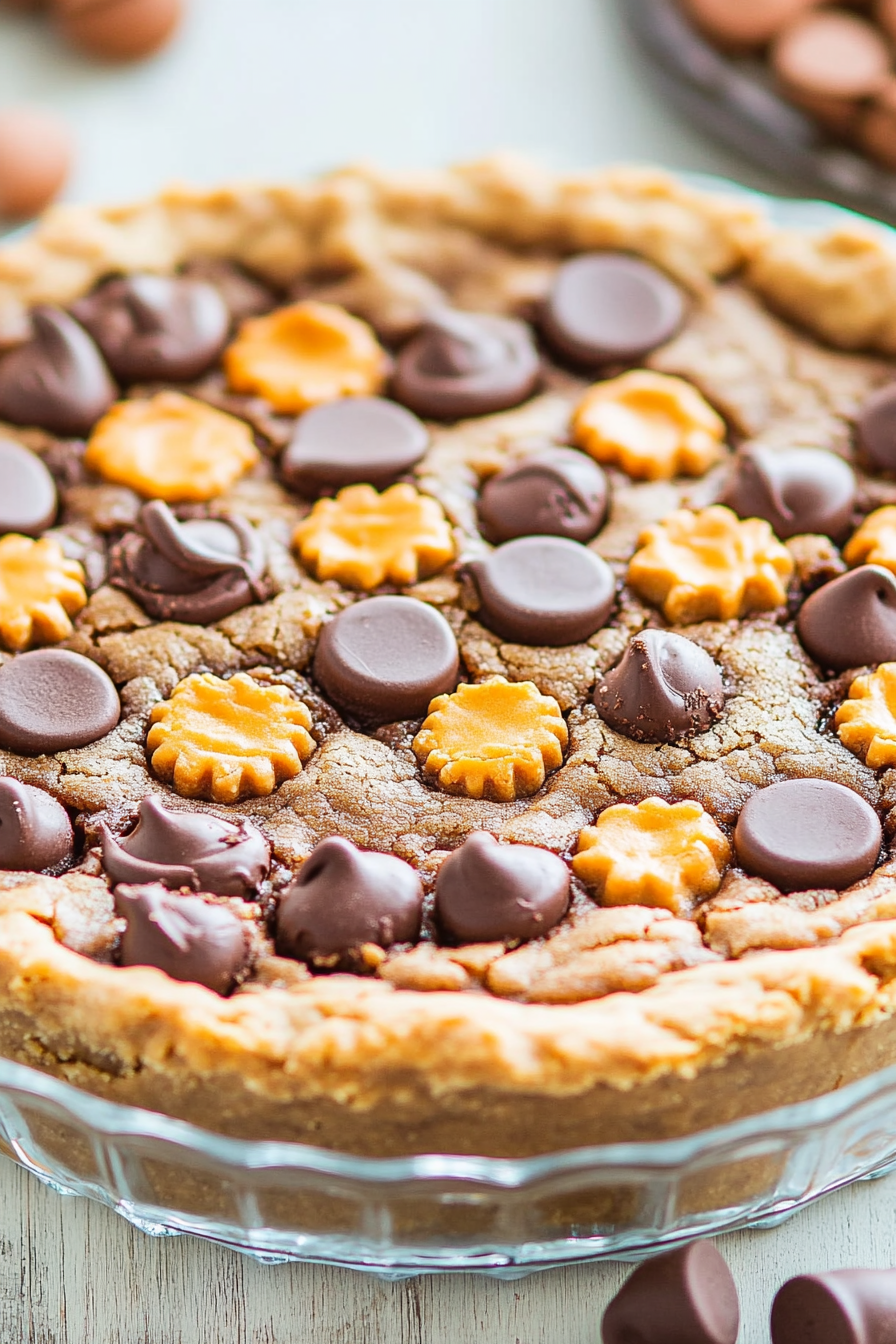
Peanut Butter Cookie Pie How to Make It
There’s something about zucchini baked into a sweet cake that just feels like a warm hug from the kitchen. I remember the first time I made this, it was late summer, and my garden was overflowing with fresh zucchinis. My kids were skeptical—“Zucchini in cake? Really?”—but one bite, and they were hooked. It’s definitely one of those recipes that surprises everyone. The incredible thing? You don’t need fancy ingredients or hours of prep. This brown sugar zucchini cake is my go-to when I want something comforting, a little nostalgic, and totally fail-proof. Plus, the smell alone brings everyone running to the kitchen—trust me on this one. It’s perfect for sneaking those veggies in, and the vanilla glaze drizzled on top? It’s like a fancy bakery treat you can whip up on a weekday. Honestly, I’ve made this countless times, and it never fails to disappear in minutes at my house. So, gather your zucchinis and let’s get baking!
What is brown sugar Zucchini cake?
Think of this as a cozy, moist loaf with a subtle sweetness, where the zucchini keeps every bite surprisingly tender and flavorful. It’s essentially a quickbread-style cake, but with a slightly denser crumb — kind of like a cross between banana bread and a buttery pound cake. The name might sound fancy, but it’s just a tender, sweet cake that indulges in the natural moisture of zucchini, balanced perfectly by the rich, caramel-y taste of brown sugar. The vanilla glaze? That’s the crown, adding a touch of creamy sweetness that makes each bite feel even more indulgent. This cake is a family favorite in my house—and I love that it’s one of those dishes everyone asks for, especially when I have a surplus of zucchinis from the garden. It’s a simple pleasure that brings back childhood summers, and I can’t help but smile every time I make it.
Why you’ll love this recipe?
What I love most about this brown sugar zucchini cake is how effortless it is to put together. Honestly, if you can grate zucchini and stir a few ingredients, you’re already halfway there. The flavor? Pure comfort—warm, caramel notes from the brown sugar paired with the fresh, slightly earthy zucchini. It’s like a cross between a cozy breakfast bread and a sweet dessert, making it versatile for any occasion. Plus, it’s budget-friendly—most of us have the ingredients hiding in the pantry and fridge already. My kids actually ask for this all the time, especially when I drizzle that glossy vanilla glaze on top—so it’s definitely a crowd-pleaser. I’ve also tested it with different types of zucchinis and even apples, and it turns out just as delicious. It’s a perfect way to use up those end-of-season zucchinis, and I promise, once you make it, it’ll become a staple at your house too.
How do I make Zucchini cake?
Quick Overview
This cake comes together in just a few easy steps. First, you grate the zucchini and squeeze out some excess moisture (so it’s not too gushy). Then, you whisk together the dry ingredients—flour, baking powder, spices—and in a separate bowl, stir up the wet ingredients like eggs, melted butter, and brown sugar. You fold everything gently together, add your shredded zucchini, then pour the batter into a prepared loaf pan. After baking for about an hour, you let it cool just enough to handle before drizzling on a silky vanilla glaze. It’s a straightforward process that yields a moist, flavorful cake with little fuss, making it perfect for busy weekdays or casual weekend baking.
Ingredients
For the Main Batter:
- 2 cups grated zucchini (about 2 small zucchinis, shredded and lightly squeezed)
- 1 ½ cups all-purpose flour (I often use unbleached for a richer flavor)
- 1 teaspoon baking powder
- ½ teaspoon baking soda
- ½ teaspoon ground cinnamon (optional but adds a lovely warmth)
- ¼ teaspoon ground nutmeg (trust me, it rounds out the flavor beautifully)
- ½ teaspoon salt
- 1 cup packed brown sugar (the molasses-y flavor just makes this cake irresistible)
- 2 large eggs
- ½ cup melted unsalted butter or oil (I like butter for richer taste)
- 1 teaspoon vanilla extract (the staple in my kitchen)
For the Filling (optional):
- Think of this as a flavor enhancer—sometimes, I fold in some walnuts or a handful of shredded coconut, but honestly, the cake is delicious plain too!
For the Glaze:
- 1 cup powdered sugar
- 2-3 tablespoons milk or cream (add more if you want a thinner glaze)
- ½ teaspoon vanilla extract (or a splash of almond extract for a twist)
Step-by-Step Instructions
Step 1: Preheat & Prep Pan
Set your oven to 350°F (175°C). Grease or line a loaf pan with parchment paper — this helps the cake come out clean and easy to cut. I always do this because I hate fighting with stuck bits after baking. Make sure your zucchini is grated and drained — I usually squeeze out the excess moisture using a clean kitchen towel or cheesecloth to prevent a soggy cake.
Step 2: Mix Dry Ingredients
In a large bowl, whisk together the flour, baking powder, baking soda, cinnamon, nutmeg, and salt. This step is super important because it ensures everything gets evenly distributed — no unpleasant surprises with uneven rising or flavor pockets. I like to sift mine if I have a few extra minutes—little tip that makes a difference!
Step 3: Mix Wet Ingredients
In a separate bowl, beat the eggs, then stir in melted butter or oil, brown sugar, and vanilla. Whisk until smooth and shiny—that’s how you know the sugar has dissolved and everything’s well combined. I’ve tested this with almond milk and it actually made it even creamier, but stick with whole milk or cream for classic richness.
Step 4: Combine
Pour the wet ingredients into the dry and fold gently with a spatula — don’t overmix! Overmixing can make the cake dense, and that’s the opposite of what we want. Just enough to combine everything into a batter. Then, fold in the grated zucchini until evenly distributed. You’ll notice it looks a little thick and chunky, which is perfect!
Step 5: Prepare Filling
If you’re adding anything extra like nuts or shredded coconut, fold them in now. Otherwise, keep the batter as is. Sometimes I sprinkle chopped walnuts on top before baking for added texture—my kids love that crunch!
Step 6: Layer & Swirl
Pour the batter into your prepared loaf pan and smooth the top. If you want to swirl in a little extra flavor—like a swirl of cinnamon sugar or a handful of blueberries—you can gently swirl with a toothpick or skewer. I love doing a few gentle figure-eights for a marbled look, but honestly, it’s just as beautiful plain.
Step 7: Bake
Bake for about 55-65 minutes, or until a toothpick inserted in the center comes out clean. Ovens vary—my tip is to start checking at 55 minutes. The top should be golden and slightly springy. Let it cool in the pan for about 10 minutes before transferring to a wire rack. Trust me, rushing this step can lead to crumbs everywhere!
Step 8: Cool & Glaze
Once cooled slightly, drizzle the vanilla glaze over the warm cake. It seeps in into every crack, making each square mouthwateringly sweet. Let the glaze set for about 10 minutes before slicing—this prevents it from running all over the place.
Step 9: Slice & Serve
Use a serrated knife to cut neat slices. For best presentation, wipe off the knife between cuts. Serve warm or at room temperature, with a cup of coffee or tea. I love this slightly warmed, topped with a dollop of whipped cream or a scoop of vanilla ice cream—yum! It also makes a lovely brunch offering or a casual dessert that feels just a little special.
What to Serve It With
This cake is incredibly versatile. For breakfast, I serve a slice with a cup of strong coffee and some fresh fruit—perfect for a quick, satisfying start. When I’m hosting brunch, I like to place it alongside a yogurt parfait or a cheese platter, with a mimosa on the side for a touch of celebration. As a dessert, the glaze adds just enough sweetness, but I also love dusting the slices with a little powdered sugar or serving it alongside a scoop of vanilla ice cream or a drizzle of caramel. And for a cozy afternoon snack? Warm a slice and spread a bit of butter or cream cheese. It’s one of those recipes that honestly feels like a warm hug—something my family always asks for, especially when zucchini is in season. It’s simple enough to whip up on a weeknight, yet impressive enough to serve to guests. I truly believe you’ll have as much fun baking this as I do — and that pleasure will shine through in every bite.
Top Tips for Perfecting Your Brown Sugar Zucchini Cake
Years of baking have taught me a few tricks to make this cake even better:
- Zucchini Prep: Always drain and squeeze out excess moisture — if your zucchini is too watery, your batter will be thin and the cake might not rise well. I’ve tested grating and squeezing with both a clean dish towel and cheesecloth — both work great, but I prefer cheesecloth for less mess.
- Mixing Advice: Overmixing batter can lead to a dense cake. Fold gently—the goal is just to combine, not beat out all the air. Look for a uniformly moistened batter, with no streaks of flour.
- Swirl Customization: For a pretty pattern, try layering toppings or using a toothpick to create a marble effect. I’ve also added a swirl of honey or maple syrup for extra flavor.
- Ingredient Swaps: Substitute applesauce for some of the butter for a healthier twist, or swap in coconut sugar—just remember it’s less sweet, so adjust accordingly.
- Baking Tips: Place the pan on the middle rack for even baking. Tent with foil if it browns too quickly. Test doneness with a toothpick—if it comes out sticky, give it a few more minutes.
- Glaze Variations: Mix in a splash of lemon juice, or add a teaspoon of cinnamon or vanilla beans to the glaze for extra flavor. Whisk well to get that smooth, shiny finish.
In my own kitchen, I’ve learned that patience is key—let the cake cool completely before glazing, and don’t rush the cutting. The first slice might be a little crumbly, but once you get the hang of it, you’ll be serving bakery-quality slices with that perfect crumb every time.
Storing and Reheating Tips
This cake keeps beautifully at room temperature for a day or two—cover loosely with foil to keep it fresh. For longer storage, I recommend wrapping it tightly in plastic or storing it in an airtight container in the fridge; it will stay moist and delicious for up to 5 days. Reheat in the microwave for about 20 seconds for a warm treat, or enjoy straight from the fridge—either way, it’s just as good. To freeze, wrap slices individually in plastic wrap and place in a freezer bag. Thaw at room temperature or warm gently in the microwave before serving. If you plan to frost or glaze after freezing, I suggest doing so after thawing to keep everything nice and fresh—trust me, it makes a difference! The glaze rehydrates beautifully, giving each slice a shiny, bakery-finish look that’s totally Instagram-worthy. Honestly, I keep a few slices in the freezer for those “I need something sweet but don’t want to bake” days, and it’s a lifesaver.
Frequently Asked Questions
Final Thoughts
If you’re anything like me, you’ll find yourself craving a slice of this cozy zucchini cake at unexpected moments. It’s one of those recipes that feels like a love letter to summer—bright, comforting, and surprisingly versatile. I’ve made it for lazy Sunday mornings, quick weekday treats, and even last-minute dessert guests rave about. The best part? It’s so forgiving and adaptable—throw in nuts, blueberries, or coconut; it’s all delicious. And that vanilla glaze? It’s the perfect finishing touch, adding just enough sweetness and shine to elevate this humble loaf into something special. I hope you give it a try and that it becomes a part of your home baking repertoire like it is in mine. Feel free to experiment—trust your taste buds, and don’t be afraid to make it your own. Happy baking, and I can’t wait to hear how yours turns out!
peanut butter cookie pie
Ingredients
Method
- Preheat oven to 350F. Spray a 9-inch glass pie plate with cooking spray.
- In a microwave-safe bowl, melt the butter on high for about 1 minute.
- Let the melted butter cool slightly, then add the egg, brown sugar, and vanilla. Whisk until smooth.
- Add the peanut butter and stir until combined.
- Stir in the flour and salt until just combined. Do not overmix.
- Fold in the sprinkles and Reese's Pieces.
- Pour the batter into the prepared pie plate. Evenly space the peanut butter cups on top and gently push them down to be flush with the dough.
- Sprinkle extra Reese’s Pieces on top for decoration.
- Bake for 26 to 29 minutes until center is set and a toothpick inserted comes out clean or with moist crumbs.
- Let the pie cool on a wire rack for at least 30 minutes before slicing and serving.