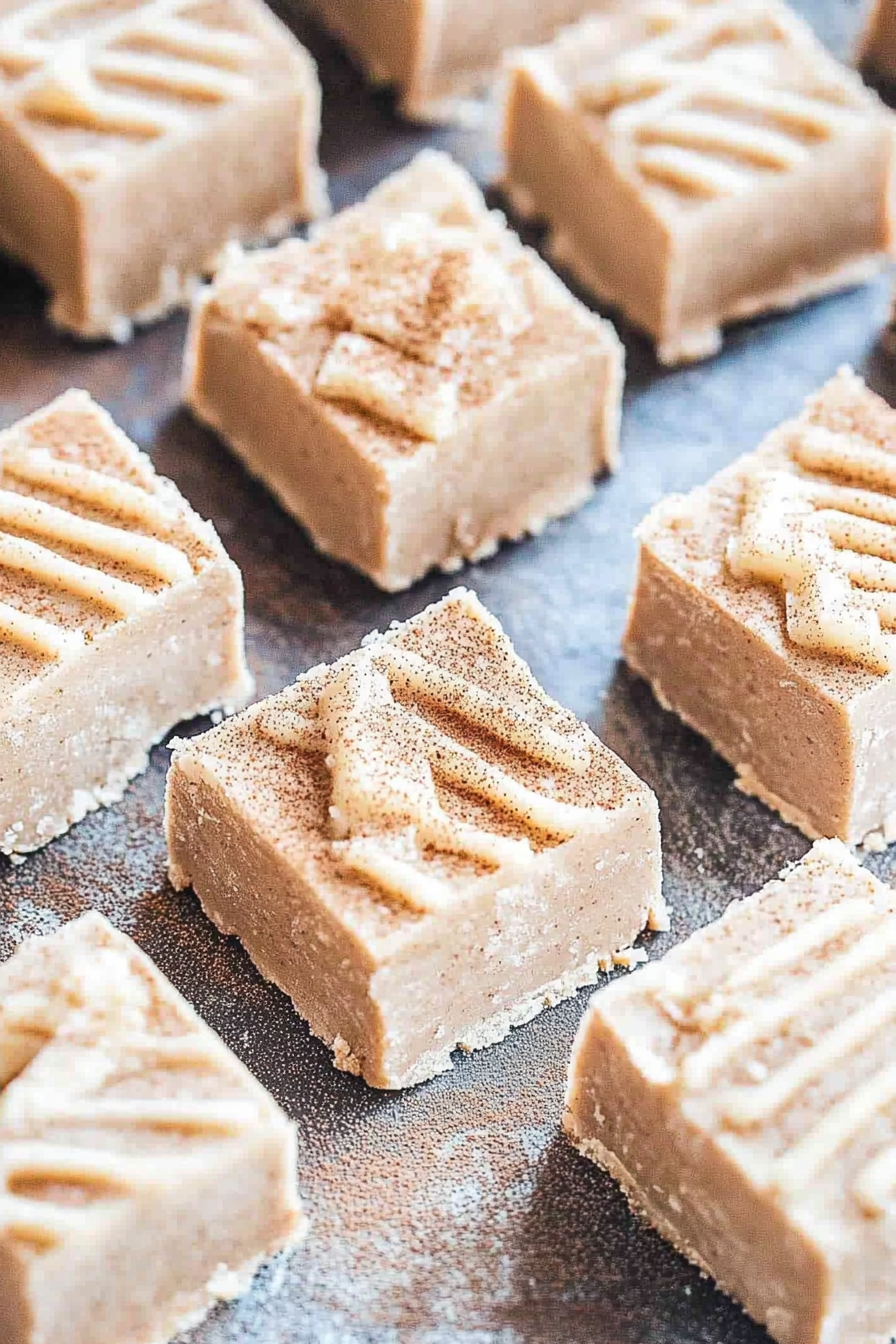
How to Make Cinnamon Roll Fudge
If you’ve ever had a slice of moist, decadent chocolate cake and thought, “Wow, this is amazing — yet somehow I wish it was a little lighter,” then you’re in for a treat. My grandma used to bake something similar when I was little, and I swear that smell of cocoa and baked fruit would fill the whole house, making everybody come running. Years later, I finally cracked the recipe that combines that cozy nostalgia with a sneaky veggie twist you won’t believe. This chocolate zucchini cake is my secret weapon for busy weeknights or when I want something sweet but don’t feel like spending hours in the kitchen. The best part? It’s so straightforward, even if you’re a beginner, you’ll feel like a pro. Plus, using zucchini means I don’t have to feel guilty about indulging — it’s basically like sneaking in veggies while satisfying my sweet tooth. Trust me, this one’s a lifesaver on busy nights when you need comfort food that actually feels good to eat.
What is chocolate Zucchini cake?
Think of it as the chocolate cake version of a cozy hug in cake form. It’s essentially a super moist, fudgy, slightly dense cake that gets an upgrade from fresh zucchini. The zucchinis get grated and folded right into the batter, adding moisture and a subtle veggie sweetness without any fuss. The name’s pretty straightforward — “chocolate” for the rich cocoa flavor, and “zucchini” because that’s what makes it so tender and almost mousse-like inside. It’s a perfect balance of indulgence and clever ingredient swapping. I love how it feels special enough for a family gathering or a weekend brunch, but it’s also simple enough that I can whip it up in under an hour on a weekday. Think of it as that classic chocolate cake with a secret healthy ingredient — because honestly, who doesn’t love a recipe that makes you feel a little better while tasting so indulgent?
Why you’ll love this recipe?
Oh, where do I even start? There are so many reasons I keep coming back to this chocolate zucchini cake. First, the flavor — it’s just so rich and chocolatey that my kids ask for this all the time (and honestly, I don’t mind sneaking in those extra veggies now and then). The cocoa provides a deep, almost bittersweet note, but the sweetness is perfectly balanced without being overly sugary. Then, there’s the texture — it’s incredibly moist and tender, but not heavy or greasy. This is because of the zucchini, which keeps it light yet satisfying. Plus, it’s crazy easy to make. I always do this when I have a few zucchinis lying around, and I need a quick dessert that wows everyone. It’s also budget-friendly — the ingredients are staples in most kitchens, and you can swap things around if you’re missing something. What I love most about this is that it tastes fancy but is absolutely foolproof. It’s versatile, too. Serve it warm with a dollop of whipped cream, or cold with a drizzle of chocolate glaze — either way, it disappears in minutes at my house. This recipe has become a family favorite because it’s all about comforting flavors with just a little twist, and honestly, it’s my go-to when I want something sweet without feeling guilty.
How do I make Zucchini cake?
Quick Overview
This cake comes together surprisingly quickly — the grated zucchini is mixed into a simple batter with cocoa, sugar, eggs, and a few pantry staples, then layered with a fudgy chocolate glaze. The whole process takes about 10 minutes of prep, and the baking is just around 30-35 minutes. I like to start by preheating the oven and grating the zucchini while the oven warms up. Then, I mix up the dry ingredients, toss together the wet, fold everything gently, and pour it into my trusty pan. A swirl of the chocolate filling before baking makes it extra special, and I always test for doneness with a toothpick. Once it’s out of the oven, I let it cool slightly before glazing and slicing — trust me, patience pays off. The smell alone will fill your kitchen with comfort, and I promise, the first slice will make your whole day better.
Ingredients
For the Main Batter:
– 2 cups grated zucchini (about 2 small zucchinis)
– 1 1/2 cups all-purpose flour (or a gluten-free blend if needed)
– 1/2 cup unsweetened cocoa powder (preferably Dutch-processed)
– 1 cup granulated sugar (or coconut sugar for a healthier twist)
– 1 teaspoon baking powder
– 1/2 teaspoon baking soda
– 1/4 teaspoon salt
– 1/2 cup vegetable oil (or melted coconut oil)
– 3 large eggs
– 1 teaspoon vanilla extract
For the Filling:
– 1/2 cup semi-sweet chocolate chips or chopped chocolate
– 2 tablespoons butter or coconut oil
– A splash of milk or cream (to make it smoother, if needed)
For the Glaze:
– 1/2 cup powdered sugar
– 2-3 tablespoons cocoa powder
– 2-3 teaspoons milk or plant-based alternative
– Optional: a sprinkle of sea salt or a splash of vanilla for flavor enhancement
Step-by-Step Instructions
Step 1: Preheat & Prep Pan
Set your oven to 350°F (175°C). Grease a 9-inch round cake pan or line it with parchment paper — I often use a loose-bottom pan for easier removal. Grate your zucchinis and give them a quick squeeze to remove excess moisture; trust me, too much moisture will turn your batter into a soggy mess. Set aside.
Step 2: Mix Dry Ingredients
In a large bowl, whisk together flour, cocoa powder, sugar, baking powder, baking soda, and salt. Mixing the dry ingredients first helps keep everything evenly distributed, so there are no awkward clumps of baking soda or salt later. I learned this trick after a few too-dense cakes!
Step 3: Mix Wet Ingredients
In a separate bowl, beat eggs, then add oil and vanilla. Whisk until combined and slightly frothy. Pour this into the dry ingredients and gently fold together — don’t overmix, or your cake might turn out dense instead of fluffy. The batter should be thick but silky.
Step 4: Combine
Add the grated zucchini into the batter, folding just until evenly incorporated. Stir in the zucchini carefully to preserve the batter’s light texture. If it feels too thick, a splash of milk can loosen it up—just enough to make it pourable but not runny.
Step 5: Prepare Filling
While your batter’s resting, melt chocolate chips and butter over low heat, stirring until smooth. I like to add a splash of milk to loosen it just a tiny bit; this makes swirling it into the batter easier. Pour this chocolate filling over the batter when you’re ready to assemble.
Step 6: Layer & Swirl
Pour the batter into the prepared pan. Dollop the melted chocolate on top and use a toothpick or skewer to swirl it in a figure-eight pattern. This swirling creates a marbled effect that looks gorgeous and makes each bite special.
Step 7: Bake
Pop it into the oven and bake for 30-35 minutes. The edges should be set, and a toothpick inserted into the center should come out with a few moist crumbs. Every oven is a little different, so start checking at 30 minutes. Don’t overbake — you want it moist inside.
Step 8: Cool & Glaze
Let the cake cool in the pan for about 15 minutes—this helps it set and makes slicing easier. Meanwhile, prepare your glaze by mixing powdered sugar, cocoa, and milk until smooth and pourable. Once cooled, spread the glaze over the top, letting it drip down the sides for more visual appeal.
Step 9: Slice & Serve
Use a sharp knife to cut neat slices. I like to serve this slightly warm with a dollop of whipped cream or a scoop of vanilla ice cream, but honestly, it’s so good that it’s perfect just as is. It’s a slice of comfort every single time.
What to Serve It With
This cake is so versatile — it’s a dessert, a snack, or even a slightly decadent breakfast if you’re feeling cheeky. For breakfast, I love pairing a warm slice with a strong black coffee or a glass of cold milk. My kids ask for this on weekend brunches, especially when I sprinkle a little powdered sugar or add some fresh berries on top. As a dessert, it’s perfect with a scoop of vanilla ice cream, a drizzle of caramel, or just a simple dusting of cocoa powder.
If I want to turn it into a more grown-up treat, I sometimes serve it with a splash of port or a glass of cold milk — whatever feels right! The best part? It feels fancy enough to serve to guests but easy enough that I know I can make it without stress. Plus, leftovers are great for breakfast, so it’s an all-around win.
Top Tips for Perfecting Your Chocolate Zucchini Cake
Over the years, I’ve learned a few tricks to make this cake even better. First, always squeeze out as much moisture from the zucchini as possible; the drier it is, the better your cake will turn out. I use a clean kitchen towel and give the grated zucchini a good squeeze, sometimes even pressing it with the back of a spoon. Trust me, it makes a huge difference.
When mixing, avoid overdoing it after adding the flour — a few gentle folds are all it takes. Overmixing leads to dense, rubbery cakes, and nobody wants that. I also experiment with different types of chocolate — bittersweet, milk, or even dark — to tweak the flavor profile according to what I have on hand. Plus, I’ve tested this with almond milk, and honestly, it made the cake even creamier and added a subtle nutty flavor that I loved.
If swirling the chocolate mixture feels tricky, try dotting it over the batter in uneven dollops and then swirling gently with a skewer. That way, you get a marbled look without too much hassle. When baking, I always keep an eye on the clock and check a couple of minutes early if I can — every oven varies, and I want moist, not dry.
For glazes, you can get creative — add a splash of espresso powder for a mocha twist or a pinch of cinnamon for warmth. I usually mix my glaze last minute and keep it slightly runny; that way, it spreads easily and creates a shiny, beautiful finish.
All in all, I’ve made this cake dozens of times, and I still get excited every single time. It’s that rare recipe that’s effortless but always impressive. And honestly, the compliments I get on it make me feel like a baking superstar, even if I’m just winging it in my kitchen.
Storing and Reheating Tips
Once baked, this cake stays delicious for days. I recommend letting it cool completely before storing—if you cover it too soon, it can get sticky or damp on top. Wrap it tightly with plastic wrap or store in an airtight container. At room temperature, it lasts up to 2 days, especially if it’s kept out of direct sunlight. If you want to keep it longer, refrigerate it — just make sure to cover it well so it doesn’t dry out.
In the fridge, it stays fresh for up to 4 days. To reheat, give a slice a quick 10-15 seconds in the microwave or enjoy it cold — both ways are fantastic. If you plan to serve it over several days, I love slicing it and popping individual pieces into the toaster oven for a quick warm-up, which softens the chocolate and makes every bite feel just a little more indulgent.
If you’ve made a larger batch and want to freeze portions, wrap slices tightly in plastic wrap and then foil. Thaw at room temperature for about an hour before serving. I find it keeps well for up to 3 months, making it a perfect make-ahead treat for busy days.
As for the glaze, I usually wait until just before serving to add it — if you store the cake with the glaze on, it can get a little sticky or less shiny over time. Keep the glaze separate and spread it right before slicing for that fresh, glossy look every time.
Frequently Asked Questions
Final Thoughts
If you’re looking for a little slice of happiness that’s simple to make and packed with flavor, this chocolate zucchini cake is it. It’s a recipe that’s been part of my family for years, and I love how it turns out every single time — moist, rich, and just a little surprising. Plus, it’s a sneaky way to get a veggie into dessert, which always wins in my book. Whether it’s for a quick weeknight treat, a special occasion, or just because you need a little chocolate fix, I promise this cake will become a staple in your kitchen too. I encourage you to experiment with toppings, fillings, or even making muffins — the beauty of this recipe is how adaptable it is. So go ahead, grab those zucchinis, turn on some music, and bake your way to a cozy, chocolatey moment. Can’t wait to hear how yours turns out — happy baking!
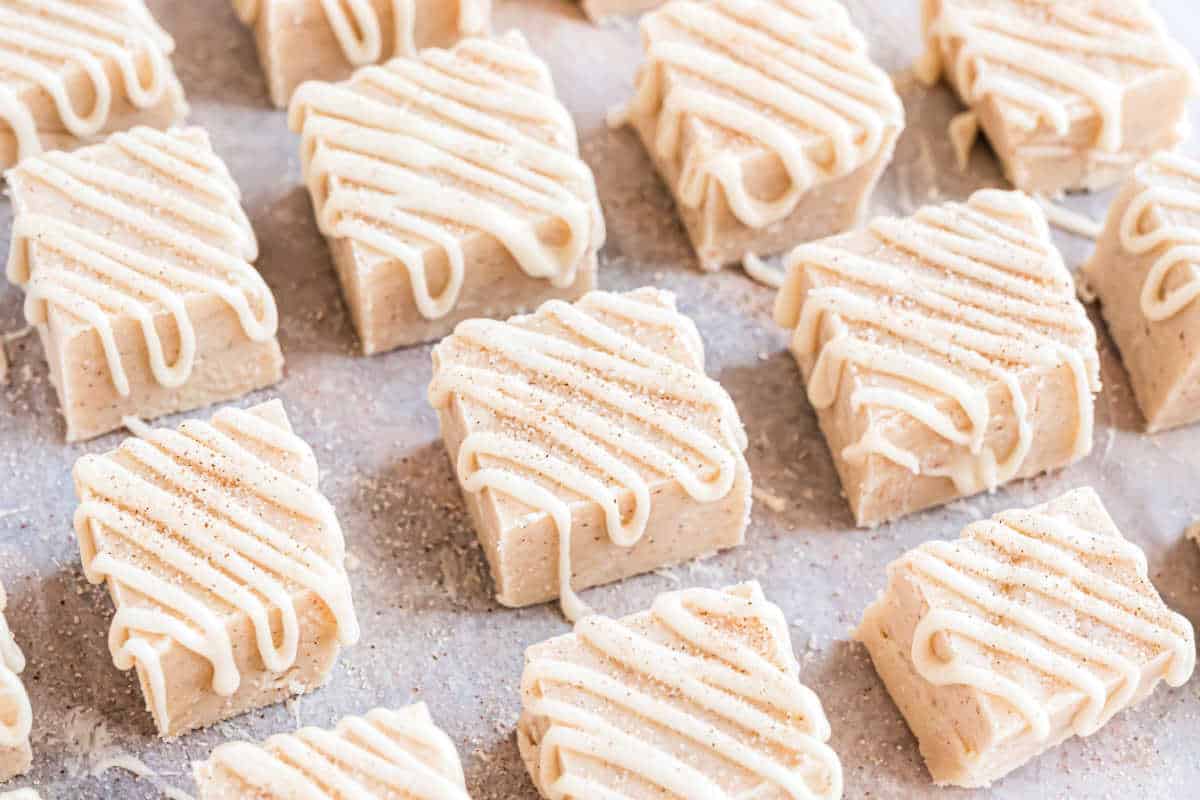
cinnamon fudge
Ingredients
Method
- Line a 13x9 glass baking dish with parchment paper. Set aside.
- In a large saucepan, heat granulated sugar, butter, salt, 1/4 cup cinnamon sugar mix, and heavy cream until combined. Bring to a rolling boil and stir continuously for 4 minutes.
- Remove from heat. Quickly stir in white chocolate morsels, marshmallow cream, and 2 Tbsp cinnamon sugar. Whisk vigorously until smooth. Be patient, this may take a couple of minutes. Works best with an electric mixer.
- Pour fudge into prepared pan and refrigerate for 3 hours, until hardened.
- Remove from pan, remove parchment paper, and lay fudge on a cutting board. Cut into small bite-sized pieces.
- To make drizzle, whisk together the powdered sugar, maple syrup, and heavy cream until smooth. Pour into a ziploc bag, and snip a tiny piece off the corner. Drizzle over cut pieces of fudge. Sprinkle immediately with remaining 1 tsp of cinnamon sugar sprinkles. Place fudge back in refrigerator until icing hardens, about 15 minutes.