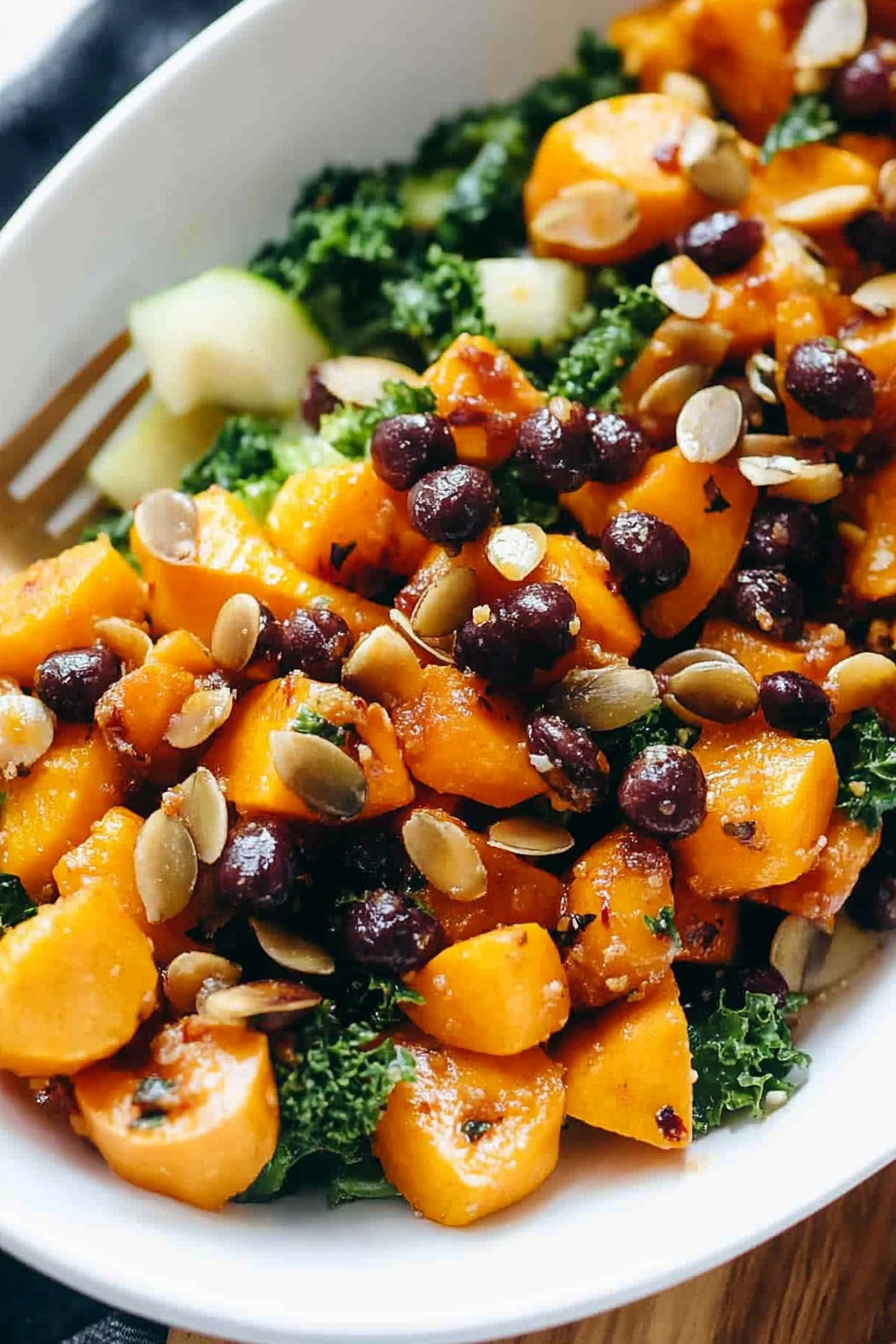
How to Make a Delicious Winter Squash Salad
There’s something about baking that instantly makes the house smell like home, don’t you think? I remember growing up in my grandma’s kitchen, the warm aroma of freshly baked sweet treats wafting through the air, making everyone gather around, just waiting for that first slice. That’s exactly why I fell for this zucchini chocolate swirl cake — it’s comfort, it’s nostalgia, and it’s super simple to whip up, even on those busy weeknights. Honestly, I love that I can sneak in a vegetable without anyone batting an eye — my kids absolutely ask for this all the time, especially when I tell them there’s chocolate involved! It’s honestly like a hug in cake form, and the best part? It’s incredibly forgiving. So if you’re craving something sweet that feels fancy but is actually a breeze, this one’s a lifesaver on busy nights. Plus, I swear, the chocolate swirl makes it look just as beautiful as those bakery masterpieces. Trust me on this — you’ll want to keep making it again and again!
What is Zucchini Chocolate Swirl Cake?
This cake is basically what happens when you take two humble ingredients — zucchini and chocolate — and turn them into something magical. Think of it as a moist, tender sponge with pops of rich chocolate swirls that look like they took hours to perfect, but actually took minutes. The name says it all: “zucchini” because, well, that’s the secret ingredient that keeps it moist and adds a subtle veggie boost, and “chocolate swirl” because I swirl the batter with a luscious chocolate mixture, creating beautiful marbled patterns in every slice. It’s essentially a breakfast cake, a cozy dessert, and a sneaky way to get those greens in, all rolled into one. Think of it as a cross between a super soft banana bread (minus the bananas) and a decadent chocolate cake. It’s inviting, approachable, and absolutely irresistible.
Why you’ll love this recipe?
What I love most about this zucchini chocolate swirl cake is how it balances health and indulgence without breaking a sweat. The zucchini makes it super moist — I’ve tested this with almond milk, and honestly, it made the crumb even creamier — and the chocolate swirl adds a richness that just *sings*. It’s a hit at my house because it tastes like a treat, but you can feel good about serving it. Plus, the ingredients are budget-friendly, almost pantry staples, which makes this my go-to when I want something homemade but don’t have hours to spend in the kitchen. This cake is so versatile too. Sometimes I add a handful of nuts or a splash of vanilla. Other times, I make mini muffins for quick bites. The beauty? It’s forgiving. Overmixing isn’t a big deal here — I learned that after a few tries, and it’s definitely a game changer. And let me tell you, it’s perfect for every occasion: brunch, dessert, or even a cozy snack on a rainy day. The kids call it “the magic cake,” probably because of those beautiful chocolate swirls that look fancy but are sooo easy. Honestly, once I mastered this, it became a household staple. It’s rich, just sweet enough, and downright comforting.
How do I make Zucchini Chocolate Swirl Cake?
Quick Overview
This cake comes together in just about an hour — perfect for last-minute cravings or when unexpected guests show up. Start by grating your zucchini and squeezing out excess moisture to keep the cake light and tender. Make a simple batter with flour, eggs, and a little oil, then prepare a quick chocolate mixture to swirl in. Pour the batter into your loaf pan or cake pan, dollop with the chocolate, and swirl it around with a toothpick or skewer. Bake until a toothpick comes out mostly clean, then cool and glaze optional. It’s seriously foolproof and super satisfying. Once you get the hang of swirling, you can get creative with your patterns. The smell alone will fill your home with warmth — a total mood lifter.
Ingredients
For the Main Batter:
– 1 1/2 cups all-purpose flour (or some almond flour for a gluten-free spin)
– 1 teaspoon baking powder
– 1/2 teaspoon baking soda
– 1/4 teaspoon salt
– 1/2 cup brown sugar or coconut sugar
– 1/2 cup vegetable oil or melted coconut oil
– 3 large eggs
– 1 teaspoon vanilla extract
– 1 cup grated zucchini (about 1 large zucchini, patted dry)
– 1/4 cup milk (dairy or plant-based, I tested with almond milk — worked great!)
For the Filling:
– 1/3 cup semi-sweet chocolate chips or chopped dark chocolate
– 2 tablespoons hot coffee or warm milk (to help melt the chocolate smoothly)
– Optional: a teaspoon of cinnamon or a splash of orange zest for extra flavor
For the Glaze:
– 1/2 cup powdered sugar
– 2-3 teaspoons milk or lemon juice
– A few chocolate shavings or sprinkles for topping
Step-by-Step Instructions
Step 1: Preheat & Prep Pan
Preheat your oven to 350°F (175°C). Line your loaf or cake pan with parchment paper or lightly grease it with butter or non-stick spray. This little step prevents sticking and makes slicing much easier. I always do this first so I don’t forget later — trust me, nothing kills the mood like trying to get a stubborn piece out of a pan!
Step 2: Mix Dry Ingredients
In a medium bowl, whisk together the flour, baking powder, baking soda, and salt. This ensures everything is evenly distributed. I find that sifting isn’t necessary unless you want an extra fluffy crumb, but honestly, a good whisk does the trick. This step is important because it prevents dense patches or blobs later on. Set aside.
Step 3: Mix Wet Ingredients
In a large bowl, whisk together the eggs, sugar, and oil until smooth and creamy. Add vanilla, and then the grated zucchini. As I mentioned, I always squeeze out a bit of excess moisture from the zucchini — it keeps the cake from being too watery. Mix well, but don’t overdo it. You want the batter to come together nicely without turning into a gluey mess.
Step 4: Combine
Gradually add the dry ingredients into the wet, gently folding until just combined. Overmixing will develop gluten and make the cake tough, so stir until you see no dry flour but avoid beating it to death. It’s okay if there are a few lumps — that’s how you get a beautifully tender crumb.
Step 5: Prepare Filling
Place chocolate chips or chopped chocolate in a small bowl. Add warm milk or coffee and stir until smooth. This makes your chocolate swirl extra glossy and easy to drizzle. If you want a richer flavor, sprinkle in a pinch of cinnamon or a bit of orange zest — totally optional but worth trying!
Step 6: Layer & Swirl
Pour half the batter into your prepared pan. Dollop the melted chocolate over the batter — no need for perfect placement here. Then pour the rest of the batter on top. Using a skewer or toothpick, swirl the chocolate down and through the batter in a figure-eight or zigzag pattern. Don’t overdo it; a few gentle swirls are enough to create that gorgeous marbled effect. My kids actually ask for “the swirl pattern” now — it’s become our signature move.
Step 7: Bake
Pop it into the oven and bake for about 40-45 minutes. Check for doneness by inserting a toothpick in the center — it should come out with just a few moist crumbs, not wet batter. If the top is browning too fast, tent it loosely with foil. Timing can vary based on the pan you use, so don’t be discouraged if it takes a few minutes longer or shorter.
Step 8: Cool & Glaze
Let the cake cool in the pan for about 15-20 minutes. Then transfer it to a wire rack to cool completely. I usually wait until it’s just warm for the glaze — adding it too early can cause melting or pooling. Mix together powdered sugar and milk, drizzle it over the top, and sprinkle with shavings or sprinkles if you like. The glaze adds that extra touch of sweetness and looks pretty too!
Step 9: Slice & Serve
This cake is best served at room temperature, sliced with a serrated knife for clean cuts. I love pairing it with a weak coffee or a glass of cold milk — cheers to simple pleasures! The swirls — oh, the swirls! — create such an eye-catching pattern that every piece feels special, even if you hurriedly whipped it up at 9 pm. It’s equally delicious plain or with a dollop of whipped cream or a scoop of vanilla ice cream. Your family is going to go nuts for it.
What to Serve It With
This zucchini chocolate swirl cake is pride of place on our breakfast table during lazy weekend mornings, especially with a steaming cup of coffee or a tall glass of milk. My kids find it fancy enough for brunch, served alongside fresh fruit and maybe a splash of orange juice. When I want to dress it up as a dinner party dessert, I serve slices with a dollop of whipped cream and some berries — the contrast of the creamy topping with the rich chocolate and sweet zucchini crumb is heaven. And honestly, I keep some in the freezer sliced up — a quick dessert fix on busy weeknights. Sometimes, we even have it as an afternoon snack with tea or cocoa; it’s just that versatile and comforting. This cake has become our family’s secret weapon for turning a simple snack into a celebration.
Top Tips for Perfecting Your Zucchini Chocolate Swirl Cake
Over the years, I’ve picked up a handful of tricks that make this cake turn out just right every time. First, always squeeze out the excess water from the zucchini — a soggy crumb is no fun. I find that a clean dish towel or cheesecloth is perfect for this — trust me, it makes a noticeable difference. When mixing the batter, fold gently — overmixing is the enemy of that tender crumb. I’ve made this with just a tad too much stirring and ended up with a dense cake — lesson learned!
Swirling the chocolate is where the fun really begins. Don’t overthink it — a few swoops with a skewer create beautiful marbled patterns, and that randomness is part of the charm. For swaps, you can try Greek yogurt instead of oil for a slightly tangier, even moister cake, or coconut sugar for a deeper caramel flavor. The bake time can vary depending on your pan material — darker pans tend to brown faster, so keep an eye on it in the last 10 minutes.
Personally, I like to add a splash of vanilla or a pinch of cinnamon to give it a more layered flavor profile, but the basic recipe is perfect as is. And don’t forget to test for doneness with a toothpick — it’s the only reliable way to know when it’s just right. Also, when you bake with chocolate chips, I’ve found that warming them a little before swirling gives a silkier texture. Practice makes perfect, so don’t be discouraged if your first batch isn’t picture-perfect — it’s all part of the fun!
Storing and Reheating Tips
This cake is surprisingly great the next day, so don’t worry if you have leftovers. Store it in an airtight container at room temperature for up to 2 days, or in the fridge for up to 4 — just make sure it’s well covered to keep it moist. I prefer wrapping individual slices in plastic wrap and refrigerating them if I want to keep them longer. When reheating, I usually pop a slice in the microwave for about 20 seconds — just enough to soften it up without turning it into a soggy mess. If you’ve glazed it, I recommend doing that shortly before serving so it stays fresh and shiny.
For freezing, wrap slices tightly in plastic wrap and then foil. They hold well for up to 3 months. Thaw in the fridge overnight or at room temp for a quick fix. The texture remains moist and flavorful, and the chocolate swirl stays beautiful after freezing. Just a quick tip: add the glaze after reheating if you’re craving that visual wow factor, and it’ll taste just as good as fresh out of the oven.
Frequently Asked Questions
Final Thoughts
Honestly, this zucchini chocolate swirl cake has become a beloved staple in my kitchen. It’s the kind of dessert that feels indulgent but secretly sneaks in some veggies — because, let’s be real, who can resist that luscious chocolatey swirl? Every time I make it, I get a little thrill watching friends and family’s eyes light up when they see those beautiful marbled patterns. It’s moist, flavorful, and versatile — I’ve even swapped in different chocolates or added hints of citrus. Plus, it’s almost impossible to mess up, which makes it perfect for both beginner bakers and seasoned pros. Whether for a lazy weekend breakfast or a quick after-dinner treat, this cake never disappoints. I encourage you to give it a try — tweak the flavors, make it your own, and enjoy every bite. And hey, I’d love to hear how yours turns out, so don’t forget to leave a comment or tag me if you share your photos. Happy baking, friend — and get ready for a piece of chocolatey heaven!
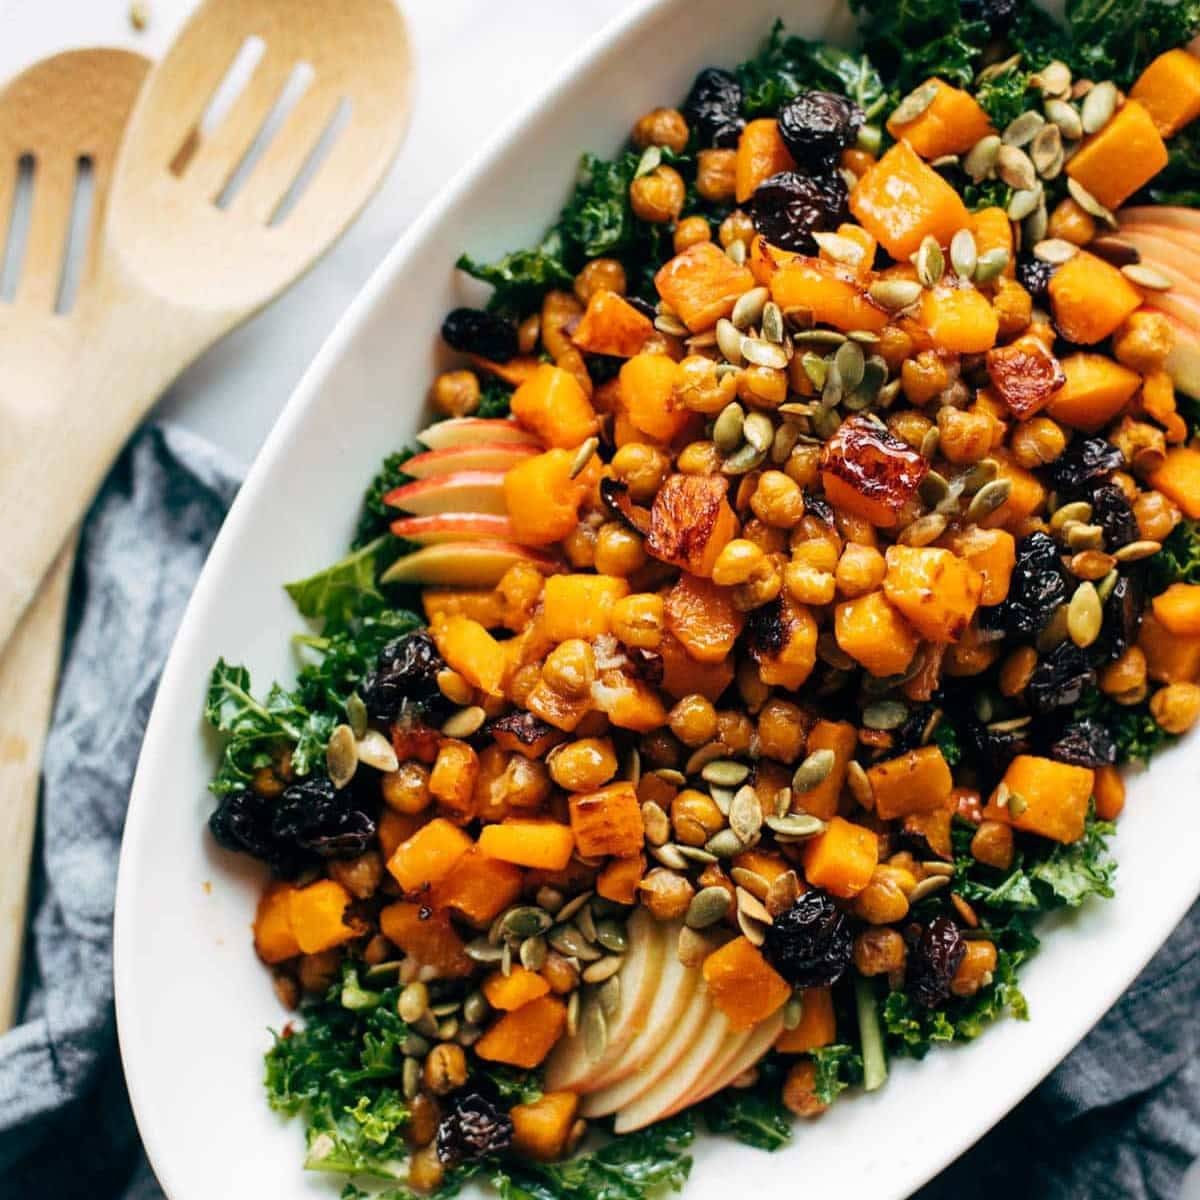
squash salad
Ingredients
Method
- Preheat the oven to 425 degrees Fahrenheit. Place squash and chickpeas on a baking sheet. Drizzle with oil and sprinkle with salt. Roast for 30-40 minutes until tender and caramelized. Roast garlic cloves in foil with a drizzle of oil for the last 20 minutes.
- Whisk together the oil, lemon juice, salt, pepper, and sugar to make the dressing. Mash the roasted garlic and add to the dressing.
- Massage the chopped kale with a portion of the dressing until tender and deep green.
- In a large bowl, combine kale, roasted squash, chickpeas, apple slices, pepitas, and dried cherries. Toss with the remaining dressing before serving.