Game Day Cupcakes How to Score Big
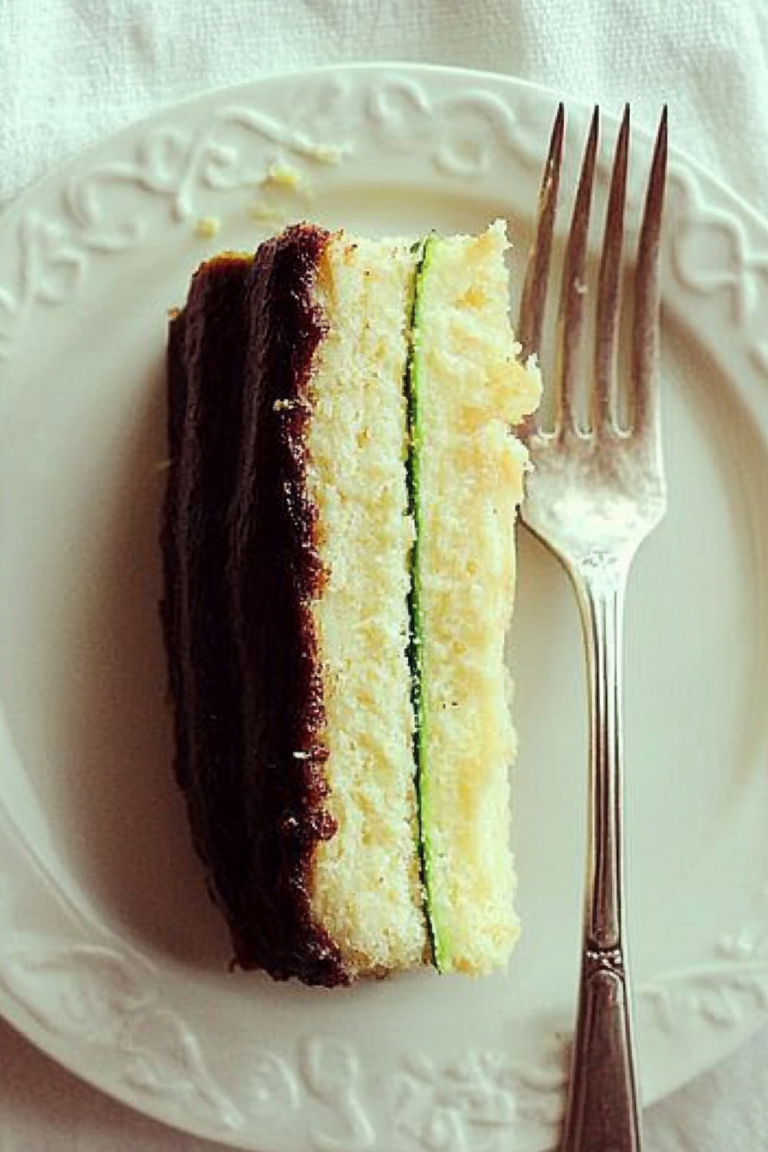
If you’ve ever rummaged through your veggie drawer, stared at a lonely zucchini with a sigh, and thought, “What the heck am I supposed to do with this thing?” then I’ve got a little secret to share. This zucchini chocolate swirl cake is one of those recipes that feels like a sneaky gift—you get to indulge in something sweet, while sneaking in a healthy veggie without even noticing. I tested this cake during a week when I was craving something hearty but didn’t want the usual guilt or the hassle of complicated baking. The smell alone, as it baked, reminded me of my childhood—those lazy weekend afternoons baking with my grandma, giggling over batter drips and tasting spoonfuls of chocolate when my mom wasn’t looking. It’s incredibly soft, moist, and the swirls of deep cocoa make it feel like a fancy bakery treat, but trust me—this is so straightforward that anyone can whip it up on a busy weekday. My kids ask for this all the time, and I love that I can justify a little extra zucchini sneaked in with encouragement that it’s “extra healthy.” It’s a win-win!
What is Zucchini Chocolate Swirl Cake?
Think of this zucchini chocolate swirl cake as a delightful mash-up between a fudgy brownie and a tender banana bread—only it’s made with grated zucchini, which keeps it super moist and adds a sneaky veggie punch. The name might sound fancy, but really, it’s just a loaf of cake with swirls of rich cocoa running through it. The “swirl” part is what makes it special—swirling the chocolate batter into the plain zucchini base creates a marbled effect that’s as pretty as it is delicious. The idea behind it? Use what you already have—extra zucchinis from your garden, perhaps, or a little leftover from yesterday’s grocery run. It’s essentially a quick way to turn healthy veggies into something irresistibly decadent. No complicated frosting needed—just a simple glaze or dusting of powdered sugar, and you’re good to go. Think of it as a little act of baking rebellion—healthy, cozy, and downright addictive.
Why you’ll love this recipe?
What I love most about this zucchini chocolate swirl cake is that it’s one of those recipes I keep coming back to. It’s just so forgiving and adaptable. If you don’t have fancy ingredients in the pantry, it still turns out amazing. Plus, it’s incredibly flavorful—moist, with just the right amount of cocoa bitterness balanced by a touch of sweetness. The smell as it baked? I swear it’s better than a candle shop—rich chocolate, warm zucchini scent, and just a hint of vanilla. This cake’s a lifesaver on busy nights when I want a treat but don’t want to spend hours baking. It’s budget-friendly with pantry staples—flour, eggs, zucchinis, cocoa powder—and it’s perfect when you’re craving something sweet at 10 pm but don’t want to bake a whole cake. My kids ask for this all the time, especially when I tell them it’s partly healthy—yeah, I’ll admit, I love the secret “healthier” twist! The best part? Customizable. Want more coconut? Throw in shredded coconut. Love walnuts? Toss them in. This cake feels like a warm hug—simple, satisfying, and made with love.
How do I make Zucchini Chocolate Swirl Cake?
Quick Overview
This cake is a breeze to make. Start by grating fresh zucchini and squeezing out any excess water (trust me, this step keeps it from getting soggy). Mix together your dry ingredients in one bowl, whisk up your wet ingredients—eggs, oil, vanilla—in another, then gently combine. Pour half the batter into your prepared loaf pan, spread a layer of chocolate batter on top, swirl gently, and repeat. Bake until the top is set and a skewer comes out just clean. Cool slightly, then dust with powdered sugar or drizzle a simple glaze. It’s quick, forgiving, and guaranteed to fill your kitchen with the most comforting aroma.
Ingredients
For the Main Batter:
- 2 cups grated zucchini (squeeze out excess moisture—don’t skip! Every time I forget, I end up with a soggy mess)
- 1 1/2 cups all-purpose flour (or a gluten-free blend if you prefer)
- 1/2 cup cocoa powder (unsweetened, naturally)
- 1 teaspoon baking powder
- 1/2 teaspoon baking soda
- 1/4 teaspoon salt
- 3/4 cup sugar (you can reduce a tad if you like it less sweet)
- 1/4 cup vegetable oil or melted coconut oil (my favorite for moistness)
- 3 large eggs
- 1 teaspoon vanilla extract
For the Filling:
- 1/2 cup melted dark chocolate or chocolate chips (use quality—this makes a difference!)
- Optional: a tablespoon of coffee or espresso powder to intensify the chocolate flavor
For the Glaze:
- 1/2 cup powdered sugar
- 1-2 teaspoons milk or almond milk
- Optional: a dab of vanilla or a pinch of cinnamon for extra warmth
Step-by-Step Instructions
Step 1: Preheat & Prep Pan
Set your oven to 350°F (180°C). Grease your loaf pan well with butter or non-stick spray and line it with parchment paper if you want an easy-out. I always do this—it makes life so much easier. While the oven heats, grate your zucchini and squeeze out every drop of moisture with a clean dish towel or paper towels. This simple trick keeps the cake from turning into a soggy mess.
Step 2: Mix Dry Ingredients
In a large bowl, whisk together the flour, cocoa powder, baking powder, baking soda, salt, and sugar. Mixing these dry ingredients first helps distribute everything evenly, preventing clumps of cocoa or baking soda from sneaking into your batter.
Step 3: Mix Wet Ingredients
In another bowl, beat the eggs lightly, then add the oil and vanilla. I like to add a splash of warm water sometimes, just to loosen it up a bit. Whisk until smooth and fragrant. Then, fold in the grated zucchini—don’t stir too vigorously; just enough to combine. The zucchini should be evenly distributed, and the batter will look thick but moist.
Step 4: Combine
Pour your wet mixture into the dry ingredients. Using a spatula, fold gently until just combined—don’t overmix, or the cake could turn dense. Divide the batter in half. To one half, add melted chocolate; to the other, keep it plain. Now you’ve got your lovely two-tone batter prepared for swirling.
Step 5: Prepare Filling
Melt your dark chocolate gently in the microwave or over a double boiler. If you want a richer flavor, stir in a teaspoon of coffee powder—it makes a surprising difference. Set aside to cool slightly while you assemble.
Step 6: Layer & Swirl
Pour the plain batter into your pan, smoothing it out. Then pour the chocolate batter over the top in dollops. Using a skewer or a knife, swirl gently through the batter, creating gorgeous marbled patterns. No need for perfection—just flicking the tip in random circles is enough. My kids love helping with this part; it’s like art class in the kitchen.
Step 7: Bake
Bake for about 40-45 minutes, or until a toothpick inserted in the center comes out clean or with moist crumbs. Every oven is different—don’t rush. Check around the 40-minute mark; overbaking can make it dry, and nobody wants that.
Step 8: Cool & Glaze
Let the cake cool in the pan for about 10 minutes, then transfer it to a wire rack. Once cooled slightly, you can dust it with powdered sugar for a simple, classic look or drizzle with a quick glaze—just mix powdered sugar with a little milk until you get a pourable consistency. I like adding a splash of vanilla or cinnamon here—I swear it elevates the flavor.
Step 9: Slice & Serve
This cake is best served warm or at room temperature. Use a serrated knife to cut neat slices—resist the temptation to dig in too early, or it might fall apart. I love serving it with a dollop of whipped cream or a scoop of vanilla ice cream if I really want to treat myself. It’s pretty enough to serve at a brunch, but cozy enough for a rainy Sunday afternoon snack.
What to Serve It With
Honestly, this cake is pretty versatile. For breakfast, I like it with a strong cup of black coffee or a frothy latte—kind of like a mocha breakfast! It’s a hit at brunch too, especially when paired with fresh berries or a fruit compote—a splash of acidity balances the richness of the chocolate. As a dessert, a drizzle of caramel or a dollop of mascarpone makes it feel fancy without extra fuss. And if you’re just craving a cozy snack to wind down, cut thick slices and dunk in a mug of warm milk—comfort food at its best.
My family has a tradition of sitting around the kitchen table on weekends, sharing slices of this cake and chatting about everything and nothing. I’ve made this countless times, and it never fails to bring a smile. It’s one of those recipes that feels like a warm hug—simple, honest, and totally delicious.
Top Tips for Perfecting Your Zucchini Chocolate Swirl Cake
Over the years, I’ve picked up a few tricks. First, don’t forget to squeeze out that zucchini. I learned this the hard way after I’d grated a mountain of zucchini, only to have my batter turn into a watery mess. Moisture is sneaky—it sneaks into every crevice, and excess water will make your cake dense or gummy. When grating, I always use the finest side of the box grater and then gently press out the moisture with a clean towel. You’ll notice a big difference in texture and how well it bakes up.
Mixing is another crucial point. Overmixing the batter can lead to a dense, rubbery cake, so I fold gently just until no streaks remain. If you’re swirling the chocolate, don’t jab the batter too hard—gentle movements create prettier marbling and avoid breaking through the structure.
For the swirl pattern, I love to keep it loose—drag the skewer through a few random spots; no need to be perfect. It’s part of the charm. Want more aesthetic effect? Try doing a figure-eight pattern or creating a simple spiral—it’s surprisingly easy and makes the cake look like you bought it from a boutique bakery.
Substituting ingredients? I’ve tested this with coconut oil (amazing flavor) and even almond milk (adds a slightly nutty note and makes it even moister). If you want to make it gluten-free, swap in a good-quality gluten-free flour blend—just remember, the batter might be slightly thicker or thinner depending on the mix. Add a splash more liquid if needed.
Baking tips—every oven bakes differently. I’ve learned to check my cake around the 40-minute mark, and I always do the toothpick test. If it comes out with wet batter, give it five more minutes. Also, placing the rack in the middle ensures even baking. And don’t worry if the top cracks a little—that’s normal with chocolate cakes and just adds to the homemade charm.
Glazes and toppings are another playground. I love adding a touch of cinnamon along with the powdered sugar glaze or mixing in a spoonful of peanut butter into the glaze for a salty-sweet combo. Trust me—these small tweaks keep it interesting.
Honestly, after making this dozens of times, I’ve learned that the real secret is not fussing too much. Just enjoy the process, keep a close eye on the oven, and let your senses guide you. Once you taste that first warm slice, all the little mistakes melt away—it’s pure comfort food.
Storing and Reheating Tips
This cake keeps beautifully for a couple of days—if it lasts that long! I usually store it in an airtight container at room temperature for up to two days. After that, I pop leftovers into the fridge; it likely stays fresh for about 4 days. I recommend covering it well with plastic wrap or placing it in a sealed container—exposure to air tends to dry it out. If you want to keep it around longer, freezing is your friend. Wrap individual slices tightly in plastic wrap, then foil, and freeze for up to a month. To reheat, microwave slices for about 20 seconds or serve at room temperature—either way, it’ll still be moist and yummy. When adding glaze or toppings after storage, do so just before serving to keep the freshness intact. These small tips help keep the cake tasting just as good as fresh out of the oven!
Frequently Asked Questions
Final Thoughts
This zucchini chocolate swirl cake is one of those recipes I secretly hope you try—because once you do, it’s hard not to fall in love. It’s warm, indulgent, and surprisingly healthy, especially with the sneaky zucchini sneak-in. Every time I make this, I think about how simple ingredients come together to create something that feels special—whether it’s a busy weekday treat, a weekend brunch centerpiece, or just a way to brighten up any day. If you give it a shot, I’d love to hear how yours turns out—trust me, your kitchen will smell amazing, and your family will thank you. Happy baking, and remember—sometimes the best recipes are the ones that feel like a little secret between friends. Enjoy every bite!

football cupcakes
Ingredients
Method
- Preheat oven to 300°F and prepare cupcake liners. Mix dry ingredients. Whisk wet ingredients. Combine wet and dry, add water, then bake for 18-23 minutes. Cool.
- Beat butter until smooth. Add powdered sugar and vanilla. Mix with cream and salt. Divide and color buttercream for decorating. Mix cocoa into some buttercream for the chocolate layer.
- Fill piping bag with chocolate buttercream. Pipe football shapes on cupcakes. Add green buttercream around footballs for grass. Use white buttercream to pipe laces. Serve and store leftovers in an airtight container.