Easy Slow Cooker Mexican Pork Taquitos
There’s something about biting into a slice of this zucchini banana swirl cake that just feels like a warm hug. I remember the first time I whipped this up on a lazy Sunday afternoon, and honestly, it surprised me how such simple ingredients could turn into something so moist, flavorful, and downright addictive. My kids ask for this all the time, especially when I want to sneak in a veggie without them noticing—because let’s be honest, hiding zucchini in baked goods is *almost* as fun as eating it outright! The smell alone when it bakes will fill your whole house with a cozy, sweet aroma that makes everyone come running. It’s that perfect combination of wholesome and indulgent, a treat that feels like you’re cheating on your healthy eating goals but actually isn’t. Trust me, I’ve made this countless times—it’s become one of my go-to recipes when I need something comforting yet easy. And the best part? It’s one of those desserts that looks impressive but comes together pretty quickly, so it’s definitely a lifesaver on busy nights or when unexpected guests drop by.
What is a Zucchini Banana Swirl Cake?
Think of this zucchini banana swirl cake as a lovechild of comfort food and healthy eating. It’s essentially a moist, tender cake made with ripe bananas and shredded zucchini, giving it an incredible soft texture and a subtle sweetness. The “swirl” part comes from gently swirling in a cinnamon-spiced cream cheese or butter filling—your choice—and creating beautiful marbled ribbons that make each slice a little masterpiece. This cake is a bit of a rustic beauty, not overly perfect but absolutely delicious. The name hints at the surprise ingredient—zucchini—which, if you’ve ever snuck it into muffins or bread, might sound unusual at first. But trust me, once baked, it melts into the batter, adding moisture without overpowering the flavor. It’s a clever way to get some extra veggies into your diet while satisfying that sweet tooth. Think of it as a sneaky, cozy cake you can enjoy with your morning coffee or as a weekend dessert that’s way more wholesome than it looks.
Why you’ll love this recipe?
What I love most about this zucchini banana swirl cake is how flexible it is—seriously, you can customize it endlessly. The flavor is just perfect: there’s a warm hint of cinnamon and vanilla that pairs so beautifully with the natural sweetness of bananas and the subtle earthiness of zucchini. It’s like a cozy hug in every bite. The best part? It’s super simple to put together. I’ve tested this with different types of sugar—brown, coconut, even a splash of honey—and it always turns out moist and flavorful. Plus, it’s budget-friendly! The ingredients are pantry staples you probably already have—ripe bananas, zucchinis from your garden or fridge, some flour, and a few extras. And then there’s the versatility: you can enjoy it as a breakfast treat, a casual snack with coffee, or a fancy dessert topped with a bit of whipped cream or a drizzle of caramel. Honestly, what I love most about this is how it manages to feel wholesome yet indulgent—my kids actually *ask* for seconds of this, which says a lot. Plus, if you’re into meal prepping or looking for a recipe that keeps well, this cake is a real winner—it stays moist and tastes even better the next day. It’s a recipe I come back to again and again because it never fails to impress or satisfy.
How do you make a Zucchini Banana Swirl Cake?
Quick Overview
This cake is a breeze to make, especially once you get the hang of folding in the shredded zucchini and swirling the cream cheese mixture. It starts with preheating your oven, mixing dry ingredients, then wet ingredients, and gently combining everything. The swirl part is where the magic happens—spreading your batter into the pan, dolloping the filling on top, and swirling it around for that beautiful marbled effect. Baking is straightforward, just about 40-45 minutes in a moderate oven, and cooling slightly before glazing or serving. It’s perfect when you want something satisfying but not overly complicated. I always do this when I need a little comforting dessert or when friends pop in unexpectedly. The texture is divine—moist, tender, with a slight chew from the zucchini that nobody suspects. Once baked, I like to finish with a simple glaze or a dusting of powdered sugar—it elevates the look and taste without fuss.
Ingredients
For the Main Batter:
– 2 cups all-purpose flour (I prefer unbleached for better flavor)
– 1 teaspoon baking powder
– ½ teaspoon baking soda
– 1 teaspoon ground cinnamon
– ¼ teaspoon salt
– ⅓ cup coconut oil or melted butter
– ¾ cup granulated sugar (or coconut sugar for a healthier twist)
– 2 ripe bananas, mashed well
– 1 teaspoon vanilla extract
– 1 cup shredded zucchini (squeeze out excess moisture with a clean towel)
For the Filling:
– 4 ounces cream cheese, softened
– ¼ cup powdered sugar (or maple syrup for a less sweet version)
– ½ teaspoon vanilla
– A pinch of cinnamon (optional but adds warmth)
For the Glaze:
– ½ cup powdered sugar
– 1-2 teaspoons milk or lemon juice
– A few sprinkles of cinnamon or zest of lemon for extra flavor
Step-by-Step Instructions
Step 1: Preheat & Prep Pan
Set your oven to 350°F (180°C). Grease a 9-inch round or square baking pan with butter or non-stick spray. Line it with parchment paper if you want easy removal. First, grab your zucchini—shred it on a box grater, then give it a gentle squeeze to remove excess water. This step is crucial because too much moisture can make your cake soggy. I’ve made the mistake of skipping this—and let me tell you, it doesn’t taste as nice. Just set the shredded zucchini aside as you gather your other ingredients. Meanwhile, in a small bowl, soften your cream cheese for the filling so it’s easy to spread later. This little prep saves time and stress once you’re ready to assemble.
Step 2: Mix Dry Ingredients
In a large bowl, whisk together the flour, baking powder, baking soda, cinnamon, and salt. This ensures everything gets evenly distributed and prevents clumping later. I always do this first—it’s kind of satisfying to see the dry ingredients come together, and it’s a good habit for even baking. Make sure your flour isn’t lumpy; sift if needed. You want a light, airy batter, so don’t skip this step! Setting the dry ingredients aside, you’re almost ready to combine everything for a fluffy, moist cake.
Step 3: Mix Wet Ingredients
In another bowl, mash your bananas with a fork until smooth, then stir in the sugar, vanilla, and melted butter or coconut oil. I tested this with almond milk once, and honestly, it made the cake even creamier—so don’t hesitate to experiment! Whisk until everything’s well combined. The smell of ripe bananas and cinnamon instantly makes your kitchen smell like cozy heaven. Make sure your wet ingredients are at room temperature for a smooth mix—cold bananas can cause lumps, and you definitely want a silky batter.
Step 4: Combine
Pour your wet mixture into the dry ingredients and gently fold together with a spatula. The key here is not to overmix—you want just combined, with some small lumps ok. Overmixing can make your cake dense. Now add in your shredded zucchini, folding it in gently. The batter will look somewhat thick but moist—perfect. I usually do a few gentle turns, then set it aside while I prepare the swirl filling.
Step 5: Prepare Filling
In a small bowl, beat your softened cream cheese with powdered sugar and vanilla until smooth. I like to add a tiny pinch of cinnamon here for warmth. The filling should be creamy but not runny, so if it’s too loose, pop it in the fridge for 10 minutes before swirling. This stuff is what gives the cake its delightful marbled look and that subtle tang that balances the sweetness perfectly.
Step 6: Layer & Swirl
Pour half of the batter into your prepared pan, spreading it evenly. Dollop spoonfuls of the cream cheese filling over the batter, then top with the remaining batter. Using a toothpick or skewer, gently swirl through the batter—don’t overdo it or you lose the marbling. You want artistic streaks, not a muddy mess. I find swirling in a zigzag pattern or figure-eight gives it a beautiful, rustic look that everyone will admire.
Step 7: Bake
Place your cake in the oven and bake for 40-45 minutes. When it’s done, the top should be golden and a toothpick inserted in the center comes out clean. Sometimes I check at 38 minutes—every oven is a little different! If your edges brown too quickly, tent with foil. Let it cool in the pan for about 15 minutes before transferring to a wire rack. Patience here is key—trust me, rushing it can cause cracks or crumbling.
Step 8: Cool & Glaze
Once cooled slightly, drizzle your glaze over the top. I like mixing powdered sugar with a splash of milk or lemon juice—just enough to create a pourable consistency. It’s the perfect finishing touch that adds a little extra sweetness and shine. If I’m feeling fancy, I sprinkle a pinch of cinnamon or some lemon zest on top. Wait until the glaze sets a bit—about 10 minutes—before slicing.
Step 9: Slice & Serve
Use a sharp serrated knife to slice carefully—this cake is moist, so gentle sawing is best. Serve it warm or at room temperature with a dollop of whipped cream or a few fresh berries if you like. I love pairing this with a hot cup of coffee or herbal tea. It’s great for breakfast, brunch, or an afternoon snack. The slices hold beautifully and taste just as good the next day—if you can resist eating it all right away, that is!
What to Serve It With
This cake is so versatile that it practically can do it all! For breakfast, I love serving a warm slice with a steaming mug of coffee—maybe topped with a little extra banana slices or chopped nuts. It’s a cozy start to the day, and honestly, it’s kid-approved, too. During brunch, I like to dress it up with some whipped cream, a drizzle of honey, or even scoop of vanilla ice cream if I’m feeling indulgent. It makes a delightful planter, especially if you add a touch of zest or citrus swirl on top. As a dessert, you can elevate it with caramel sauce or a dusting of powdered sugar and some fresh berries—my favorite combo. And if you’re just craving comfort, a simple warm slice with a pat of butter or nut butter on top works perfectly. This cake has become a family favorite, often making its way onto the table during weekend get-togethers or lazy afternoons. It’s about those little moments of joy—sharing a slice with loved ones and watching their faces light up as they taste something that’s equal parts simple and special. Trust me, once you try it, it’ll become a staple in your recipe box too.
Top Tips for Perfecting Your Zucchini Banana Swirl Cake
I’ve made this cake dozens of times, and I’ve picked up a few tricks along the way that really can make a difference. First, when shredding zucchini, always squeeze out as much water as you can; this keeps your cake rich and moist without the sogginess. I learned this after battling a too-wet batter that wouldn’t bake through properly. For mixing, fold gently—overmixing can lead to a dense, gummy texture. Use a spatula and just combine until you see no dry flour—you want a lightly lumpy batter; that’s what keeps your cake tender. When swirling your filling, don’t overdo it—you want a marbled effect, not muddy streaks. My tip is to do a few gentle zigzags with a toothpick or skewer—trust me, it’s all about presentation and texture. You can swap out ingredients too: try coconut sugar instead of white sugar for a deeper caramel flavor or coconut oil for added richness. For the swirl, some add a teaspoon of nut butter or chopped nuts for extra texture. When baking, always check with a toothpick at the 40-minute mark—every oven is different. If your cake browns too quickly, tent loosely with foil after 30 minutes. And finally, if your glaze seems too runny, let the sugar absorb for a few minutes, or add a bit more powdered sugar. A little patience and care go a long way for that perfect shine and set.
Storing and Reheating Tips
This cake keeps well, which is great if you want leftovers—or need to prep ahead. If you’re not serving immediately, store it in an airtight container at room temperature for up to 2 days. Just be sure to cover gently with foil or a cake dome to keep it fresh. For longer storage, refrigerate it in a sealed container—just allow it to come to room temperature before slicing so it stays moist. Freezing works wonderfully, too. Wrap individual slices tightly in plastic wrap, then place in a freezer-safe bag or container. They’ll hold for up to 3 months! For thawing, leave it out at room temp for about 20-30 minutes or gently warm slices in the microwave—just be careful not to overheat or it can dry out. As for the glaze, it’s best to add it just before serving so it sets beautifully. If you want to re-glaze a refrigerated cake, dust with powdered sugar or reapply a quick drizzle of glaze on the slice—you’ll hardly notice the difference.
Frequently Asked Questions
Final Thoughts
This zucchini banana swirl cake has truly become one of my kitchen staples. It’s a humble-looking treat that delivers on taste, moisture, and a touch of wholesome goodness. Every time I bake it, I think about the first time my kids took that first bite—their eyes lit up, and I knew I’d nailed it. It’s perfect for mornings when you need a quick breakfast, a cozy afternoon snack, or a casual weekend dessert to share with loved ones. The fact that you can sneak in zucchini and bananas, so it’s both comforting and a little bit wholesome, makes it extra special. I encourage you to experiment with the fillings, toppings, or even add nuts or chocolate chips—make it your own. I’d love to hear how yours turns out or see your creative twists! Happy baking, or as I like to say, happy making something sweet and simple that brings everyone together. Enjoy every crumb!
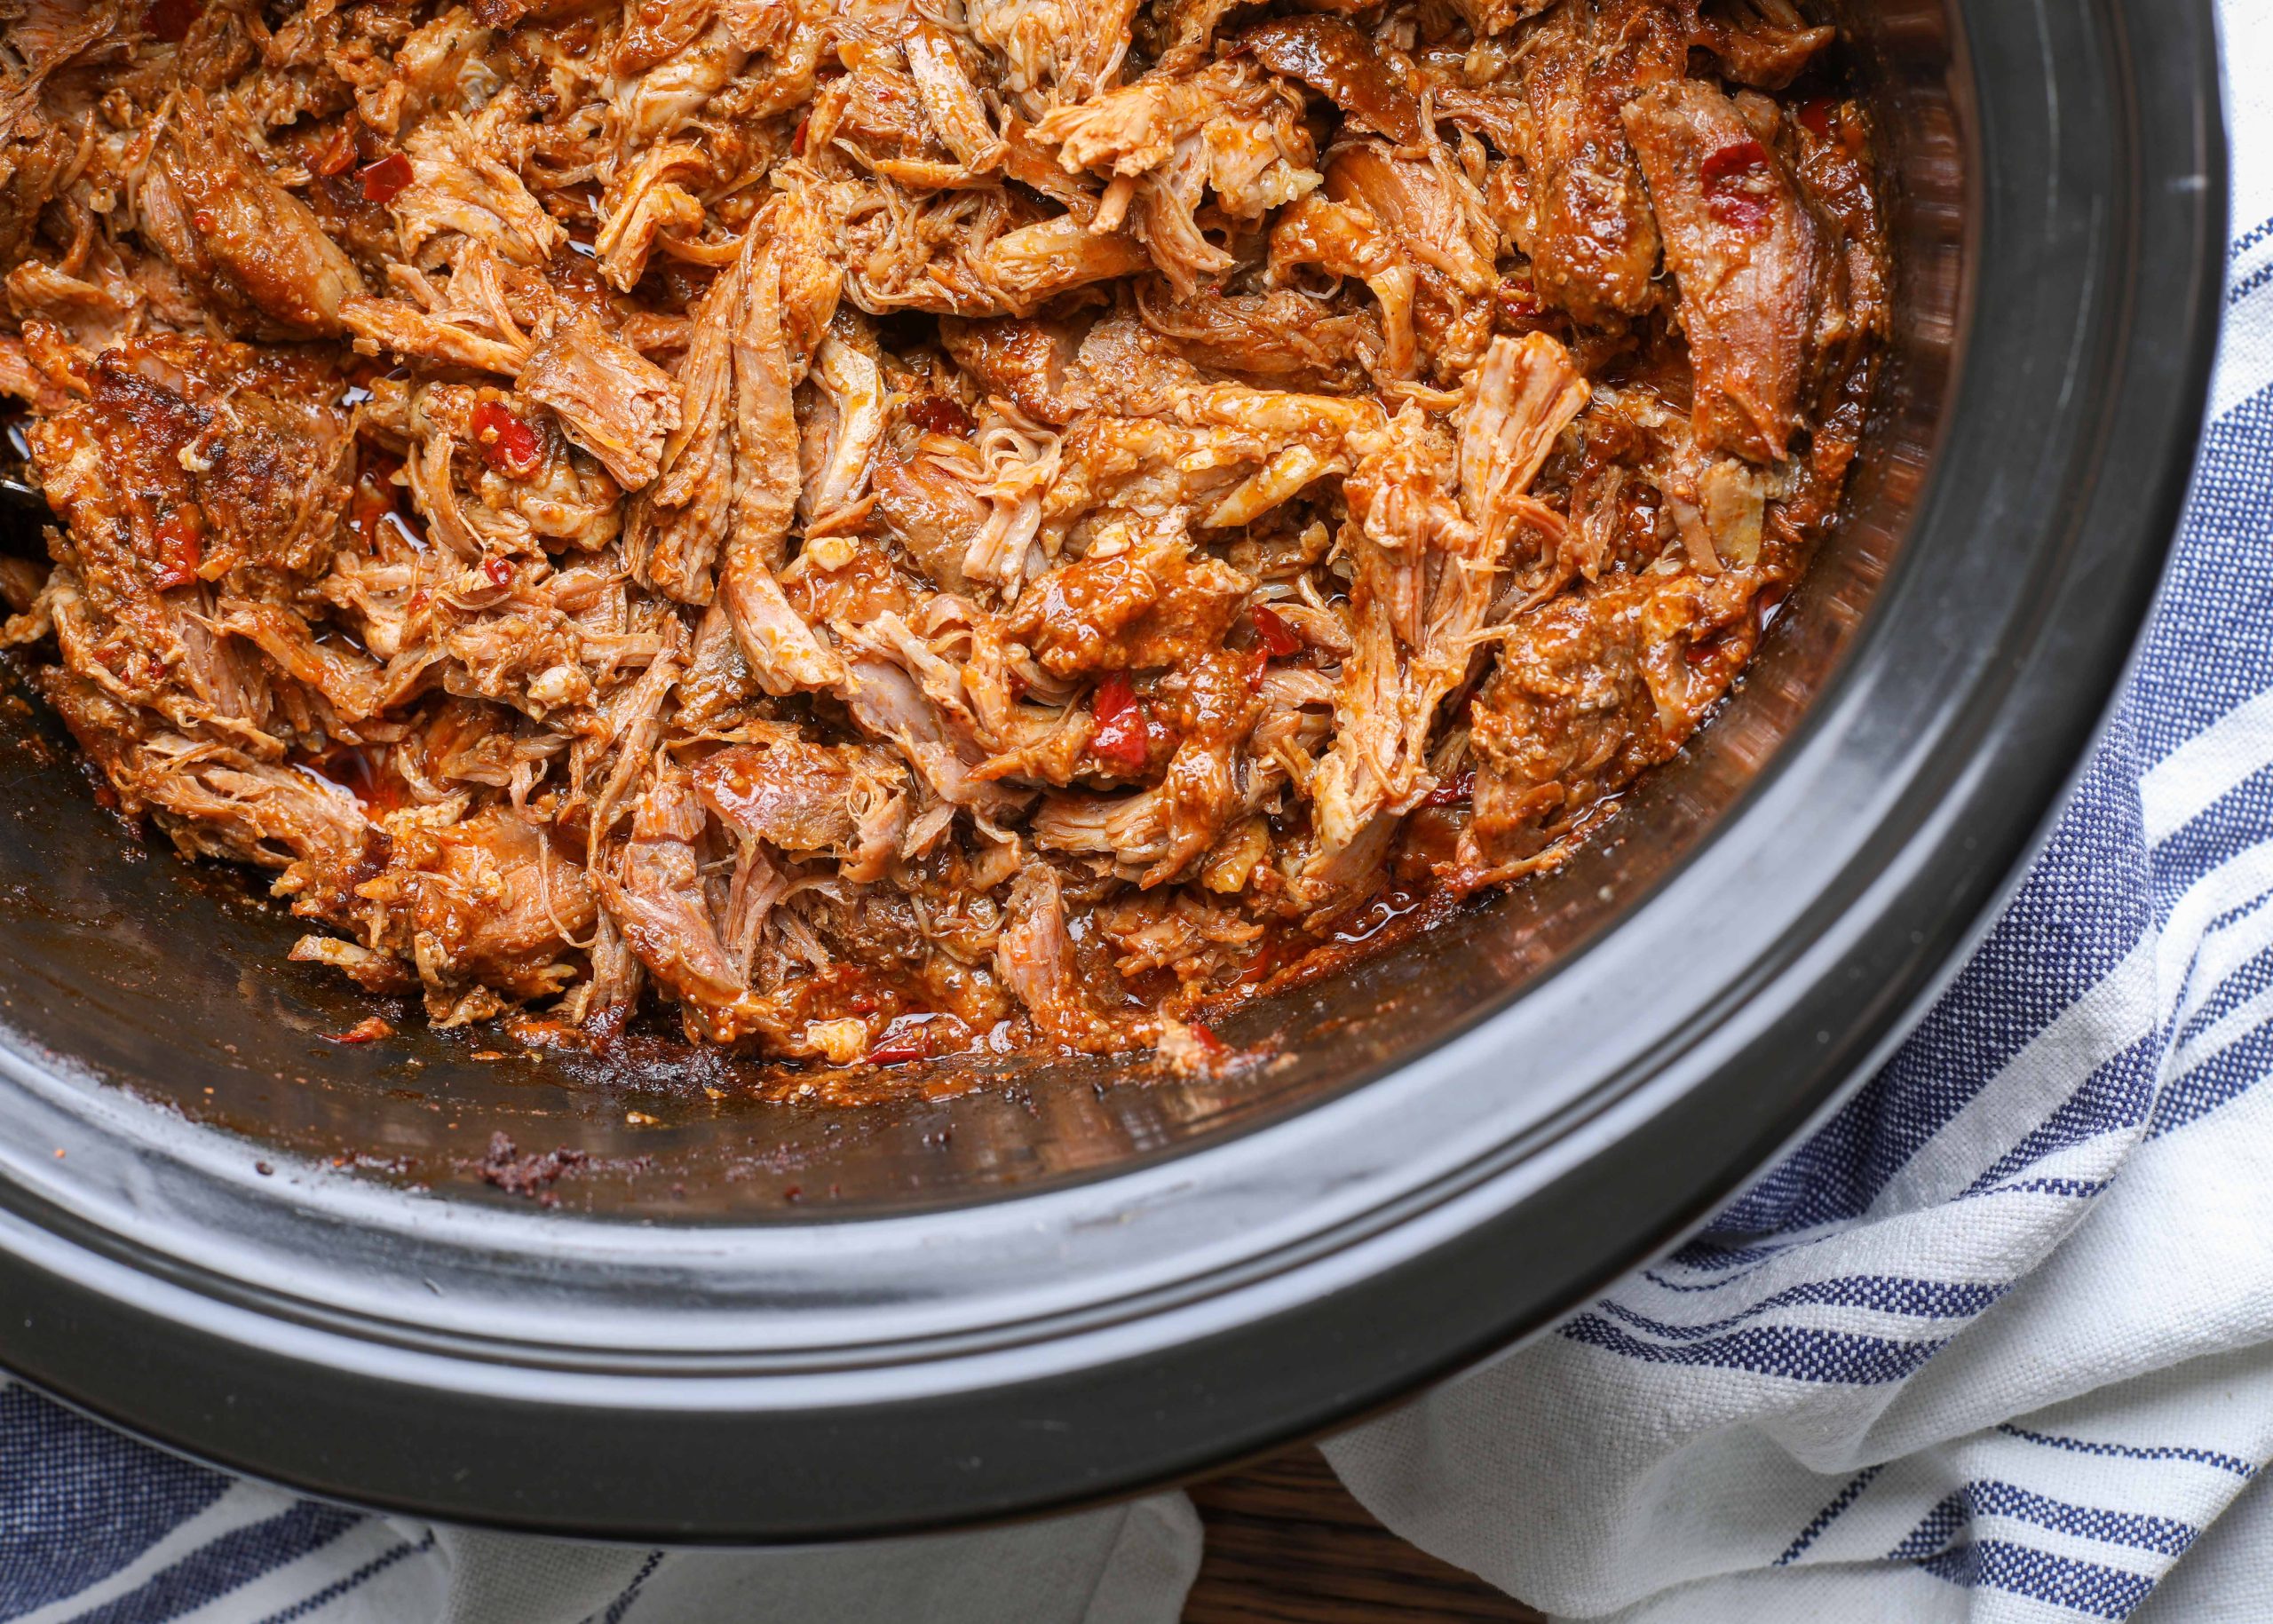
Mexican Pork Taquitos
Ingredients
Method
- Place the pork roast in the slow cooker. Sprinkle half of the spices over the roast, turn it over, and cover with the remaining spices. Add the water and cover with the lid.
- Cook on LOW for 5-6 hours or on HIGH for 3-4 hours, until the roast is tender enough to shred. Gently pull the pork apart with tongs or two forks. Break into bite-sized pieces and toss with any juices left in the bottom of the pot.
- To make taquitos, preheat the oven to 350°F (175°C). Place a dry skillet over medium-high heat. Warm the corn tortillas one at a time to make them soft and pliable for rolling. (For extra flavor, you can warm 0.25 cup of oil in the skillet and dip each tortilla in the oil before rolling.)
- Set out a large baking sheet. Place a warmed tortilla on the sheet, layer about 1 tablespoon of cheese across the center, and top with a few tablespoons of the shredded pork.
- Roll the tortilla around the filling and place it seam-side down on the baking sheet. Repeat with remaining tortillas, pork, and cheese.
- Bake for 15-20 minutes, or until the taquitos are lightly browned and crisp on the edges. Serve immediately with your favorite optional garnishes.