Easy Peanut Butter Cheesecake Trifles
Oh, hi there! Come on in, grab a mug. You know, it’s funny, I was just thinking about this recipe the other day. It’s one of those things that feels like a warm hug in food form, and it always brings me back to lazy summer afternoons at my grandma’s house. She had this incredible garden, and by August, we were always swimming in zucchini! This zucchini bread recipe, well, it’s practically magic. It uses up all that extra squash and turns it into something so ridiculously moist and flavorful, you’d never guess there was a veggie hiding in there. Honestly, it’s so good, it rivals my grandma’s famous apple pie, and that’s saying a *lot*. If you’ve ever found yourself with a bounty of zucchini and wondered what on earth to do with it, or if you’re just craving something sweet, comforting, and surprisingly good for you, you’ve landed in the right spot. This is the recipe that changed how I look at zucchini forever!
What is Zucchini Bread Bliss?
So, what exactly is this “Zucchini Bread Bliss” I keep gushing about? Think of it as the ultimate comfort bake. It’s a wonderfully moist, tender quick bread packed with grated zucchini, which sounds a little unusual, I know, but trust me, it’s the secret to its incredible texture. The zucchini melts away, adding moisture and a subtle, almost imperceptible sweetness, without any of that “green” flavor you might be worried about. It’s not overly sweet, so it’s perfect for breakfast, a snack, or even a light dessert. The name “Bliss” really just sums up how I feel every single time I pull a loaf out of the oven. It’s that moment when the aroma fills your entire house – a mix of warm spices, vanilla, and that gentle sweetness – and you just know something wonderful is about to happen. It’s essentially a hug in loaf form, a little slice of heaven that makes everyday moments feel a bit more special. It’s the kind of thing that makes you feel like a baking pro, even if you’re just starting out!
Why you’ll love this recipe?
Honestly, there are so many reasons this recipe has earned a permanent spot in my baking rotation, and I bet you’ll fall in love with it just as quickly. First off, the flavor is just out of this world. It’s not just about the zucchini; it’s the perfect dance of warm cinnamon, nutmeg, and a hint of vanilla that just makes your taste buds sing. It’s got this deep, comforting warmth that’s especially lovely on a cooler day, but it’s also light enough for a summer afternoon treat. And simplicity? Oh, this one is a lifesaver on busy nights! You can whip up the batter in about 15 minutes, and then it’s just hands-off baking time. No fancy techniques, no complicated steps. Plus, it’s incredibly cost-effective. Zucchini is usually pretty affordable, and the rest of the ingredients are pantry staples. It’s a fantastic way to make a delicious treat without breaking the bank. What I love most, though, is its versatility. I’ve tweaked this recipe countless times, and it always comes out great. My kids ask for this all the time, and they have no idea there’s zucchini in it! It’s like a little culinary secret. If you’re a fan of my Classic Banana Bread or my Lemon Poppy Seed Muffins, I promise you’ll adore this. It has that same comforting, homey feel, but with a unique twist that makes it stand out.
How do I make Zucchini Bread Bliss?
Quick Overview
This is about as straightforward as baking gets, which is why I adore it. You’ll essentially combine your dry ingredients, then your wet ingredients, bring them together gently, fold in the star ingredient (our lovely zucchini!), and bake until golden and fragrant. The beauty is in its simplicity – minimal fuss, maximum flavor and moisture. It’s perfect for when you need a bake that’s delicious but doesn’t demand your full attention for hours.
Ingredients
For the Main Batter:
You’ll need about 3 cups of all-purpose flour. I always sift mine, it just makes for a lighter texture, but if you’re short on time, it’s not the end of the world. Then, 1 teaspoon of baking soda and ½ teaspoon of baking powder – these work together to give it that perfect lift. Don’t forget the spices: 1 teaspoon of ground cinnamon and a generous ½ teaspoon of ground nutmeg. You can add a pinch of allspice too if you like that extra warmth. And of course, a good pinch of salt to balance out the sweetness. For sweetness, we’ll use 1 ½ cups of granulated sugar. If you prefer it a little less sweet, you can probably get away with 1 ¼ cups, but I find this amount is just right for that classic flavor.
For the Filling:
This is where the magic happens! We’re talking about 2 cups of grated zucchini. Make sure it’s packed in there! You don’t need to peel it; the skin adds nutrients and color, and it disappears into the bread. Just make sure it’s finely grated – a box grater works perfectly. I usually use about two medium zucchinis for this amount. If you want to jazz it up, you can add ½ cup of chopped walnuts or pecans, or even ½ cup of chocolate chips for a real treat!
For the Glaze:
This is totally optional, but oh-so-worth-it! For a simple glaze, you’ll whisk together 1 cup of powdered sugar with about 2-3 tablespoons of milk or water. You want it to be pourable but not too thin. A splash of vanilla extract in the glaze takes it to the next level. If you’re feeling fancy, you can use half-and-half or even a little heavy cream for a richer glaze. You can also add a touch of lemon juice for a tangy contrast!
Step-by-Step Instructions
Step 1: Preheat & Prep Pan
First things first, get that oven preheating to 350 degrees Fahrenheit (175 degrees Celsius). This is a pretty standard temperature for quick breads, and it ensures even baking. While the oven is doing its thing, grab a 9×5 inch loaf pan. You’ll want to grease it really well and then dust it with a little flour, tapping out any excess. Alternatively, you can line it with parchment paper, leaving some overhang on the sides – this makes lifting the cooled loaf out a breeze. I usually opt for the parchment method; it’s a lifesaver when I’m rushing!
Step 2: Mix Dry Ingredients
In a large bowl, whisk together your sifted all-purpose flour, baking soda, baking powder, cinnamon, nutmeg, and salt. I like to whisk them really well for a good minute or so. This isn’t just about combining; it helps aerate the flour and ensures your leavening agents are evenly distributed, which means a beautifully uniform rise. No one wants a dense spot!
Step 3: Mix Wet Ingredients
In a separate medium bowl, crack your eggs. I usually use three large eggs for this recipe. Then, pour in your granulated sugar. Add ½ cup of melted butter (cooled slightly, so it doesn’t cook the eggs) or vegetable oil – oil tends to make it even moister, but butter adds that lovely flavor. Finally, stir in 1 teaspoon of vanilla extract. Whisk these wet ingredients together until they’re well combined and the sugar starts to dissolve a bit.
Step 4: Combine
Now, pour your wet ingredients into the bowl with the dry ingredients. Here’s where you need to be gentle! Use a spatula or a wooden spoon to mix them together *just* until there are no dry streaks of flour visible. Overmixing is the enemy of tender quick breads, so mix it just enough. A few small lumps are perfectly fine – seriously, don’t overdo it!
Step 5: Prepare Filling
If you’re adding nuts or chocolate chips, now’s the time to gently fold them into the batter. Next, take your beautifully grated zucchini. Give it a quick squeeze with your hands to get out any excess moisture – you don’t want it to make the batter watery. Gently fold the grated zucchini into the batter. Again, be careful not to overmix. You just want to distribute it evenly throughout.
Step 6: Layer & Swirl
Pour the batter into your prepared loaf pan, spreading it evenly with your spatula. If you’re feeling a bit fancy, you can score the top with a knife in a zig-zag pattern. Some people like to swirl a bit of cinnamon sugar or even some melted chocolate into the top for extra visual appeal, but I usually keep it simple. The zucchini itself creates a lovely texture, so it doesn’t really need much help in the looks department.
Step 7: Bake
Pop that pan into your preheated oven. Bake for about 50 to 65 minutes. The exact time will depend on your oven, so keep an eye on it. You’ll know it’s ready when a wooden skewer or toothpick inserted into the center comes out clean, or with just a few moist crumbs attached. The top should be golden brown and smell absolutely heavenly. If the top is browning too quickly before the inside is cooked, you can loosely tent it with aluminum foil.
Step 8: Cool & Glaze
Once it’s baked to perfection, take the loaf pan out of the oven and let it cool in the pan for about 10-15 minutes. This allows it to set up properly. Then, carefully invert the loaf onto a wire rack to cool completely. This is crucial! If you try to glaze it while it’s still warm, the glaze will just melt off. Once it’s fully cooled, you can whisk up your glaze ingredients (powdered sugar, milk/water, vanilla) to your desired consistency and drizzle it over the top. Let the glaze set for a few minutes before slicing.
Step 9: Slice & Serve
And there you have it! Your beautiful, moist, and utterly delicious Zucchini Bread Bliss. Slice it up using a sharp knife. I usually get about 10-12 slices from a loaf. It’s wonderful served at room temperature, with or without the glaze. The aroma alone is enough to make your day a little brighter!
What to Serve It With
This zucchini bread is so versatile, it’s practically a baking chameleon! For a quick and satisfying Breakfast, I love it just as is, maybe with a thin swipe of butter. A hot mug of coffee or a nice cup of tea is the perfect companion. It’s not too sweet, so it feels perfectly acceptable to have a slice (or two!) first thing in the morning. When it comes to Brunch, it really shines. You can elevate it by serving it alongside fresh fruit salad, a yogurt parfait bar, or even alongside some savory dishes like scrambled eggs or bacon. A small sprinkle of powdered sugar on top can make it look extra elegant. As a Dessert, it’s fantastic on its own, especially with that lovely glaze. It’s also wonderful served warm with a scoop of vanilla bean ice cream – the contrast of the warm bread and cold ice cream is pure heaven. For Cozy Snacks, it’s the ultimate comfort food. It’s perfect for an afternoon pick-me-up with a glass of milk, or even a late-night treat when you’re craving something sweet but don’t want to bake a whole cake. My family loves it after school with a glass of cold milk, and it disappears in minutes!
Top Tips for Perfecting Your Zucchini Bread Bliss
I’ve been making this bread for years, and I’ve picked up a few tricks along the way that I think make all the difference. First, about the Zucchini Prep: while you don’t need to peel it, squeezing out excess moisture is key. Too much water can make your bread gummy or lead to a soggy bottom. I use a fine-mesh sieve or just my hands to gently press out as much liquid as possible. Fresh zucchini is always best, so try to use it soon after you’ve harvested it or bought it. For Mixing Advice, remember the golden rule: don’t overmix! Seriously, this is the biggest culprit for tough quick breads. Mix the wet and dry ingredients *just* until they come together. A few small lumps are actually a good sign. For Swirl Customization, if you want to add a little something extra, you can make a simple cinnamon-sugar mixture (about 2 tablespoons sugar to 1 teaspoon cinnamon) and sprinkle half of it over the batter before you put it in the pan, then swirl it gently with a knife. For Ingredient Swaps, I’ve tested this with different oils – canola, vegetable, or even light olive oil work well. For the flour, you can try a 1-to-1 gluten-free blend, though the texture might be slightly different. Applesauce can be used in place of some of the oil or butter, but it will alter the flavor a bit. When it comes to Baking Tips, every oven is different, so trust your nose and the toothpick test more than the timer. If the top is browning too quickly, tent it loosely with foil – I’ve learned that the hard way! For Glaze Variations, if you don’t have powdered sugar, you can make a simple caramel glaze or even just dust the cooled loaf with extra cinnamon sugar. A cream cheese glaze is also divine if you’re feeling decadent!
Storing and Reheating Tips
This zucchini bread is wonderful fresh, but it keeps remarkably well, which is a huge bonus! For Room Temperature storage, once the loaf is completely cool, I like to wrap it tightly in plastic wrap or place it in an airtight container. It should stay fresh and moist for about 3-4 days. This is my go-to method because it’s so easy. If you live in a warm, humid climate, or if it’s particularly hot where you are, you might want to consider Refrigerator Storage. Wrapped well and in an airtight container, it can last for up to a week in the fridge. The texture might change slightly – it can become a bit denser – but it’s still delicious. When you want to serve it, just let it come to room temperature or give it a quick gentle reheat. For longer storage, this bread freezes beautifully! Wrap the cooled loaf (or individual slices) tightly in plastic wrap, then in aluminum foil, or place it in a freezer-safe bag. It can stay in the freezer for up to 3 months. To thaw, simply remove the wrapping and let it sit at room temperature for a few hours, or gently reheat slices in a toaster oven or microwave. For Glaze Timing Advice, if you plan to freeze it, it’s best to add the glaze *after* thawing. Glaze applied before freezing can sometimes become sticky or uneven. If you’re just storing it for a few days, glazing right before serving is usually best to keep it looking fresh.
Frequently Asked Questions
Final Thoughts
So there you have it, my Zucchini Bread Bliss! It’s more than just a recipe; it’s a memory, a feeling, and a delicious way to use up those garden-fresh veggies. I really hope you give this a try. It’s one of those recipes that proves simple ingredients can create something truly extraordinary. It’s comforting, it’s moist, and it’s just… delightful. If you love this, you might also want to check out my recipe for my moist Blueberry Muffins or my hearty Whole Wheat Quick Bread – they have that same cozy, homemade vibe. I can’t wait to hear what you think once you make it! Please leave a comment below and let me know how yours turned out, or if you tried any fun variations. Happy baking, friends!
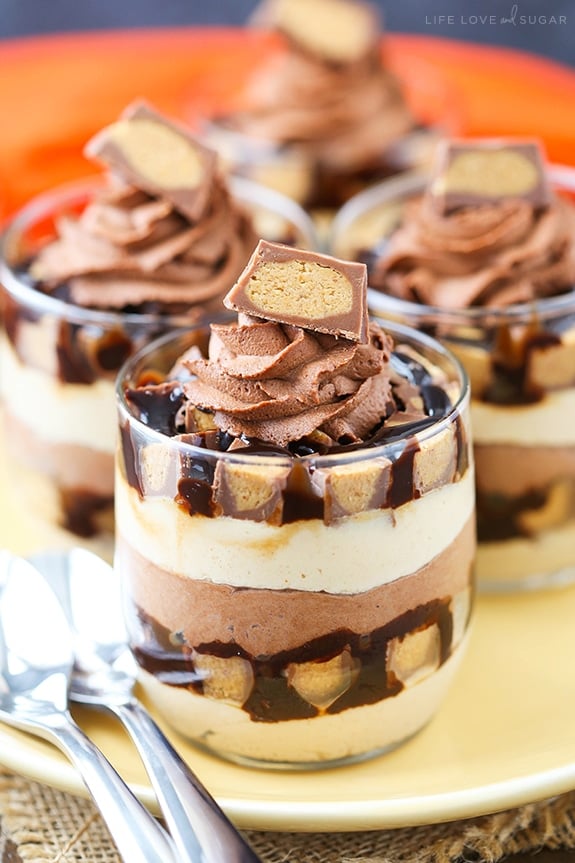
Cheesecake Trifles
Ingredients
Method
- Beat cream cheese, sugar and brown sugar together in a bowl until smooth.
- Add peanut butter and milk and mix until well incorporated. Set aside.
- In another bowl, make the whipped cream. Whip heavy whipping cream, vanilla extract, cocoa powder and powdered sugar until stiff peaks form.
- To layer the trifles, pipe or spoon an even layer of peanut butter cheesecake into the bottom of each cup.
- Top the cheesecake with 3-4 chopped Reese’s, then drizzle chocolate sauce over the Reese’s.
- Pipe or spoon an even layer of whipped cream on top of the chocolate sauce.
- Repeat with another layer of peanut butter cheesecake, Reese’s and drizzle of chocolate sauce.
- Finish trifles off with a swirl of whipped cream and a half of a mini Reese’s.
- Refrigerate until ready to serve.