Easy Lemon Chicken Piccata Recipe
You know those recipes that just *feel* like home? The ones that smell incredible as they bake, fill your kitchen with warmth, and disappear from the plate faster than you can say “second slice”? This zucchini bread is exactly that for me. It’s not just a quick bread; it’s a hug in loaf form, a little slice of pure, unadulterated comfort that I’ve been whipping up for years. Honestly, I’ve tried a lot of zucchini bread recipes over time, and while many are good, this one has a special kind of magic. It’s moist, perfectly spiced, and has this wonderful tender crumb that’s just divine. It’s the kind of treat that makes a gloomy Tuesday feel like a weekend, and my family devours it like it’s going out of style. If you’re looking for a dependable, crowd-pleasing bake that also happens to be a fantastic way to use up those garden zucchini, you’ve found your winner.
What is Zucchini bread?
So, what exactly *is* zucchini bread, you ask? Well, at its heart, it’s a sweet, moist quick bread that uses shredded zucchini as its star ingredient. Don’t let the veggie part fool you – you won’t taste the zucchini itself, but you’ll absolutely *feel* its presence in the incredible moisture and tender texture it imparts. Think of it as a delicious, slightly healthier spin on a classic banana bread or a coffee cake, but with its own unique charm. The name is pretty straightforward, but the magic is in how the humble zucchini transforms into something so delightfully decadent. It’s essentially a cake-like batter baked into a loaf, often studded with nuts or chocolate chips, and sometimes finished with a simple, sweet glaze. It’s unpretentious, incredibly versatile, and always a welcome sight on any counter.
Why you’ll love this recipe?
Let me count the ways! First off, the flavor is just spot-on. It’s perfectly spiced with cinnamon and nutmeg, a combination that just screams cozy. The sweetness is just right – not cloying, but enough to satisfy that craving for something delicious. And the texture? Oh, it’s heavenly. It’s incredibly moist thanks to the zucchini, and it has this lovely tender crumb that just melts in your mouth. Honestly, the smell that fills your house while it’s baking is pure aromatherapy; it’s one of those scents that makes you feel instantly at peace and hungry!
Beyond the taste, this recipe is a lifesaver on busy nights. It comes together surprisingly quickly – I can usually have it mixed and in the oven in about 15 minutes flat, especially if I’ve prepped my zucchini ahead of time. And talk about budget-friendly! Zucchini is often abundant and inexpensive, making this a great way to bake something special without breaking the bank. Plus, it’s so versatile. I love it plain, but adding a handful of walnuts or some chocolate chips takes it to a whole new level. It’s also fantastic for using up those summer zucchini that seem to multiply overnight in the garden. For me, it’s the perfect happy medium between a true cake and a simple loaf. It feels celebratory enough for a special occasion but is easy enough for an everyday treat. If you love my Moist Banana Bread recipe.Is this one worth a read?
How to Make Zucchini Bread
Quick Overview
The process is refreshingly simple: whisk together your dry ingredients, mix your wet ingredients separately, then combine them gently. Fold in your shredded zucchini and any add-ins, pour into a prepared loaf pan, and bake until golden and a tester comes out clean. The beauty of this recipe is its forgiving nature; it’s hard to mess up! It’s a classic one-bowl (well, two-bowl!) wonder that results in an incredibly moist and flavorful loaf every single time. Trust me, even if you’re new to baking, you can nail this one.
Ingredients
For the Main Batter:
You’ll need about 2 cups of finely shredded zucchini. Make sure to squeeze out as much excess moisture as you can – this is a crucial step for texture! I usually use a fine grater or a food processor with the shredding attachment.
All-purpose flour: 2 cups. I always use unbleached all-purpose flour for the best results.
Baking soda: 1 teaspoon. This helps give the bread a lovely lift.
Salt: ½ teaspoon. Balances out the sweetness beautifully.
Ground cinnamon: 1 teaspoon. Don’t skimp on this, it’s key for that warm, cozy flavor!
Ground nutmeg: ½ teaspoon. A little pinch adds depth and complexity.
Large eggs: 2. Make sure they’re at room temperature; they’ll incorporate more easily.
Granulated sugar: 1 cup. You can adjust this slightly based on your preference, but this amount is perfect for me.
Vegetable oil or melted unsalted butter: ½ cup. I sometimes use half oil and half melted butter for an extra rich flavor. Melted butter works wonderfully if you have it on hand!
Vanilla extract: 1 teaspoon. Pure vanilla extract makes all the difference.
Buttermilk or milk: ½ cup. I’ve tested this with almond milk and it actually made it even creamier! Buttermilk adds a lovely tang, too.
For the Filling (Optional but Recommended!):
This is where you can really customize. My absolute favorite is a simple cinnamon-sugar swirl.
Brown sugar: ¼ cup, packed.
Ground cinnamon: 1 teaspoon.
Chopped walnuts or pecans: ½ cup. Toast them first for extra flavor!
Chocolate chips: ½ cup. Semi-sweet or dark are my go-to.
For the Glaze (Optional):
This is totally optional, but it adds a beautiful finish and extra touch of sweetness.
Powdered sugar: 1 cup.
Milk or lemon juice: 2-3 tablespoons, or enough to reach desired consistency. A little lemon juice adds a nice tang!
Step-by-Step Instructions
Step 1: Preheat & Prep Pan
Get your oven nice and hot to 350°F (175°C). Grab a standard 9×5 inch loaf pan. I like to grease mine really well with butter or non-stick spray, and then flour it, tapping out any excess. For extra insurance against sticking (because no one wants a broken loaf!), I also like to line the bottom and long sides with parchment paper, leaving a little overhang. This makes lifting the baked loaf out a breeze.
Step 2: Mix Dry Ingredients
In a large bowl, whisk together the flour, baking soda, salt, cinnamon, and nutmeg. Make sure they’re really well combined; this ensures even leavening and distribution of spices. I like to give it a good whisk for about 30 seconds. This step is super simple but so important for getting that lovely, even texture.
Step 3: Mix Wet Ingredients
In a separate medium bowl, whisk together the eggs until they’re lightly beaten. Then, whisk in the granulated sugar, oil (or melted butter), vanilla extract, and buttermilk (or milk). Make sure everything is well incorporated and you don’t see any streaks of egg or sugar.
Step 4: Combine
Pour the wet ingredients into the bowl with the dry ingredients. Now, this is where you need to be gentle! Use a spatula or wooden spoon to mix until *just* combined. A few streaks of flour are perfectly okay – don’t overmix! Overmixing can develop the gluten too much and lead to a tough loaf. Once the flour is mostly incorporated, gently fold in your squeezed-out shredded zucchini and any add-ins like nuts or chocolate chips.
Step 5: Prepare Filling
If you’re making the cinnamon-sugar swirl, simply whisk together the packed brown sugar and cinnamon in a small bowl until combined. If you’re adding nuts or chips, have them ready to go.
Step 6: Layer & Swirl
Pour about half of the batter into your prepared loaf pan and spread it evenly. If you’re adding nuts or chips as a layer, sprinkle half of them over the batter now. Now, sprinkle about half of the cinnamon-sugar mixture evenly over the top. Dollop the remaining batter over this layer, spreading gently to cover. Sprinkle the remaining nuts/chips and cinnamon-sugar mixture on top. If you’re feeling fancy and want a true swirl, you can use a butter knife or skewer to gently swirl the filling into the top layer of batter, making sure not to go all the way to the bottom. Don’t overdo the swirling, or you’ll just mix it all in!
Step 7: Bake
Pop that loaf pan into your preheated oven. Bake for about 50-65 minutes. The exact time will depend on your oven, but you’ll know it’s done when the top is golden brown and a wooden skewer or toothpick inserted into the center comes out clean, with no wet batter attached. If the top starts to brown too quickly before the inside is cooked, you can loosely tent it with aluminum foil for the last 10-15 minutes of baking.
Step 8: Cool & Glaze
Once it’s baked, let the loaf cool in the pan on a wire rack for about 10-15 minutes. This allows it to set up properly. Then, use the parchment paper overhangs to carefully lift the loaf out of the pan and place it directly on the wire rack to cool completely. If you’re adding the glaze, wait until the loaf is entirely cool before drizzling it over the top. For the glaze, whisk the powdered sugar and milk (or lemon juice) together in a small bowl until smooth. You want a consistency that’s thick enough to coat the top but still drizzly. Add more liquid a teaspoon at a time if it’s too thick.
Step 9: Slice & Serve
Once the glaze is set, slice your beautiful zucchini bread. I prefer to use a serrated knife for clean slices. It’s absolutely delicious served at room temperature, but some people (including me!) love it slightly warm. It’s perfect on its own, or with a generous smear of butter.
What to Serve It With
This zucchini bread is a superstar on its own, but it also pairs wonderfully with so many things! For a leisurely Breakfast, I love it with a strong cup of coffee. The warmth and spice of the bread are just the perfect start to the day. It’s also lovely with a side of fresh berries or a dollop of plain Greek yogurt if you want a little something extra.
When we’re having Brunch, it’s a welcome addition to the table. I’ll often slice it a bit thinner and arrange it nicely on a platter. It’s a fantastic sweet counterpoint to savory dishes like scrambled eggs, bacon, or quiche. For beverages, a mimosa or a glass of sparkling cider feels just right.
As a Dessert, it’s surprisingly elegant, especially with that drizzle of glaze. I’ll sometimes serve it with a small scoop of vanilla bean ice cream or a drizzle of caramel sauce. It’s the perfect treat when you’re craving something sweet at 10pm but don’t want to bake a whole cake.
And for those Cozy Snacks? This is its natural habitat! It’s the ultimate comfort food. I’ll often just grab a slice (or two!) with a glass of milk while I’m curled up with a good book. My kids ask for this all the time when they get home from school, and it’s such a simple way to make their afternoon snack feel special. It’s truly a winner for any time of day!
Top Tips for Perfecting Your Zucchini Bread
I’ve made this recipe more times than I can count, and through those batches, I’ve picked up a few tricks that make a big difference. First, and I can’t stress this enough: Zucchini Prep is key! You absolutely must squeeze out the excess moisture from your shredded zucchini. I usually do this by placing the shredded zucchini in a fine-mesh sieve and pressing down firmly with a spoon, or by wrapping it in a clean kitchen towel or cheesecloth and wringing out as much liquid as possible. Leaving too much moisture will make your bread dense and gummy.
When it comes to Mixing Advice, remember my mantra: “just combined.” Seriously, resist the urge to beat the batter into submission. A few little lumps of flour are fine! Overmixing is the most common culprit for tough quick breads. You want to gently fold the ingredients together until they’re just married. You’re aiming for a tender crumb, not a chewy one.
For that gorgeous Swirl Customization, don’t go too deep with your knife when swirling. You want the filling to be mostly in the top half of the batter. If you swirl too deep, you’ll end up mixing the filling all the way through, and it won’t have that distinct layered look. A gentle figure-eight motion is usually enough.
When it comes to Ingredient Swaps, don’t be afraid to experiment! If you don’t have buttermilk, regular milk with a teaspoon of lemon juice or vinegar added and let to sit for 5 minutes works just fine. For the oil, melted coconut oil can also be used, though it might impart a subtle flavor. I’ve tested this with almond milk and it actually made it even creamier! If you don’t like nuts, just omit them or double up on chocolate chips.
Regarding Baking Tips, always trust your oven but also your senses. Ovens can vary, so the bake time is a guideline. Look for that golden-brown color and do the toothpick test. If the top is browning beautifully but the inside seems a bit underdone, a loose tent of foil is your best friend. I always bake on the center rack to ensure even heat distribution.
And finally, Glaze Variations are fun! If you want a thinner glaze, just add a tiny bit more liquid. For a thicker glaze, add more powdered sugar. You can also add a little orange zest or a tiny splash of maple syrup to the glaze for a different flavor profile. Remember, the glaze is completely optional; the bread is delicious on its own!
Storing and Reheating Tips
One of the things I love about this zucchini bread is how well it keeps. For Room Temperature storage, once it’s completely cooled, I wrap it tightly in plastic wrap or store it in an airtight container. It will stay fresh and moist for about 2-3 days. Just make sure it’s fully cooled first, otherwise, condensation can make it soggy.
If you need it to last a bit longer, Refrigerator Storage is your best bet. Again, ensure it’s cooled completely, then wrap it well in plastic wrap and place it in an airtight container or a resealable bag. It should keep well in the fridge for up to a week. The texture might firm up slightly in the fridge, but it’s easily revived.
This bread also freezes beautifully, which is fantastic if you’ve had a zucchini glut! For Freezer Instructions, wrap the completely cooled loaf tightly in a layer of plastic wrap, then a layer of aluminum foil, or place it in a heavy-duty freezer bag. It can be frozen for up to 3 months. To thaw, unwrap it and let it come to room temperature on the counter, or thaw it in the refrigerator overnight.
For Glaze Timing Advice, it’s always best to glaze the bread *after* it has cooled completely and *before* you store it, especially if you plan to eat it within a day or two. If you plan to freeze it, I highly recommend glazing it *after* thawing. This way, the glaze stays fresh and doesn’t get soggy in the freezer. Alternatively, you can skip the glaze if freezing and add it after thawing, or simply dust with powdered sugar.
Frequently Asked Questions
Final Thoughts
There you have it – my absolute favorite zucchini bread recipe! I truly hope you give this one a try. It’s more than just a recipe; it’s a little piece of my kitchen that I’m so happy to share with you. It’s the perfect example of how simple ingredients can come together to create something truly magical and comforting. It’s reliable, delicious, and always brings smiles to faces, which is exactly what I look for in a go-to bake. If you love this kind of moist, spiced quick bread, you might also want to check out my Cranberry Orange Muffins – they have a similar cozy vibe!
I can’t wait to hear what you think! Let me know in the comments below if you make it, how you customized it, or any special memories it brings back for you. Happy baking!
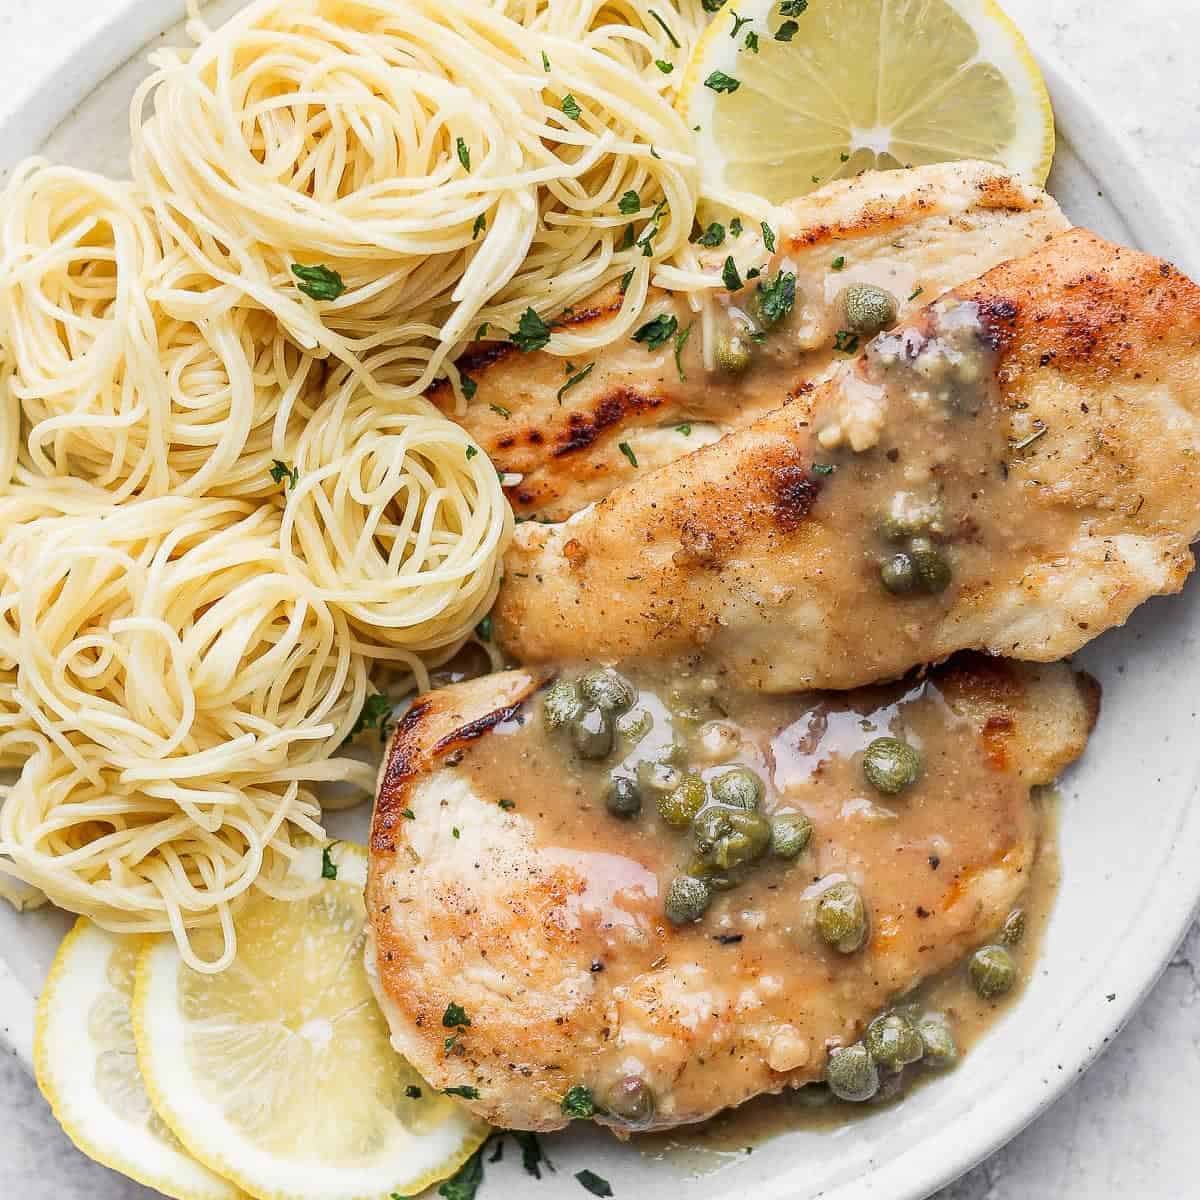
Chicken Piccata
Ingredients
Method
- Slice the chicken breasts lengthwise in half to create 4 cutlets.
- Place the chicken cutlets on a cutting board, cover with plastic wrap, and pound to a ½-inch thickness using a meat tenderizer. Set aside.
- In a medium bowl, combine the whole wheat flour, granulated garlic, salt, pepper, and Italian seasoning. Reserve 1 tablespoon of this mixture for later.
- Rinse each chicken breast with water and then dredge through the flour mixture, ensuring it's completely coated.
- Heat a large skillet over medium/high heat and add olive oil.
- Once the olive oil is fragrant, add the chicken cutlets to the pan.
- Sauté each cutlet for 4-5 minutes per side on medium heat, or until golden brown and fully cooked.
- Remove the chicken cutlets from the pan and set aside.
- Deglaze the pan by pouring the white wine into the skillet, scraping up any brown bits from the bottom with a spatula.
- Add the reserved 1 tablespoon of flour mixture to the pan and whisk with the wine until the sauce begins to thicken.
- Stir in the chicken broth, lemon juice, and capers. Whisk to combine.
- Remove the pan from heat and pour the piccata sauce over the chicken.
- Serve over pasta of choice, or on its own.