Easy Homemade Salsa Recipe
Honestly, this cake feels like a warm hug from an old friend. I’ve made it so many times that I’ve lost count, and every single time, it disappears in minutes at my house. It’s one of those recipes that feels surprisingly indulgent but is actually pretty good for you—thanks to those sneaky zucchini! I remember the first time I whipped this up on a busy Saturday afternoon. I was craving something sweet but didn’t want to bake a whole cake, and I had a few zucchinis sitting lonely in the fridge. I threw this together without much fuss, and let me tell you — it became an instant family favorite. My kids ask for this all the time, and I always do this when I want something comforting but don’t want to spend hours in the kitchen. Plus, the smell alone is enough to bring everyone running to the kitchen. You’re gonna love how simple, tasty, and versatile this little gem is.
What is Zucchini Walnut Snack Cake?
Think of this as a cross between bread and cake — a tender, moist treat packed with shredded zucchini, crunchy walnuts, and just the right touch of sweetness. It’s essentially a quick, homemade snack cake that’s perfect for breakfast, an afternoon coffee break, or even dessert. The name might throw you off at first—”snack cake”—but don’t let that fool you. The zucchini keeps it delightfully moist, while the walnuts provide a wonderful crunch that counterbalances the soft crumb. And that cream cheese glaze? It’s the cherry on top, adding a tangy richness that elevates every bite. The best part? It’s super forgiving, so you don’t need to be a pro baker to get perfect results. I love that it’s a sneaky way to get some veggies into the kids, and honestly, I keep making it because it tastes like a treat but makes me feel good too!
Why you’ll love this recipe?
What I love most about this zucchini walnut snack cake is how versatile and foolproof it is. The flavor is exactly the kind of baked-good comfort I crave—light, nutty, and just a touch sweet. The zucchini gives it incredible moisture without making it heavy or dense, so every bite feels like a little slice of soft, fragrant goodness. It’s surprisingly easy to make, with straightforward ingredients I usually have on hand, which makes it a lifesaver on busy nights or when I’re craving something homemade but don’t want to fuss over complicated recipes. Budget-wise, it’s super friendly too—no fancy ingredients here, just simple pantry staples and a fresh zucchini or two. And because it’s a “snack cake,” you can serve it for breakfast, tea-time, or after dinner without missing a beat. I’ve tested this with toasted walnuts and even tried swapping pecans — still glorious. Plus, the optional cream cheese glaze? Total game changer. That tangy richness turns ordinary cake into something special that my whole family raves about.
But honestly, it’s more than just a snack. It’s a recipe that’s become a family tradition, one I pass down to friends and that I love tweaking with different add-ins or toppings. There’s something so satisfying about slicing into this warm, fragrant cake and watching family faces light up—like, “Wow, this is just so good!” I promise, once you try it, it’ll be one of those recipes you keep coming back to. Especially when you want something quick, cozy, and totally delicious.
How do I make Zucchini Walnut Snack Cake?
Quick Overview
This cake is made from a simple batter of flour, sugar, eggs, and shredded zucchini, mixed just enough to keep it tender. The walnuts are folded in last for that lovely crunch, and then it’s all baked until golden and fluffy. The toughest part might be grating the zucchini — but I always do that first, set it aside to drain excess moisture, and then mix everything together in one bowl. Once baked, I let it cool slightly before slathering on a creamy, tangy cream cheese glaze. Trust me, the smell alone will make your kitchen feel like a bakery. It’s quick to throw together and perfect for when you’re short on time but still want something homemade and satisfying.
Ingredients
For the Main Batter:
- 2 cups shredded zucchini (about 2 small zucchinis, grated and excess moisture squeezed out)
- 1 ½ cups all-purpose flour — I sometimes swap half for almond flour for a nuttier twist
- 1 cup granulated sugar (or honey if you prefer natural sweetness)
- ½ teaspoon baking powder
- ½ teaspoon baking soda
- ¼ teaspoon salt
- 1 teaspoon ground cinnamon (because everything’s better with a dash of cinnamon)
- 3 large eggs
- ½ cup vegetable oil or melted butter — I prefer butter for flavor
- 1 teaspoon vanilla extract
For the Filling (Optional but recommended):
- ½ cup chopped walnuts (to be folded into the batter and sprinkled on top)
For the Glaze:
- 4 oz cream cheese, softened
- 1 cup powdered sugar
- 1 teaspoon vanilla extract
- 2-3 tablespoons milk or lemon juice (to reach your desired consistency)
Step-by-Step Instructions
Step 1: Preheat & Prep Pan
I always start by preheating my oven to 350°F (175°C). Grease a 9-inch loaf pan or round cake pan with butter and dust with a little flour, or line it with parchment paper. This little step saves you from breaking a sweat when trying to remove the cake later. I like to set my pan aside and get all my ingredients ready, so I don’t rush in the middle of the process.
Step 2: Mix Dry Ingredients
In a big mixing bowl, whisk together the flour, sugar, baking powder, baking soda, salt, and cinnamon. I find that whisking keeps everything evenly distributed and prevents lumps — especially with the baking soda and cinnamon. Trust me, you want every bite to be perfectly balanced.
Step 3: Mix Wet Ingredients
In another bowl, beat the eggs, then whisk in the oil, vanilla, and shredded zucchini. I always make sure the eggs are at room temperature — it helps everything combine more smoothly. If your zucchini is extra watery, give it a quick squeeze with a clean towel or paper towel; that way, your batter won’t get soggy.
Step 4: Combine
Pour the wet mixture into the dry ingredients and fold gently with a spatula until just combined. Overmixing will make the cake dense, so I stop as soon as the flour disappears. The batter should be thick but soft — don’t worry if it’s a little lumpy, that’s normal.
Step 5: Prepare Filling
Fold in half of your chopped walnuts into the batter. If you want extra crunch on top, sprinkle the remaining walnuts over the batter before baking. This way, you get a lovely visual and textural contrast.
Step 6: Layer & Swirl
Pour the batter into your prepared pan and smooth the top with a spatula. If you’re feeling fancy, sprinkle a few more walnuts on top. No need to swirl anything here — just a simple, even layer will do, and the walnuts on top add a pretty, rustic touch.
Step 7: Bake
Pop it into the oven and bake for about 45-50 minutes. You’ll know it’s done when a toothpick inserted in the center comes out clean and the top is golden. I recommend checking around the 45-minute mark — every oven is a tiny bit different. If the edges brown too quickly, tent the cake with foil for the last 10 minutes to prevent burning.
Step 8: Cool & Glaze
Let the cake cool in the pan for about 15 minutes before transferring it to a wire rack. Once it’s just warm (or completely cooled if you’re patient), spread on the cream cheese glaze. The glaze sets beautifully and adds that irresistibly tangy bite — trust me on this one!
Step 9: Slice & Serve
Use a sharp knife to cut it into slices. I like to wait until it’s fully cooled so it doesn’t fall apart. Serve it with a cup of coffee or tea—perfect for a cozy afternoon—and watch it disappear in minutes!
What to Serve It With
This cake is such a chameleon. For breakfast, I love pairing it with a good black coffee or a creamy latte. It’s also fantastic for brunch alongside fresh fruit and whipped cream—think strawberries or blueberries. My family enjoys it as an after-dinner treat, especially when I serve it warm with a dollop of extra glaze or a swirl of whipped cream. And if I’ve got some leftover, I’ll wrap slices in plastic and keep them in the fridge for a quick snack. The next day, I’ll just warm a slice in the microwave for a few seconds—it still tastes fresh and tender, even cold, but warming it really brings out those cozy flavors. Honestly, I’ve even crumbled it over yogurt or ice cream for a delightful crumble topping. This cake happily fits into any meal occasion or casual get-together. It’s become a family staple for when I want to make something special with bits and bobs from the fridge.
Top Tips for Perfecting Your Zucchini Walnut Snack Cake
Over the years, I’ve learned a few tricks that help make this cake extra perfect every time. First, when grating the zucchini, I always use the fine side of the box grater—that way, the shreds meld smoothly into the batter. After grating, I drain any excess moisture by pressing the zucchini in a clean kitchen towel; it keeps the cake from turning out too wet or greasy. I also tested swapping out part of the flour with almond flour, which not only adds nutty flavor but also makes the cake more moist and tender. When folding in the walnuts, be gentle—you want them suspended evenly without breaking down the batter’s airy structure. About swirling or decorating the top, I recommend sprinkling a few extra walnuts and even a little cinnamon sugar for that caramelized crunch. If you want to switch up the nuts, pecans or chopped hazelnuts work beautifully. Speaking of baking, I usually bake on the middle rack and keep an eye on the clock—every oven runs a bit differently. To check for doneness, insert a toothpick and see if it comes out with just a few moist crumbs. The glaze can be made thinner or thicker depending on your preference—add more milk for pourable or less for spreadable consistency. And don’t underestimate the power of a good-quality cream cheese; it really makes the glaze shine. Personal tip: I’ve tested with coconut sugar instead of regular sugar, and it adds a lovely caramel note—just be aware it may slightly alter moisture content. Trust me, the more I make this, the more I find little tweaks to make it just perfect for my mood or ingredients on hand.
Storing and Reheating Tips
This cake keeps surprisingly well. For short-term storage, I cover it loosely with a clean cloth or plastic wrap at room temperature—up to two days. Just make sure it’s well covered to keep it moist and prevent it from drying out. If I want to keep it longer, I slice it up and store individual pieces in airtight containers in the fridge. It stays fresh for about 4 days, and I find that warming a slice in the microwave for about 10 seconds makes it taste just-baked all over again. For longer storage, I often freeze slices wrapped tightly in plastic wrap and foil. When I want to enjoy it, I let it thaw at room temperature for about 30 minutes or warm it slightly in the microwave. Just a quick note: if you’ve added the glaze, it’s best to add that after reheating, so it doesn’t get soggy from freezing. To keep the glaze fresh, I recommend topping the cake just before serving, especially if it’s been stored for a day or two. It’s a small step that makes a big difference in presentation and flavor. Overall, this cake is pretty hardy—perfect for making ahead and savoring throughout the week. Plus, leftovers are even tastier the next day, especially when warmed up or paired with a cup of tea.
Frequently Asked Questions
Final Thoughts
This zucchini walnut snack cake isn’t just a recipe — it’s a little piece of comfort in my kitchen. Each time I make it, I’m reminded of lazy Sunday mornings and bustling afternoons, all wrapped into one. It’s a recipe I keep refining, and honestly, every tweak makes it even better. It’s forgiving enough for beginner bakers but charming enough to impress friends or family. The combination of moist zucchini, crunch walnuts, and tangy cream cheese glaze makes every bite memorable. Feel free to customize it—add a handful of chocolate chips, switch up the nuts, or even sprinkle some coconut flakes on top. The possibilities are endless. Trust me, once you make this, you’ll find yourself reaching for the ingredients at least once a week. Happy baking! I can’t wait to hear how yours turns out — don’t forget to leave a comment or share your own twists. This one’s a keeper, for sure.

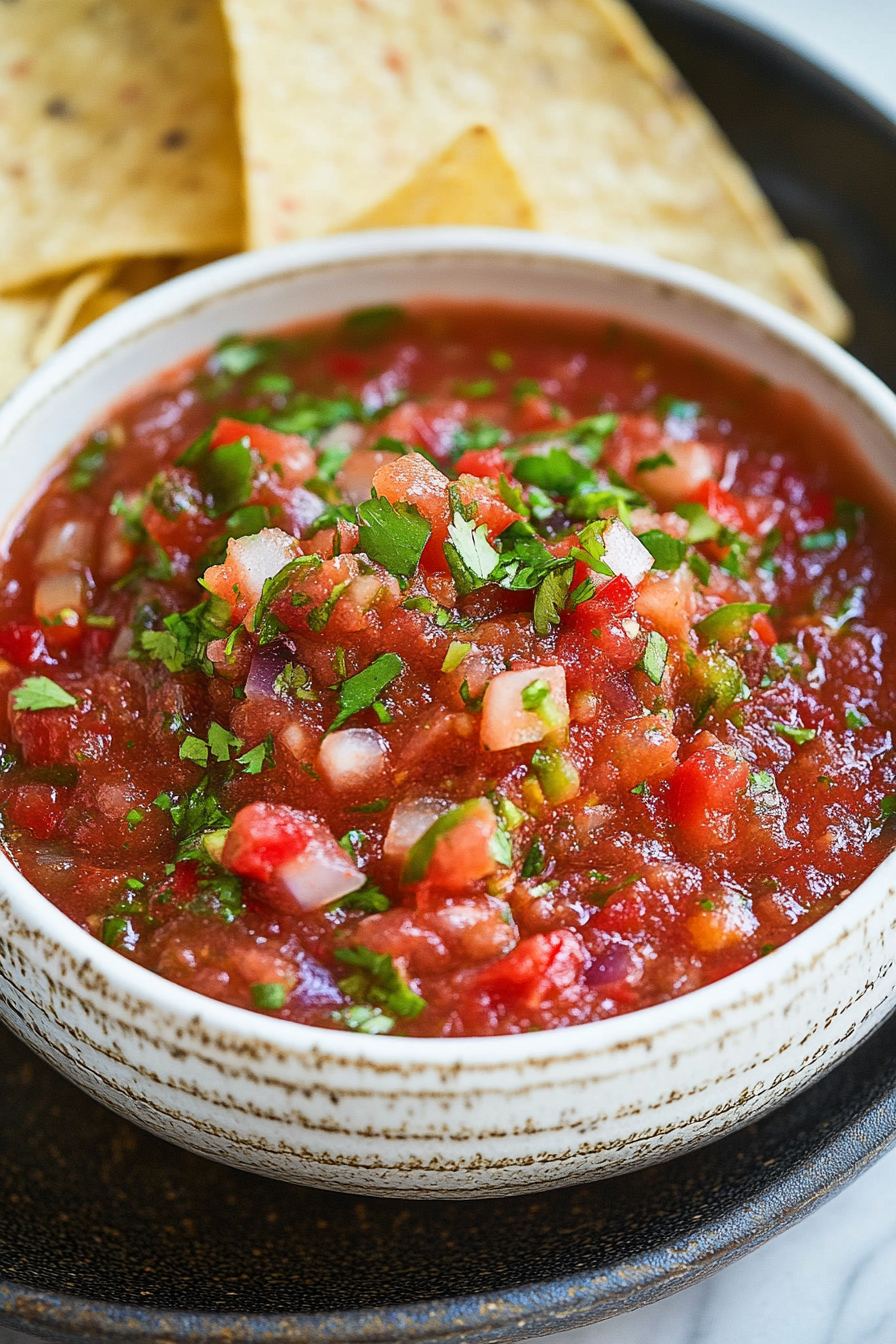
Fresh Homemade Salsa
Ingredients
Method
- Combine all ingredients in a food processor and pulse in 1 second bursts until all ingredients are finely chopped.
- Serve with tortilla chips. Note that salsa always tastes best after it's been refrigerated for a few hours, so if time allows let the flavors marinate together before serving.
- Store in refrigerator up to 1 week.