Easy Chicken Parmesan with Cottage Cheese
There’s something about the smell of warm cinnamon wafting through the house that instantly makes me feel like a kid again—snuggled on the couch, coffee in hand, and Mom’s special breakfast baking in the oven. This zucchini cinnamon swirl coffee cake is one of those recipes that’s become my family’s little tradition. I always do this when I want something indulgent but also secretly healthy—because, hey, it’s got zucchini in it! And trust me, no one can tell. The best part? It’s surprisingly easy to whip up on a busy weekend morning or even as a quick weekday treat. I’ve made this countless times, and it never fails to disappear in minutes at my house. My kids ask for this all the time, especially when they’re craving something warm and sweet that’s not loaded with sugar and artificial flavors. The swirl of cinnamon and the moist texture make it feel like a cozy hug, and there’s a memory in every bite. Plus, the recipe’s flexible enough to tweak—adding nuts, swapping out the glaze, or even making muffins. I promise, once you try this, it’ll be a regular in your rotation too.
What is Zucchini cinnamon swirl coffee cake?
This zucchini cinnamon swirl coffee cake is basically a delightful mash-up of your favorite breakfast treat and a cozy dessert. Think of it as a classic coffee cake—moist, crumbly, with a generous cinnamon swirl—meets the freshness of zucchini, which just keeps it light and surprisingly nutritious. The name might sound fancy, but it’s honestly just a simple cake that’s layered with cinnamon sugar, then baked until golden and fragrant. It’s essentially a cake you can enjoy with your morning coffee or as an afternoon snack. The zucchini melts into the batter, adding moisture and a tender crumb. It’s rustic, a little indulgent, and totally comforting. I love that it’s versatile—serve it warm with a drizzle of glaze or topped with a dusting of powdered sugar for an effortless finish. Whatever your mood, this cake is my go-to when I want a treat that feels like a warm hug, and because it’s packed with zucchini, I never feel guilty about seconds!
Why you’ll love this recipe?
The thing I love most about this zucchini cinnamon swirl coffee cake is how it’s both a crowd-pleaser and a bit of a secret weapon in my kitchen. The flavor? Oh, it’s incredible—the cinnamon swirl is rich and fragrant, and the cake itself stays moist and tender thanks to the zucchini. The *best* part? It’s so easy to make, even on your busiest mornings. I’ve tested this with almond milk, and honestly, it made it even creamier—trust me on this one! Plus, with simple pantry ingredients like flour, sugar, and heat-up zucchini, it’s budget-friendly and doesn’t require fancy stuff. And because it’s a layered cake, you can get creative with toppings—try a dollop of whipped cream, fresh berries, or a drizzle of my homemade vanilla glaze. It’s perfect for breakfast, brunch, or even sneaking into the dessert category. I find myself reaching for this recipe when I need comfort or just want to impress friends without much fuss. What I love most about it is how it makes my house smell like heaven and how my family always asks for seconds. It’s cozy, versatile, and honestly, a little bit addictive.
How do you make Zucchini Swirl Coffee Cake?
Quick Overview
This coffee cake is surprisingly straightforward. You start by whisking together the dry ingredients, then blending the wet ingredients until smooth. Grate your zucchini (no peeling needed unless you want to), fold it into the batter, then layer it in a baking dish. Mix cinnamon sugar for the swirl, dollop it into the batter, and swirl it around with a skewer or knife. Bake until golden, cool just enough, then drizzle with a simple glaze or dust with powdered sugar. It’s just *that* easy—and, trust me, the result is a gorgeous, moist cake that’s perfect for sharing!
Ingredients
For the Main Batter:
– 2 cups all-purpose flour (I always use unbleached for a softer crumb)
– 1 cup granulated sugar
– 1 teaspoon baking powder
– ½ teaspoon baking soda
– ½ teaspoon salt
– 1 teaspoon cinnamon (plus extra for the swirl)
– 2 large eggs
– ½ cup vegetable oil or melted butter
– 1 cup grated zucchini (squeeze out excess moisture—learned this after a few soggy mishaps!)
– ½ cup whole milk or almond milk (I tested both—both work, but almond milk keeps it dairy-free and still creamy)
For the Filling (Cinnamon Sugar Swirl):
– ½ cup brown sugar
– 2 teaspoons ground cinnamon
– 1 tablespoon melted butter (or coconut oil if you prefer dairy-free)
– Optional: a handful of chopped nuts for added crunch
For the Glaze (Optional but totally worth it):
– ½ cup powdered sugar
– 2–3 teaspoons milk (or lemon juice for a zingier twist)
– A drop of vanilla extract (because vanilla makes everything better)
Step-by-Step Instructions
Step 1: Preheat & Prep Pan
Set your oven to 350°F (175°C). Grease an 8×8 or 9×9 baking dish—trust me, lining it with parchment makes this so much easier to remove later. If you want to get fancy, a springform pan works great too! Just make sure everything is ready to go before you start mixing—timing is everything.
Step 2: Mix Dry Ingredients
In a big bowl, whisk together the flour, sugar, baking powder, baking soda, salt, and cinnamon. Sifting isn’t necessary but it does help keep everything nice and airy. I’ve made this with lumps before, and it’s never fun—so take your time to get it mixed well. This step ensures your cake bakes evenly and rises perfectly.
Step 3: Mix Wet Ingredients
In another bowl, beat the eggs, then stir in the oil (or melted butter), milk, and vanilla. When your eggs are fully beaten and the mixture looks creamy, fold in the grated zucchini. I always use a rubber spatula—it’s gentle but gets everything incorporated. I test the zucchini after grating; if it’s super watery, I squeeze out the excess moisture with a clean towel—this keeps your batter from getting soggy. I’ve tested this with just a little extra zucchini, and I swear, it makes the cake even moister and more flavorful.
Step 4: Combine
Pour the wet mixture into your bowl of dry ingredients. Fold gently—overmixing can make the cake dense, and nobody wants that. Stop just as the ingredients come together; a few lumps are okay. It should look moist and slightly thick but pourable. If it’s feeling too stiff, a splash more milk might do the trick.
Step 5: Prepare Filling
Mix the brown sugar, cinnamon, and melted butter to make a gooey cinnamon-sugar paste. Feel free to add chopped nuts here if you like a bit of crunch or even a handful of mini chocolate chips for a fun twist. I’ve learned that spreading this evenly in the batter helps create that gorgeous swirl—so grab a spoon and dollop small heaps on top.
Step 6: Layer & Swirl
Pour half the batter into the prepared pan. Spread it out gently, then sprinkle your cinnamon-sugar mixture evenly over it. Top with the remaining batter, then swirl it all with a butter knife or skewer—don’t overdo it, just a few gentle twirls to create a marbled effect. When you bake it, that swirling becomes this beautiful ribbon of cinnamon that everyone loves to see when they cut in.
Step 7: Bake
Pop it into the oven and bake for 35–45 minutes, depending on your oven. I start checking around 35 minutes by inserting a toothpick into the center—if it comes out clean, you’re all set. The top should be golden and slightly cracked, and the house will smell like cinnamon heaven. I’ve had mine bake a little longer, and the edges get super crisp—delicious either way, so keep an eye on it.
Step 8: Cool & Glaze
Once out of the oven, let it cool in the pan for about 10 minutes before transferring it to a wire rack. This helps the structure set, especially if you layered your filling thick. Drizzle with your prepared glaze while it’s still slightly warm—it seeps in so beautifully when the cake’s just fresh out of the oven. If you prefer, dust with powdered sugar for a simpler look.
Step 9: Slice & Serve
Use a serrated knife for clean cuts. I like serving slices slightly warm with a cup of coffee—or even a dollop of whipped cream on top. It’s equally delicious cold, though, and makes wonderful leftovers. Honestly, I often keep a slice in the fridge for a quick snack, and the flavor only gets better the next day.
What to Serve It With
This cake is so versatile that it pairs with pretty much anything. In the mornings, I love to serve it with a hot cup of coffee or a glass of almond milk. It’s perfect for a lazy brunch alongside fresh fruit and a dollop of Greek yogurt. When I do a more fancy brunch, I like laying slices on a plate, topping with a smear of mascarpone, and garnishing with berries or edible flowers. For dessert, a drizzle of caramel sauce or a dusting of powdered sugar elevates it, but honestly, just a simple cup of tea can make it feel like an indulgent treat. My family’s favorite way to enjoy it is warm, with a little bit of butter melted into each slice. It’s become a staple, especially on those chilly weekend mornings when everyone needs a little extra comfort. It’s also great for potlucks or brunch parties because it transports well and looks stunning on any table. Whether you end up serving it for breakfast or dessert, I can guarantee it will become a quick favorite—everyone always asks for the recipe!
Top Tips for Perfecting Your Zucchini Cinnamon Swirl Coffee Cake
Over the years, I’ve learned a few tricks that help make this cake turn out perfectly every time. First, always squeeze out as much moisture from the zucchini as possible—this keeps your batter from becoming too wet or gummy. I learned that lesson the hard way when I once skipped that step and ended up with a soggy bottom. Next, don’t overmix your batter—fold gently and stop when everything’s just combined. Overmixing can develop gluten and make your cake dense rather than tender. For the swirl, I suggest using a skewer or chopstick rather than a spoon—it makes a neater pattern and distributes the cinnamon sugar more evenly. When it comes to baking, I always position the rack in the middle of the oven to promote even heat. If your oven runs hot, don’t be afraid to lower the temp slightly or reduce the baking time. Indent the center with a toothpick to test doneness—if it comes out with moist crumbs, it’s ready. I’ve also experimented with ingredient swaps—using coconut sugar instead of white granulated sugar gives it a richer flavor, and swapping almond flour for some of the all-purpose flour makes it a tad nuttier. Lastly, top it with your favorite glaze—whether it’s lemon glaze, vanilla, or even a splash of bourbon—your cake will taste even more special. The biggest lesson I’ve learned? Be patient. Good baking isn’t about perfection—it’s about loving the process and savoring every bite.
Storing and Reheating Tips
This cake keeps well, which is great because you might find yourself sneaking a slice even a day later. For short-term storage, simply cover it with a clean towel or transfer to an airtight container. It stays soft and moist at room temperature for about 2 days—just keep it away from direct sunlight or heat. For longer storage, pop it in the fridge in a sealed container—perfect for breakfasts or snacks the next day. If you’re thinking ahead and want leftovers for later, freezing is a good option. Wrap slices tightly in plastic wrap and then place in a freezer bag—this prevents freezer burn. When you’re ready to enjoy, let it thaw at room temp for about 30 minutes or warm it gently in the microwave. The glaze (if used) might get a little gooey, so remember to reapply if needed. I’ve learned from experience that the flavors deepen overnight, so don’t be shy about making this the day before a brunch or family gathering. Reheating a slice in the microwave for about 15–20 seconds makes it taste just as fresh as when it came out of the oven. A quick zap and a spoonful of coffee or tea makes the perfect pairing. Trust me, leftovers never last long at my house!
Frequently Asked Questions
Final Thoughts
If you’re anything like me, baked goods are more than just recipes—they’re little moments of joy, nostalgia, and love. This zucchini cinnamon swirl coffee cake is one of those recipes I keep coming back to, especially when I want something that feels special but is also incredibly simple. The smell alone is enough to bring everyone to the kitchen, and the first bite is pure comfort—the perfect balance of moist, sweet, and spicy. I hope you try it soon; I can almost guarantee it’ll become a staple in your home too. Whether you serve it warm in the morning, as an afternoon treat, or even as a casual dessert, it’s a hit every time. Plus, it’s a clever way to sneak more veggies into your family’s diet without anyone noticing! Happy baking—can’t wait to hear how yours turns out. And hey, don’t forget to come back and tell me if you added your own twist or found a new way to enjoy it. That’s what makes this recipe truly yours.

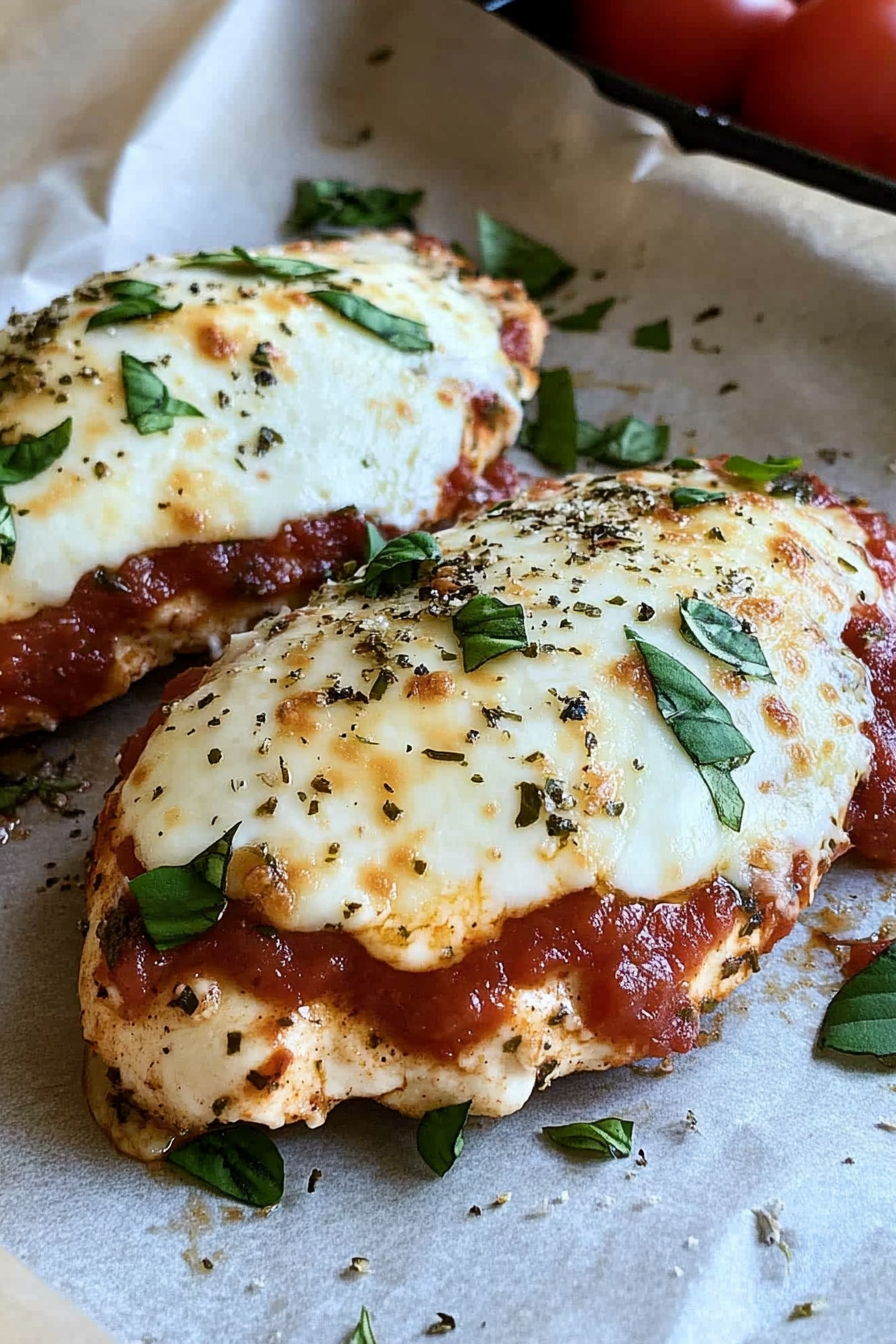
Chicken Parmesan
Ingredients
Method
- Preheat oven to 425°F. Line a large baking sheet with parchment paper.
- Tenderize chicken breasts and season with garlic powder, onion powder, Italian herb blend, and bread crumbs. Drizzle with olive oil.
- Bake chicken for 15 minutes or until internal temperature reaches 165°F.
- Remove from oven, top each chicken breast with marinara sauce, cottage cheese, and parmesan. Bake for an additional 5-7 minutes until cheese melts.