Easy Beef Zucchini Bake for a Delicious Dinner
There’s something about the smell of freshly baked zucchini bars that’s pure nostalgia for me. My grandma used to make a similar recipe, filling the kitchen with that warm, cinnamon-scented air that just felt like a hug. I always do this when I want something sweet that feels special but also quick enough to whip up after a busy day. Honestly, it’s kind of my go-to for when the kids are asking for desserts but I don’t want to pull out a whole cake or spend hours baking. This zucchini crumble bar is a clever little secret—think of it as a cross between a comforting crumble and a moist bake that’s almost healthy because, hello, zucchini! And trust me, I’ve made this countless times, and it never fails to disappear in minutes at my house. It’s perfect with a cup of coffee or tea, and the best part? It’s so simple to make, even if your baking skills are just average like mine. I love how flexible it is, too — you can tweak the spices, add a handful of nuts, or even skip the glaze if you’re feeling more rustic. Let me take you through my favorite way to make these irresistibly tender, slightly spicy, and oh-so-satisfying bars. Grab your apron, and let’s dive in!
What is a Zucchini Crumble Bar?
Think of zucchini crumble bars as a delightful mash-up of veggie goodness and dessert comfort. They’re essentially a layered treat: a lightly sweetened, buttery crust at the bottom, then a generous layer of grated zucchini mixed with cinnamon and sometimes a splash of vanilla. On top? A crumble topping that’s crisp, buttery, and a little gooey when fresh out of the oven. The name might sound strange for a dessert, but I promise you, the zucchini just melts into the batter, making these bars incredibly moist and tender. The cinnamon and a hint of nutmeg give it that warm, cozy flavor, kind of like fall in a bite. It’s a recipe that’s been handed down in my family—my mom used to make her version with apples, but I swapped in zucchini because it’s so mild and gets along with just about everything. Plus, it’s sneaky: my kids don’t even realize they’re eating their veggies! It’s perfect for when I want to serve something homemade and comforting, but with that little secret health kick.
Why you’ll love this recipe?
What I love most about these zucchini crumble bars is how they strike the perfect balance—sweet enough to satisfy my sugar cravings but still wholesome enough to feel like a little bit of a treat. The aroma alone is addictive; I always do this when I want my kitchen to smell like cinnamon and baking happiness. The best part? They’re so easy to make—no fancy tools or complicated steps—just mix, layer, and bake. It’s practically foolproof, which is perfect for those days when I want something tasty with minimal fuss. Plus, this recipe won’t break the bank. You probably have most of these ingredients already hiding in your pantry or fridge—zucchini, butter, flour, sugar, and spices. I’ve tested this with regular all-purpose flour, but I tried it with almond flour, and honestly, it made the crumble even more tender! And if you love adding a little crunch, toss in some chopped walnuts or pecans — they add a lovely contrast. What makes this recipe a true favorite in my house is how versatile it is: serve it for breakfast with coffee, as a dessert after dinner, or even as a cozy snack with afternoon tea. Sometimes, I even sprinkle a little powdered sugar on top for a prettier finish. It’s not fancy, but it’s real, comforting, and almost addictive.
How do you make Zucchini Crumble Bars?
Quick Overview
These bars come together faster than you’d think. You start by preheating your oven, then whip up a buttery crust that’s pressed into your pan. Next, you grate some zucchini — I always do this with a box grater; it’s so quick — then mix it with cinnamon, sugar, and a touch of vanilla. Spread this layer over the crust, then sprinkle your crumble topping all over. Bake until golden, cool slightly, and drizzle with a simple glaze or dust with powdered sugar. Voila! You’ve got warm, fragrant squares ready to wow family and friends. The magic here is in how the zucchini melts into the batter, making each bite moist and flavorful. Trust me, the smell alone will have everyone rushing to the kitchen!
Ingredients
For the Main Batter:
– 1 ½ cups all-purpose flour (or gluten-free blend, if you prefer)
– ½ cup granulated sugar
– ½ teaspoon baking powder
– ¼ teaspoon salt
– 1 teaspoon ground cinnamon (more if you love it!)
– ½ cup unsalted butter, melted (or coconut oil for dairy-free)
– 1 large egg
– 1 teaspoon vanilla extract
For the Filling:
– 2 medium zucchinis, grated (about 2 cups)
– ¼ cup brown sugar
– 1 teaspoon ground cinnamon
– ½ teaspoon freshly grated nutmeg (if you like a bit more warmth! )
– 1 teaspoon vanilla
– 1 tablespoon all-purpose flour (to prevent excess moisture)
– Pinch of salt
For the Crumble Topping:
– 1 cup all-purpose flour
– ½ cup old-fashioned rolled oats (optional but adds crunch!)
– ½ cup light brown sugar
– ½ teaspoon ground cinnamon
– ¼ teaspoon salt
– ½ cup unsalted butter, cubed (keep it cold for super crisp topping)
– (Optional) ½ cup chopped nuts or oats for extra texture
Step-by-Step Instructions
Step 1: Preheat & Prep Pan
I always start by heating my oven to 350°F (180°C). Line a 9×9 inch baking pan with parchment paper—this is the easiest way to get clean slices—and give it a quick spray of non-stick spray just to be safe. If you don’t have parchment, just butter the pan lightly. This little trick helps with peeling out the bars once they’re baked, especially with that crumbly topping.
Step 2: Mix Dry Ingredients for Crust
In a mixing bowl, whisk together the flour, sugar, baking powder, salt, and cinnamon. I always do this first—I like ensuring all those dry ingredients are evenly combined. It keeps the batter uniform and prevents clumping.
Step 3: Mix Wet Ingredients
In another bowl, beat the egg, then add the melted butter, vanilla, and a pinch of salt. Whisk until smooth. I’ve also tested this with almond milk instead of butter, and I gotta say — it made the crust a little lighter and I loved how creamy the overall texture felt!
Step 4: Combine
Pour the wet mixture into the dry and stir just until combined. Don’t overmix — just fold gently. Overmixing makes the crust tough, which is the biggest mistake I learned the hard way. Looks a bit crumbly, but that’s perfect for pressing into the pan.
Step 5: Prepare Filling
In a bowl, toss your grated zucchini with brown sugar, cinnamon, nutmeg, vanilla, flour, and a tiny pinch of salt. The flour helps absorb excess moisture from the zucchini, so your bars aren’t soggy. Sometimes, I squeeze out some of the excess water from the zucchini with a paper towel if I notice it’s particularly watery—that’s a game changer for a more stable filling.
Step 6: Layer & Swirl
Press the crust evenly into your prepared pan. Spread the zucchini mixture over it, then gently swirl it with a butter knife to mix the layers slightly—this creates a beautiful marbled effect when baked. My kids love watching me do this; it feels like crafting art in the kitchen!
Step 7: Bake
Bake in your preheated oven for about 35-40 minutes, or until the top is golden and crispy. It’s a bit of a judgment call — the edges should be puffed and slightly crisp, and the filling bubbly. If yours starts to brown too quickly, tent it loosely with foil and keep baking.
Step 8: Cool & Glaze
Let the bars cool in the pan for at least 15 minutes; this lets everything settle. I love adding a simple glaze made from powdered sugar and just a splash of milk or lemon juice to give it a little shine and extra sweetness. If you prefer no glaze, a dusting of powdered sugar works beautifully—looks pretty, too!
Step 9: Slice & Serve
Use a sharp serrated knife for clean cuts. Serve warm or at room temperature—either way, they’re dreamy. My favorite way? With a generous dollop of whipped cream or a scoop of vanilla ice cream if I really want to treat myself. These bars also do well stored in the fridge for a day or two, just cover them tightly so they don’t dry out.
What to Serve It With
This dessert is so versatile, I’ve found tons of ways to enjoy it—it’s always a hit at my house. For breakfast, I love a warm square with my morning coffee; the cinnamon just wakes me right up. For brunch, serve it with fresh fruit and an herbal tea for a cozy vibe. As a dessert after dinner? I sometimes add a drizzle of honey or a splash of caramel sauce for extra indulgence. If I just want a quick snack, I pop a piece in the microwave for 10 seconds — the warmth makes the zucchini filling even more tender. And don’t forget to toss in a handful of chopped nuts on top before baking if you crave crunch. Honestly, these are good at any time—it’s like a hug in bar form, and I promise, once you try it, it’ll become one of your favorites, too.
Top Tips for Perfecting Your Zucchini Crumble Bars
Throughout my baking journey with these bars, I’ve picked up a few tricks that really make the difference. First, when grating zucchini, I always do it on the finer side — it blends better into the batter and doesn’t turn the filling watery. I’ve learned that squeezing out some of the moisture with a clean kitchen towel or paper towels is essential, especially if your zucchini’s particularly juicy. Otherwise, the bottom can get a little soggy, which no one wants. For the crumble topping, keeping the butter cold helps it stay crumbly rather than melting into a paste—trust me on this! I test the bake by looking for a golden top and check the edges—if they look crisp and pulled slightly away from the pan, it’s a good sign. If you want to switch things up, try adding a pinch of ground ginger or swapping the cinnamon for pumpkin pie spice—both work beautifully and add a festive touch. I’ve also played with making these gluten-free by swapping regular flour for a blend of oat and almond flour, and honestly, they turn out just as delicious. My biggest lesson? Don’t overmix the batter and filling; keeping things a little rustic gives these bars their charm.
Storing and Reheating Tips
These zucchini crumble bars are delightful straight out of the oven, but if you want to keep some for later, they store well too. I usually cover them tightly with plastic wrap or pop them into an airtight container. At room temperature, they’re good for about one day — just keep them in a cool spot away from direct sunlight. If I need to keep them longer, I refrigerate them for up to 3 days. To warm up leftovers, I toss a slice in the microwave for about 10-15 seconds — just enough to bring back that freshly baked feel. If you add the glaze beforehand and store in the fridge, it might get a little less glossy, but I prefer storing the bars separately and adding fresh glaze before serving. For longer storage, I tightly wrap individual slices with plastic and freeze them up to a month. Thaw at room temperature or microwave briefly. Just a tip: if your glaze gets a little sticky after reheating, a quick splash of warm milk and stirring makes it silky smooth again! These tricks help me enjoy my favorite treat anytime, guilt-free.
Frequently Asked Questions
Final Thoughts
If you’re looking for a way to enjoy zucchini all year round, these crumble bars are my personal favorite! They’re comforting, a little nostalgic, and come together faster than you can say “dessert.” I love how the moist zucchini layer pairs perfectly with that crispy, cinnamon-scented crumble, making each bite a little burst of cozy sweetness. Plus, they’re endlessly adaptable: you can add chopped nuts, swap spices, or even experiment with different sweeteners. My family asks for these so often I’ve practically memorized the recipe—and honestly, I don’t mind one bit! Baking these always reminds me of lazy weekend mornings when I’d help my grandma in her tiny kitchen, her singing softly as she measured out ingredients. I hope you give this a try and find as much joy in making it as I do. I’d love to hear how your version turns out—leave a comment or share a photo, I always love seeing your creations! Happy baking, friends!
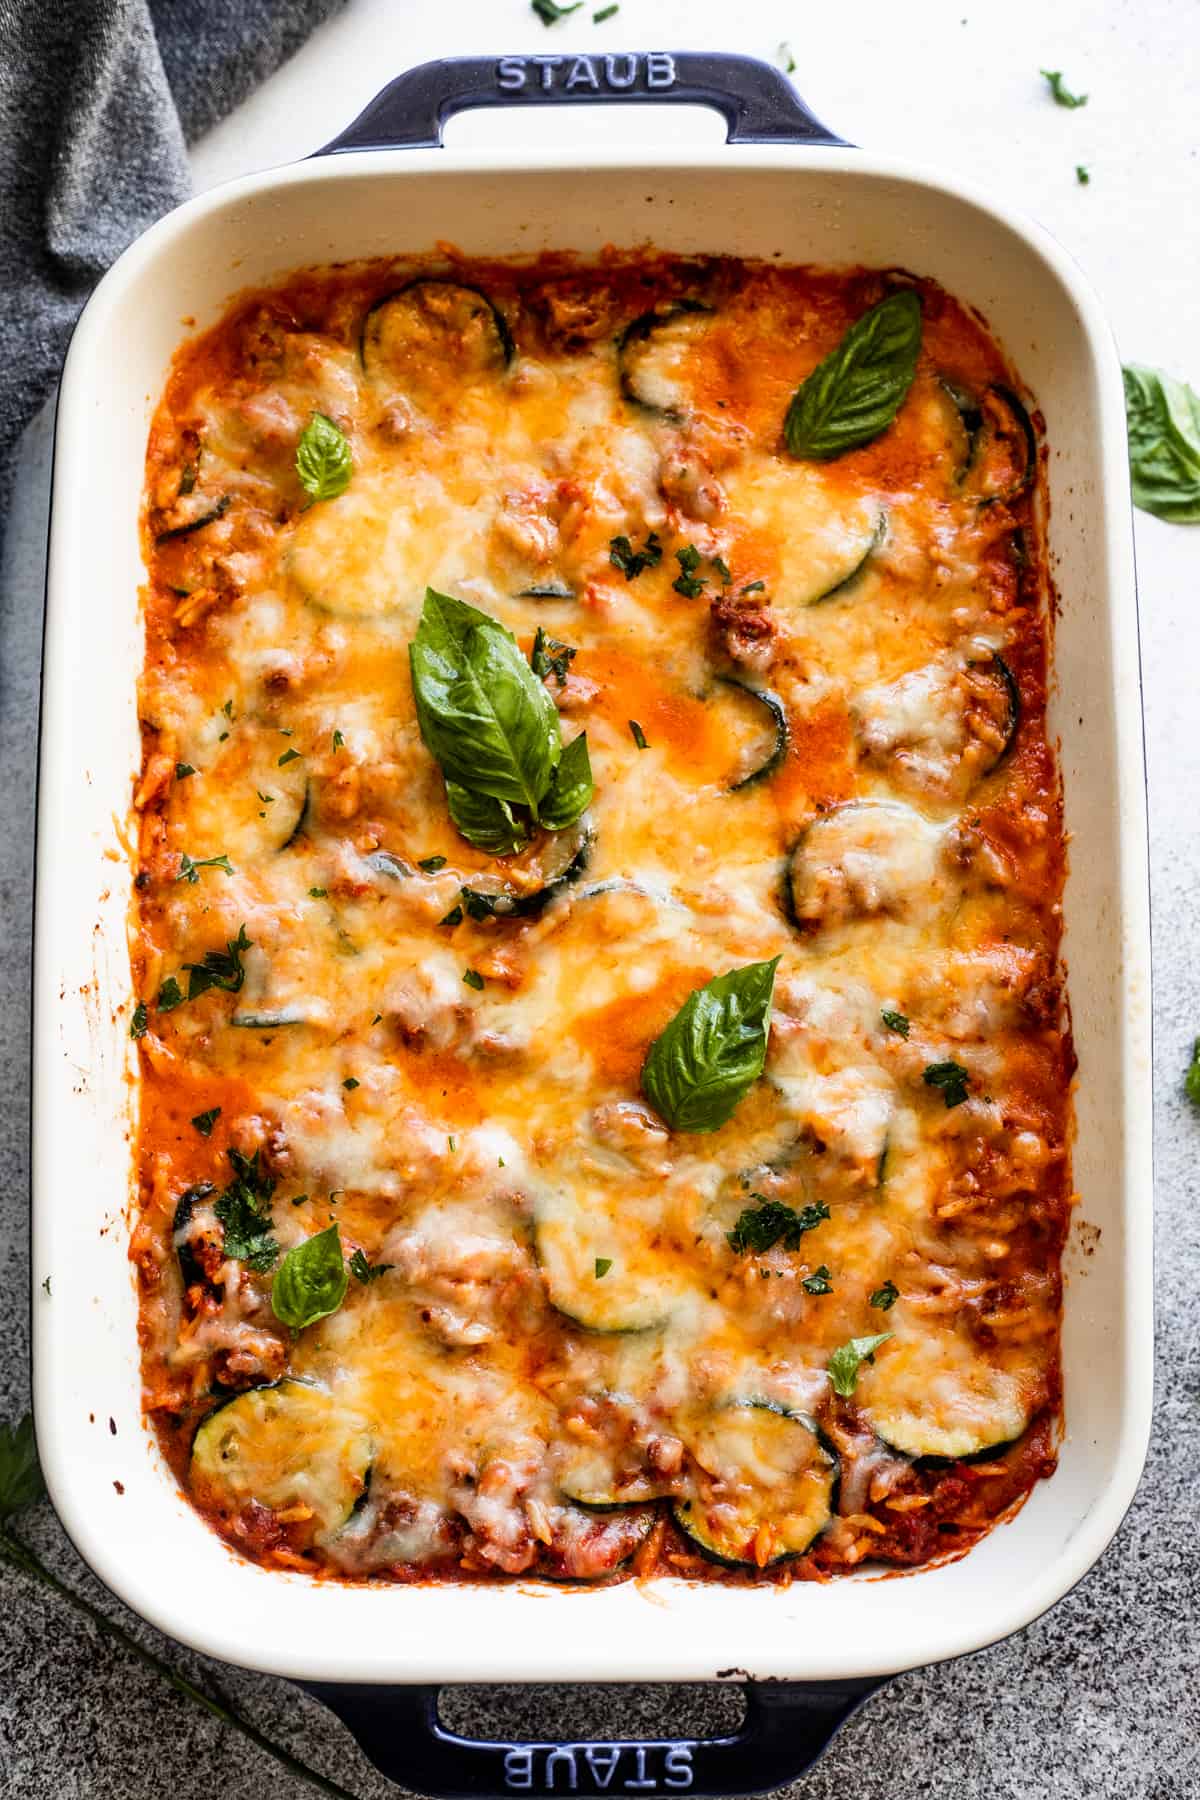
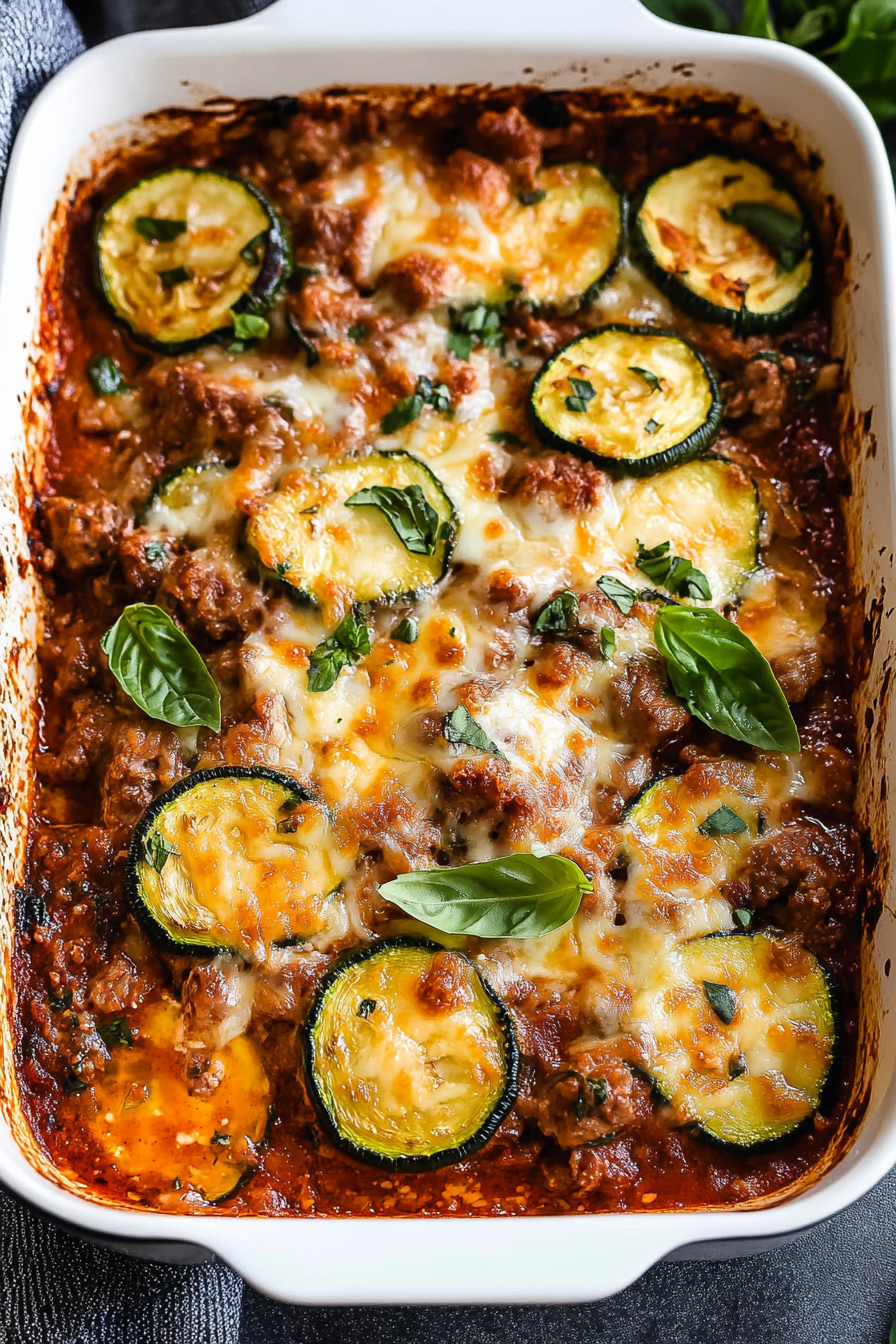
Beef Zucchini Casserole
Ingredients
Method
- Preheat oven to 375°F. Lightly grease a 9x13 baking dish with cooking spray and set aside.
- Cook the orzo according to the directions on the package. Meanwhile, heat 1 tablespoon olive oil in a large skillet set over medium heat.
- Add the zucchini to the heated oil and season with Italian seasoning, ¼ teaspoon salt, and pepper. Cook for 5 minutes, or until zucchini is crisp-tender.
- Remove zucchini from the pan and transfer to a large mixing bowl. To the same bowl, add the drained cooked orzo; stir and set aside.
- Return skillet to the burner and heat remaining olive oil over medium-high heat. Add in the onions and cook for 1 minute. Stir in the garlic and cook for 20 seconds.
- Stir in the ground beef, breaking it up with a wooden spoon. Season with remaining salt and cook for about 6 to 7 minutes, or until the ground beef is completely browned and cooked through.
- Drain fat, if any, then add the beef to the large bowl with the orzo and zucchini.
- Stir in the crushed tomatoes, ½-cup mozzarella cheese, ricotta cheese, parmesan cheese, basil, and thyme. Stir until everything is well combined and cheeses are melted.
- Transfer the mixture to previously prepared baking dish and top with remaining mozzarella cheese.
- Bake for 20 to 25 minutes, or until casserole is bubbly and cheese is melted.
- Remove from oven and let stand 10 to 15 minutes.
- Garnish with basil and serve.