Best Soft Oatmeal Raisin Cookie Cake
There’s something about a warm slice of zucchini swirl cake that instantly transports me right back to my grandma’s kitchen. The smell alone—rich, sweet, with just a hint of that earthy zucchini—fills the air and makes everyone gather around, even my usually picky kids. Honestly, I’ve made this cake more times than I can count, and it’s still my go-to when I want something comforting yet impressive. It’s kind of like a giant, cozy hug on a plate, with bursts of sweet and tender zucchini swirling through moist cake. And the best part? It’s ridiculously easy to pull together, even when I’m running on fumes after a long day. Trust me, this one’s a lifesaver on busy nights, and I always do a little happy dance when I see how quickly it disappears at my house. Whether it’s a weekend treat or a surprise for friends, this zucchini swirl cake never fails to make everyone smile—and the recipe has become a favorite for my family and me over the years.
What is Zucchini Swirl Cake?
Think of zucchini swirl cake as a soft, cake batter with a surprise inside—streaks of goodness that make every bite special. It’s essentially a cross between a simple summer cake and a veggie-packed treat, which sounds odd but works beautifully. The name comes from the way the shredded zucchini is layered into the batter and gently swirled, creating gorgeous marbled patterns once baked. And, trust me, you won’t even taste the zucchini much—what you get instead is a moist, tender crumb infused with a subtle sweetness and a little earthy depth. I like to think of it as a sneaky way to get my kids to eat a vegetable and ask for seconds! Originally, it’s a classic recipe that’s been passed down in Southern bakeries, but over time, I’ve added my own little tweaks to make it even more delicious and foolproof. Think of it as the perfect blend of humble ingredients elevated into a cake that’s almost too pretty to cut.
Why you’ll love this recipe?
What I love most about this zucchini swirl cake is how *versatile* it is. It’s perfect when you want something sweet but not overly rich—kind of like a little pick-me-up that hits the spot without feeling heavy. The flavor? Oh, it’s just sweet enough with that tender zucchini flavor softly shining through. Plus, the moistness is unmatched, thanks to some secret tricks I’ve picked up along the way—like slightly grating the zucchini and squeezing out excess moisture so the cake stays fluffy and light.
This recipe is also incredibly *simple*. You don’t need fancy ingredients or complicated techniques—just basic pantry staples. I always keep a bag of shredded zucchini in the freezer for nights when I crave a quick dessert, and it works beautifully here. It’s budget-friendly, too—perfect for when you want to indulge without breaking the bank. And honestly, my kids ask for this all the time. I’ve made it for birthday parties, after-school snacks, and even last-minute brunch spreads, and it always wins everyone over.
Another big perk? It’s adaptable! You can swap out ingredients—use honey instead of sugar, add nuts or chocolate chips, or top it with a dusting of powdered sugar for an elegant finish. There are endless ways to make it your own, which is why I keep coming back to this recipe no matter how many new ones I try. It’s just one of those comforting, dependable cakes that feels like a warm hug once it’s out of the oven.
How do I make Zucchini Swirl Cake?
Quick Overview
This cake comes together quickly—mix your dry ingredients, whisk together your wet ones, fold everything gently, layer with the shredded zucchini, swirl, and bake. The magic happens in the layers, creating gorgeous marbled patterns and that tender crumb we all love. If you’re short on time, just know that this cake is pretty forgiving; I’ve caught myself overmixing or underbaking, and it still comes out delicious every single time. The filling adds a lovely surprise inside, and the swirl technique is so simple once you get the hang of it. I like to make an extra batch of glaze to drizzle on top—it makes it look pretty and adds just the right touch of sweetness. Trust me, once you get the rhythm going, you’ll want to make this every week.
Ingredients
For the Main Batter:
- 2 cups all-purpose flour — I always use a good quality brand for the best texture
- 1 1/2 teaspoons baking powder — makes sure it rises nicely
- 1/2 teaspoon baking soda — a pinch for extra fluffiness
- 1/4 teaspoon salt — enhances all the flavors
- 1/2 cup unsalted butter, softened — real butter makes all the difference
- 1 cup granulated sugar — can adjust to your sweetness preference
- 2 large eggs — room temp helps everything mix better
- 1 teaspoon vanilla extract — for that warm, inviting aroma
- 1/2 cup whole milk — I’ve even tested with almond milk, and it’s still great!
- 1 cup shredded zucchini — squeeze out excess moisture, don’t skip this step!
For the Filling:
- 1/2 cup brown sugar — makes that caramel-y swirl
- 1 teaspoon ground cinnamon — adds cozy warmth
- 1/4 cup chopped walnuts or pecans (optional)— for crunch
For the Glaze:
- 1 cup powdered sugar
- 2-3 tablespoons milk or cream — adjust for desired consistency
- 1/2 teaspoon vanilla — optional, but adds a lovely flavor
Step-by-Step Instructions
Step 1: Preheat & Prep Pan
Set your oven to 350°F (175°C). Grease a 9-inch round cake pan or line it with parchment—trust me, this step saves heartbreak when you try to get the cake out. I always do a quick spray with baking spray and then dust with a little flour. It’s the small things that make the baking process smoother!
Step 2: Mix Dry Ingredients
In a medium bowl, whisk together the flour, baking powder, baking soda, and salt. This ensures your leavening agents distribute evenly, so your cake rises perfectly. I’ve learned the hard way that overmixing dry ingredients can make the texture tough, so I just do a quick whisk and set aside.
Step 3: Mix Wet Ingredients
In a large bowl, cream the softened butter and sugar until light and fluffy—about 2-3 minutes. Add eggs one at a time, beating well after each. Mix in vanilla. I like to pause and smell that gorgeous aroma—nothing beats fresh vanilla! Then, stir in the milk gradually, making sure it’s all combined but not overmixed.
Step 4: Combine
Pour the dry ingredients into the wet, folding gently with a spatula. Overmixing here can make the cake dense, so stir until just combined. You want a smooth batter with a few lumps, that’s perfect.
Step 5: Prepare Filling
Mix the brown sugar and cinnamon in a small bowl. If you’re feeling fancy, toss in nuts here. Set aside; we’ll sprinkle this in layers later.
Step 6: Layer & Swirl
Pour half of the batter into your prepared pan. Spread evenly. Then, sprinkle the cinnamon-sugar mixture over the batter. Add the remaining batter on top, then use a knife or skewer to swirl gently—start from the center and make figure-eight motions or circles. Don’t overdo it—you’re just creating a pretty marbled effect, not a messy jumble.
Step 7: Bake
Pop it into your preheated oven for about 30-35 minutes. Use a toothpick to check—if it comes out clean, you’re golden. Ovens vary so keep an eye on it around the 30-minute mark; I’ve gotten caught waiting too long because I was distracted chatting away!
Step 8: Cool & Glaze
Once out, let the cake cool in the pan for about 10 minutes, then transfer to a wire rack. This step is crucial to avoid a soggy bottom. While it cools, whisk together your glaze ingredients. When the cake is just warm (not hot), drizzle the glaze over the top. I like to do this when the cake’s just a little bit warm to help the glaze seep in a little, making it even more moist and flavorful.
Step 9: Slice & Serve
Once completely cooled, slice carefully with a sharp serrated knife. The swirl pattern will look gorgeous, and each piece will have that beautiful marbling. Serve with a cup of coffee or a glass of milk—it’s a real treat. I often sneak a little extra glaze on the side, just in case anyone wants more sweetness.
What to Serve It With
This cake is so cozy that I love pairing it differently depending on the occasion. For breakfast or brunch, I might serve a slice alongside a steaming mug of coffee with a splash of cream and some fresh berries. It’s perfect with a pot of chai or herbal tea, too. When I make it for a casual hangout, I’ll just cut thick slices and pile them onto a platter, maybe with a dusting of powdered sugar or extra glaze for that “restaurant” look.
As dessert, it’s even better warmed up a little, topped with a dollop of whipped cream or a scoop of vanilla ice cream. The other day, I added a drizzle of caramel sauce on top, and wow—game changer! For a more rustic vibe, serve it with a glass of cold milk or a warm cup of spiced cider. I also love sharing this with friends during family gatherings—everyone agrees it’s one of those recipes that feels like a warm hug on a plate.
Top Tips for Perfecting Your Zucchini Swirl Cake
Over years of making this cake, I’ve picked up a few tricks that make all the difference:
- Zucchini Prep: Always squeeze out excess moisture after shredding. I use a clean kitchen towel or cheesecloth—and trust me, leftover moisture can make your batter watery and affect the cake’s rise.
- Mixing Advice: Avoid overmixing once you combine wet and dry ingredients. It’s tempting to stir until smooth, but that can lead to dense cakes. Gentle folding is the secret for that tender crumb.
- Swirl Customization: Want more visible marbling? Drop dollops of batter alternately, then swirl gently with a skewer or knife. Make pretty figure-eights or spirals—whatever makes you happy! You can also sprinkle mini chocolate chips or chopped nuts for extra texture.
- Ingredient Swaps: Tried using coconut sugar? Lovely! Almond flour for a gluten-free version? Still testing, but I think it could work with some adjustments. Keep in mind, swapping too many ingredients might change the batter’s texture, so start with small tweaks.
- Baking Tips: Rotate your cake halfway through baking if your oven heats unevenly. And test for doneness early—no one wants a dry cake! If the top edges are golden and a toothpick comes out clean, you’re good.
- Glaze Variations: Switch vanilla for lemon or honey flavor. If you want it thicker, add more powdered sugar; for a runnier glaze, add a splash more milk. Warm the glaze slightly before drizzling for a smooth finish.
This recipe has evolved through many attempts and mess-ups, but now I’ve got it down to a science. It’s truly a forgiving cake that rewards you with cozy, homey goodness—a little bit rustic, a little bit fancy, and entirely delicious.
Storing and Reheating Tips
To keep this cake fresh and luscious:
- Room temperature: Wrap loosely in foil or store in an airtight container for up to two days—if it lasts that long! I’ve found that uncovering it for a few hours helps keep the top from getting soggy.
- Refrigerator: Keep in an airtight container for up to four days. To reheat, warm slices gently in the microwave for about 15-20 seconds—just enough to take the chill off without drying it out.
- Freezer: Wrap individual slices tightly in plastic wrap, then stash in a freezer bag. They’ll keep up to 2 months. To reheat, I just defrost overnight or warm directly in the microwave, and they’re just as good as fresh.
- Adding glaze: If you plan to store the cake for a while, wait to glaze until just before serving. Glaze can get a little sticky or runny if it sits too long.
Frequently Asked Questions
Final Thoughts
If you’re looking for a cozy, every-day cake that feels like a warm hug, this zucchini swirl cake is your new best friend. It’s one of those recipes that tastes like it took hours to craft, but in reality, it’s so straightforward you’ll want to make it weekly. I love how the swirl pattern makes each piece feel special, almost like art—plus, sneaking zucchini into dessert is just plain sneaky and fun! Over the years, I’ve experimented with a handful of tweaks, but honestly, this version hits all the right notes: moist, flavorful, and versatile. It’s perfect for lazy Sundays, quick brunches, or surprise guests—you can swap ingredients, add your own twist, and it always turns out beautifully. Give it a try, and I’d love to see your creations—share your pictures and variations! Happy baking, and more than anything, enjoy every sweet, tender slice.
oatmeal raisin cookie cake
Ingredients
Method
- Preheat oven to 350°F. Line a 9-inch round cake pan with parchment paper and spray lightly with baking spray. Set aside.
- Combine the flour, baking soda, cinnamon, and salt in a bowl and set aside.
- Cream together the butter, brown sugar, and granulated sugar in a large bowl until light and fluffy, about 2-3 minutes.
- Add eggs one at a time, mixing well after each addition. Mix in vanilla extract.
- Gradually add dry ingredients into the wet mixture until just combined. Do not overmix.
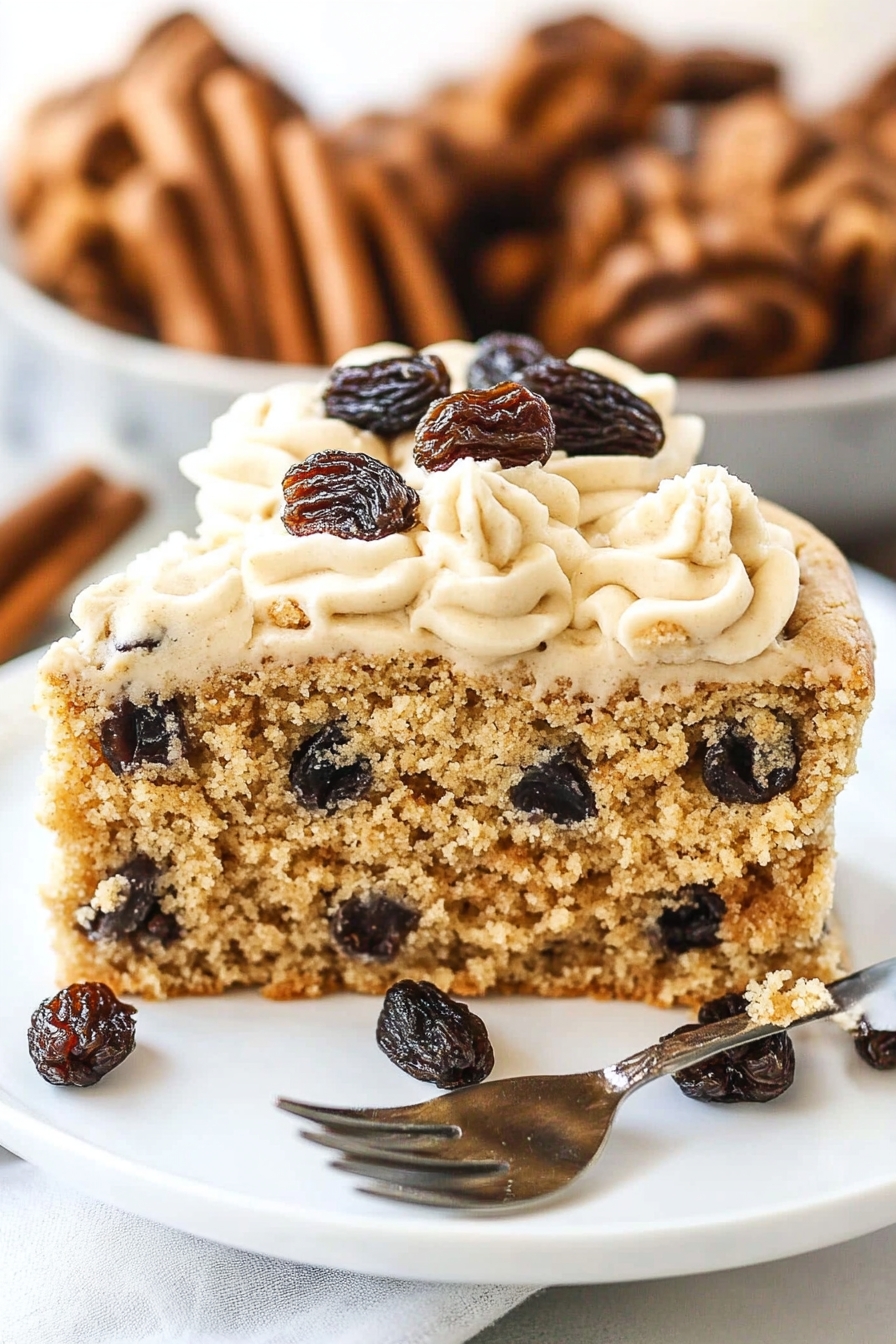
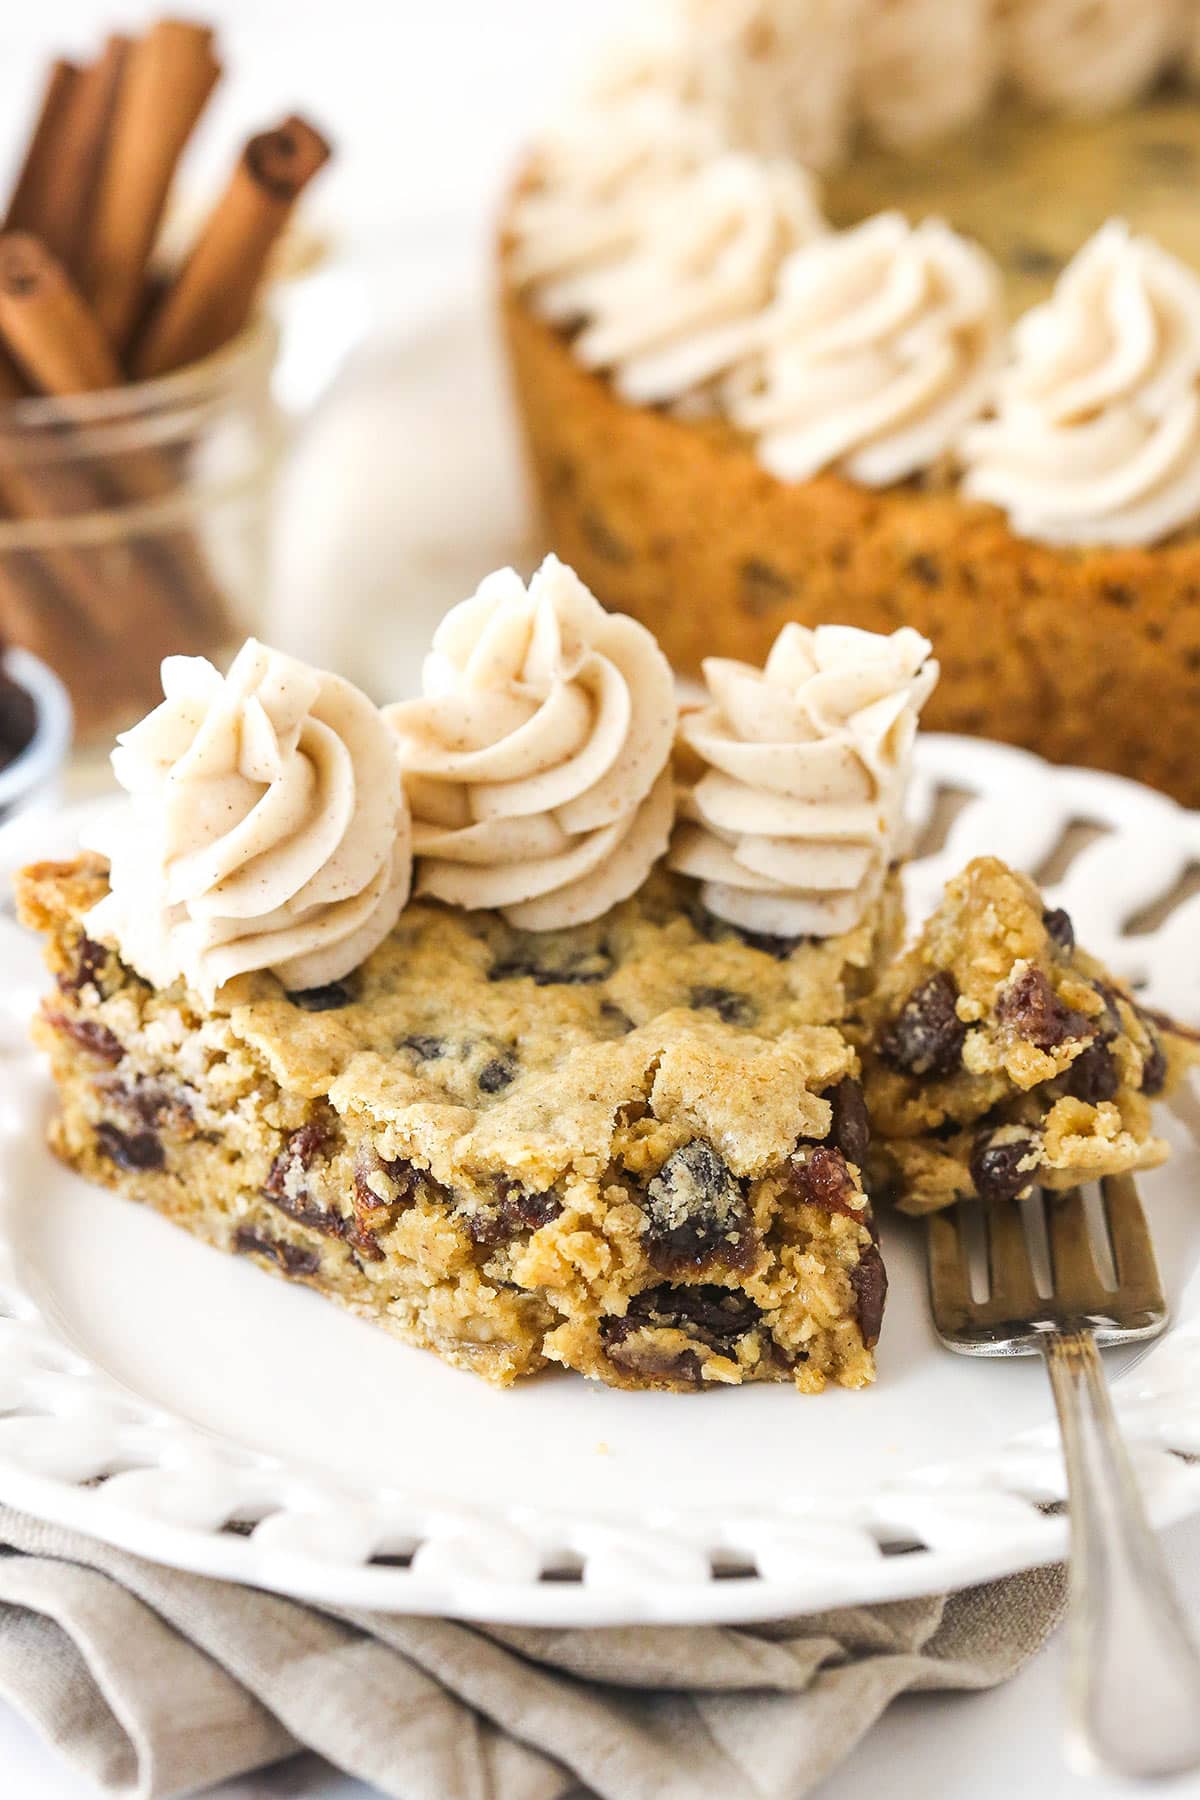
- Stir in oats and raisins until evenly distributed. The batter will be thick and sticky.
- Press the dough evenly into the prepared cake pan, pressing additional raisins on top if desired.
- Bake for 18 to 20 minutes or until edges are golden Brown. Allow to cool completely in the pan.
- Once cooled, transfer to a serving plate if necessary. Prepare the maple-cinnamon buttercream for topping.
- To make the buttercream, beat room temperature butter until smooth, then gradually add powdered sugar, maple extract, cinnamon, and a tablespoon of heavy cream until desired consistency is achieved.
- Frost the cooled cookie cake with the prepared buttercream, piping decorative swirls if desired.