Autumnal Honey Spice Cookies How to Bake
You know those recipes that just *feel* like a hug? The ones that transport you back to your grandma’s kitchen or a cozy Sunday morning? Well, this is one of those for me. It’s my absolute go-to zucchini bread recipe, and let me tell you, it’s a lifesaver. It’s moist, perfectly spiced, and has this incredible, subtle sweetness that just hits the spot. I’ve tried countless zucchini bread recipes over the years, some that turn out dry, some too dense, and some that just taste… well, bland. But this one? This one’s different. It’s the kind of thing that disappears in minutes at my house, and honestly, my kids ask for it all the time, which is saying something! If you’ve ever been intimidated by baking with zucchini, don’t be. This recipe makes it so incredibly easy, and the result is pure magic. It’s a little bit like a comforting cake, a little bit like a sweet bread, and a whole lot of deliciousness.
What is Zucchini bread?
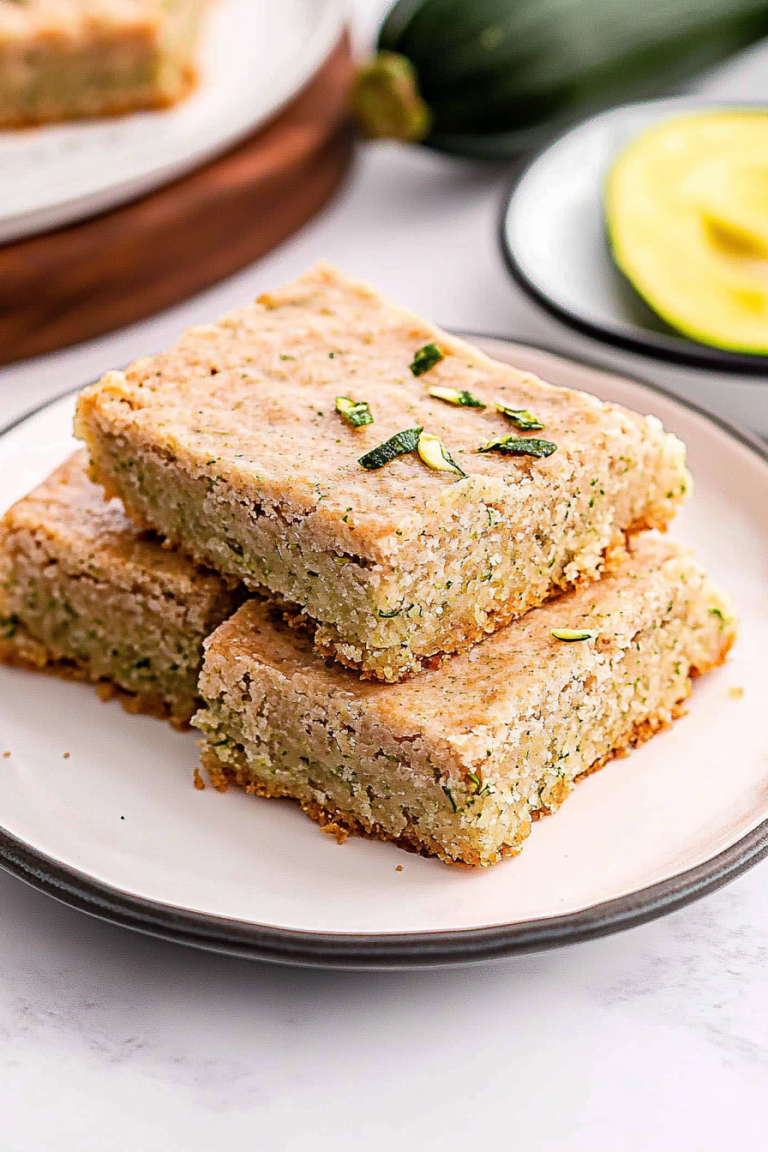
Okay, so what exactly *is* zucchini bread, anyway? At its heart, it’s a quick bread that uses shredded zucchini as a key ingredient. Now, I know what you might be thinking – zucchini in a sweet bread? Trust me on this one! The zucchini doesn’t add a strong vegetable flavor; instead, it works its magic by keeping the bread incredibly moist and tender. Think of it as nature’s little secret for the most luscious baked goods. The name itself is pretty straightforward – it’s bread, and it has zucchini in it. But the experience of eating it? That’s way more complex and wonderful than the name suggests. It’s essentially a fantastic vehicle for warm spices like cinnamon and nutmeg, often with the delightful addition of nuts or chocolate chips. It’s the kind of treat that feels both wholesome and indulgent, perfect for any time of day.
Why you’ll love this recipe?
There are so many reasons why this zucchini bread has earned a permanent spot in my recipe binder, and I just know you’re going to adore it too. First and foremost, the flavor is out of this world. It’s got that perfect balance of sweet and spice. The cinnamon and nutmeg are front and center, creating this warm, comforting aroma that fills your kitchen the moment it starts baking. And that moisture? Oh my goodness, it’s so unbelievably tender and moist, thanks to the secret weapon – zucchini! You’d never guess it was in there, but you can definitely taste the difference it makes.
Beyond the incredible taste, this recipe is surprisingly simple. I’ve made it on busy weeknights when I’ve had barely an hour to spare, and it’s always a success. The ingredients are all pretty standard pantry staples, too, so you likely won’t need a special trip to the grocery store. This also makes it super cost-efficient; you can whip up a loaf of pure deliciousness without breaking the bank. What I love most about this is its versatility. It’s not just a breakfast item; it’s perfect for an afternoon snack, a delightful dessert, or even a thoughtful homemade gift. It’s basically the perfect answer when you’re craving something sweet at 10 pm but don’t want to bake a whole cake. It’s more forgiving than many cakes and muffins, and always turns out wonderfully. Compared to a lot of other quick bread recipes I’ve tried, this one consistently delivers on texture and flavor, making it a true winner in my book.
How do I make [Recipe Name]?
Quick Overview
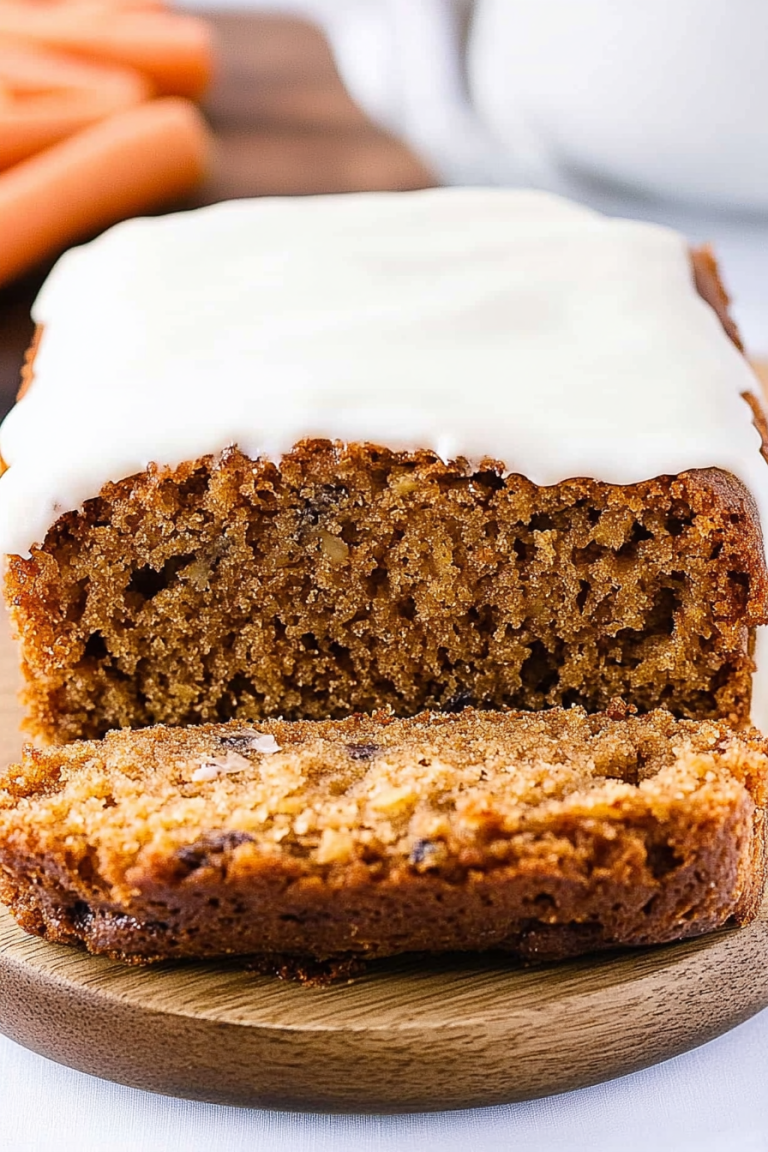
Making this amazing zucchini bread is surprisingly straightforward. You’ll essentially whisk together your dry ingredients, mix your wet ingredients separately, then combine them gently. While that’s happening, you’ll whip up a simple yet decadent filling and swirl it through the batter before baking. The result is a beautifully marbled loaf that’s incredibly moist, tender, and bursting with flavor. It’s the kind of recipe where even if you’re a beginner baker, you’ll feel like a pro. The real magic happens in the oven as the aromas fill your home, and then, the most satisfying part – slicing into that golden-brown loaf.
Ingredients
For the Main Batter:
2 cups all-purpose flour: I always opt for unbleached all-purpose flour; it just seems to give baked goods a better texture. If you’re feeling adventurous, you can try a 1:1 gluten-free blend, though I haven’t personally tested that here yet!
1 teaspoon baking soda: This is crucial for getting that lovely rise!
½ teaspoon baking powder: A little extra lift never hurt anyone, right?
½ teaspoon salt: Balances out all the sweetness.
1 ½ teaspoons ground cinnamon: Don’t skimp here, the cinnamon is key to that cozy flavor!
½ teaspoon ground nutmeg: Just a hint adds a wonderful depth.
¼ teaspoon ground cloves (optional, but I love it!): If you have it, add it. It really elevates the spice profile.
1 ½ cups granulated sugar: This is for the perfect level of sweetness. We’ll add more in the filling!
½ cup vegetable oil (or other neutral oil like canola or melted coconut oil): Oil makes this bread incredibly moist.
2 large eggs: Room temperature eggs incorporate better.
1 teaspoon vanilla extract: For that classic comforting flavor.
1 cup finely shredded zucchini, squeezed dry: This is the star! Make sure to squeeze out as much moisture as possible – it’s a crucial step for texture. I use the large holes of my box grater.
For the Filling:
½ cup packed light brown sugar: The brown sugar adds a lovely caramel note to the swirl.
2 tablespoons all-purpose flour: This helps the filling set up nicely.
1 teaspoon ground cinnamon: More cinnamon goodness!
½ cup chopped walnuts or pecans (optional, but highly recommended!): Toasted nuts add a fantastic crunch. I love using pecans.
¼ cup melted unsalted butter: This binds the filling together.
For the Glaze:
1 cup powdered sugar: Sifted for a super smooth glaze.
2-3 tablespoons milk (or buttermilk for extra tang!): Start with 2 tablespoons and add more until you reach your desired drizzling consistency.
½ teaspoon vanilla extract: Enhances the sweetness.
Step-by-Step Instructions
Step 1: Preheat & Prep Pan
First things first, let’s get your oven ready. Preheat it to 350°F (175°C). Then, grab a standard 9×5 inch loaf pan. I like to grease it really well with butter or cooking spray, and then dust it with a little flour. Alternatively, you can line it with parchment paper, leaving some overhang on the sides. This makes lifting the loaf out a breeze later on. Trust me, no one wants their beautiful bread stuck to the pan!
Step 2: Mix Dry Ingredients
In a large bowl, whisk together the 2 cups of all-purpose flour, baking soda, baking powder, salt, cinnamon, nutmeg, and cloves (if you’re using them). Give it a good whisk to make sure everything is evenly distributed. This step is important for a consistent texture, so don’t rush it. You want all those lovely spices to be in every bite.
Step 3: Mix Wet Ingredients
In a separate medium bowl, whisk together the 1 ½ cups granulated sugar, ½ cup vegetable oil, 2 large eggs (make sure they’re at room temperature if you remember!), and 1 teaspoon vanilla extract. Whisk until everything is well combined and looks nice and smooth. No streaks of egg yolk or white should be visible.
Step 4: Combine
Now, pour the wet ingredients into the bowl with the dry ingredients. Stir gently with a spatula or wooden spoon until *just* combined. It’s really important not to overmix here! A few streaks of flour are okay. Overmixing can develop the gluten too much, leading to a tough loaf. Then, gently fold in the 1 cup of finely shredded and squeezed zucchini. Make sure it’s evenly distributed throughout the batter. The batter will be thick, but that’s exactly what we want.
Step 5: Prepare Filling
While the oven finishes preheating, let’s make that irresistible filling. In a small bowl, combine the ½ cup packed light brown sugar, 2 tablespoons flour, and 1 teaspoon cinnamon. Stir it all together. Now, pour in the ¼ cup melted unsalted butter and stir until it forms a crumbly paste. If you’re adding nuts, stir them in now. This mixture is going to create those gorgeous ribbons of flavor throughout your bread.
Step 6: Layer & Swirl
Pour about half of the zucchini batter into your prepared loaf pan. Sprinkle half of the filling mixture evenly over the top. Then, pour the remaining batter over the filling, and sprinkle the rest of the filling mixture on top. Now for the fun part: grab a butter knife or a skewer and gently swirl the filling into the batter. You don’t want to overdo it; just a few gentle passes will create beautiful marbling. Imagine you’re painting with batter – that’s the idea!
Step 7: Bake
Pop that beautiful loaf into your preheated oven. Bake for 50-65 minutes. Now, oven temperatures can vary, so keep an eye on it. Around the 50-minute mark, I usually check for doneness. You want to insert a toothpick or a skewer into the center of the loaf. If it comes out clean or with a few moist crumbs attached, it’s ready! If there’s wet batter, give it another 5-10 minutes and check again. If the top is browning too quickly, you can loosely tent it with aluminum foil.
Step 8: Cool & Glaze
Once it’s baked to perfection, take the loaf pan out of the oven and let it cool in the pan for about 15-20 minutes. This allows it to set up a bit before you try to remove it. Then, carefully invert the pan onto a wire rack and lift the loaf out. Let it cool completely before you even *think* about glazing it. Seriously, patience is key here! Once it’s totally cool, whisk together the 1 cup powdered sugar, 2-3 tablespoons milk, and ½ teaspoon vanilla extract until smooth. Drizzle this over the top of the cooled loaf. Let the glaze set for a bit before slicing.
Step 9: Slice & Serve
The moment of truth! Using a sharp serrated knife, slice your beautiful zucchini bread. It’s best served at room temperature, where all those flavors and textures really shine. Look at those swirls! It’s so satisfying to see the marbling you created. This is pure homemade goodness. Enjoy every single bite!
What to Serve It With
This zucchini bread is a chameleon, folks! It’s wonderful all on its own, of course, but it also plays exceptionally well with others. For a classic breakfast, I love serving a warm slice alongside a steaming mug of good quality coffee. The rich coffee aroma just complements the spices in the bread perfectly. It’s also fantastic with a glass of cold milk for the kiddos (or for me, let’s be honest!).
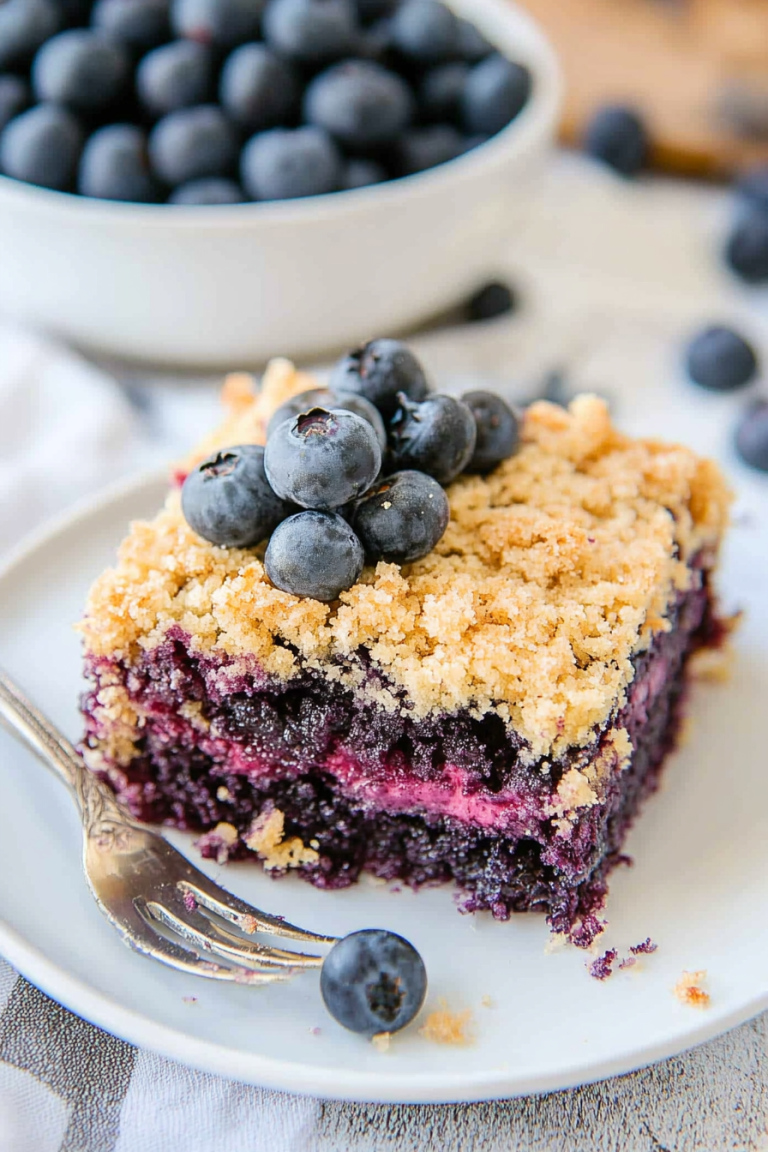
When we have brunch, I like to make it a bit more elegant. A slice of this zucchini bread is beautiful served alongside some fresh berries or a dollop of Greek yogurt. It adds a lovely sweet counterpoint to savory brunch dishes like scrambled eggs or bacon. For a more sophisticated brunch spread, I might even serve it with a light fruit salad.
As a dessert, this bread is a dream. It’s perfect for when you want something sweet after dinner but don’t want to go through the whole process of making a cake. I love it slightly warm, maybe with a tiny bit of whipped cream or a scoop of vanilla bean ice cream. The contrast between the warm bread and cold ice cream is pure bliss!
And for those cozy snack times? Oh, this is where it truly shines. Picture this: a rainy afternoon, a good book, and a generous slice of this zucchini bread. It’s pure comfort. I often just grab a piece while I’m in the kitchen tidying up, or have it with my afternoon tea. My family also loves it as an after-school snack – it’s filling enough to tide them over until dinner.
Top Tips for Perfecting Your [Recipe Name]
I’ve baked this zucchini bread more times than I can count, and over the years, I’ve picked up a few tricks that I think make a big difference. Let’s dive into some of my top tips to ensure your loaf turns out absolutely spectacular every single time.
Zucchini Prep: This is probably the most critical step for avoiding a soggy loaf. You absolutely MUST squeeze out as much moisture as possible from the shredded zucchini. I use a fine-mesh sieve and press down with a spoon, or for really good results, I wrap the shredded zucchini in a clean kitchen towel or cheesecloth and wring it out like a sponge. It might seem like a lot of zucchini goes in, but a good amount of water will come out! Fresh zucchini is best, but if yours is looking a little sad, it will still work; just be extra thorough with the squeezing.
Mixing Advice: Remember what I said about not overmixing? This is so important for quick breads. Once you add the wet ingredients to the dry, mix only until *just* combined. A few small lumps of flour are totally fine. Overmixing develops the gluten too much, resulting in a dense, tough texture. You want tender, moist, and light – not chewy like bread dough!
Swirl Customization: The swirl is where you can really get creative! For distinct swirls, don’t over-swirl. Just a few gentle passes with a knife or skewer is enough to create beautiful patterns. If you want a more uniform distribution of the filling, swirl a bit more, but be careful not to mix it in completely. You can also play with the colors of your swirl by adding a drop of food coloring to the filling mixture if you’re feeling fancy!
Ingredient Swaps: I’ve experimented a bit, and I can tell you this recipe is pretty forgiving. If you don’t have vegetable oil, a neutral-flavored oil like canola or even melted coconut oil works well. For the nuts, feel free to swap pecans for walnuts, or even skip them if you prefer. I’ve even added chocolate chips to the batter (about ½ cup) and they were delicious! For a dairy-free option, I’ve tested this with almond milk for the glaze, and it worked beautifully, making it even creamier. I haven’t tested dairy-free milk in the batter itself, but a good plant-based yogurt might work as a sour cream substitute if you want to try that.
Baking Tips: Always preheat your oven thoroughly. An oven that’s not hot enough will affect the rise and texture. If your oven tends to run hot, or if you notice the top browning too quickly, loosely tent the loaf with aluminum foil about halfway through baking. This will prevent the crust from burning while the inside finishes cooking. Trust your toothpick test – it’s the most reliable way to check for doneness.
Glaze Variations: The glaze is optional, but I highly recommend it! If you prefer a less sweet glaze, use milk instead of a milk/sugar mixture. For a tangier glaze, a little bit of buttermilk or even some lemon juice mixed with powdered sugar is divine. You can also skip the glaze entirely and just dust the cooled loaf with a little extra powdered sugar or cinnamon sugar for a simpler finish.
Storing and Reheating Tips
One of the best things about this zucchini bread is how well it stores. It stays wonderfully moist for days, making it perfect for make-ahead baking.
Room Temperature: Once completely cooled, I store my zucchini bread wrapped tightly in plastic wrap or in an airtight container at room temperature. It will stay delicious and moist for about 3-4 days. I try to keep it out of direct sunlight to prevent it from getting too warm or drying out.
Refrigerator Storage: If you live in a particularly warm climate or just want to extend its life, you can store it in the refrigerator. Wrap it well in plastic wrap, and then place it in an airtight container. It should stay good for up to a week. The texture might firm up a bit in the fridge, but don’t worry, it re-softens beautifully when warmed.
Freezer Instructions: This recipe freezes incredibly well! This is a lifesaver for me when I have an abundance of zucchini from the garden. Once the loaf is completely cool and glazed (or un-glazed, if you prefer), wrap it tightly in plastic wrap, then in a layer of aluminum foil, and finally place it in a freezer-safe bag or container. It will keep its quality for up to 3 months. To thaw, unwrap it and let it sit at room temperature for a few hours, or gently reheat it.
Glaze Timing Advice: If you plan to freeze the loaf, I highly recommend glazing it *after* thawing. The glaze can sometimes become sticky or melt unevenly in the freezer. If you’re just storing it at room temperature or in the fridge, glazing it once it’s completely cooled is perfectly fine. The glaze will set up and keep its lovely texture.
Frequently Asked Questions
Final Thoughts
So there you have it – my absolute favorite, fail-proof zucchini bread recipe. It’s more than just a recipe to me; it’s a little slice of comfort, a reminder of warm kitchens and happy moments. I truly believe this recipe will become a staple in your kitchen too, especially when you need something delicious, relatively healthy, and incredibly satisfying. The way the spices mingle with the moist crumb and those sweet pockets of filling is just pure perfection. It’s that kind of recipe that makes you feel good about baking, and even better about sharing.
If you loved this recipe, I bet you’ll also enjoy my recipe for [Link to another similar recipe, e.g., “My Famous Banana Bread”] or perhaps my tips for [Link to another related content, e.g., “Gardening with Zucchini: From Seed to Table”]. There’s always something delicious to be made!
I can’t wait to hear how yours turns out! Please leave a comment below and let me know your thoughts, or share any fun variations you’ve tried. Happy baking, my friends!
Soft and Puffy Pumpkin Spice Cookies
Ingredients
Method
- In the bowl of a stand mixer fitted with the paddle attachment, combine the butter, sugar, and egg. Beat on medium-high speed until well-creamed, light, and fluffy, about 5 minutes (or use a hand mixer and beat for at least 7 minutes). Do not shortcut the creaming process; ensure the dough is very light in color and fluffy. Scrape down the sides of the bowl as necessary.
- Stop the mixer, scrape down the sides of the bowl, and add the honey, pumpkin pie spice, and vanilla extract. Beat on medium-high speed until combined and smooth, about 2 minutes.
- Stop the mixer, scrape down the sides of the bowl, and add the flour, cornstarch, baking soda, and optional salt. Mix until just combined, about 1 minute.
- Using a medium 2-inch cookie scoop, form heaping two tablespoon mounds of dough. Place the mounds on a large plate, flatten them very slightly with your palm, cover with plastic wrap, and refrigerate for at least 3 hours, or up to 5 days, before baking. Do not bake with warm dough, as the cookies will spread and bake thinner and flatter.
- Preheat oven to 350°F (175°C). Line baking sheets with Silpats or spray with cooking spray.
- Place the chilled dough mounds on the prepared baking sheets, spacing them at least 2 inches apart (bake 8 cookies per sheet). Bake for 8 to 9 minutes, or until the edges have set and the tops are just beginning to set, even if they appear undercooked, pale, and glossy in the center. For soft cookies, do not bake longer than 9 minutes as they will firm up as they cool. Bake for 9-10 minutes if you prefer firmer cookies.
- Allow the cookies to cool on the baking sheet for about 5 minutes before removing them and transferring to a wire rack to finish cooling completely.