Autumn Spice Bars How to Bake Them
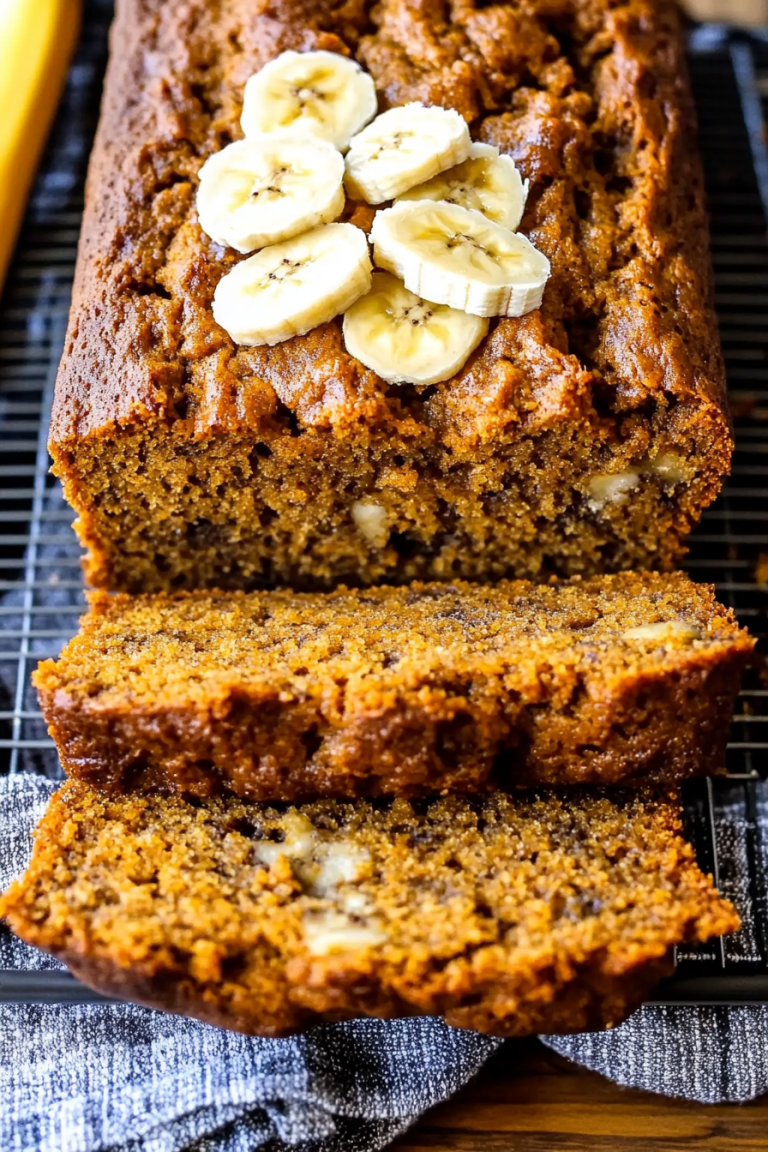
You know, there are some recipes that just… *feel* like home. For me, that’s definitely my Zucchini Bread. It’s not just any zucchini bread, mind you. This is the one I’ve tweaked and perfected over years, the one that my family begs for, the one that makes the entire house smell like pure comfort. If you’ve ever had zucchini bread that tasted a little too much like… well, health food, then you absolutely have to try this. It’s surprisingly moist, perfectly spiced, and honestly, it’s so good it could pass for a decadent dessert. I’ve tried countless versions, some too dry, some too dense, but this one? This one is a game-changer. It’s like a warm hug in loaf form, and I can’t wait to share it with you!
What is Zucchini bread?
So, what exactly *is* zucchini bread? At its heart, it’s a quick bread, meaning it uses chemical leaveners like baking soda and baking powder instead of yeast, so there’s no long waiting period for it to rise. The “zucchini” part comes from finely grated zucchini, which might sound a little odd, but trust me, it’s the secret weapon! When baked, the zucchini breaks down and adds an incredible amount of moisture to the batter, making the bread unbelievably tender and fudgy, almost like a cake. It’s naturally flavored with warm spices like cinnamon and nutmeg, and often studded with nuts or chocolate chips. Think of it as the ultimate comfort bake – a little bit healthy-ish thanks to the veggies, but mostly just a delicious excuse to enjoy something sweet and satisfying.
Why you’ll love this recipe?
Honestly, there are so many reasons why this zucchini bread has become my go-to, and I think you’re going to fall in love with it just as much as I have. First off, the flavor is just out of this world. It’s perfectly spiced with cinnamon and a hint of nutmeg, and when you add chocolate chips (which I *always* do, because why wouldn’t you?), it’s pure bliss. The texture is what really sets it apart though. It’s unbelievably moist and tender, thanks to that magical zucchini. It’s not dense or heavy; it’s light and almost cake-like, which is a huge win in my book. Plus, it’s ridiculously easy to make! You don’t need any fancy equipment, just a couple of bowls and a whisk. This recipe is a lifesaver on busy weeknights when you need a quick dessert or a special treat for the weekend. And let’s talk about cost-efficiency. Zucchini is usually pretty budget-friendly, and the other ingredients are pantry staples. You get so much deliciousness for such a small investment. It’s also super versatile. You can add nuts, different kinds of chocolate chips, or even a swirl of cream cheese – the possibilities are endless! What I love most is that it uses up those extra zucchinis from the garden or farmer’s market, so it’s a win-win. It’s even better than my grandma’s classic banana bread, and that’s saying something!
How do I make Zucchini bread?
Quick Overview
This recipe is all about simplicity and delicious results. We’ll whisk together our dry ingredients, mix our wet ingredients, then combine them gently. A little bit of zucchini magic goes in, followed by a swirl of chocolate chips, and then it’s off to the oven. You’ll end up with a beautifully golden-brown loaf that’s unbelievably moist and fragrant. It’s truly foolproof, even if you’re new to baking!
Ingredients
For the Main Batter:
2 cups all-purpose flour (I always use King Arthur for consistency)
1 teaspoon baking soda
1/2 teaspoon baking powder
1/2 teaspoon salt
1 teaspoon ground cinnamon (freshly ground is best!)
1/4 teaspoon ground nutmeg
1 cup granulated sugar (you can adjust this slightly, but this is my perfect sweet spot)
1/2 cup unsalted butter, softened (or a neutral oil like canola or vegetable oil)
2 large eggs, at room temperature
1 teaspoon vanilla extract
For the Zucchini and Add-ins:
1 1/2 cups finely grated zucchini, squeezed dry (this is crucial – more on that later!)
1 cup semi-sweet chocolate chips (or dark chocolate, or even white chocolate – your call!)
For the Optional Glaze:
1 cup powdered sugar
2-3 tablespoons milk (or water, or even a little lemon juice for tang)
1/2 teaspoon vanilla extract
Step-by-Step Instructions
Step 1: Preheat & Prep Pan
First things first, let’s get your oven ready. Preheat it to 350°F (175°C). While it’s heating up, grab a standard 9×5 inch loaf pan. Grease it really well with butter or cooking spray, and then lightly flour it. You can also line it with parchment paper, leaving some overhang on the sides – this makes lifting the finished loaf out a breeze. I always opt for the parchment paper method because I’ve had loaves stick before, and it’s just heartbreaking!
Step 2: Mix Dry Ingredients
In a medium-sized bowl, whisk together the flour, baking soda, baking powder, salt, cinnamon, and nutmeg. Give it a good whisk so everything is evenly distributed. This step ensures your leaveners work their magic and you don’t end up with pockets of spice. I like to do this first so I know it’s all ready to go when I need it.
Step 3: Mix Wet Ingredients
In a larger bowl, cream together the softened butter (or oil) and granulated sugar until it’s light and fluffy. If you’re using butter, this might take a couple of minutes with an electric mixer, or a good bit of elbow grease by hand. Then, beat in the eggs one at a time, making sure each one is fully incorporated before adding the next. Stir in the vanilla extract. This creates a lovely base for our zucchini bread.
Step 4: Combine
Now, it’s time to bring it all together. Gradually add the dry ingredients to the wet ingredients, mixing on low speed (or gently by hand) until *just* combined. Don’t overmix! Overmixing can lead to a tough bread, and we want this to be super tender. A few streaks of flour are okay; they’ll disappear when you add the zucchini.
Step 5: Prepare Filling
This is where the magic ingredient comes in! Make sure your grated zucchini is squeezed very dry. You can do this by wrapping it in a clean kitchen towel or paper towels and squeezing out as much moisture as possible. This is probably the most important step to avoid a soggy loaf. Gently fold the squeezed zucchini and the chocolate chips into the batter. Again, don’t overmix; just fold them in until they’re evenly distributed.
Step 6: Layer & Swirl
Pour the batter into your prepared loaf pan. Smooth the top a little with your spatula. If you’re feeling fancy, you can sprinkle a few extra chocolate chips on top for good measure. Some people like to add a swirl of cream cheese or even a bit of cinnamon-sugar mixture here for extra flair, but I usually keep it simple with just the chocolate chips.
Step 7: Bake
Bake in your preheated oven for 50-65 minutes. The exact time will depend on your oven, so start checking around the 50-minute mark. The bread is done when a toothpick inserted into the center comes out clean, or with just a few moist crumbs attached (especially if you have melty chocolate chips). The top should be golden brown and it should feel slightly firm to the touch.
Step 8: Cool & Glaze
Once baked, let the loaf cool in the pan for about 10-15 minutes. This allows it to set up nicely. Then, carefully invert it onto a wire rack to cool completely. If you used parchment paper, you can just lift it right out! Once it’s fully cooled, you can whisk together the powdered sugar, milk (or water/lemon juice), and vanilla extract to make the glaze. Drizzle it over the top. I love to do this because it adds a touch more sweetness and looks so pretty! If you prefer it less sweet, you can skip the glaze entirely – it’s still amazing on its own.
Step 9: Slice & Serve
Once the glaze has set (or if you skipped it and the bread is fully cooled), slice it up and enjoy! A serrated knife works best for clean slices. This bread is absolutely delicious at room temperature, but I also love it slightly warm.
What to Serve It With
This Zucchini Bread is wonderfully versatile, making it a star at any meal or snack time. For a perfect breakfast, I love it toasted and served with a smear of butter alongside a steaming mug of coffee or a refreshing glass of orange juice. It’s not too sweet for the morning, but it feels like a real treat. For a more leisurely brunch, I’ll often serve it alongside some fresh fruit salad and maybe some scrambled eggs or a frittata. It adds a lovely sweet counterpoint to savory dishes. As a dessert, it’s fantastic on its own, especially with that delightful glaze. But if you want to go all out, a dollop of whipped cream or a scoop of vanilla ice cream takes it to a whole new level. For those cozy, late-night cravings, it’s the perfect single-serving treat. Just a slice with a glass of milk is pure comfort. My kids also love it crumbled over yogurt, which is a fun way to get them to eat their breakfast!
Top Tips for Perfecting Your Zucchini Bread
I’ve made this recipe so many times, and along the way, I’ve picked up a few tricks that I think make all the difference. Here are my top tips to ensure your Zucchini Bread turns out perfectly every single time:
Zucchini Prep: This is non-negotiable! You MUST squeeze the grated zucchini dry. I can’t stress this enough. If you don’t, you’ll end up with a heavy, gummy bread. Use a clean kitchen towel or several layers of paper towels and really wring out every last drop of liquid. The drier the zucchini, the better the texture of your bread.
Mixing Advice: Remember, with quick breads, you want to mix just until the ingredients are combined. Overmixing develops the gluten in the flour, which leads to a tough, dense texture. I always stop mixing as soon as I don’t see any dry flour streaks. A few lumps are perfectly fine!
Swirl Customization: While I love a simple chocolate chip zucchini bread, don’t be afraid to experiment! For a beautiful marbled effect, you could make a simple cream cheese filling (cream cheese, sugar, egg yolk) and swirl it into the batter before baking. Or, try a cinnamon-sugar swirl by mixing a few tablespoons of cinnamon and sugar with a tablespoon of melted butter and swirling that through.
Ingredient Swaps: If you don’t have butter, a neutral oil like canola, vegetable, or even melted coconut oil works well. For a dairy-free version, you can use your favorite non-dairy milk in the glaze and a plant-based butter or oil for the batter. I’ve even tested this with almond milk in the glaze and it made it even creamier!
Baking Tips: Ovens can be finicky! If you find your bread is browning too quickly on top before the center is cooked, loosely tent it with aluminum foil for the last 15-20 minutes of baking. Always rely on the toothpick test; it’s your best friend for confirming doneness.
Glaze Variations: Don’t feel limited to the basic glaze! For a bit of tang, add a splash of lemon juice. For a richer glaze, use half-and-half or heavy cream instead of milk. You can also add a touch of almond extract for a different flavor profile. If you prefer no glaze, a simple dusting of powdered sugar just before serving also looks lovely.
Storing and Reheating Tips
One of the best things about this zucchini bread is how well it keeps! It stays wonderfully moist for days. If you’re planning to eat it within a day or two, you can simply leave it at room temperature. Just wrap it tightly in plastic wrap or place it in an airtight container. It should stay fresh and delicious for about 2-3 days this way. If you think it might take longer than that, or if your kitchen is particularly warm, it’s best to store it in the refrigerator. Again, wrap it well in plastic wrap, then an additional layer of foil, or put it in an airtight container. It will last for about a week in the fridge, though I find the texture is best in the first 4-5 days. For longer storage, you can absolutely freeze it! Once the bread has cooled completely, wrap it tightly in plastic wrap, then a layer of aluminum foil, and finally place it in a freezer-safe bag. It will keep well in the freezer for up to 3 months. To reheat, you can let it thaw overnight in the refrigerator, or carefully warm individual slices in the microwave for about 15-20 seconds. If you froze the whole loaf, you can also reheat it gently in a low oven (around 300°F/150°C) until warmed through. For the glaze, I always recommend applying it *after* the bread has cooled completely and *just before* serving if you’re going to serve it fresh. If you plan to freeze it, it’s often best to store the glaze separately and apply it after thawing and reheating to prevent it from becoming sticky or cracking.
Frequently Asked Questions
Final Thoughts
There you have it – my absolute favorite zucchini bread recipe! I truly hope you give this a try. It’s more than just a recipe; it’s a little slice of happiness that I love sharing. It’s the perfect bake for any occasion, whether you need a sweet treat for yourself, a dessert for a gathering, or just a way to use up those extra zucchinis. The incredible moisture, the warm spices, and the burst of chocolate chips make it irresistible. If you enjoy this, you might also like my [link to another related recipe, e.g., “Moist Blueberry Muffins”] or my classic [link to another related recipe, e.g., “Best Ever Chocolate Chip Cookies”]. I can’t wait to hear how your zucchini bread turns out! Please leave a comment below and let me know your favorite add-ins or any variations you tried. Happy baking!
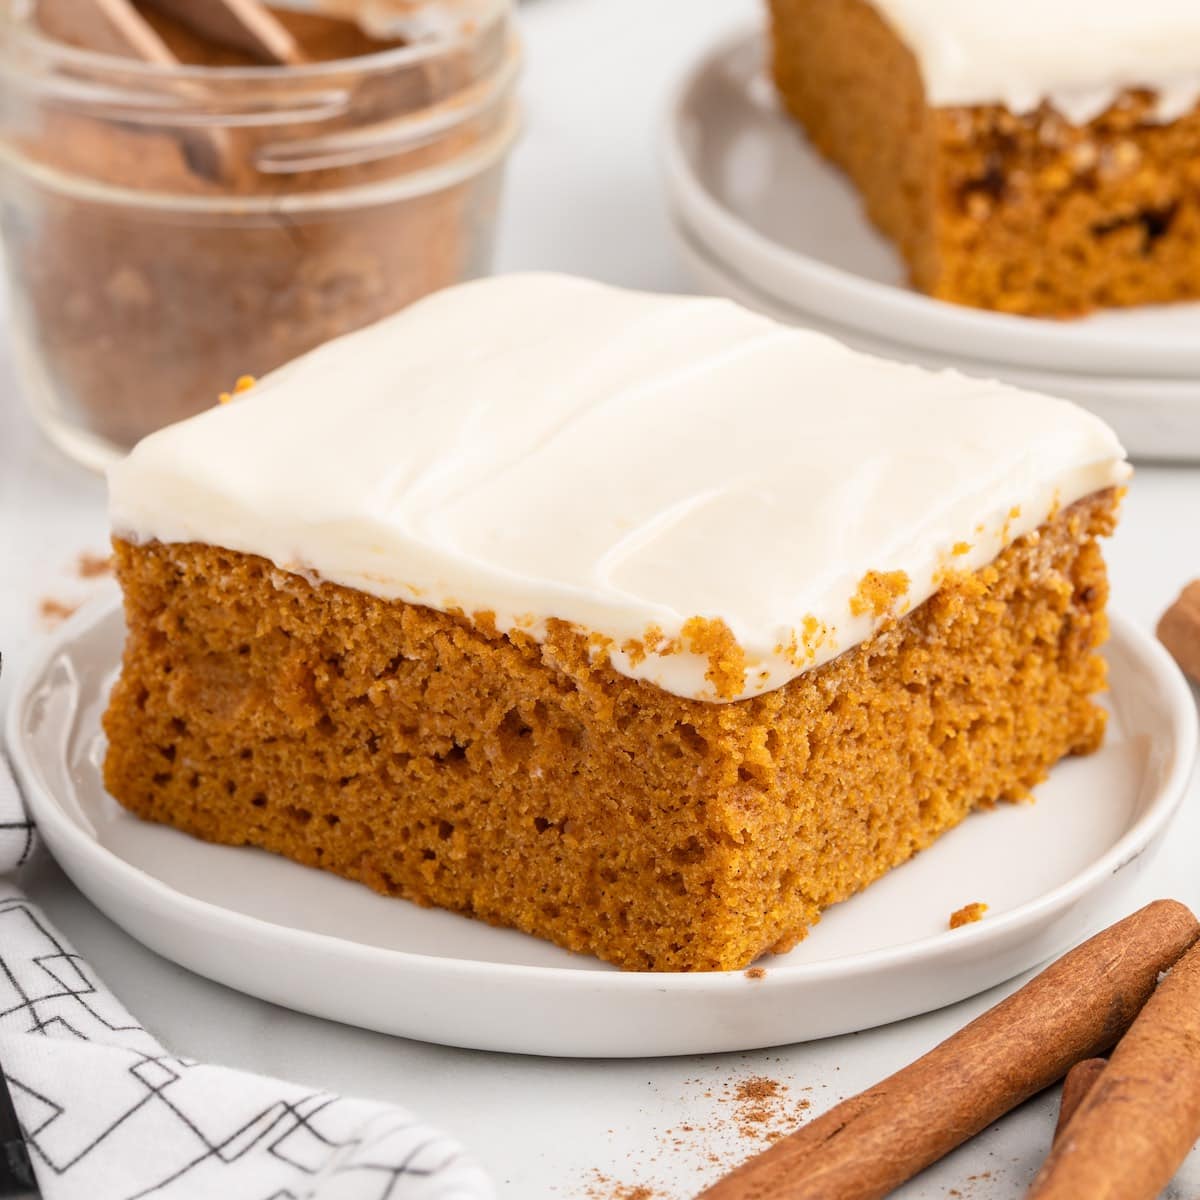
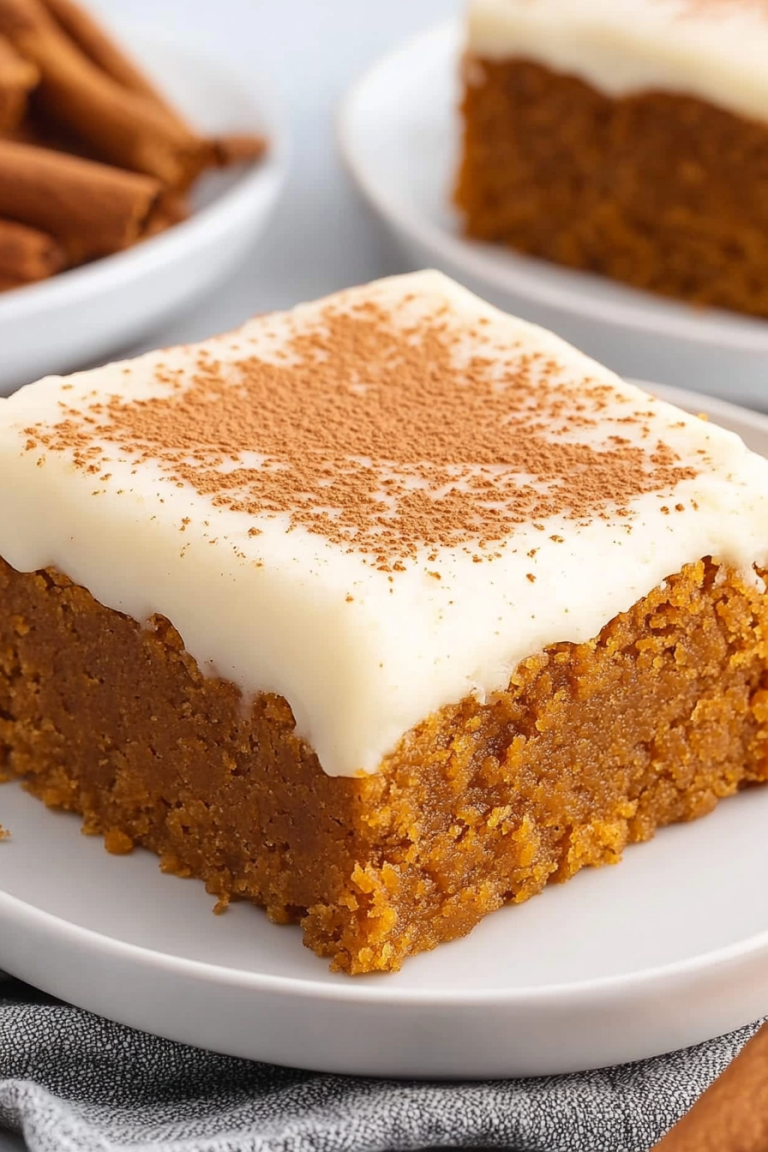
Pumpkin Bars
Ingredients
Method
- Preheat oven to 350° F. Spray a 9x13 inch straight sided metal baking pan with non-stick baker’s spray and set aside.
- To a small bowl combine together the all-purpose flour, ground cinnamon, baking soda, salt, ground ginger and ground nutmeg. Set aside.
- To a large mixing bowl whisk together the pure pumpkin puree, granulated sugar and light brown sugar until completely combined.
- Add the canola oil, eggs and vanilla extract to the bowl of wet ingredients. Whisk until smooth and the eggs are fully incorporated.
- Add the dry ingredients to the bowl of wet ingredients. Whisk just until combined and no lumps, or dry streaks of flour remain. Scrape down the sides and bottom of the bowl to ensure the pumpkin cake batter is evenly mixed.
- Spread the pumpkin bar batter evenly into the prepared 9x13 baking pan. Use an offset spatula to smooth the batter to an even thickness to ensure the bars bake up to a uniform thickness.
- Bake the pumpkin bars for 25-30 minutes or a toothpick inserted into the center comes out clean or with just a couple moist crumbs.
- Allow the pumpkin bars to cool completely to room temperature before adding the cream cheese frosting.
- To make the cream cheese frosting add the cream cheese and unsalted butter to a large mixing bowl. Beat on medium speed, using a handheld mixer, for 1 minute or until smooth and creamy.
- Add the powdered sugar and mix until fully incorporated. Add the heavy cream and vanilla extract. Mix for 1-2 minutes or until the frosting is smooth, light and fluffy.
- Using an offset spatula, spread the cream cheese frosting evenly over the cooled pumpkin bars. Cut into squares and serve.