Amazing Monster Cookie Recipe
I probably don’t need to tell you this, but I have a little obsession with zucchini in desserts. I know, I know—sounds weird, right? But trust me, it’s one of those hidden gems that turns out to be totally irresistible. I remember the first time I baked this zucchini swirl cake—my kids were doubtful at first, but once they took that first bite, their eyes lit up. It’s moist, flavorful, and packed with a subtle veggie goodness that sneaks in effortlessly. Plus, it’s one of those recipes that feels like a cozy hug after a busy day. This one’s a lifesaver on weeknights when you want something sweet but don’t want to spend hours in the kitchen. It’s incredibly simple, uses pantry staples, and the swirl of cream cheese filling makes it look fancy — but I promise, anyone can do it. Each time I make this, it disappears in minutes at my house. It’s become my go-to for birthday treats, casual brunches, or even just a sweet pick-me-up after the kids are asleep. Honestly, it’s so good I can’t stop myself from sneaking a second slice—don’t tell anyone! That warm aroma filling the house? It’s pure magic.
What is Zucchini Swirl Cake?
This zucchini swirl cake is essentially a moist, tender cake with a surprise swirl of cream cheese filling running through the middle. Think of it as a cross between your classic coffee cake and a zucchini bread—only in cake form! Its name comes naturally from the way you layer that luscious filling and swirl it into the batter before baking, creating beautiful marbled patterns once it’s sliced. The sneaky zucchini isn’t just for moisture; it adds a gentle earthiness and natural sweetness that balances the sugary cake. If you’ve ever tasted a banana bread with hidden chocolate chips, you’ll love how this cake hides those subtle veggie notes while still tasting sweet and indulgent. Sometimes I call it my “secret weapon” because it’s a sneaky way to get a little more greens into the kids. I’ve made this countless times, tweaking the filling here and there, but it always comes out perfectly—everyone leaves the table asking for more. It’s a treat that feels special without any fuss, and I love how versatile it is—serve it with coffee, whipped cream, or just a glass of milk. That’s comfort, right there.
Why you’ll love this recipe?
What I love most about this zucchini swirl cake is its perfect harmony of flavor and ease. The smell alone is enough to make you want to dive right in—warm, sweet, with a hint of vanilla and that subtle vegetable aroma. The cake itself is incredibly moist and tender, almost cake-bous, thanks to the zucchini and a bit of sour cream I like to toss in—trust me, it makes all the difference. The real magic, though, is in the cream cheese swirl—rich, tangy, and with just the right sweetness. My kids ask for this all the time, especially when I pair it with a simple dusting of powdered sugar or a drizzle of honey on top. The best part? It’s super easy to make and budget-friendly to boot. I usually have all the ingredients in my pantry, and it comes together quickly—no fancy tools required. I also love how adaptable it is—try adding some citrus zest or swapping the filling with jam or Nutella for a fun twist. It’s one of those recipes that never gets old, and every time I bake it, I feel like I’m sharing a little piece of home with whoever’s at the table. Truly, it’s comfort food with a punch of nutrition and nostalgia.
How do I make Zucchini Swirl Cake?
Quick Overview
This cake is all about simple steps that come together fast but look impressively elegant. You start by grating fresh zucchini—no need to peel—then mix up a moist, fluffy batter with a touch of vanilla and sour cream. The filling is just cream cheese blended with sugar and a splash of vanilla, spread atop the batter, then swirled before baking. The swirl effect is easy if you layer the filling and use a toothpick or skewer to drag through the batter, creating those beautiful marbled patterns. When it’s out of the oven, you want to cool it completely before glazing or dusting—it helps the flavors to settle and makes slicing easier. It’s perfect when you’re craving something sweet, but with a little healthy twist. And trust me, once you taste that first warm slice with a cup of coffee or tea, you’ll see why I keep making this again and again!
Ingredients
For the Main Batter:
– 2 cups all-purpose flour (I like King Arthur for the best texture)
– 1 ½ teaspoons baking powder
– ½ teaspoon baking soda
– ½ teaspoon salt
– 1 cup granulated sugar
– ½ cup vegetable oil or melted butter
– 2 large eggs
– 1 teaspoon vanilla extract
– 1 cup sour cream or Greek yogurt (for extra moistness)
– 1 medium zucchini, grated (about 1 cup; I always do this with a box grater and drain off excess moisture)
For the Filling:
– 8 oz cream cheese, softened
– ½ cup powdered sugar
– 1 teaspoon vanilla extract
– Optional: a pinch of lemon zest for brightness
For the Glaze (Optional):
– ½ cup powdered sugar
– 1-2 teaspoons milk or lemon juice
– A splash of vanilla or lemon zest for flavor
Step-by-Step Instructions
Step 1: Preheat & Prep Pan
Set your oven to 350°F (175°C). Grease a 9-inch round or square baking pan and lightly dust with flour or line it with parchment paper. This cake is quite moist, so a non-stick spray helps for easy removal. I usually do this ahead of time so the oven’s ready when I’ve got my batter prepared. Cooling racks are also handy for cooling the cake evenly after baking.
Step 2: Mix Dry Ingredients
In a medium bowl, whisk together the flour, baking powder, baking soda, and salt. Doing this first ensures that all dry ingredients are evenly distributed, which gives your cake a nice, even rise. It’s a little step, but worth it to avoid clumps or uneven texture later on.
Step 3: Mix Wet Ingredients
In a large bowl, beat the sugar, eggs, and vanilla until smooth and slightly frothy—that’s your sign it’s ready. Add in the oil (or melted butter), sour cream, and grated zucchini. Mix just until combined. I’ve tested this with almond milk and it actually made the cake even creamier, so feel free to experiment if you want a dairy-free version. The zucchini should be well incorporated, and the batter will look a bit lumpy, but that’s okay!
Step 4: Combine
Gently fold the dry ingredients into the wet mixture. You want to mix just until there are no streaks—overmixing will make your cake dense. Remember, light and airy is the goal here! Once your batter is ready, set it aside while you make the filling.
Step 5: Prepare Filling
In a small bowl, beat the softened cream cheese with powdered sugar and vanilla until smooth. For a rolling swirl, you want it to be spreadable but not too runny. If it’s too loose, pop it in the fridge for 10 minutes. If you like a more lemony flavor, add some zest here. This filling is the star, so don’t skimp on quality—full-fat cream cheese makes all the difference.
Step 6: Layer & Swirl
Pour half of the batter into your prepared pan, then gently spread the cream cheese mixture on top. Cover with the remaining batter carefully. Use a skewer or toothpick to swirl through the batter in a figure-eight motion—just enough to create beautiful marbling. Trust me, the visual effect is as stunning as the flavor.
Step 7: Bake
Pop it into the oven and bake for about 40-45 minutes. You’ll know it’s done when a toothpick inserted in the center comes out clean or with just a few moist crumbs. Ovens vary, so start checking around the 38-minute mark. If it browns too quickly, tent it loosely with foil.
Step 8: Cool & Glaze
Let the cake cool completely on a wire rack—this takes about an hour or so. If you glaze it warm, the icing might slide right off. Once cooled, whisk up your glaze with powdered sugar and milk or lemon juice, then drizzle over the top. I love how the glaze adds that glossy, sweet crunch to every bite.
Step 9: Slice & Serve
Use a sharp serrated knife to get clean slices. If the cake sticks a little, a quick warm-up of the knife in hot water does the trick. Serve it plain, dusted with powdered sugar, or topped with whipped cream and fresh berries. It’s perfect slightly warm or at room temperature. Honestly, a slice with your morning coffee or afternoon tea is pure bliss—you’ll find yourself reaching for seconds.
What to Serve It With
This cake fits all kinds of occasions. For breakfast or brunch, I love serving it with a strong brewed coffee or a frothy cappuccino. A dollop of whipped cream and a sprinkle of shredded coconut turn it into a fancy dessert for weekend dinners. My family prefers it plain, but I sometimes jazz it up by adding fresh berries or a smear of lemon curd on the side. It’s also fabulous as an afternoon snack paired with a cold glass of milk or herbal tea. Think of it as a versatile treat—delicious warm from the oven, or even the next day if stored properly. I often make a big batch on Sunday and enjoy slices for mornings throughout the week. For a more decadent touch, dusting with powdered sugar or drizzling honey on top is always a winner. If you want to make it fancy for guests, serve with a scoop of vanilla ice cream—it’s like the best brunch or dessert hybrid ever. Honestly, it’s one of our family’s favorites because it checks all the boxes—comfort, flavor, and a little surprise flavor moment with that swirl of cream cheese.
Top Tips for Perfecting Your Zucchini Swirl Cake
Having baked this cake more times than I can count, I’ve picked up a few tricks along the way to make it perfect every time. First, don’t skip squeezing out that excess moisture from the zucchini! I do this with a clean dish towel and press gently; too much moisture can make your batter runny or dense. I’ve tested this with a few different grating methods, and I find that grating zucchini with a box grater provides the best texture—rapid and even. When mixing the wet ingredients, I like to do it by hand—light and gentle fold-ins prevent the batter from deflating. Swirling the cream cheese filling is all about the visual—you want a marbled effect, not a solid layer, so be light-handed and use a toothpick or skewer carefully. As for ingredient swaps, I’ve played around with Greek yogurt instead of sour cream for extra tang, and it works beautifully. You can also swap the sugar for coconut sugar or maple syrup, but note that it might slightly change the moisture content. For baking, oven placement matters—middle rack ensures even heat, but if your oven runs hot, lower the rack a bit. Don’t forget to check for doneness with a toothpick—every oven is different! I’ve also learned that allowing the cake to cool completely prevents the glaze from melting or sliding. For the glaze, a little lemon zest adds brightness, but you could also try vanilla or almond extract. The key is finding what flavor you love most and making it your own.
Storing and Reheating Tips
This cake actually keeps pretty well—especially if you wrap it tightly with plastic wrap or store in an airtight container. At room temperature, it’s good for about one day; after that, I recommend moving it to the fridge. Refrigerated, it’s still moist and delicious for up to 4 days, but make sure it’s well covered to prevent it from drying out. If you want to keep leftovers longer, pop slices into freezer-safe bags or containers—wrapped tightly, it’ll stay fresh for up to 3 months. To reheat, just microwave a slice for about 20 seconds—it’s warm and soft again, perfect with a cold glass of milk or tea. If you’ve added glaze or frosting, I recommend letting it come to room temp after defrosting to get that lovely glossy look back. A good tip I learned: if the cake gets a little stale, warming it up slightly can revive moisture and flavor. Just avoid over-reheating, or it might turn rubbery. For the best presentation, dust with powdered sugar or fresh fruit right before serving. This way, it looks pretty and tastes even better. Trust me, a well-stored slice still tastes amazing—worth sneaking a bit on your lunch break!
Frequently Asked Questions
Final Thoughts
This zucchini swirl cake has become a staple in my kitchen—proof that even veggies can be turned into something wonderfully indulgent. The balance of moist crumb, creamy swirl, and a hint of vegetable sneaks in just enough nutrition without sacrificing flavor. Every time I bake it, I feel a little nostalgic—recalling family gatherings or lazy weekend mornings. It’s one of those recipes that makes me smile because it’s so forgiving and versatile. Whether you’re a seasoned baker or just starting out, this cake will deliver. Make it your own—add chocolate chips, swap the filling with fruit preserves, or top it with fresh berries. Whatever variation you choose, I promise, it’ll bring a cozy, happy moment to your home. Happy baking! I can’t wait to hear how yours turns out. Drop a comment below or share your photos—I love seeing your creations!
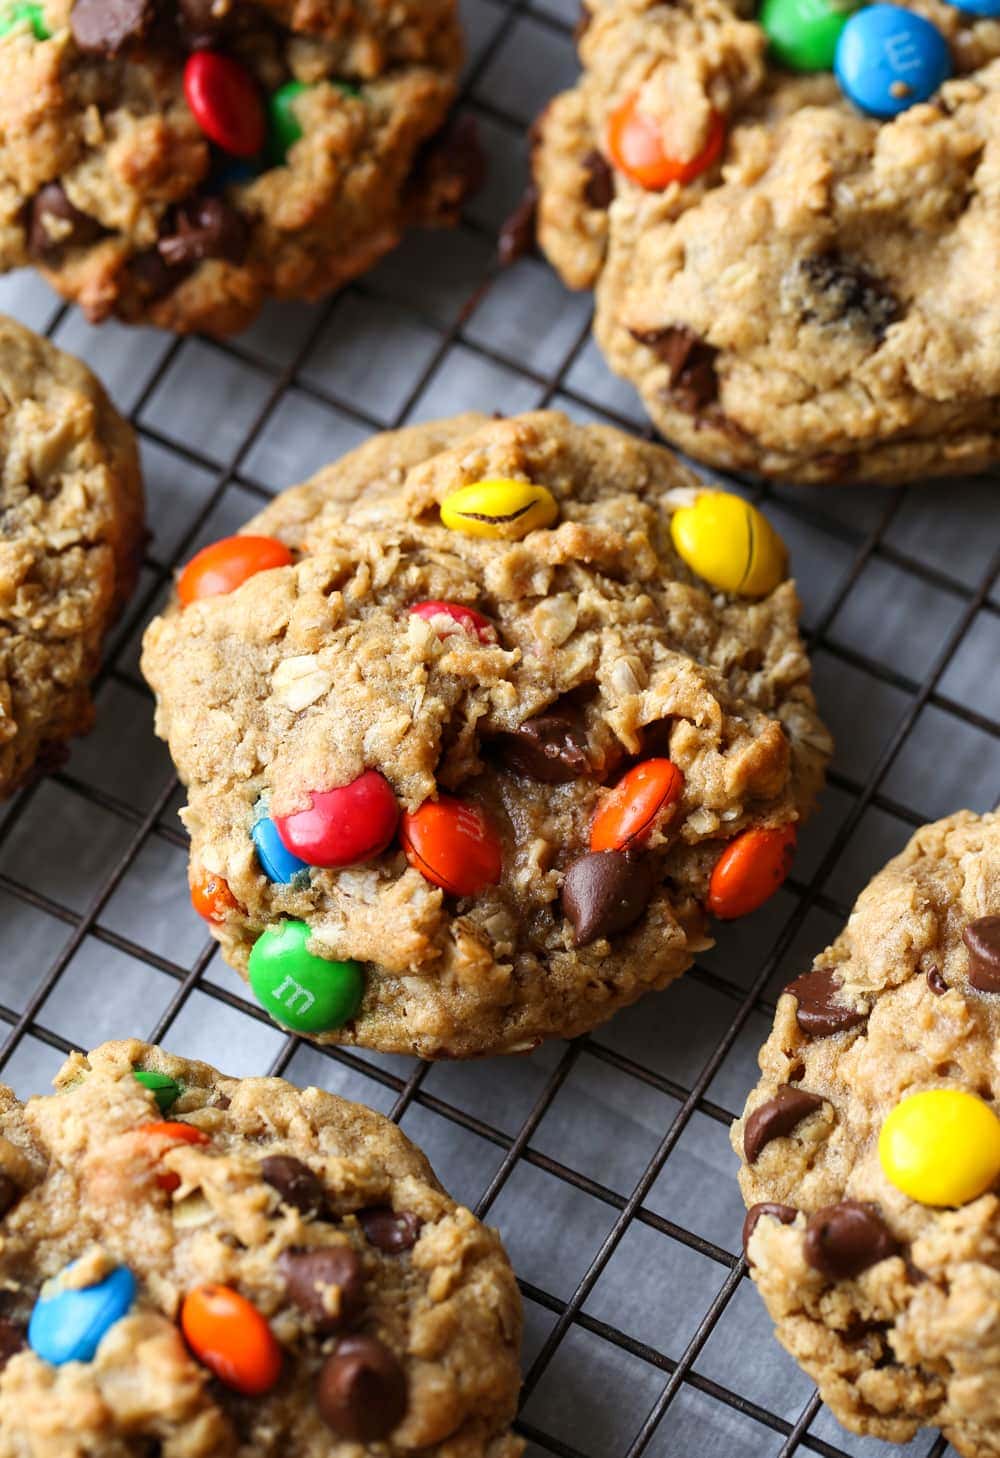
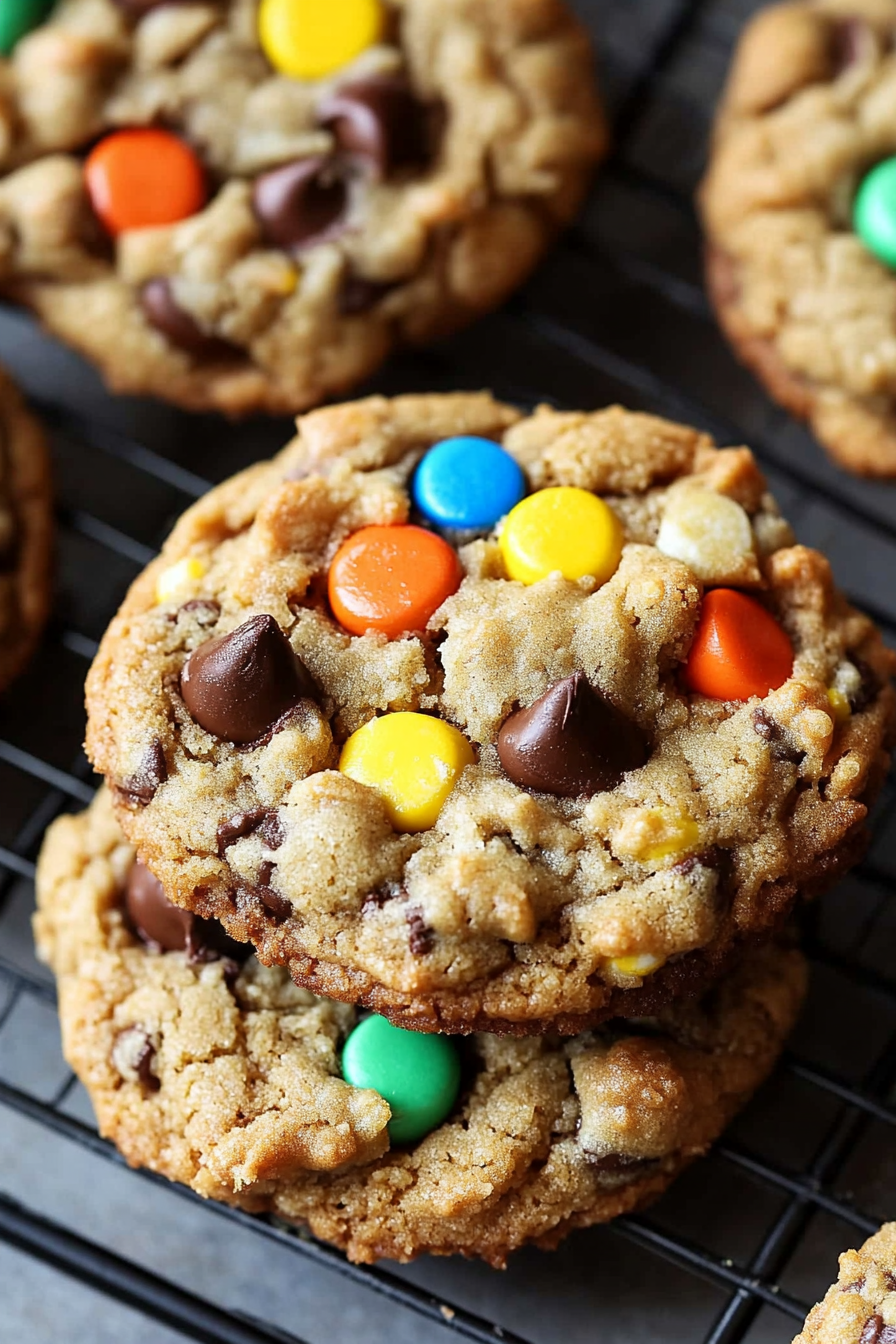
Monster Cookies
Ingredients
Method
- In the bowl of your stand mixer fitted with the paddle attachment mix the butter, peanut butter, brown sugar, and granulated sugar together on medium speed for 2 minutes.
- Add in the eggs one at a time, vanilla extract, baking soda, and salt and mix until smooth for 1 minute, scraping the sides of the bowl as necessary.
- Turn the mixer to low and add in the flour, mixing until combined.
- Slowly add in the oats and mix until incorporated.
- Stir in the chocolate chips, M&Ms, and other optional add-ins.
- Cover the bowl and refrigerate the dough for at least 2 hours.
- Preheat oven to 375°F. While the oven is preheating, remove the dough from the refrigerator to take the chill off.
- Line your baking sheet with parchment paper. Using a medium (2-tablespoon) cookie scoop, portion out the dough and place 2-inches apart on the baking sheet.
- Bake for 10 – 12 minutes, until lightly golden. Allow the cookies to cool on the baking sheet for 5 minutes before transferring to a wire rack to cool completely.