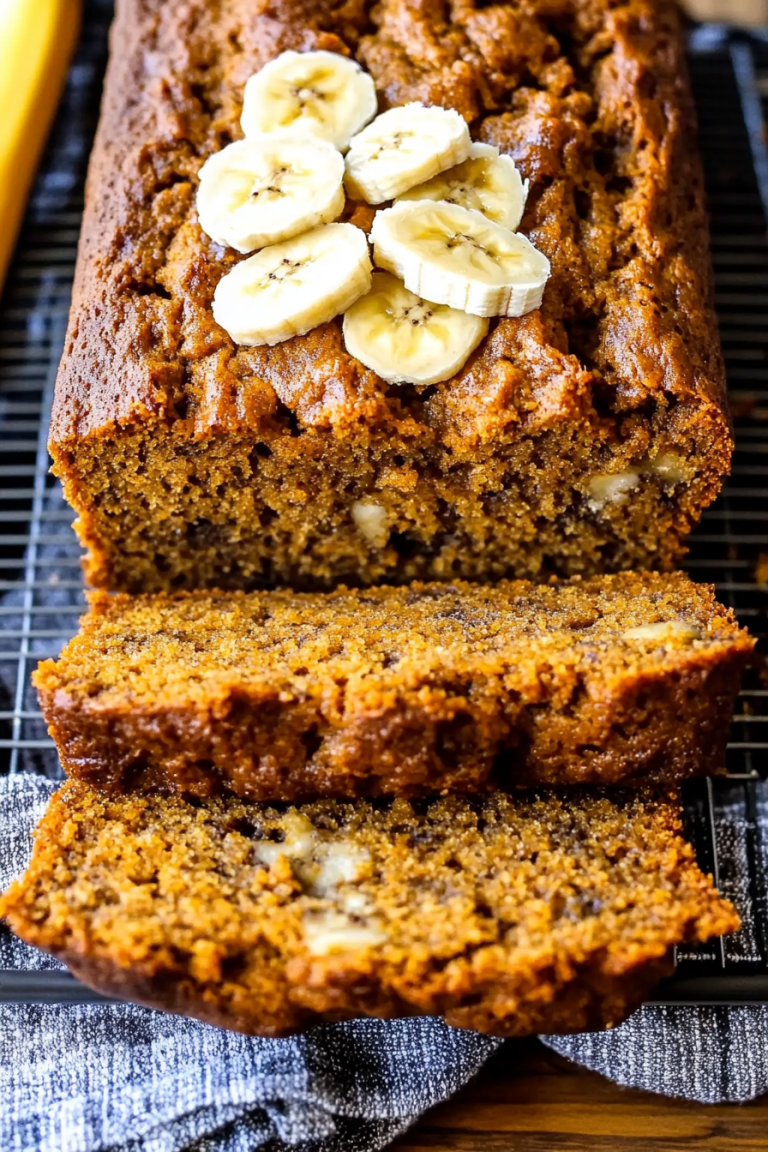
Easy Homemade Hostess Cupcakes Delight
Oh my goodness, I’m so excited to finally share this with you! You know those recipes that just *feel* like home? The ones that instantly transport you back to a cozy kitchen, the smell of something baking filling the air? This zucchini bread is *that* recipe for me. It’s not just any zucchini bread, though. This one has a little something extra, a depth of flavor and a tenderness that honestly rivals a good cake. I’ve made countless loaves, and every single time, people rave. My kids, who can be *super* picky, devour it. It’s the perfect thing to have with a hot cup of coffee on a chilly morning, or honestly, just whenever that sweet craving hits and you don’t want to spend hours in the kitchen. Forget those dry, bland versions you might have tried; this is the real deal, the one that makes everyone ask, “What’s your secret?” And spoiler alert: it’s not complicated at all!
What is Zucchini bread?
So, what exactly is this magical zucchini bread I’m always raving about? Think of it as the ultimate comfort bake, elevated. It’s moist, perfectly spiced, and has this incredible tender crumb that just melts in your mouth. The “zucchini” in the name isn’t just for show; it’s the secret ingredient that makes it so incredibly moist without feeling heavy or greasy. It’s essentially a quick bread, meaning no fancy yeast rising or complicated techniques. It’s the kind of thing you can whip up on a Sunday morning and have ready for snacks all week. The name itself, “Zucchini Bread Bliss,” just felt right because that’s exactly how it makes me feel every time I bake it. It’s a classic for a reason, but my version has a few little tweaks that I think really make it sing.
Why you’ll love this recipe?
Honestly, where do I even begin with why this zucchini bread is a keeper? For starters, the flavor profile is just divine. It’s not overly sweet, which I love, but the warm spices – cinnamon, nutmeg, and a tiny hint of cloves – create this amazing comforting aroma and taste. And the texture? Oh, the texture! It’s so unbelievably moist and tender. The zucchini, when grated, practically disappears into the batter, contributing moisture and a subtle sweetness. This makes it feel so decadent, almost like a dessert, but it’s perfectly appropriate for breakfast or a snack. Plus, it’s surprisingly simple to make. You don’t need any special equipment, just a couple of bowls and a whisk. I’ve had many nights where I’m staring into the pantry at 9 PM thinking, “I need something sweet, but I don’t have time to bake,” and this is always my lifesaver. It’s also incredibly budget-friendly; most of the ingredients are pantry staples, and zucchini is usually pretty inexpensive, especially when it’s in season. I’ve even experimented with adding chocolate chips or walnuts, and it’s fantastic both ways. What I love most, though, is how forgiving it is. Even if you’re a beginner baker, you can absolutely nail this. It’s a much more accessible and quicker bake than something like a layer cake, but delivers that same “wow” factor. If you’re a fan of my Banana Bread Bonanzas. Banana Bread Bonanzas.What are some of the best zucchini bread recipes?
How to Make My Go-To Zucchini Bread
Quick Overview
The beauty of this zucchini bread is its straightforwardness. You’ll start by whisking your dry ingredients together, then combine your wet ingredients, and finally, bring them all together. The star player, grated zucchini, gets folded in, and then it’s just a matter of pouring it into your prepared pan and baking until golden and fragrant. It’s a process that takes minimal effort but yields maximum deliciousness. I always feel so accomplished when I pull this out of the oven, and the aroma alone is worth the little bit of effort.
Ingredients
For the Main Batter:
This is where we build our moist foundation. Always use fresh zucchini; it makes a huge difference. I usually grab a medium-sized one, about 8-10 inches long. When grating, I use the medium side of my box grater. And for the flour, all-purpose is perfect here, but if you want to try a blend, I’ve had success with a good quality 1-to-1 gluten-free baking flour. Don’t shy away from the spices – they are key to that cozy flavor. I always use freshly grated nutmeg if I can, it’s a game-changer!
- 2 cups all-purpose flour
- 1 teaspoon baking soda
- 1/2 teaspoon salt
- 1 teaspoon ground cinnamon
- 1/4 teaspoon ground nutmeg
- Pinch of ground cloves (optional, but I love it!)
- 1 1/4 cups granulated sugar (or adjust to your sweetness preference)
- 1/2 cup vegetable oil (or other neutral oil like canola or melted coconut oil)
- 2 large eggs, at room temperature
- 1 teaspoon vanilla extract
- 1 1/2 cups grated zucchini (about 1 medium zucchini), squeezed dry
For the Filling (Optional but highly recommended!):
This is where we add an extra layer of indulgence. Chocolate chips are my family’s favorite, but chopped nuts like walnuts or pecans are also fantastic. I’ve even tried dried cranberries for a tart kick!
- 1/2 cup chocolate chips (milk, dark, or semi-sweet work well)
- 1/2 cup chopped walnuts or pecans (optional)
For the Glaze:
This is the crowning glory for me! It adds a touch of sweetness and makes it look so pretty. I like a simple powdered sugar glaze, but you can get creative with additions like a little lemon zest or even a tiny bit of orange juice for a different flavor. The key is getting the consistency right – pourable but not too thin.
- 1 cup powdered sugar
- 2-3 tablespoons milk (or water, or lemon juice for a zing!)
- 1/2 teaspoon vanilla extract
Step-by-Step Instructions
Step 1: Preheat & Prep Pan
First things first, get your oven preheating to 350°F (175°C). This is a crucial step so your bread bakes evenly from the moment it goes in. While the oven is warming up, grab a standard 9×5 inch loaf pan. Grease it really well with butter or non-stick spray, and then give it a little dusting of flour. Tap out any excess flour. This thorough greasing and flouring is my secret to ensuring the loaf slides out perfectly without any sticking. Nobody wants to lose even a corner of their beautiful zucchini bread!
Step 2: Mix Dry Ingredients
In a large bowl, whisk together your all-purpose flour, baking soda, salt, cinnamon, nutmeg, and the pinch of cloves if you’re using it. Whisking these together ensures all those leavening agents and spices are evenly distributed throughout the batter. You don’t want any pockets of baking soda or clumps of cinnamon! I give it a good 30 seconds or so, making sure there are no visible streaks of spices. This step is simple but so important for an even rise and consistent flavor.
Step 3: Mix Wet Ingredients
In a separate, medium-sized bowl, whisk together the granulated sugar and vegetable oil until well combined. Then, crack in your room-temperature eggs, one at a time, whisking well after each addition. Stir in the vanilla extract. Having your eggs at room temperature helps them emulsify better with the oil and sugar, creating a smoother, more consistent batter. If your eggs are cold, you can pop them in a bowl of warm water for about 5-10 minutes to bring them up to temperature.
Step 4: Combine
Now, it’s time to bring those wet and dry ingredients together. Pour the wet ingredients into the bowl with the dry ingredients. Using a spatula or wooden spoon, gently fold them together until *just* combined. It’s really important not to overmix here! A few streaks of flour are okay; they’ll disappear as you add the zucchini. Overmixing can develop the gluten too much, leading to a tough bread, and we definitely don’t want that. This is where you’ll gently fold in your grated and squeezed-dry zucchini. Give it a few more gentle stirs until it’s evenly distributed.
Step 5: Prepare Filling
If you’re adding chocolate chips or nuts, this is the time! Toss them gently into the batter and give it a final few stirs to distribute them. This is optional, but I find it adds a wonderful texture and extra burst of flavor. My kids absolutely love it when I add chocolate chips, and they disappear so fast!
Step 6: Layer & Swirl
Pour the batter into your prepared loaf pan, spreading it evenly. If you’re feeling fancy and want to create a marbled effect with extra chocolate chips or nuts, you can sprinkle some on top and gently swirl them in with a knife or skewer. I usually just mix them into the batter, but a swirl can look really pretty. The goal is just to get everything into the pan and relatively even.
Step 7: Bake
Pop that beautiful pan into your preheated oven. Now, the baking time can vary a bit depending on your oven, but generally, it takes about 50-65 minutes. To check for doneness, insert a toothpick into the center of the loaf. If it comes out clean or with a few moist crumbs attached (not wet batter), it’s ready! If it’s still wet, give it another 5-10 minutes and check again. If the top is browning too quickly, you can loosely tent it with aluminum foil.
Step 8: Cool & Glaze
Once it’s baked, let the zucchini bread cool in the pan on a wire rack for about 10-15 minutes. This allows it to set up properly. Then, carefully invert the pan to remove the loaf. Let it cool completely on the wire rack before you even *think* about glazing it. Seriously, the glaze will just melt off if the bread is warm. While it’s cooling, whisk together the powdered sugar, vanilla extract, and enough milk (or your liquid of choice) to reach a pourable, but not watery, consistency. If it’s too thick, add a tiny bit more liquid; if it’s too thin, add a little more powdered sugar. Once the bread is completely cool, drizzle or spread the glaze over the top.
Step 9: Slice & Serve
Once the glaze has set a little, it’s time for the best part: slicing and enjoying! I like to use a serrated knife for a clean cut. This bread is delicious served at room temperature. It’s perfect on its own, but also wonderful with a smear of butter or cream cheese if you’re feeling extra indulgent. Enjoy every single bite!
What to Serve It With
This zucchini bread is wonderfully versatile, making it perfect for any time of day or any occasion. For a classic breakfast, I love to serve a thick slice alongside a steaming mug of my favorite coffee. It’s not too sweet, so it pairs beautifully with the richness of coffee. If you’re planning a brunch spread, this bread is a fantastic addition. It looks so inviting on a platter, and I often serve it with fresh berries or a dollop of Greek yogurt for a lighter touch. For dessert, it’s absolutely divine. I’ll sometimes warm a slice slightly and serve it with a scoop of vanilla bean ice cream – talk about decadence! It’s also my go-to for cozy snacks. When the kids get home from school, a slice of this with a glass of milk is always a hit. My personal favorite way to serve it is simply on a pretty plate with a cup of tea in the afternoon. It’s that comforting, homey treat that always hits the spot. I’ve also found it pairs wonderfully with a side of fruit salad for a light and satisfying meal.
Top Tips for Perfecting Your Zucchini Bread
Over the years, I’ve learned a few tricks that help make this zucchini bread absolutely perfect every time. First, when it comes to the zucchini prep, you absolutely *must* squeeze out as much moisture as possible after grating. Use paper towels or a clean kitchen towel and really wring it out. This is the single biggest factor in preventing a soggy loaf and ensuring that tender, cake-like crumb. If you don’t, you risk your bread not baking through properly. For mixing, remember my mantra: gentle is best! Overmixing is the enemy of tender quick breads. Just mix until the ingredients are combined, and don’t fret over a few flour streaks; they’ll disappear. When it comes to swirling in fillings like chocolate chips, I find less is more. Don’t over-swirl, or you’ll end up with brown streaks everywhere instead of distinct pockets of deliciousness. If you’re looking for ingredient swaps, I’ve tested this with almond milk instead of regular milk in the glaze, and it made it even creamier! For the oil, you can use melted coconut oil (it adds a subtle flavor) or even a light olive oil in a pinch, though vegetable or canola oil is my preference for a neutral taste. Baking is pretty straightforward, but keep an eye on your oven. If you notice the top browning too fast, a loose tent of foil is your best friend. It allows the inside to cook without burning the outside. And for the glaze, consistency is key! You want it thick enough to coat but thin enough to drizzle. If it’s too thick, add milk a teaspoon at a time. If it’s too thin, add powdered sugar a tablespoon at a time. Don’t be afraid to experiment with flavorings in the glaze too – a little lemon zest or a splash of orange juice can add a lovely brightness.
Storing and Reheating Tips
This zucchini bread is fantastic at room temperature for a few days, which is why it’s so great for snacking. I usually store it in an airtight container or wrap the loaf tightly in plastic wrap and then foil. It stays fresh and moist for about 2-3 days this way. If I know we won’t get through it that quickly, or if it’s particularly warm out, I’ll pop it into the refrigerator. In the fridge, it will stay good for up to a week. I store it in an airtight container to prevent it from drying out. When I want a slice from the fridge, I just let it sit at room temperature for about 15-20 minutes, or I’ll give it a quick toast in the toaster oven. If you want to freeze portions for longer storage, I highly recommend slicing it first. Wrap individual slices tightly in plastic wrap, then place them in a freezer-safe bag or container. It can be frozen for up to 3 months. To thaw, just unwrap a slice and let it come to room temperature, or gently warm it in the microwave or toaster oven. For the glaze, I always recommend adding it *after* the bread has completely cooled and just before serving, especially if you plan to store it for more than a day. If you glaze it and then store it, the glaze can become a bit sticky or absorb moisture, especially in the fridge. So, my best advice is to glaze right before you plan to eat it or store it for immediate consumption.
Frequently Asked Questions
Final Thoughts
So there you have it – my absolute favorite, tried-and-true zucchini bread recipe! It’s more than just a recipe to me; it’s a little slice of happiness that I love sharing. It’s proof that sometimes the most comforting and delicious things come from the simplest ingredients and a little bit of love in the kitchen. I truly hope you get a chance to make it and that it brings you and your loved ones as much joy as it brings my family. If you love baking quick breads with that perfect moist texture, you should definitely check out my recipe for Easy Apple Cinnamon Muffins. Don’t be shy – give this zucchini bread a try, and let me know in the comments how it turns out! I can’t wait to hear all about your baking adventures and any delicious variations you come up with. Happy baking!
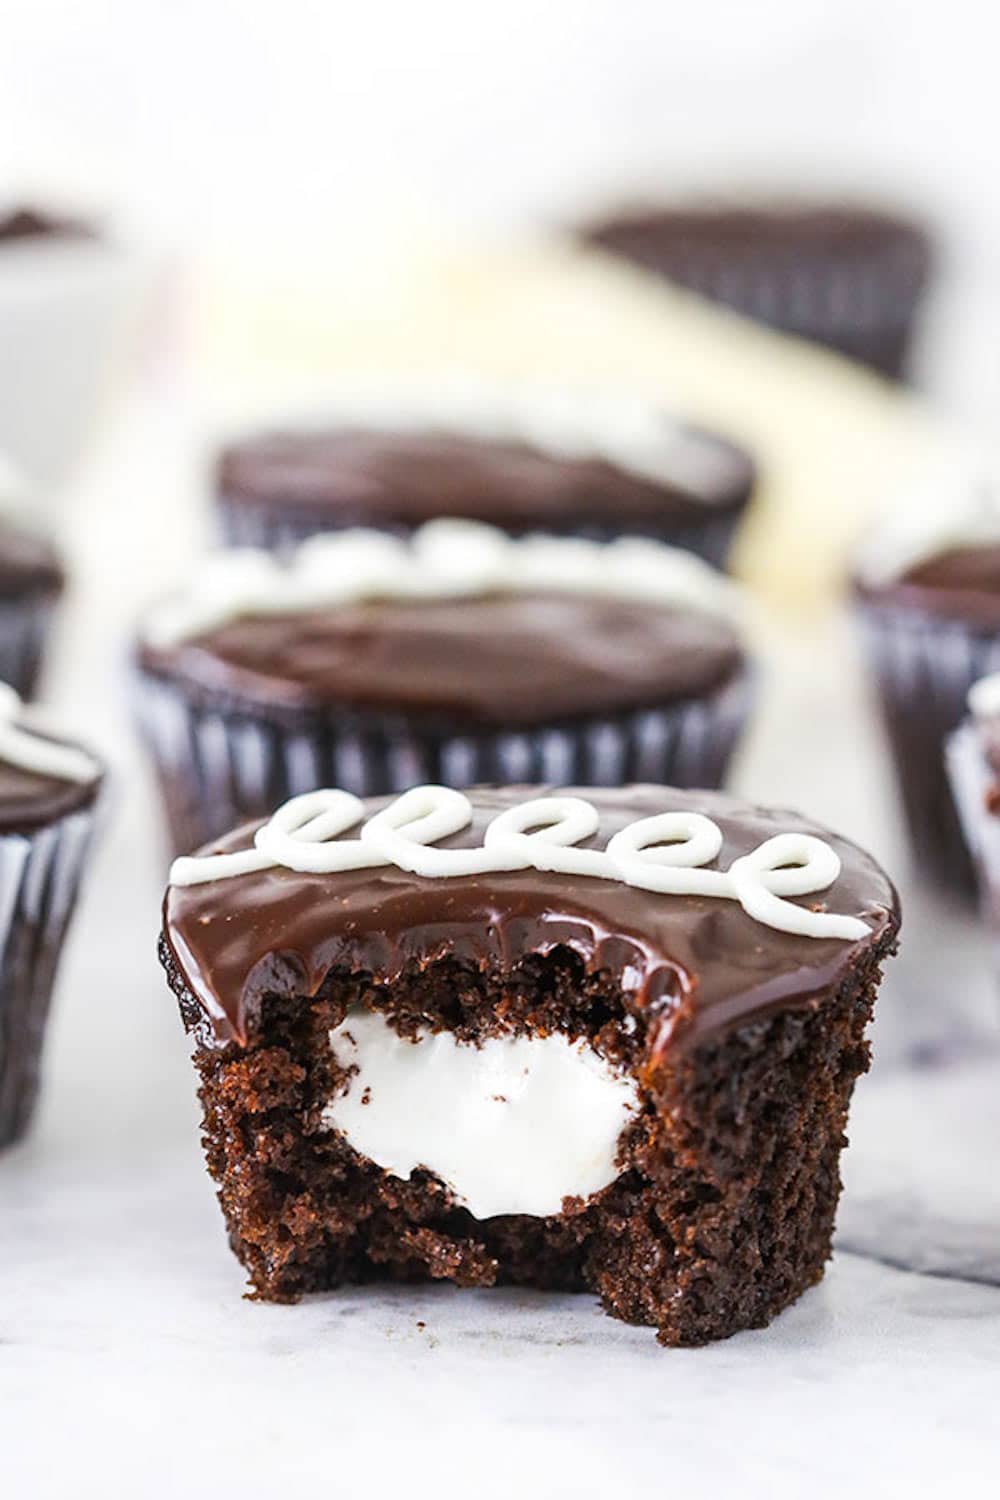
Hostess Cupcakes
Ingredients
Method
- Preheat oven to 300°F (148°C) and prepare a cupcake pan with liners.
- In a large bowl, whisk together the flour, sugar, cocoa powder, baking soda, and salt. Set aside.
- In a separate medium bowl, whisk together the egg, milk, vegetable oil, and vanilla extract.
- Add the wet ingredients to the dry ingredients and mix until just combined. The batter will be thick.
- Gradually stir in the hot water until the batter is smooth and pourable. It will be thin.
- Fill cupcake liners about two-thirds full. Bake for 18-23 minutes, or until a toothpick inserted into the center comes out with moist crumbs.
- Let cupcakes cool in the pan for a few minutes before transferring to a wire rack to cool completely.
- While cupcakes cool, make the filling. Beat the room temperature butter in a mixer bowl until smooth.
- Add half of the powdered sugar and mix until smooth, scraping down the bowl as needed. Add the remaining powdered sugar and mix until well combined.
- Add the marshmallow creme and stir until fully incorporated and smooth.
- To fill the cupcakes, use a cupcake corer or a small knife to remove the center of each cupcake. Be careful not to go all the way to the bottom.
- Spoon or pipe the filling into the hollowed-out centers of the cupcakes. Place the removed cake pieces back on top of the filling.
- To make the ganache, place semi-sweet chocolate chips in a heatproof bowl. Heat heavy whipping cream in a saucepan just until it begins to simmer. Pour the hot cream over the chocolate chips. Let stand for 3-5 minutes, then whisk until smooth and glossy.
- Spread the ganache over the tops of the filled cupcakes, allowing it to drip down the sides slightly.
- For the vanilla icing, beat the room temperature butter until smooth. Add powdered sugar and mix until crumbly. Add milk and vanilla extract and beat until smooth and creamy.
- Transfer the icing to a piping bag fitted with a small round tip. Pipe a decorative swirl on top of each ganache-covered cupcake.
- Refrigerate the cupcakes until ready to serve for the best texture.