Tangy Cheesecake Recipe: How to Make It Easy
You know those recipes that just *feel* like home? The ones that have a permanent spot in your heart (and your recipe binder)? This zucchini bread is absolutely one of those for me. It’s not just about the deliciousness, though oh my goodness, it is *delicious*. It’s about the memories it brings back – my mom making it on a lazy Sunday afternoon, the whole house smelling like cinnamon and warm spices, and us kids practically hovering by the oven, begging for it to be done. It’s funny, I used to think zucchini was just for salads or grilling, but this recipe totally changed my tune. It’s like a secret weapon for using up all that garden zucchini, and it’s so good, you’d never guess there’s a whole lot of goodness hidden inside. Forget those dry, crumbly loaves you might have tried; this one is incredibly moist, tender, and has just the right amount of sweetness. If you’ve ever tried my chocolate chip cookies, you know I’m all about that perfect balance of texture and flavor, and this zucchini bread hits every single mark. It’s a true crowd-pleaser, and honestly, it’s one of the things my family asks for most often.
What is Zucchini bread?
So, what exactly *is* zucchini bread? At its core, it’s a quick bread, which means it uses a chemical leavening agent like baking soda or baking powder instead of yeast, making it super fast to whip up. The star ingredient, of course, is zucchini! When grated and mixed into the batter, it does this magical thing where it adds incredible moisture without making the bread taste like, well, vegetables. Think of it as nature’s secret to the most tender, never-dry baked goods. The name itself is pretty straightforward, but what it *doesn’t* tell you is how versatile and comforting this treat can be. It’s not just a bread; it’s a muffin, it’s a breakfast staple, it’s a dessert, it’s a snack. It’s essentially a hug in loaf form, packed with warm spices like cinnamon and sometimes nutmeg, and often studded with nuts or chocolate chips. It’s a classic for a reason, and my version aims to be the best you’ve ever tried.
Why you’ll love this recipe?
I love zucchini bread, and I know you will too. I’m obsessed. I’m obsessed. I’m obsessed. I’m obsessedflavor is just out of this world. It’s got that comforting, warm spice blend that just feels like autumn, even when it’s summer. The zucchini lends this incredible, subtle sweetness and keeps the whole loaf unbelievably moist. Seriously, I’ve had people try it who were skeptical about “vegetable bread” and they’ve been absolutely blown away. Then there’s the simplicity. This is a lifesaver on busy nights or lazy weekends. You don’t need any fancy equipment, just a couple of bowls, a whisk, and a loaf pan. The whole process from start to finish is pretty quick, and the results are always so rewarding. It’s also incredibly cost-efficientI have a garden and a friend with one overflowing with zucchini! It uses pantry staples you probably already have on hand. And theversatility! Oh, I could go on forever. You can jazz it up with chocolate chips, walnuts, or pecans. It’s amazing plain, but it’s also fantastic with a smear of cream cheese or a dollop of whipped cream. It’s perfect for a quick breakfast on the go, a delightful afternoon pick-me-up with a cup of coffee, or even a light dessert. What I love most about this recipe, though, is how forgiving it is. Even if you’re new to baking, you can nail this. It’s a true winner that makes everyone happy. If you’re looking for something that tastes incredible and doesn’t require hours in the kitchen, this is your answer. It’s a fantastic alternative to my classic banana bread when you’re looking for something a little different but just as comforting.
How to Make Zucchini Bread
Quick Overview
Whipping up this amazing zucchini bread is surprisingly straightforward. You’ll start by prepping your pan and preheating the oven, then quickly mix your dry ingredients in one bowl and your wet ingredients in another. The magic happens when you gently combine them, being careful not to overmix. Then, you’ll prepare a simple, flavourful filling, layer it into the batter, and bake until golden and fragrant. The whole process, from gathering ingredients to pulling it out of the oven, takes less than an hour and a half, with most of that time being hands-off baking. It’s proof that delicious, homemade treats don’t have to be complicated!
Ingredients
For the Main Batter:
You’ll need 2 cups of all-purpose flour. Make sure it’s measured correctly – spoon it into your measuring cup and level it off with a straight edge, don’t just scoop directly from the bag, or you might end up with a dense loaf. This is a lesson I learned the hard way early on!
1 teaspoon baking soda: This is what gives our bread its lift and tender crumb.
1/4 teaspoon salt: Balances the sweetness and brings out the flavors.
1 teaspoon ground cinnamon: The warm hug of flavor!
1/4 teaspoon ground nutmeg (optional, but highly recommended): Adds a little extra warmth and complexity.
1 1/2 cups granulated sugar: You can adjust this slightly depending on how sweet you like things, but this is the sweet spot for me.
2 large eggs: At room temperature, they incorporate better into the batter.
3/4 cup vegetable oil (or other neutral oil like canola or melted coconut oil): This is key for moisture. If you’re looking for a healthier swap, I’ve tested this with applesauce, but it can make it a bit gummier, so oil is my preferred choice for texture.
1 teaspoon vanilla extract: Always use real vanilla extract – it makes such a difference!
2 cups grated zucchini: About 2 medium zucchinis. Make sure to squeeze out the excess moisture after grating! This is crucial, otherwise, your bread can turn out soggy. I usually wrap it in a clean kitchen towel or cheesecloth and give it a good squeeze. You want it dry-ish, not bone dry, but definitely not dripping.
For the Filling:
1/2 cup packed light brown sugar: Adds a lovely caramel note.
1 teaspoon ground cinnamon: More of that cozy spice goodness.
1/2 cup chopped walnuts or pecans (optional): For a delightful crunch. My kids love this bread with chocolate chips instead, so feel free to swap them out!
For the Glaze:
1 cup powdered sugar: Sifted to ensure a smooth glaze.
2-3 tablespoons milk (any kind works – dairy, almond, soy): Start with 2 tablespoons and add more, a teaspoon at a time, until you reach your desired drizzling consistency. I tested this with almond milk and it actually made it even creamier!
1/2 teaspoon vanilla extract: For a touch of extra flavor.
Step-by-Step Instructions
Step 1: Preheat & Prep Pan
First things first, preheat your oven to 350°F (175°C). This is important for even baking. Now, grab a standard 9×5 inch loaf pan. Grease it really well with butter or non-stick spray, then lightly flour it. I like to tap out any excess flour – you just want a thin coating to prevent sticking. Some people like to line their pan with parchment paper, leaving an overhang on the sides, which makes lifting the bread out a breeze. I’ve done it both ways and both work like a charm!
Step 2: Mix Dry Ingredients
In a large bowl, whisk together the flour, baking soda, salt, cinnamon, and nutmeg (if you’re using it). Whisking thoroughly ensures all those leavening agents and spices are evenly distributed, which means no surprise pockets of baking soda or bland bites. You want to see a uniform color and texture in your dry mix.
Step 3: Mix Wet Ingredients
In a separate medium bowl, whisk together the granulated sugar, eggs, vegetable oil, and vanilla extract until everything is well combined and smooth. You’re not looking for it to be super aerated, just nicely blended. The sugar should be mostly dissolved into the wet ingredients.
Step 4: Combine
Now, pour the wet ingredients into the bowl with the dry ingredients. Gently fold them together with a spatula or wooden spoon. Here’s the crucial part: DO NOT OVERMIX. Mix just until you no longer see streaks of dry flour. A few lumps are perfectly fine! Overmixing develops the gluten in the flour too much, which can lead to a tough, dense bread. Once it’s just combined, gently fold in your squeezed, grated zucchini. Make sure it’s evenly distributed throughout the batter.
Step 5: Prepare Filling
In a small bowl, mix together the brown sugar, cinnamon, and your chopped nuts or chocolate chips (if using). This mixture is going to add little pockets of spiced sweetness and texture throughout the bread. It’s super simple but makes a huge difference!
Step 6: Layer & Swirl
Pour about half of the zucchini batter into your prepared loaf pan, spreading it out evenly. Sprinkle about half of the filling mixture over the batter. Then, pour the remaining batter on top, followed by the rest of the filling. Now, grab a knife or a skewer and gently swirl the filling into the batter. You don’t need to go crazy – just a few passes to create lovely swirls of cinnamon and spice. This is where the visual magic happens, and it ensures you get bursts of flavor in every slice.
Step 7: Bake
Place the loaf pan in the preheated oven. Bake for 50-65 minutes. The exact time will depend on your oven, so keep an eye on it. You’ll know it’s done when a toothpick inserted into the center comes out clean or with a few moist crumbs attached (not wet batter). The top should be golden brown and it should smell absolutely divine!
Step 8: Cool & Glaze
Once baked, let the zucchini bread cool in the pan on a wire rack for about 15-20 minutes. This allows it to set up properly. Then, carefully invert the pan to remove the loaf and let it cool completely on the wire rack. Trying to glaze a warm loaf is a recipe for disaster – the glaze will just melt right off! Once it’s completely cool, whisk together the powdered sugar, 2 tablespoons of milk, and vanilla extract in a small bowl until smooth. If it’s too thick, add more milk, a teaspoon at a time, until it’s drizzly but not too thin. Drizzle it over the top of the cooled loaf. Let the glaze set for about 15-30 minutes before slicing.
Step 9: Slice & Serve
Once the glaze has set, it’s time for the best part! Use a serrated knife to slice the bread. This helps create clean slices without squishing the loaf. Serve it at room temperature for the best flavor and texture. It’s perfect with your morning coffee or as an afternoon snack!
What to Serve It With
This zucchini bread is so wonderfully versatile, it fits into almost any meal or craving! For a simple, satisfying breakfast, I love it toasted lightly and served with a smear of butter or cream cheese. A hot cup of coffee or a mug of herbal tea is the perfect accompaniment. For a more elaborate brunch spread, consider serving thick slices alongside fresh fruit salad, a yogurt parfait bar, or even some crispy bacon. It adds a lovely sweet counterpoint to savory dishes. If you’re looking for a comforting dessert, it’s fantastic warm, perhaps with a scoop of vanilla ice cream or a drizzle of caramel sauce. It’s also perfect for those late-night cravings when you want something sweet but don’t want to bake a whole cake. It’s incredibly satisfying on its own, making it a great option for cozy snacks anytime. My kids love it simply sliced and eaten plain, often asking for seconds before they’ve even finished their first slice! I’ve also found it pairs wonderfully with a glass of cold milk. My family traditions often involve a fresh loaf on the table during weekend brunches or as a little treat after school. It’s just one of those recipes that brings smiles all around.
Top Tips for Perfecting Your Zucchini Bread
After making this countless times, I’ve picked up a few tricks that really elevate this zucchini bread from good to absolutely sensational. First, regarding zucchini prep: squeezing out that excess moisture is non-negotiable. I usually use a clean kitchen towel or a few layers of paper towels and give the grated zucchini a good, firm squeeze. You don’t want it bone dry, but you definitely don’t want it dripping wet – that’s the quickest way to a gummy, dense loaf. For grating, I prefer the medium side of a box grater; it gives you just the right texture. When it comes to mixing advice, remember that the golden rule for quick breads is to avoid overmixing! Mix the wet and dry ingredients *just* until combined. A few small lumps in the batter are totally fine. Overmixing develops gluten, making the bread tough. Your batter should be thick and look almost lumpy – that’s a good sign! For swirl customization, don’t go overboard. Just a few gentle passes with a knife or skewer are enough to create beautiful patterns and distribute the flavor. Too much swirling can muddy the flavors and textures. Experiment with different patterns; a figure-eight motion often works well. When it comes to ingredient swaps, if you’re out of brown sugar for the filling, you can use an equal amount of granulated sugar mixed with a tiny splash of molasses, but brown sugar really gives that deeper, caramel-like flavor. For the nuts, almonds, pistachios, or even a mix would be delicious. If you’re feeling daring, try white chocolate chips or even dried cranberries for a tart burst. For baking tips, always trust the toothpick test. Ovens can vary, so the suggested bake time is a guideline. If the top is browning too quickly but the center isn’t done, you can loosely tent the loaf with foil. Make sure your oven rack is in the center of the oven for even heat distribution. For glaze variations, if you want a less sweet glaze, you can add a tiny pinch of lemon zest or a drop of almond extract to the powdered sugar mixture. For a more rustic look, you can skip the glaze entirely and just dust the cooled loaf with a little powdered sugar or cinnamon sugar. A cream cheese frosting is also divine if you’re feeling decadent!
Storing and Reheating Tips
One of the best things about this zucchini bread is how well it keeps, making it perfect for making ahead! For room temperature storage, once the loaf has completely cooled and the glaze has set, wrap it tightly in plastic wrap or aluminum foil, or store it in an airtight container. It will stay delicious at room temperature for up to 3 days. I usually find it’s best eaten within the first 2 days, as it tends to be the most moist then. For refrigerator storage, if your kitchen is particularly warm or you won’t be eating it within a few days, you can store it in an airtight container in the fridge. It should last for up to a week, though it might lose a little bit of its moisture. When you want to enjoy it, you can eat it chilled or let it come to room temperature for about 30 minutes. If you want to make a big batch to have on hand for longer, freezer instructions are your best friend. Let the loaf cool completely and the glaze set (or wait to glaze after thawing). Wrap the loaf very tightly in a layer of plastic wrap, followed by a layer of aluminum foil. You can also freeze individual slices the same way. It will keep well in the freezer for up to 3 months. To thaw, remove the foil and plastic wrap and let it thaw at room temperature for several hours, or overnight in the refrigerator. For glaze timing advice, if you plan to freeze the bread, it’s often best to freeze it plain and then make and apply the glaze after it has thawed. This prevents the glaze from cracking or becoming gummy during the freezing and thawing process. If you do glaze it before freezing, ensure it’s fully set and wrap very carefully.
Frequently Asked Questions
Final Thoughts
So there you have it, my absolute favorite zucchini bread recipe. It’s more than just a bake; it’s a little bit of comfort, a whole lot of deliciousness, and a fantastic way to use up that garden bounty. I truly believe this recipe is a winner because it’s consistently moist, flavorful, and remarkably easy to make, even for beginner bakers. The combination of tender cake, warm spices, and that sweet glaze is just divine. If you love this recipe, you might also enjoy my recipe for moist blueberry muffins or my perfectly chewy oatmeal raisin cookies. Both share that same commitment to incredible flavor and satisfying textures. I can’t wait for you to try this zucchini bread and make your own memories with it. Please, if you make it, leave a comment below and tell me how yours turned out! I love hearing about your baking adventures and any twists you put on the recipe. Happy baking!
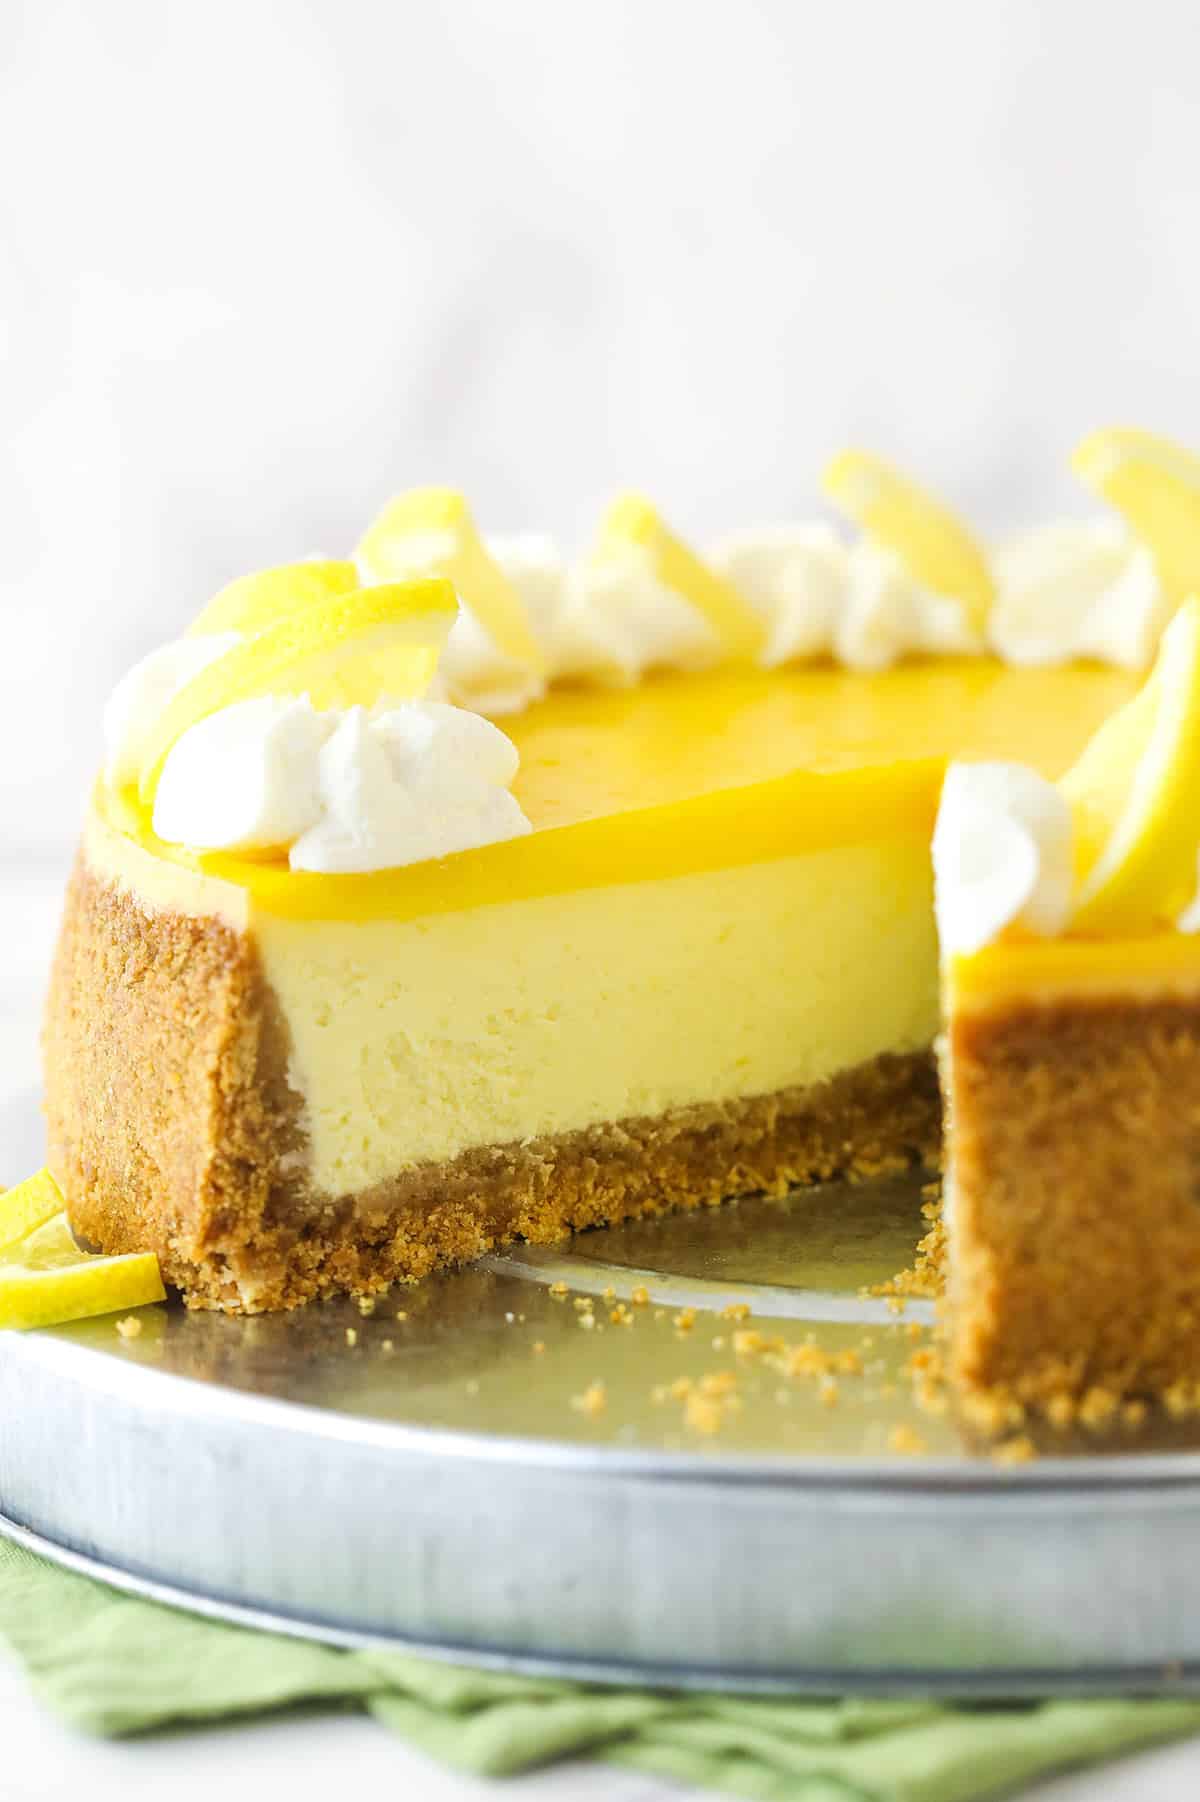
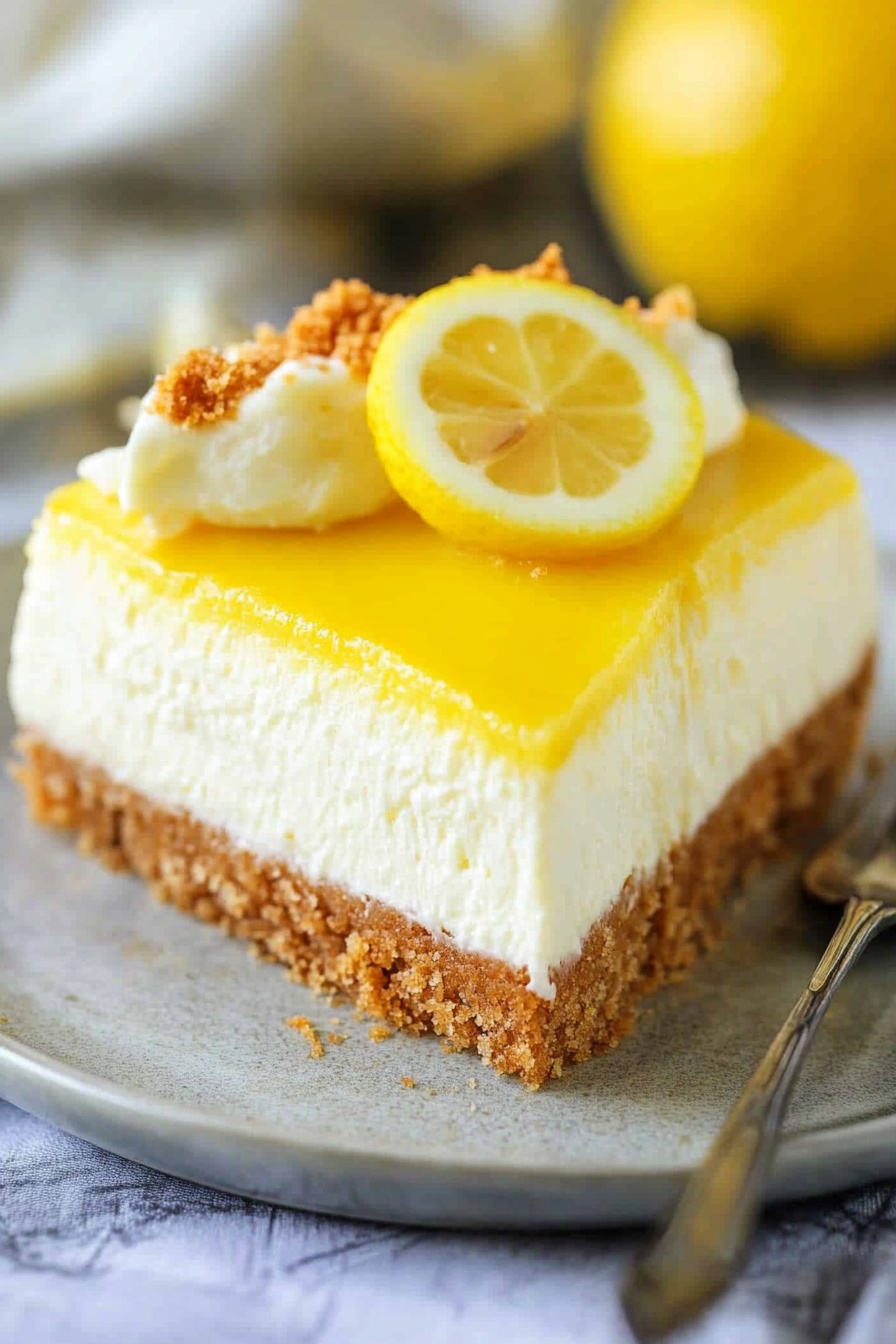
Lemon Cheesecake
Ingredients
Method
- Preheat oven to 325°F (163°C). Line a 9-inch (23cm) springform pan with parchment paper in the bottom and grease the sides.
- Combine the crust ingredients in a small bowl. Press the mixture into the bottom and up the sides of the springform pan.
- Bake the crust for 10 minutes, then set aside to cool.
- Cover the outsides of the pan with aluminum foil so that water from the water bath cannot get in. Set prepared pan aside.
- Reduce oven temperature to 300°F (148°C).
- In a large bowl, beat the cream cheese, sugar and flour on low speed until completely combined and smooth. Be sure to use low speed to reduce the amount of air added to the batter, which can cause cracks. Scrape down the sides of the bowl.
- Add the sour cream, lemon juice and lemon zest and mix on low speed until well combined.
- Add the eggs one at a time, mixing slowly to combine after each addition, then add the egg yolks and mix until well combined. Scrape down the sides of the bowl as needed to make sure everything is well combined.
- Pour the cheesecake batter evenly into the crust.
- Place the springform pan inside another larger pan. Fill the outside pan with enough warm water to go about halfway up the sides of the springform pan. The water should not go above the top edge of the aluminum foil on the springform pan.
- Bake for 1 hour 15 minutes. The center should be set, but still jiggly.
- Turn off the oven and leave the door closed for 30 minutes. The cheesecake will continue to cook, but slowly begin to cool as well.
- Crack the door of the oven for 30 minutes to allow the cheesecake to continue to cool slowly. This process helps prevent cracking.
- Remove the cheesecake from the oven and water bath wrapping and set the cheesecake aside to cool to about room temperature.
- To make the lemon curd, combine all the ingredients in a double boiler (or in a metal bowl over a pot of simmering water). Heat while whisking constantly until mixture thickens and reaches 170-180 degrees.
- Add the lemon curd to the top of the cheesecake quickly, before it cools and thickens.
- Place the cheesecake in the fridge until completely cool and firm, 4-5 hours.
- Add the heavy whipping cream, powdered sugar and vanilla extract to a large mixer bowl and whip on medium speed until stiff peaks form.
- Remove your cheesecake from the springform pan and set it on a plate or serving platter, then pipe the whipped cream around the rim of the cheesecake.
- Store the cheesecake in the fridge until ready to serve. Cheesecake is best if eaten within 4-5 days.