Autumn Sweetness Best Candy Corn Cookies
You know those recipes that just feel like a warm hug? The ones you reach for when you need a little bit of sunshine on a cloudy day, or when you want to impress your family without spending hours in the kitchen? Well, this is one of those for me. It’s my go-to zucchini bread, and let me tell you, it’s a total lifesaver. It’s not just any zucchini bread; it’s the kind that makes your whole house smell like cinnamon and happiness, the kind that disappears faster than you can say “seconds, please!” It’s my absolute favorite, and I’ve been making it for years, tweaking it here and there until it was just perfect. I know there are a ton of zucchini bread recipes out there, but this one has a special something that just keeps me coming back. It’s that perfect balance of moist, tender crumb and sweet, spiced goodness that truly makes it unforgettable. I’m so excited to share this with you!
What is Zucchini bread?
So, what exactly is this magical zucchini bread we’re talking about? Think of it as the ultimate comfort food, baked into a loaf. It’s essentially a quick bread, meaning you don’t need any fancy yeast or lengthy proofing times. It’s made with grated zucchini, which sounds a little odd, I know, but trust me on this! The zucchini adds an incredible amount of moisture and tenderness to the finished product, without any overpowering zucchini flavor whatsoever. Honestly, if you didn’t know it was in there, you’d never guess. It’s the secret weapon for an unbelievably soft and decadent crumb. The name itself, “comfort bread,” really says it all – it’s simple, delicious, and always hits the spot. It’s the kind of treat that makes a regular Tuesday feel a little bit special.
Why you’ll love this recipe?
There are so many reasons why I absolutely adore this zucchini bread, and I just know you will too! First off, the flavor is just out of this world. It’s perfectly spiced with cinnamon, a hint of nutmeg, and if you’re feeling it, a touch of clove, creating this wonderfully warm and inviting aroma as it bakes. The sweetness is just right – not too much, not too little – making it a perfect treat any time of day. Then there’s the texture. Oh, the texture! It’s incredibly moist and tender, thanks to that secret ingredient (you guessed it, the zucchini!). It literally melts in your mouth. And don’t even get me started on how easy it is to whip up. I’ve made this on a busy weeknight with barely enough time, and it still turns out phenomenal. The ingredients are all pantry staples, making it super budget-friendly too, which is always a win in my book. Plus, it’s so versatile! You can toss in some chocolate chips, nuts, or even a swirl of cream cheese if you’re feeling fancy. It’s a real crowd-pleaser. My kids, who can be super picky sometimes, gobble this up like it’s going out of style. It’s definitely a recipe that has earned its permanent spot in my recipe binder.
How do I make this dreamy Zucchini Bread?
Quick Overview
This recipe is wonderfully straightforward. We’ll be mixing up a simple batter, folding in the grated zucchini, pouring it into a loaf pan, and baking until it’s golden and fragrant. The beauty lies in its simplicity – minimal fuss, maximum flavor. You’ll be amazed at how something so delicious can come together so quickly, making it perfect for those moments when a craving strikes or unexpected guests pop by. Just a few steps, and you’ll have a warm, comforting loaf ready to enjoy.
Ingredients
For the Main Batter:
Here’s what you’ll need for the base of our delicious loaf. I always try to use good quality, fresh ingredients, and it really does make a difference. For the flour, all-purpose is what I typically reach for, and it works like a charm. Make sure your baking soda and baking powder are fresh, though, or your loaf might not get that lovely lift. And don’t skip the salt; it really balances out the sweetness!
- 2 cups all-purpose flour
- 1 teaspoon baking soda
- 1/2 teaspoon baking powder
- 1/2 teaspoon salt
- 1 teaspoon ground cinnamon
- 1/4 teaspoon ground nutmeg
- 2 large eggs, at room temperature
- 1 cup granulated sugar
- 1/2 cup vegetable oil (or melted unsalted butter for a richer flavor)
- 1/4 cup milk (any kind works, I’ve even used almond milk and it made it super creamy!)
- 1 teaspoon vanilla extract
For the Zucchini:
This is our star ingredient that brings all the magic! I usually use medium-sized zucchinis, about 6-8 inches long. You want to make sure they’re fresh and firm. Don’t worry about peeling them; the skins add extra fiber and nutrients, and you won’t even notice them once it’s baked. Grating them is key to distributing them evenly.
- 2 cups grated zucchini (about 2 medium zucchinis), squeezed dry
For the Optional Swirl (if you’re feeling fancy!):
This is totally optional, but it adds a lovely little extra something, both in looks and a subtle boost of flavor. I sometimes add a tablespoon or two of brown sugar and a pinch more cinnamon to this mixture for an extra caramel-y swirl.
- 1/4 cup brown sugar
- 1 teaspoon ground cinnamon
For the Glaze:
This is the cherry on top! A simple glaze that adds a touch of sweetness and a beautiful finish. You can adjust the consistency by adding more or less milk. If you like a thinner glaze, just add a tiny bit more milk until it reaches your desired pour. If you prefer it thicker, use a little less.
- 1 cup powdered sugar
- 2-3 tablespoons milk (or water)
- 1/2 teaspoon vanilla extract
Step-by-Step Instructions
Step 1: Preheat & Prep Pan
First things first, let’s get our oven ready. Preheat it to 350 degrees Fahrenheit (175 degrees Celsius). While the oven is warming up, grease and flour a 9×5 inch loaf pan. You can use butter or cooking spray, and then dust it with a little flour, tapping out any excess. This step is super important to make sure your beautiful loaf doesn’t stick!
Step 2: Mix Dry Ingredients
In a medium bowl, whisk together the flour, baking soda, baking powder, salt, cinnamon, and nutmeg. Give it a good whisk to make sure everything is evenly distributed. This ensures that the leavening agents and spices are spread throughout the batter, leading to an evenly baked and flavorful loaf.
Step 3: Mix Wet Ingredients
In a large bowl, beat the eggs and granulated sugar together until they’re light and fluffy. This usually takes about 2-3 minutes with an electric mixer, or a bit longer by hand. Then, gradually beat in the vegetable oil (or melted butter), milk, and vanilla extract until well combined. It should look smooth and slightly thickened.
Step 4: Combine
Now, it’s time to bring it all together! Gradually add the dry ingredients to the wet ingredients, mixing on low speed or by hand until just combined. Be careful not to overmix here! Overmixing can lead to a tough loaf, and we want ours to be super tender. A few streaks of flour are okay; they’ll disappear as you fold in the zucchini.
Step 5: Prepare Filling
If you’re adding the optional swirl, mix the brown sugar and cinnamon together in a small bowl. If you’re not swirling, you can skip this. The key is to have this ready to go when the batter is.
Step 6: Layer & Swirl
Gently fold the grated, squeezed zucchini into the batter until just incorporated. Now, if you’re doing the swirl, pour about half of the batter into your prepared loaf pan. Sprinkle half of the brown sugar and cinnamon mixture over the top. Then, pour the remaining batter over that, and sprinkle the rest of the brown sugar and cinnamon mixture on top. Take a knife or skewer and gently swirl it through the batter. Don’t over-swirl, just a few gentle turns to create pretty patterns. This step is more for looks and a little extra flavor burst in certain bites!
Step 7: Bake
Place the loaf pan in your preheated oven. Bake for 50-65 minutes, or until a wooden skewer or toothpick inserted into the center comes out clean. Baking times can vary depending on your oven, so start checking around the 50-minute mark. If the top starts to brown too quickly, you can loosely tent it with aluminum foil.
Step 8: Cool & Glaze
Once it’s done, remove the loaf from the oven and let it cool in the pan for about 10-15 minutes. This allows it to set up a bit. Then, carefully invert it onto a wire rack to cool completely. While it’s cooling, whisk together the powdered sugar, 2 tablespoons of milk, and vanilla extract for the glaze. Add more milk a teaspoon at a time until it reaches your desired drizzling consistency. Once the bread is completely cool, drizzle the glaze over the top. Let the glaze set for a bit before slicing.
Step 9: Slice & Serve
Once the glaze has set, slice your beautiful zucchini bread and enjoy! It’s best served at room temperature, but a slightly warm slice with a dollop of butter is pure heaven. I love using a serrated knife for clean slices.
What to Serve It With
This zucchini bread is so wonderfully versatile, it’s perfect for just about any occasion! For a cozy
For Breakfast:
My family loves this warm from the oven first thing in the morning. It’s fantastic on its own, but a smear of salted butter takes it to the next level. It pairs perfectly with a hot cup of coffee or a glass of cold milk. Honestly, it’s what gets my kids out of bed on a Saturday.
For Brunch:
For a slightly more elegant brunch spread, I love to serve it sliced and arranged prettily on a platter. It’s a wonderful sweet addition alongside savory dishes like quiches or scrambled eggs. A small bowl of fresh berries on the side adds a lovely pop of color and freshness. It’s also a hit when I bring it to potlucks; it’s always one of the first things to go!
As Dessert:
This bread is sweet enough to stand as a dessert on its own, especially with that lovely glaze. If you want to make it extra special, serve a warm slice with a scoop of vanilla bean ice cream or a dollop of freshly whipped cream. A drizzle of caramel sauce is also divine. It’s the perfect little treat for a late-night craving that doesn’t involve baking a whole cake.
For Cozy Snacks:
This is my go-to for an afternoon snack when I need a little pick-me-up. It’s just so comforting and satisfying. I often pack a slice in my lunchbox for work, and it always makes my midday break feel a little brighter. It’s the ultimate comfort pairing for a good book and a quiet moment.
Top Tips for Perfecting Your Zucchini Bread
I’ve learned a thing or two over the years of making this zucchini bread, and I want to share some of my best tips to help yours turn out absolutely perfect every single time!
Zucchini Prep:
The most crucial step for a moist but not soggy loaf is squeezing out the excess moisture from your grated zucchini. After grating, I’ll put it in a fine-mesh sieve and press down with a spoon, or even wrap it in a clean kitchen towel or cheesecloth and give it a good squeeze. This prevents the bread from becoming heavy or wet. Don’t skip this part! I learned this the hard way after one too many soggy loaves when I was first starting out.
Mixing Advice:
Remember what I said about not overmixing? This is probably the most important tip for achieving that tender crumb. Mix the wet and dry ingredients until they are *just* combined. A few small lumps in the batter are perfectly fine; they will disappear during baking. Overmixing develops the gluten in the flour too much, leading to a tough, dense texture, and nobody wants that in their zucchini bread.
Swirl Customization:
If you decide to do the cinnamon-sugar swirl, don’t go overboard. A few gentle swirls with a knife or skewer are all you need to create pretty patterns. Too much swirling can muddy the batter and make the bread less distinct. For a more pronounced swirl, you can even slightly thicken the brown sugar mixture with a tiny bit of melted butter before sprinkling.
Ingredient Swaps:
I’ve experimented quite a bit! For the oil, you can use melted coconut oil for a subtle tropical hint, or even unsweetened applesauce for a lower-fat option (though it might change the texture slightly). For the milk, any non-dairy milk works beautifully – almond or oat milk adds a lovely creaminess. If you’re not a fan of cinnamon, try using pumpkin pie spice or adding some lemon zest for a brighter flavor.
Baking Tips:
Always preheat your oven thoroughly. An unevenly heated oven can lead to uneven baking. If you notice the top browning too quickly before the center is cooked, loosely tent the loaf pan with aluminum foil. This reflects heat away from the top, allowing the inside to bake through without the crust becoming too dark. You can also test for doneness by gently pressing the top of the loaf; it should spring back slightly.
Glaze Variations:
For a lemon-zucchini bread, add a tablespoon of fresh lemon juice to the glaze instead of some of the milk. For a chocolate glaze, sift in a tablespoon of unsweetened cocoa powder. If you prefer no glaze at all, a simple dusting of powdered sugar or a sprinkle of chopped nuts on top of the warm bread is also delicious.
Storing and Reheating Tips
Storing this delicious zucchini bread properly is key to keeping it fresh and flavorful for days. I’ve found these methods work best:
Room Temperature:
Once the bread is completely cool (and the glaze is set!), you can store it at room temperature. Wrap the loaf tightly in plastic wrap or place it in an airtight container. It should stay wonderfully moist and delicious for about 3-4 days. I usually don’t even need to cover it if I know it’ll be gone by then!
Refrigerator Storage:
If you live in a very warm or humid climate, or if you want to extend its life a bit longer, you can store it in the refrigerator. Wrap it well in plastic wrap, and then place it in an airtight container. It should keep well for up to a week. The texture might become a little firmer when chilled, but it’s easily fixed (see reheating tips!).
Freezer Instructions:
This zucchini bread freezes like a dream! This is my secret weapon for having homemade goodness on hand. Once completely cooled, wrap the loaf tightly in plastic wrap, then in a layer of aluminum foil, or place it in a freezer-safe bag. It can be stored in the freezer for up to 3 months. To thaw, unwrap it and let it sit at room temperature for a few hours, or gently reheat it. You can also freeze individual slices for quicker thawing and portion control.
Glaze Timing Advice:
If you plan to store the bread at room temperature or in the refrigerator, it’s best to add the glaze *after* the bread has completely cooled. If you’re freezing the loaf, I usually recommend glazing it *after* it has thawed. This way, the glaze stays nice and pretty. If you absolutely must glaze before freezing, make sure it’s fully set and then wrap very carefully to prevent sticking.
Frequently Asked Questions
Final Thoughts
There you have it – my absolute favorite, go-to zucchini bread recipe. It’s more than just a recipe to me; it’s a source of comfort, a guaranteed crowd-pleaser, and a reminder of how simple ingredients can come together to create something truly magical. I really hope you give this a try, and I’m so excited for you to experience that incredible aroma filling your kitchen and that first bite of moist, tender perfection. If you love this recipe, you might also enjoy my recipe for the best ever banana bread or my moist blueberry muffins – they have that same kind of comforting, easy-to-make charm! Please, let me know in the comments below how your zucchini bread turns out. I’d love to hear any variations you tried or any special memories it brings back for you. Happy baking, and enjoy every delicious crumb!
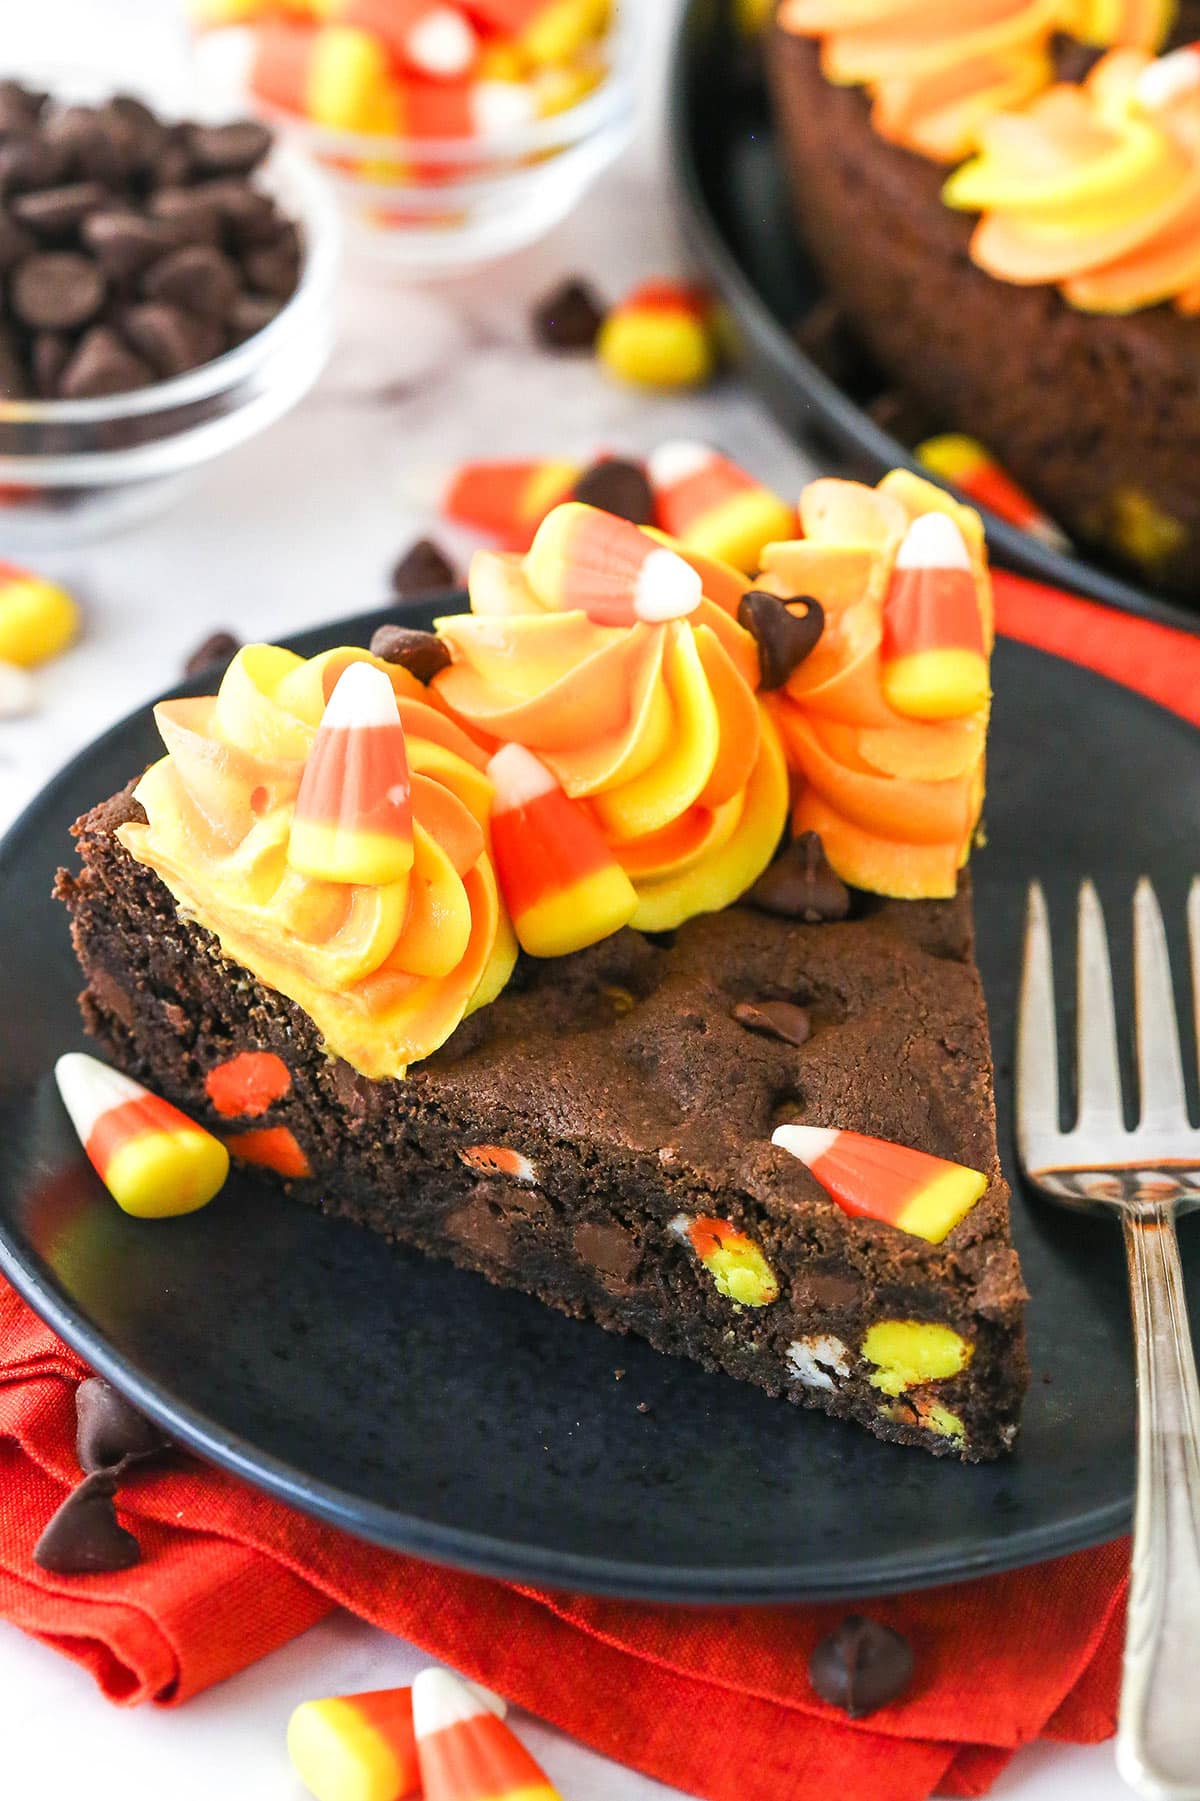
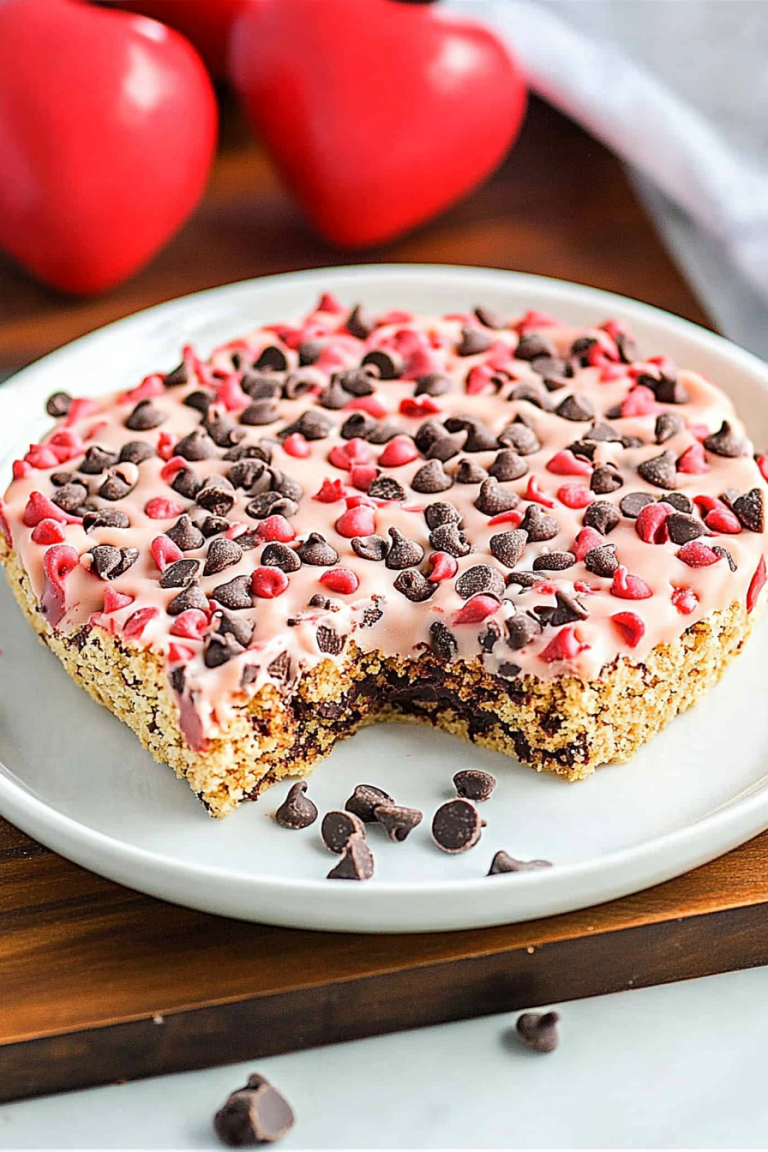
Candy Corn Chocolate Cookie Cake
Ingredients
Method
- Preheat oven to 350°F (180°C) and line the bottom of a 9-inch cake pan with parchment paper and grease the sides.
- In a medium sized bowl, combine the flour, cocoa powder, baking soda and salt. Set aside.
- Add the butter and sugars to a large mixer bowl and beat together until light in color and fluffy in texture, about 2-3 minutes. Do not skimp on the creaming time.
- Add the egg and vanilla extract and mix until well combined.
- Add the dry ingredients to the butter mixture and beat just until combined. Use your spatula to gently finish combining everything to keep from over mixing the cookie dough.
- Fold in the chocolate chips and candy corn. The cookie dough will be thick.
- Spread the dough evenly into the prepared cake pan. Press a few more chocolate chips and candy corn into the top of the cookie cake, if desired.
- Bake for 18-20 minutes or until it looks baked, but still wiggles a little when you jiggle it.
- Remove from oven and allow to cool completely in the cake pan, then transfer to a serving plate.
- To make the buttercream, add the butter to a large mixer bowl and beat until well combined and smooth.
- Add about half of the powdered sugar and mix until well combined and smooth.
- Add the vanilla extract and a tablespoon of cream and mix until well combined and smooth.
- Add the rest of the powdered sugar and mix until smooth. Add more cream to get the right consistency.
- Divide the buttercream evenly between two bowls. Color one with orange gel icing color and the other with yellow gel icing color.
- To make the two-toned frosting, add each color of frosting to a Ziplock bag. Lay a piece of clear wrap out on the counter. Trim the corner off of each Ziplock bag. Pipe a thick row of each color of frosting side-by-side onto the clear wrap.
- Fold the clear wrap over into a long log. Twist both ends closed and trim off one end so that the frosting is right at the edge.
- Put the log into a piping bag with the open end of the log going into the piping tip. I used piping tip Ateco 844. Pipe swirls of frosting around the outer edge of the cake. Decorate with additional candy corn and chocolate chips, if desired.
- Store cookie cake in an airtight container at room temperature for up to 48 hours, in the fridge for 3-4 days or in the freezer for up to 3 months. Cookie cake is best if eaten within 3-4 days.