Easy Mediterranean Orzo Salad Recipe
You know those recipes that just *feel* like home? The ones you return to again and again, not just because they taste good, but because they’re tied to memories? This Zucchini Bread is that for me. It’s the kind of recipe that fills your kitchen with the most incredible aroma, making everyone hover around the oven, impatiently waiting. It’s not just *any* zucchini bread, mind you. I’ve tinkered with this for years, and I finally landed on *the* version. It’s so unbelievably moist, packed with warm spices, and has this subtle sweetness that’s just perfect. Forget those dry, crumbly versions you might have tried; this one is a game-changer. It’s honestly my go-to when I need a little pick-me-up, or when I have a bunch of zucchini from the garden I need to use up. It’s like a warm hug in cake form, and trust me, once you try it, you’ll understand why it’s earned a permanent spot in my recipe binder.
What is Zucchini bread?
So, what exactly *is* this magical thing called zucchini bread? At its heart, it’s a quick bread, meaning it uses chemical leaveners like baking soda or baking powder instead of yeast. The star ingredient, of course, is zucchini. Now, I know what you might be thinking – zucchini? In a sweet bread? But here’s the secret: when grated, zucchini adds an incredible amount of moisture and a super tender crumb without imparting any strong vegetable flavor. It’s essentially a delicious cake batter that happens to have a healthy dose of fresh zucchini. Think of it as a sweet, spiced loaf that’s perfect for breakfast, a snack, or even dessert. It’s not a fussy dessert, either. It’s the kind of thing you can whip up on a Tuesday afternoon and have ready to go for that 10 pm craving. It’s a bit like a more wholesome, subtly spiced banana bread, but with that extra boost of moisture from the zucchini that makes it truly special.
Why you’ll love this recipe?
Honestly, there are so many reasons why this zucchini bread recipe has become my absolute favorite, and I think you’ll fall in love with it too. First off, the flavor! It’s just heavenly. You get that warm hug of cinnamon and nutmeg, a hint of vanilla, and the sweetness is perfectly balanced. It’s not overly sweet, which is a big plus for me. Then there’s the texture. Oh my goodness, the texture! It’s unbelievably moist and tender, thanks to that grated zucchini. I’ve tested this with different types of oil, and I always come back to a neutral one like canola or vegetable oil because it truly lets the other flavors shine without being heavy. Another thing I adore is how budget-friendly it is. Most of the ingredients are pantry staples, and zucchini itself is usually quite affordable, especially when it’s in season. This recipe is a lifesaver on busy nights when I want to bake something delicious without a lot of fuss. Plus, it’s incredibly versatile! I’ll get to more on that later, but you can add chocolate chips, nuts, or even a swirl of cream cheese if you’re feeling fancy. What I love most, though, is how forgiving it is. Even if you’re a beginner baker, you’re going to nail this. It’s the kind of bake that always turns out, and it makes my whole house smell amazing. It’s definitely a crowd-pleaser; my kids ask for this all the time, and it’s always the first thing to disappear at potlucks!
How do you make Zucchini bread?
Quick Overview
Making this incredible zucchini bread is surprisingly simple. You’ll basically whisk together your dry ingredients, then your wet ingredients, and then combine them with the grated zucchini. Pour it all into a prepared loaf pan and bake until golden and a toothpick comes out clean. The beauty of this recipe is that it comes together in one bowl (well, two, if you count the wet and dry separately!) and requires no special equipment. It’s a straightforward process that yields maximum deliciousness with minimal effort, making it perfect for any day of the week.
Ingredients
For the Main Batter:
2 cups all-purpose flour – I always use unbleached flour for a better texture, but all-purpose works perfectly fine.
1 teaspoon baking soda – This is crucial for that lovely lift.
1/2 teaspoon salt – Balances out the sweetness and enhances the flavors.
1 teaspoon ground cinnamon – The backbone of that warm, cozy flavor.
1/2 teaspoon ground nutmeg – Just a whisper adds so much depth!
1/4 teaspoon ground cloves (optional, but highly recommended!) – If you like a bit more spice, add this. It’s my little secret.
1 1/2 cups granulated sugar – For sweetness. You can reduce it slightly if you prefer, but this is my tested sweetness level.
2 large eggs – Room temperature is best; they incorporate more easily.
1 cup neutral oil (like vegetable or canola) – This is the key to ultimate moistness! You can use melted butter, but oil keeps it moist for longer.
1 teaspoon vanilla extract – A must for any good baked good.
2 cups grated zucchini (about 2 medium zucchinis) – Make sure to squeeze out the excess moisture; I’ll explain how below!
For the Filling (Optional, but oh so good!):
1/2 cup chopped walnuts or pecans – Toasted, if you have the time, for extra flavor.
1/2 cup chocolate chips (semi-sweet or dark work best) – My kids *insist* on these! They melt into gooey pockets of happiness.
1 teaspoon ground cinnamon – To mix with the nuts and chocolate for an extra cinnamon punch.
For the Glaze (Optional, but makes it extra special!):
1 cup powdered sugar – Sifted to avoid lumps.
2-3 tablespoons milk (or almond milk for extra creaminess!) – Start with 2 and add more until you reach your desired consistency.
1/2 teaspoon vanilla extract – Enhances the sweetness.
Step-by-Step Instructions
Step 1: Preheat & Prep Pan
First things first, get your oven preheated to 350 degrees Fahrenheit (175 degrees Celsius). While the oven is heating up, grease and flour a standard 9×5 inch loaf pan. I like to line the bottom with parchment paper too, with a little overhang on the sides. This makes it SO much easier to lift the loaf out once it’s baked, preventing any sticking disasters. This little step has saved me so much heartache over the years!
Step 2: Mix Dry Ingredients
In a large bowl, whisk together your flour, baking soda, salt, cinnamon, nutmeg, and cloves (if using). Give it a good whisking to make sure everything is evenly distributed. This step ensures your leavening agents and spices are spread out so you don’t get pockets of salt or baking soda. It also helps to aerate the flour a bit.
Step 3: Mix Wet Ingredients
In a separate medium bowl, whisk together your granulated sugar and eggs until well combined. Then, slowly pour in the oil while whisking continuously. Stir in the vanilla extract. You want this mixture to be smooth and emulsified. Don’t overmix, just get it combined.
Step 4: Combine
Now, pour the wet ingredients into the bowl with the dry ingredients. Using a spatula or wooden spoon, gently fold them together until *just* combined. It’s super important not to overmix here! You don’t want to see streaks of dry flour, but a few small lumps are totally okay. Overmixing develops the gluten too much, which can lead to a tough bread.
Step 5: Prepare Filling
If you’re adding the optional filling (and I highly recommend it!), now’s the time to gently stir in your chopped nuts and chocolate chips. I like to toss them with a teaspoon of cinnamon before adding them to the batter. This helps them distribute evenly and adds another layer of flavor. Again, fold them in gently.
Step 6: Layer & Swirl
Add the grated and squeezed zucchini to the batter. Fold it in until it’s just incorporated. The batter will be thick. Now, carefully spoon the batter into your prepared loaf pan, spreading it out evenly. If you’re feeling adventurous and want a swirl effect (which looks lovely!), you can sometimes reserve a small portion of the batter and swirl in some extra cinnamon or cocoa powder, then dollop it on top and swirl gently with a knife. For this recipe, though, I usually just fold it all in for a uniform texture.
Step 7: Bake
Pop the loaf pan into your preheated oven. Bake for 50-65 minutes. The exact time can vary depending on your oven. You’ll know it’s done when the top is golden brown and a wooden skewer or toothpick inserted into the center comes out clean, or with just a few moist crumbs attached (no wet batter!). If the top is browning too quickly, you can loosely tent it with foil for the last 10-15 minutes.
Step 8: Cool & Glaze
Once baked, let the zucchini bread cool in the pan for about 15-20 minutes. This allows it to set up properly. Then, use the parchment paper overhang to carefully lift the loaf out of the pan and place it on a wire rack to cool completely. This is important – if you glaze it while it’s hot, the glaze will just melt off. Once it’s *completely* cool, you can whip up the glaze by whisking together the powdered sugar, milk (or almond milk!), and vanilla extract until smooth. Drizzle it over the top, letting it drip down the sides. It adds a touch of sweetness and makes it look so pretty!
Step 9: Slice & Serve
Once the glaze has set a bit, slice into your beautiful zucchini bread. I find a serrated knife works best for clean slices. Enjoy it at room temperature! The smell alone is enough to make your mouth water. It’s perfect as is, or with a nice cup of coffee or tea.
What to Serve It With
This zucchini bread is so versatile, it’s practically a culinary chameleon! For a simple and satisfying breakfast, I love slicing it and serving it warm with a dollop of cream cheese or a smear of butter. It pairs wonderfully with a hot cup of coffee or a refreshing glass of orange juice. For a more leisurely weekend brunch, I’ll often toast slices and serve them alongside scrambled eggs, bacon, or fresh fruit salad. It adds a lovely sweet element to balance out the savory dishes. As a dessert, it’s fantastic on its own, but for something a little more decadent, a drizzle of chocolate ganache or a scoop of vanilla bean ice cream takes it to the next level. My kids’ favorite way to have it is as a cozy snack after school. I’ll just cut a thick slice and they’re happy as can be. It’s also lovely with a warm apple cider in the fall or iced tea in the summer. Honestly, any time you’re craving something a little sweet and comforting, this zucchini bread fits the bill perfectly!
Top Tips for Perfecting Your Zucchini Bread
Over the years of making this recipe countless times, I’ve picked up a few tricks that I think are really worth sharing. They’re the little things that take your zucchini bread from good to absolutely phenomenal.
Zucchini Prep: This is probably the most important step. You absolutely must squeeze out the excess moisture from your grated zucchini. Use a fine-mesh sieve and a spatula, or even just your clean hands, to press out as much liquid as you can. If you skip this, you’ll end up with a gummy, heavy bread. I usually grate my zucchini into a colander set over a bowl, let it sit for about 10 minutes, then give it a good squeeze. Fresh zucchini is best, but if you’re using frozen, make sure it’s thawed and squeezed out *very* well.
Mixing Advice: Remember that rule about not overmixing? It’s really key here. Mix the wet and dry ingredients until they’re *just* combined. A few streaks of flour are fine; they’ll disappear as you fold in the zucchini. Overmixing develops the gluten in the flour, which can result in a tough, dense loaf instead of a tender, moist one. Gentle folding is your friend!
Swirl Customization: While this recipe is fantastic folded together, if you’re feeling artsy and want a swirl, here’s a quick tip. Divide your batter in half. Mix a tablespoon of cocoa powder and a tablespoon of sugar into one half. Spoon half of the plain batter into the pan, then dollop the chocolate batter over it, and top with the remaining plain batter. Use a knife or skewer to gently swirl the batters together for a marbled effect. It’s beautiful and adds a lovely chocolatey hint.
Ingredient Swaps: I’ve experimented quite a bit! For a richer loaf, you *can* use melted butter instead of oil, but know that the oil will keep it moist for longer. If you want to make it vegan, you can try flax eggs (1 tablespoon flaxseed meal + 3 tablespoons water per egg, let sit for 5 minutes) and use a plant-based milk for the glaze. I’ve also found that adding a bit of unsweetened applesauce alongside the zucchini can boost moisture even further, though it might slightly alter the flavor.
Baking Tips: Every oven is a little different, so get to know yours. Start checking for doneness around the 50-minute mark. If the top is browning too fast, tent it loosely with foil. Placing the loaf pan in the center of the oven usually ensures even baking. For a perfectly golden crust, a good quality loaf pan makes a difference; darker pans tend to brown faster.
Glaze Variations: If you’re not a fan of the sweet glaze, a simple dusting of powdered sugar is lovely. Or, you can try a lemon glaze by mixing powdered sugar with lemon juice instead of milk. For a richer glaze, try using cream cheese mixed with powdered sugar and a splash of vanilla. Experiment with flavor extracts like almond or maple for a twist!
Storing and Reheating Tips
One of the best things about this zucchini bread is how well it keeps! It’s delicious fresh, but often, I think it’s even better the next day once the flavors have had a chance to meld. Here’s how I store it to keep it tasting its best:
Room Temperature: Once the loaf is completely cool, I wrap it tightly in plastic wrap, and then place it in an airtight container or a zip-top bag. It will stay wonderfully moist at room temperature for about 3-4 days. This is how I usually keep it if we’re going to finish it within that time frame.
Refrigerator Storage: If you live in a warmer climate or just want it to last a little longer, you can store it in the refrigerator. Again, wrap it tightly in plastic wrap, then an airtight container. It should keep well for about a week. When you’re ready to eat it, you might want to let it come to room temperature for about 15-20 minutes, or give it a quick toast, as refrigerated baked goods can sometimes be a bit firmer.
Freezer Instructions: This is a lifesaver if you bake a big batch or just want to have some on hand for later. Let the loaf cool completely, then wrap it *very* well in a double layer of plastic wrap, followed by a layer of aluminum foil, or place it in a freezer-safe bag. It can be stored in the freezer for up to 3 months. To thaw, simply unwrap it and let it sit at room temperature for a few hours. You can also warm it gently in a low oven.
Glaze Timing Advice: For room temperature and refrigerator storage, I glaze the loaf *after* it has completely cooled. If I’m freezing it, I usually leave the glaze off until after it’s thawed and I’m ready to serve it. This prevents the glaze from cracking or becoming sticky during freezing and thawing. However, if you can’t resist, you can freeze a glazed loaf, just know the glaze might not look as pristine upon thawing.
Frequently Asked Questions
Final Thoughts
There you have it – my absolute favorite zucchini bread recipe! It’s more than just a recipe to me; it’s a little piece of home, a reliable source of comfort, and a fantastic way to use up those summer zucchini. I truly believe this recipe strikes the perfect balance between moistness, flavor, and ease of preparation. It’s the kind of thing that makes you feel like a baking superstar, even on your busiest days. I hope you give it a try and that it becomes a treasured recipe in your kitchen too. If you love this zucchini bread, you might also enjoy my incredibly moist banana bread or my easy one-bowl blueberry muffins. They’re all designed with that same spirit of deliciousness and simplicity in mind.
I can’t wait to hear what you think! If you make this, please leave a comment below and let me know how it turned out. Feel free to share any variations or your favorite additions – I love hearing how you all adapt recipes! And if you’re sharing photos, be sure to tag me!
Happy baking!
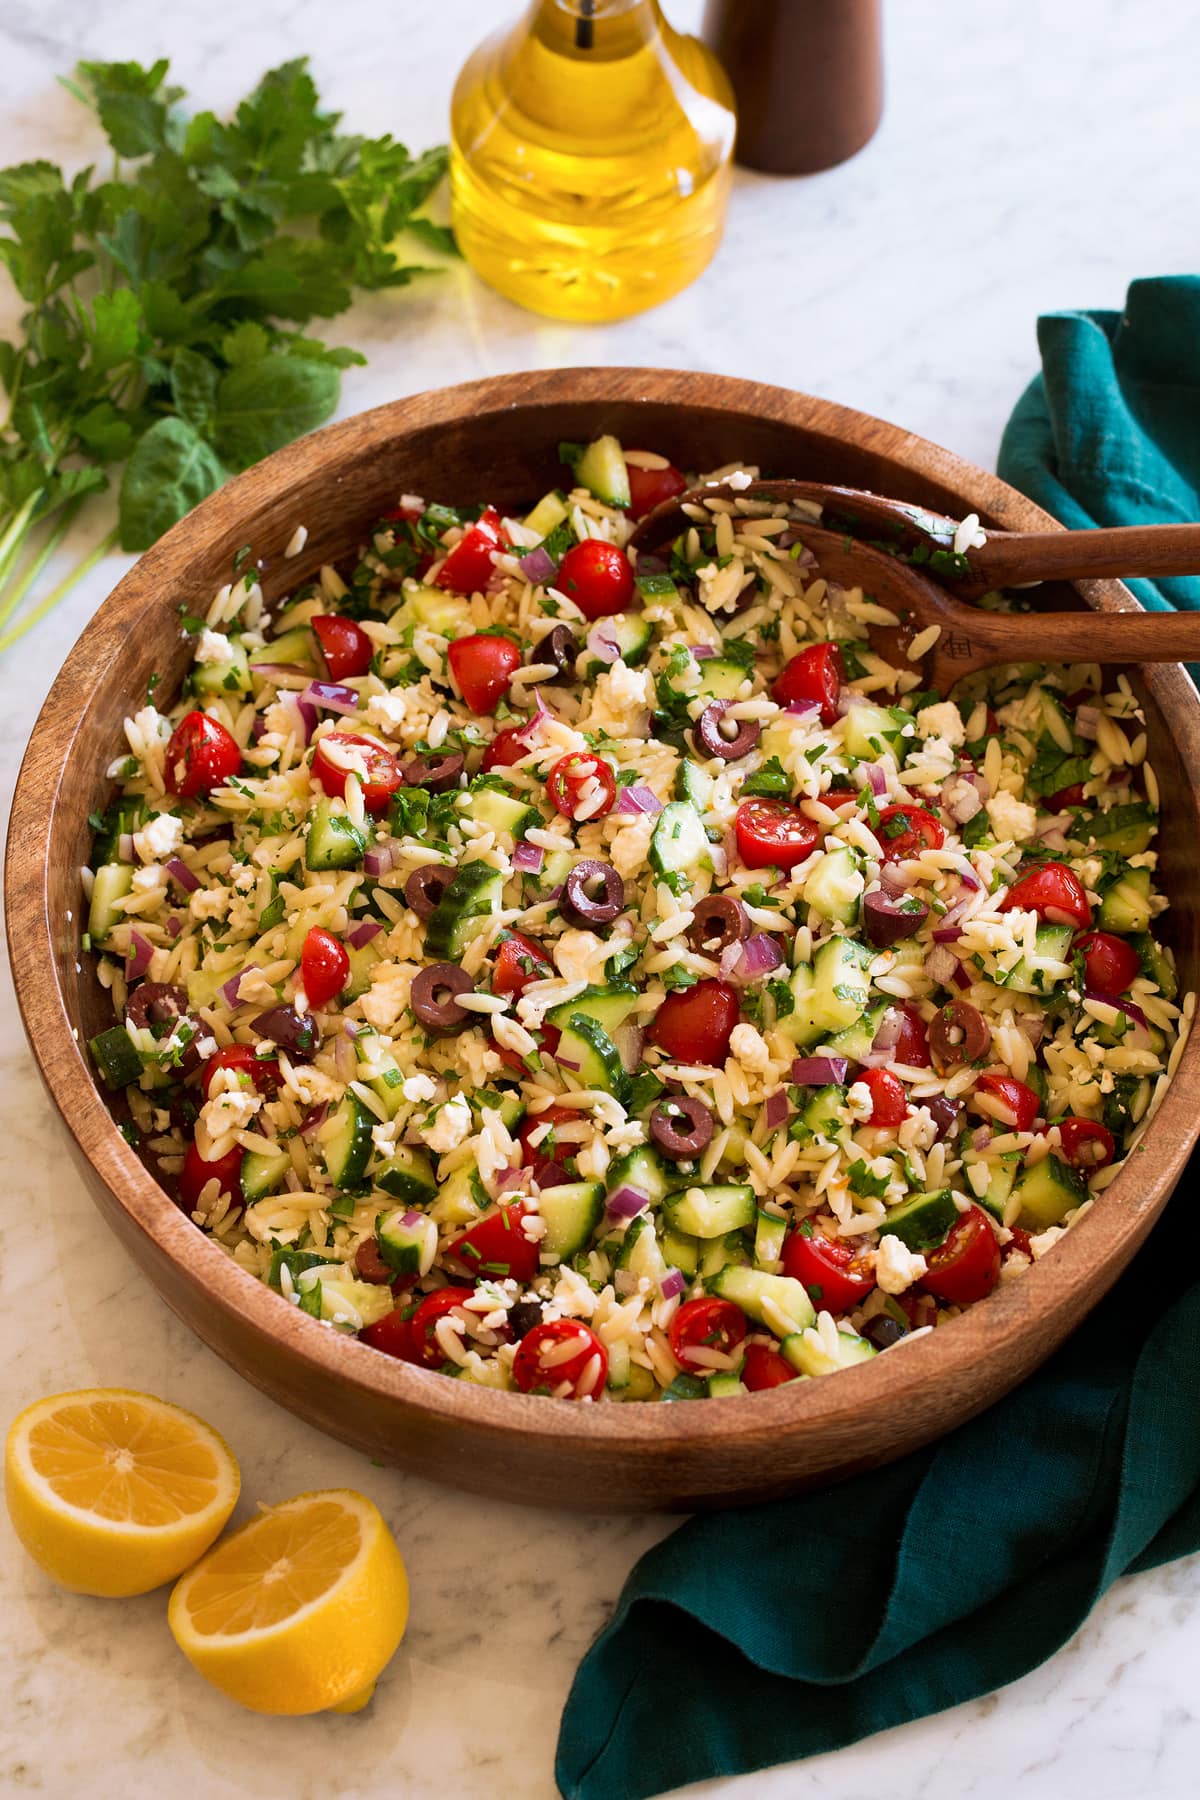
Greek Orzo Salad
Ingredients
Method
- In a medium mixing bowl, whisk together olive oil, lemon juice, and minced garlic. Season with salt and pepper to taste. Set aside.
- Cook orzo according to package directions until al dente, or just 1 minute shy. Drain and rinse under cold water for about 10 seconds. Drain well.
- Add the cooked orzo, feta cheese, diced cucumber, halved grape tomatoes, sliced olives, chopped red onion, fresh basil, and fresh parsley to a large bowl. Toss to combine.
- Pour the prepared dressing over the salad and toss gently to evenly coat all ingredients.
- Store in the refrigerator for up to 2 days.