Easy Cauliflower Taco Filling Recipe
Okay, so imagine this: it’s a lazy Sunday morning, the sun is just starting to peek through the kitchen window, and the smell of something warm, sweet, and utterly comforting is wafting through the air. That’s the magic of this zucchini bread. It’s not just *any* zucchini bread, mind you. This is the one that disappeared in minutes at my house, the one my kids beg for, the one that’s become my go-to for potlucks and quiet afternoon treats. Honestly, if you’ve ever had a zucchini bread that was just… okay… and wondered what the fuss is about, this is the recipe that will make you a believer. It’s like a hug in loaf form, and it’s surprisingly simple to pull off, even if you’re not a seasoned baker. It’s got that perfect balance of moist crumb, subtle sweetness, and just enough spice to make you close your eyes with delight.
What is Zucchini bread?
So, what exactly *is* this glorious thing we call zucchini bread? At its heart, it’s a quick bread, which means no fussy yeast or long proofing times. Think of it as a super moist, slightly sweet cake that happens to have shredded zucchini as its secret ingredient. The zucchini, when baked, melts into the batter, adding incredible moisture and a tender crumb without any noticeable zucchini flavor. It’s kind of a culinary magic trick! The name itself is pretty straightforward – it’s bread made with zucchini. But don’t let the humble name fool you. This isn’t your grandma’s (unless your grandma was a baking genius!) dense, bland quick bread. This is light, fluffy, and packed with so much flavor, you’ll forget there’s a vegetable in it. It’s the perfect example of how simple, fresh ingredients can transform into something truly spectacular.
Why you’ll love this recipe?
What are some good reasons to make zucchini bread?flavor is just out of this world. It’s not overly sweet, which I really appreciate. You get a lovely warmth from the cinnamon and nutmeg, a little hint of vanilla, and that amazing moist texture that only zucchini can provide. It’s honestly addictive! Then there’s the simplicity. This recipe is a lifesaver on busy weeknights or when you have unexpected guests. You can whip it up in under 20 minutes of active time, and the rest is hands-off baking. It’s one of those recipes I can make with my eyes half-closed. And let’s talk about Cost-efficiency: What is the best way to measure cost-efficiency?! Zucchini is usually pretty affordable, especially when it’s in season. This recipe uses pantry staples you probably already have, making it a budget-friendly way to create something delicious and impressive. What I love most about this recipe, though, is its versatility. You can easily add chopped walnuts or pecans for a bit of crunch, or even some chocolate chips (my personal guilty pleasure!). It’s also fantastic with a cream cheese frosting or just a simple dusting of powdered sugar. Compared to other quick breads I’ve tried, this one strikes the perfect balance of being satisfyingly moist without being heavy or greasy. It’s a true crowd-pleaser, and I’ve never had anyone guess it was hiding zucchini!
How to Make Zucchini Bread
Quick Overview
The process is incredibly straightforward. You’ll basically mix your dry ingredients together, then your wet ingredients separately, and then combine them gently. While that’s happening, you’ll prepare a simple, delicious filling that gets swirled into the batter for extra pockets of flavor and beauty. Finally, it bakes into a golden-brown masterpiece. What makes this method special is how the ingredients come together to create that signature moist crumb and how the swirl adds a lovely visual element and burst of flavor. It’s designed to be foolproof, even for beginners!
Ingredients
For the Main Batter:
You’ll need 2 cups of all-purpose flour. I always use unbleached all-purpose flour; I find it gives a slightly better texture. Plus, 1 teaspoon of baking soda, which is crucial for that nice lift. Make sure your baking soda is fresh – it makes a huge difference! Then, 1/2 teaspoon of salt to balance out the sweetness, and 1 teaspoon of ground cinnamon and 1/4 teaspoon of ground nutmeg for that cozy spice kick. If you love cinnamon, feel free to add a little more! I also add 1/2 teaspoon of ground ginger sometimes, especially if I’m feeling festive.
For the Wet Ingredients:
This is where the moisture comes from! You’ll need 3 large eggs, lightly beaten. I always let my eggs sit out for about 10-15 minutes before using them; room temperature eggs incorporate better. Then, 1 cup of granulated sugar. You can reduce this slightly if you prefer it less sweet, but I find this amount perfect. And 1/2 cup of melted unsalted butter. Unsalted butter lets you control the salt content. I’ve tried this with oil (like vegetable or canola), and it works, but the butter really adds a richness that’s hard to beat. Lastly, and most importantly, 1 1/2 cups of grated zucchini. You don’t need to peel it, just give it a good wash and grate it on the medium holes of your grater. Squeeze out just a little bit of the excess moisture, but not so much that it becomes dry. We want that moisture!
For the Filling:
This is the little surprise that makes it extra special! You’ll need 1/2 cup of packed light brown sugar for that caramel-y goodness, 1 tablespoon of all-purpose flour to help bind it, 1 teaspoon of ground cinnamon, and a pinch of salt. If you’re feeling adventurous, add 1/2 cup of chopped walnuts or pecans to this mixture. It adds a lovely crunch!
Step-by-Step Instructions
Step 1: Preheat & Prep Pan
First things first, get that oven preheating to 350 degrees Fahrenheit (175 degrees Celsius). This is super important because you want the oven to be nice and hot when the batter is ready. Now, grab a standard 9×5 inch loaf pan. I like to grease mine really well with butter or non-stick spray, and then dust it with a little flour. This makes sure your beautiful loaf pops out easily without any sticking. You can also line it with parchment paper if you’re worried about sticking – that’s an easy way to get it out too!
Step 2: Mix Dry Ingredients
In a large bowl, whisk together the all-purpose flour, baking soda, salt, cinnamon, and nutmeg. Whisking them together first ensures that the leavening agent (baking soda) and spices are evenly distributed throughout the flour. This helps guarantee an even rise and consistent flavor in every bite. You want to see no lumps of baking soda or spice.
Step 3: Mix Wet Ingredients
In a separate medium bowl, whisk together the lightly beaten eggs, granulated sugar, and melted butter. Make sure the melted butter isn’t too hot, or it could scramble the eggs. Whisk until everything is well combined and the mixture is smooth. The color should be a pale yellow.
Step 4: Combine
Now, pour the wet ingredients into the bowl with the dry ingredients. Using a rubber spatula or a wooden spoon, gently fold everything together until *just* combined. It’s really important not to overmix here! A few streaks of flour are okay. Overmixing develops the gluten in the flour, which can lead to a tough, dense loaf, and we definitely don’t want that. Once it’s mostly combined, add your grated zucchini and fold it in gently until it’s just distributed.
Step 5: Prepare Filling
While your oven is doing its thing, let’s make that yummy filling. In a small bowl, combine the packed light brown sugar, flour, cinnamon, and pinch of salt. Stir it all up until it’s well mixed. If you’re adding nuts, stir them in now. This mixture is going to create those delightful pockets of spiced goodness throughout your bread.
Step 6: Layer & Swirl
Now for the fun part! Pour about half of the zucchini batter into your prepared loaf pan. Sprinkle about half of the brown sugar filling mixture evenly over the batter. Then, spoon the remaining batter over the filling. Finally, sprinkle the rest of the filling mixture on top. To create those beautiful swirls, you can use a knife or a skewer to gently swirl the filling into the batter. Don’t overdo it; just a few passes should do the trick to create pretty patterns without mixing everything together completely.
Step 7: Bake
Pop that pan into your preheated oven. Bake for about 50 to 65 minutes. The exact time can vary depending on your oven, so keep an eye on it! The best way to check if it’s done is to insert a toothpick or a thin skewer into the center. If it comes out clean, or with just a few moist crumbs attached (not wet batter!), it’s ready. If it’s still gooey, give it another 5-10 minutes and check again. You want that lovely golden-brown crust!
Step 8: Cool & Glaze
Once it’s baked to perfection, take the loaf pan out of the oven and let it cool in the pan on a wire rack for about 15-20 minutes. This allows the bread to set up a bit. After that, carefully invert the pan to remove the loaf and let it cool completely on the wire rack before slicing. If you’re adding a glaze (and I highly recommend it!), wait until the bread is completely cool. For a simple glaze, I usually mix about 1 cup of powdered sugar with 2-3 tablespoons of milk or lemon juice until it’s a pourable consistency. You can also add a touch of vanilla extract.
Step 9: Slice & Serve
Once it’s fully cooled and glazed (if you’re using one), it’s time to slice and enjoy! Use a serrated knife for clean cuts. This bread is absolutely delicious on its own, but I love it served with a nice cup of coffee or tea. It’s also fantastic with a dollop of whipped cream or a scoop of vanilla ice cream if you’re serving it as a dessert!
What to Serve It With
This zucchini bread is so versatile, it can be enjoyed at any time of day and with almost anything! For breakfast, a thick slice toasted lightly is pure heaven, especially with a smear of butter. It pairs beautifully with a strong cup of coffee or a refreshing glass of orange juice. My kids sometimes grab a piece as they’re heading out the door for school, and it keeps them satisfied until lunch. For a more relaxed brunch, I love to serve it alongside fresh fruit salad, yogurt parfaits, or even a savory egg dish. A drizzle of honey over the top makes it feel a bit more elegant. When I’m craving something sweet for dessert, this zucchini bread is a winner. It’s wonderful warmed up slightly and served with a scoop of vanilla bean ice cream or a dollop of crème fraîche. The warmth of the bread and the cool ice cream is just divine. And for those cozy snacks when you just need something comforting, a thick slice, maybe with a glass of milk, is perfection. It’s that kind of treat that warms you from the inside out.
Top Tips for Perfecting Your Zucchini Bread
I’ve made this zucchini bread more times than I can count, and over the years, I’ve picked up a few tricks that make a world of difference. For zucchini prep, don’t go overboard squeezing out all the moisture. You want some of that natural moisture to keep the bread tender. Just a gentle squeeze is perfect. Also, grating it on the medium holes of your box grater gives you nice pieces that distribute well without making the batter too watery. For mixing advice, seriously, don’t overmix! Once you combine the wet and dry ingredients, stop as soon as you don’t see large streaks of dry flour. A few small ones are fine, they’ll disappear during baking. Overmixing is the enemy of tender quick breads. When it comes to swirl customization, my advice is to keep it simple. You want distinct layers of filling, not a muddy mess. Just a few gentle passes with a knife or skewer are enough to create a beautiful marbled effect. If you want bolder colors, you could even divide the filling and add a drop of food coloring to one half! For ingredient swaps, if you don’t have butter, you can use a neutral-flavored oil like vegetable or canola oil (about 1/2 cup), though I find butter gives a richer flavor. For the nuts in the filling, feel free to use pecans, almonds, or even skip them if you prefer. And if you don’t have brown sugar for the filling, you can use granulated sugar, but it won’t have quite the same depth of flavor. When it comes to baking tips, always use the center rack of your oven. This ensures even heat circulation. If your loaf is browning too quickly on top before the center is cooked, you can loosely tent it with aluminum foil for the last 15-20 minutes of baking. For glaze variations, if you want a less sweet glaze, use less powdered sugar and more liquid. For a tangier glaze, a tablespoon of lemon juice or sour cream can be added. You can also skip the glaze entirely and just dust with powdered sugar once it’s cooled!
Storing and Reheating Tips
Storing this delicious zucchini bread is pretty straightforward, and it stays wonderfully moist. At room temperature, I find it’s best to store it in an airtight container or wrap it tightly in plastic wrap. It will stay fresh and delicious for about 2-3 days. Any longer than that, and it’s best to move it to the refrigerator. For refrigerator storage, wrap the cooled loaf tightly in plastic wrap, then place it in an airtight container or a zip-top bag. It should last for about a week in the fridge, though the texture might change slightly. If it feels a bit dry when you take it out, a quick toasting usually fixes that right up! For freezer instructions, this bread freezes beautifully. Once completely cooled, wrap the loaf very tightly in plastic wrap, then in aluminum foil, or place it in a freezer-safe bag. It can be frozen for up to 3 months. To thaw, remove it from the freezer and let it come to room temperature on the counter. If you want to revive it a bit, you can slice it and gently warm it in a toaster oven or a low oven for a few minutes. For glaze timing advice, always apply the glaze *after* the bread has completely cooled. If you glaze it while it’s warm, the glaze will melt and become a sticky mess. If you’re freezing the loaf, I usually recommend glazing it *after* it’s thawed and before serving. This keeps the glaze looking its best.
Frequently Asked Questions
Final Thoughts
So there you have it! My absolute favorite zucchini bread recipe. It’s a recipe that’s woven into the fabric of our family meals, and I truly believe it’s a recipe that will bring a little extra joy to your kitchen too. It’s that perfect blend of comforting, delicious, and remarkably easy to make. The moistness from the zucchini, the warm spice, and that delightful swirl make it stand out from any other quick bread. If you love this recipe, you might also enjoy my Easy Banana Bread or my Fluffy Blueberry Muffins, which share a similar easy-going, delicious vibe. Give this zucchini bread a try; I promise you won’t regret it! I can’t wait to hear what you think and how yours turns out. Don’t be shy about leaving a comment below with your own tips or variations!
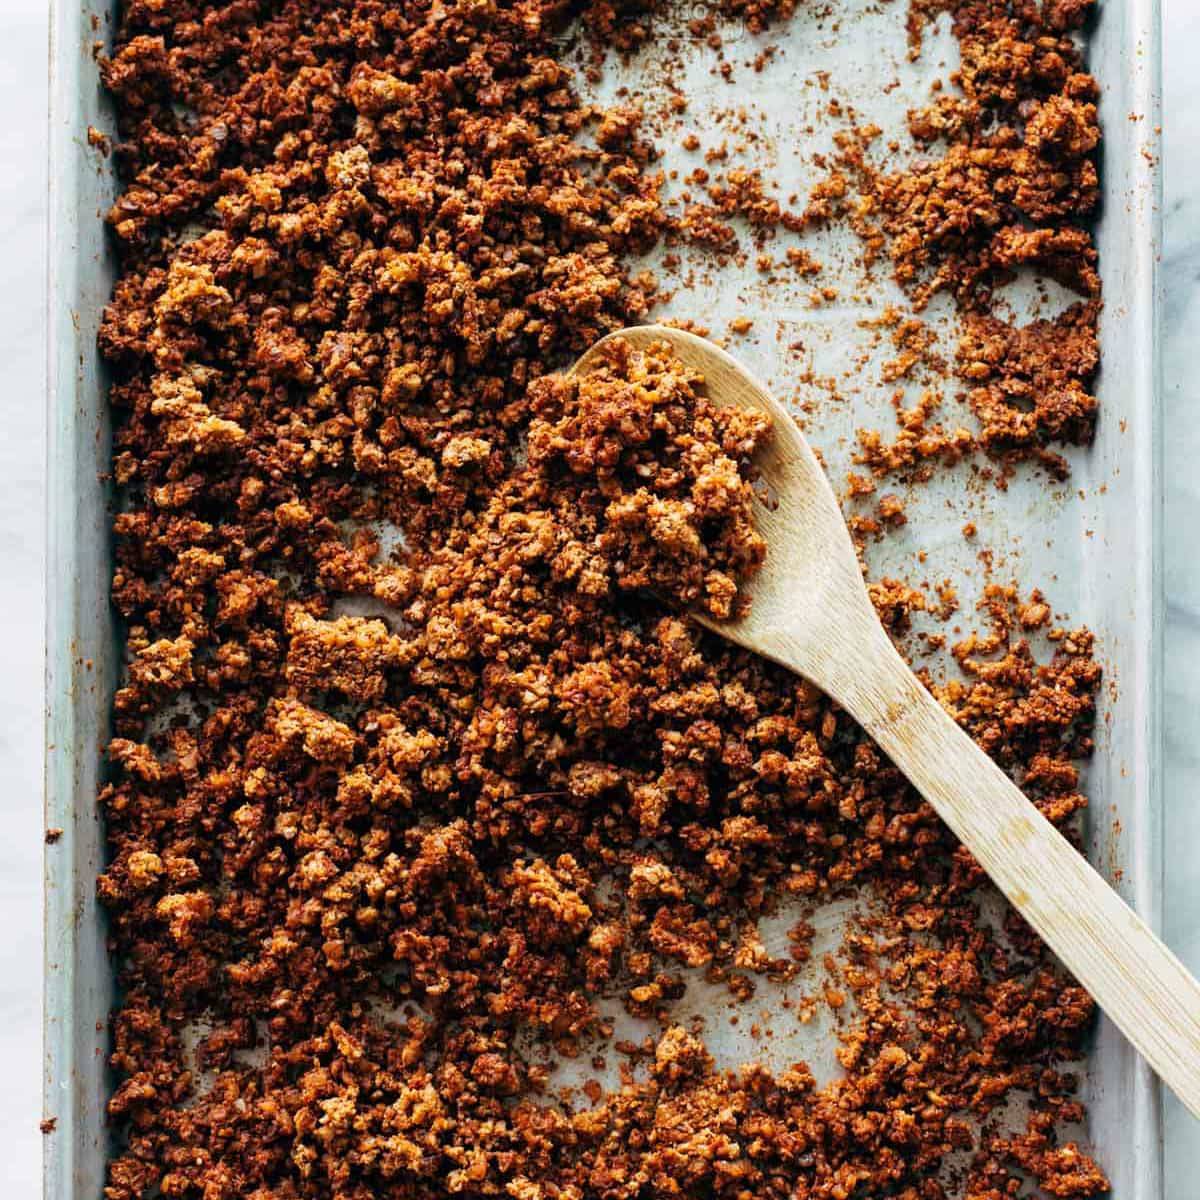
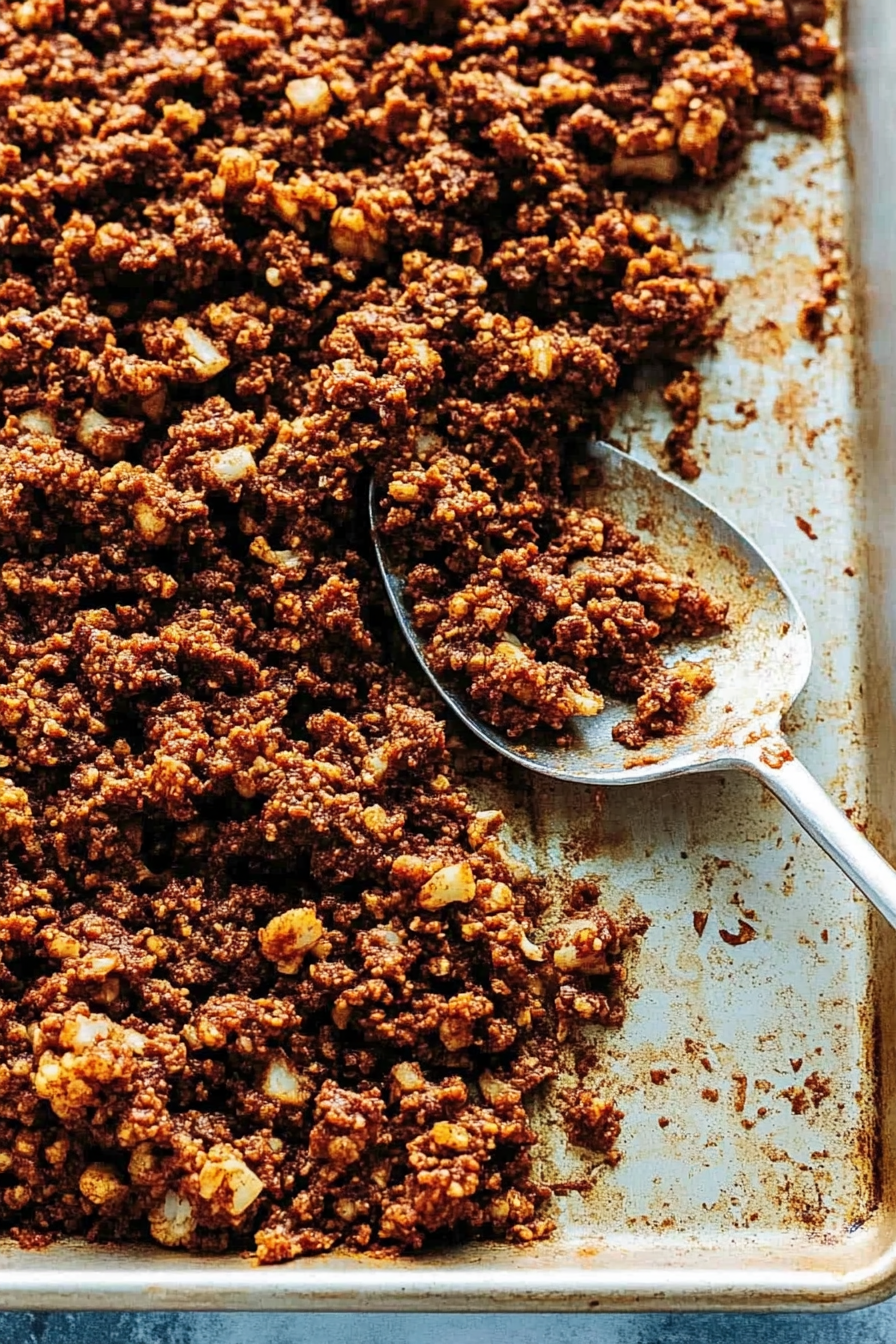
Cauliflower Walnut Taco Filling
Ingredients
Method
- Preheat the oven to 375 degrees F. Pulse cauliflower, walnuts, chipotles, chili powder, cumin, salt, lime juice, garlic/onion powder, and cayenne pepper in a food processor until the mixture is evenly ground.
- Transfer the mixture to a greased baking sheet. Bake for 30 minutes, stirring halfway through to prevent over-browning.
- Serve in tacos, burritos, quesadillas, bowls, or any other way you like!