Fudgy Chocolate Pie Recipe
Okay, confession time. For years, I was *that* person who’d eye zucchini with suspicion, especially when it came to baking. It seemed… well, watery. A bit bland. How could something so unassuming possibly transform into a delicious baked good? But then, my neighbor, bless her heart, brought over a loaf of her famous zucchini bread, and my whole perspective shifted. The aroma alone was enough to pull me in – warm, sweet, with just a hint of spice. And the taste? Oh, the taste! It was incredibly moist, not dense at all, and packed with this comforting, familiar flavor that just screamed “cozy afternoon.” It tasted so incredibly good, I honestly couldn’t believe it was made with zucchini. This recipe, my friends, is that very same magic. It’s become my go-to when I have a surplus of zucchini from the garden, and honestly, it’s a lifesaver on busy nights when the kids are clamoring for a treat but I don’t have hours to dedicate to elaborate baking. It’s almost foolproof, and the results are consistently, wonderfully delicious. It’s right up there with my classic chocolate chip cookies, but with a wholesome twist that makes me feel just a little bit virtuous.
What is Zucchini bread?
So, what exactly *is* zucchini bread? At its heart, it’s a quick bread, meaning it uses chemical leaveners like baking soda and baking powder instead of yeast, so you don’t have to wait for dough to rise. The star ingredient, zucchini, is grated and mixed into the batter. Now, I know what you might be thinking – zucchini in a sweet bread? It sounds a little odd, right? But here’s the amazing part: when baked, the zucchini essentially melts into the batter, contributing incredible moisture and a subtle, almost undetectable sweetness. It’s like nature’s secret ingredient for creating the most tender, moist baked goods. Think of it as a more wholesome, less intensely sweet cousin to banana bread. The name itself is pretty straightforward – it’s bread, and it has zucchini in it! It’s typically spiced with cinnamon, sometimes nutmeg, and often includes additions like chocolate chips or nuts, which really elevate the flavor profile. It’s the perfect way to use up that garden bounty and create something truly special.
Why you’ll love this recipe?
Honestly, where do I even begin with why this zucchini bread recipe is an absolute winner? First off, the flavor is just out of this world. It’s this perfect balance of sweet and spice. The cinnamon really shines through, and if you add nuts or chocolate chips, it just takes it to a whole new level of deliciousness. It’s that comforting, homemade taste that makes you feel all warm and fuzzy inside. But beyond the taste, the simplicity of this recipe is a huge selling point for me. I mean, we’re talking one bowl for the dry, one for the wet, and then just combine. It’s incredibly straightforward, even for beginners. And let’s talk about cost-efficiency, because that’s a big deal for me too. Zucchini is usually pretty affordable, especially when it’s in season, and the other ingredients are pantry staples. So, you get a fantastic, crowd-pleasing treat without breaking the bank. The versatility is another thing I absolutely adore. You can jazz it up with chocolate chips (my kids’ favorite!), walnuts, or even a little swirl of cream cheese. It’s fantastic plain, but it’s also a perfect canvas for other flavors. What I love most about this recipe is how forgiving it is. Even if you’re not a seasoned baker, you’re going to nail this. It’s the kind of recipe that makes you feel like a baking pro without all the fuss. It’s just fundamentally good, honest baking that delivers every single time. It’s way better than those store-bought loaf cakes, and you know exactly what’s going into it. Plus, the smell when it’s baking? Pure magic that fills the whole house!
How do you make Zucchini bread?
Quick Overview
This zucchini bread comes together in a flash! You’ll simply whisk together your dry ingredients, mix your wet ingredients, then gently combine them with the star of the show – freshly grated zucchini. Add in your mix-ins, pour into a loaf pan, and bake until golden and fragrant. The beauty of this recipe is its straightforward nature; no fancy equipment or complicated techniques are needed. It’s the kind of recipe you can whip up on a whim, making it perfect for unexpected guests or those sudden cravings for something sweet and comforting. You’ll be amazed at how something so simple can yield such an incredibly moist and flavorful result.
Ingredients
For the Main Batter:
This is where the magic starts! You’ll need all-purpose flour, granulated sugar for sweetness, some brown sugar for that lovely caramel note, baking soda and baking powder for lift, salt to balance the flavors, and a good dose of cinnamon and nutmeg for warmth. I always use freshly grated zucchini – it makes a world of difference compared to pre-shredded. Make sure your zucchini is medium-sized and firm; avoid any that are waterlogged. You’ll need about 2 cups, which is usually 2 medium zucchini. I find that not peeling the zucchini gives the bread a nice flecked appearance and adds a bit more fiber, but if you prefer a smoother texture, feel free to peel them first.
For the Filling:
This is where you can really customize! My absolute favorite addition is semi-sweet chocolate chips – they get wonderfully melty and gooey. About a cup is perfect. If you’re more of a nut person, chopped walnuts or pecans are fantastic. Just make sure they’re roughly chopped so you get a nice distribution. For a bit of zing, you could even add some lemon or orange zest to the batter itself. Some people like to add a swirl of cream cheese or even a dollop of jam in the middle before baking for an extra special touch.
For the Glaze:
This is totally optional, but oh-so-good! A simple glaze made with powdered sugar and a little milk or lemon juice adds a lovely sweetness and a pretty finish. You can adjust the consistency by adding more or less liquid. For a richer glaze, try using heavy cream instead of milk. If you prefer less sweetness, you can skip the glaze altogether or just dust the cooled bread with a little powdered sugar. I’ve also experimented with adding a tiny bit of vanilla extract or even a dash of almond extract to the glaze for a different flavor profile.
Step-by-Step Instructions
Step 1: Preheat & Prep Pan
First things first, let’s get your oven ready. I always preheat mine to 350 degrees Fahrenheit (175 degrees Celsius). While that’s warming up, grab a standard 9×5 inch loaf pan. You’ll want to grease it really well and then flour it, or better yet, line it with parchment paper. This step is crucial for ensuring your beautiful loaf doesn’t stick. I usually leave a little overhang with the parchment paper on the sides, which makes it super easy to lift the bread out once it’s baked. Trust me, wrestling a stuck loaf out of the pan is no fun!
Step 2: Mix Dry Ingredients
In a large bowl, whisk together your all-purpose flour, granulated sugar, brown sugar, baking soda, baking powder, salt, cinnamon, and nutmeg. Give it a good whisk to make sure everything is evenly distributed. This is important because it ensures your leavening agents and spices are spread throughout the batter, leading to an evenly risen and flavorful loaf. You want to see no clumps of baking soda or powder. I usually do this step right at the beginning so it’s ready to go when the wet ingredients are mixed.
Step 3: Mix Wet Ingredients
In a separate medium bowl, whisk together your eggs, melted butter (or vegetable oil – I’ve tried both and both work wonderfully!), and vanilla extract. Make sure the melted butter has cooled slightly so it doesn’t scramble the eggs. Whisk until everything is well combined and you have a lovely, emulsified mixture. This is also where I add my grated zucchini. Don’t squeeze the zucchini dry! You want that moisture. Just add it directly to the wet ingredients. The mixture will look a bit chunky with the zucchini, and that’s perfectly fine.
Step 4: Combine
Now for the satisfying part! Pour the wet ingredients (including the zucchini) into the bowl with the dry ingredients. Using a spatula or wooden spoon, gently fold them together. The key here is NOT to overmix. Mix just until there are no dry streaks of flour visible. A few small lumps are okay; overmixing will develop the gluten too much, resulting in a tough, dense bread. Stop mixing as soon as it’s combined. If you’re adding chocolate chips or nuts, gently fold them in now as well.
Step 5: Prepare Filling
If you’re feeling fancy and want to add a swirl or an extra layer of flavor, now’s the time to prepare your filling. For a simple chocolate chip swirl, you might want to reserve about half a cup of chocolate chips and sprinkle them over the batter in the pan before adding the rest of the batter on top, or gently swirl them in with a knife after pouring the batter. If you’re using a cream cheese filling, make sure it’s softened and perhaps mixed with a little sugar and vanilla. This step is entirely optional, but it adds a lovely surprise element to each slice.
Step 6: Layer & Swirl
Pour about half of the batter into your prepared loaf pan and spread it evenly. If you’re doing a swirl, this is when you’d add your cream cheese mixture or jam, dotting it over the batter. Then, spoon the remaining batter on top, spreading it to cover. If you’re using a swirl filling, now is the time to gently swirl it through the top layer of batter with a knife or skewer, being careful not to overmix. For chocolate chips, I usually just mix them all into the batter in the previous step, but you could also sprinkle some on top for visual appeal.
Step 7: Bake
Pop that beautifully prepared loaf pan into your preheated oven. Bake for about 55-70 minutes. The exact time can vary depending on your oven, so keep an eye on it. You’ll know it’s done when a wooden skewer or toothpick inserted into the center comes out clean, with maybe just a few moist crumbs attached. The top should be golden brown and the edges should be pulling away slightly from the sides of the pan. If the top starts to brown too quickly before the inside is cooked, you can loosely tent it with aluminum foil.
Step 8: Cool & Glaze
Once it’s baked, take the loaf pan out of the oven and let the bread cool in the pan for about 10-15 minutes. This allows it to set up a bit. Then, carefully invert the pan to remove the loaf. If you used parchment paper, you can easily lift it out. Transfer the loaf to a wire rack to cool completely. This is super important! Trying to glaze a warm loaf will result in a melty, sticky mess. Once it’s completely cool, you can prepare your glaze. Whisk together powdered sugar with a little milk or lemon juice until it’s a pourable consistency. Drizzle it over the top of the cooled loaf and let it set.
Step 9: Slice & Serve
Once the glaze (if using) has set, it’s time for the best part! Using a sharp knife, slice the zucchini bread into nice thick slices. It’s delicious served at room temperature. I find it’s perfect on its own, but it’s also lovely with a smear of butter. For a more decadent treat, a dollop of whipped cream or even a scoop of vanilla ice cream alongside it is divine. The smell alone as you slice into it is enough to make your mouth water. Enjoy every single bite!
What to Serve It With
This amazing zucchini bread is so versatile, it fits in beautifully with almost any meal or occasion. For a simple breakfast, I love it toasted and served with a mug of hot coffee or a glass of cold milk. It’s not overly sweet, so it’s a perfectly acceptable morning treat! For a more festive brunch, I’ll often cut it into smaller, more elegant squares and arrange them on a platter alongside fresh fruit salad, yogurt parfaits, and maybe some mini quiches. It adds a lovely homemade touch to the spread. As a dessert, it’s fantastic on its own, especially with that simple glaze. But if you want to go all out, serve a warm slice with a scoop of good quality vanilla bean ice cream or a drizzle of caramel sauce. It’s also absolutely perfect for those cozy afternoon or evening snacks. When the weather turns cooler, or when I’m just craving something comforting, a slice of this bread with a cup of tea is pure bliss. My family also loves it as an after-school snack, especially when there are chocolate chips in it – it disappears in minutes!
Top Tips for Perfecting Your Zucchini Bread
Over the years, I’ve learned a few little tricks that I think make a big difference in achieving zucchini bread perfection. First, when it comes to zucchini prep, I always use a box grater with medium-sized holes. Don’t bother squeezing out the excess moisture! That liquid is your friend; it’s what makes the bread so incredibly moist. Just grate it directly into your wet ingredients. For mixing the batter, remember the golden rule of quick breads: do not overmix! Seriously, just stir until you don’t see any dry flour. A few small lumps are perfectly fine and are actually a good thing. Overmixing is the quickest way to get a tough loaf. When it comes to swirling in additions like chocolate chips or nuts, be gentle. You want them distributed, not pulverized. My kids always ask for the chocolate chip version, and I’ve found that folding them in gently at the end works best. If you’re experimenting with ingredient swaps, I’ve had success using half whole wheat flour for a nuttier flavor, but be aware it might make the bread a bit denser. I’ve also tested this recipe with almond milk instead of regular milk in the glaze, and it actually made it even creamier! For baking, always trust the toothpick test. Ovens can be tricky, so if the top is browning too fast, a loose tent of foil will save the day. And for the glaze, consistency is key! Start with less liquid and add more tablespoon by tablespoon until you get that perfect drizzling consistency. If it’s too thin, just add more powdered sugar. Remember, these are just guidelines; the most important ingredient is love (and maybe a good amount of cinnamon!).
Storing and Reheating Tips
This zucchini bread is so good, you’ll probably want to keep it around for a few days! If you’re planning to enjoy it within two to three days, storing it at room temperature is perfectly fine. Just make sure to wrap it tightly in plastic wrap or place it in an airtight container. This will help keep it from drying out. If you think you might have it longer than that, or if your kitchen tends to be warm, I’d recommend refrigerating it. Wrapped well, it will stay fresh in the fridge for up to a week. The flavor actually deepens a bit over a couple of days, which is a nice bonus! For longer storage, this bread freezes beautifully. You can either freeze the whole loaf or slice it first. Wrap individual slices or the whole loaf very tightly in plastic wrap, then in aluminum foil or place them in a freezer-safe bag. It will keep well in the freezer for up to three months. To reheat, if it’s from the fridge, a quick toast in the toaster oven or a warm slice at room temperature is lovely. If it’s from frozen, you can let it thaw on the counter for a bit, or gently warm slices in a toaster oven or microwave (just a few seconds on low power so it doesn’t get rubbery). I usually wait to add the glaze until just before serving if I’m freezing slices, or apply it after it’s thawed and warmed, to keep it looking its best.
Frequently Asked Questions
Final Thoughts
So there you have it – my absolute favorite zucchini bread recipe! I truly hope you give this one a try. It’s more than just a recipe; it’s a little piece of comfort that I’m so happy to share. It’s proof that sometimes the most humble ingredients can create something truly spectacular. It’s the perfect way to use up that garden zucchini, to bring a little homemade joy into your day, or to simply impress your friends and family with your baking prowess. It’s the kind of recipe that makes you feel good about what you’re serving, and the delicious outcome is always so rewarding. If you love this recipe, you might also enjoy my recipe for the Best Ever Banana Bread or my foolproof Apple Cinnamon Muffins – they have that same cozy, homemade vibe. Please, if you make this zucchini bread, let me know how it turns out in the comments below! I love hearing your stories and seeing your creations. Happy baking, my friends!

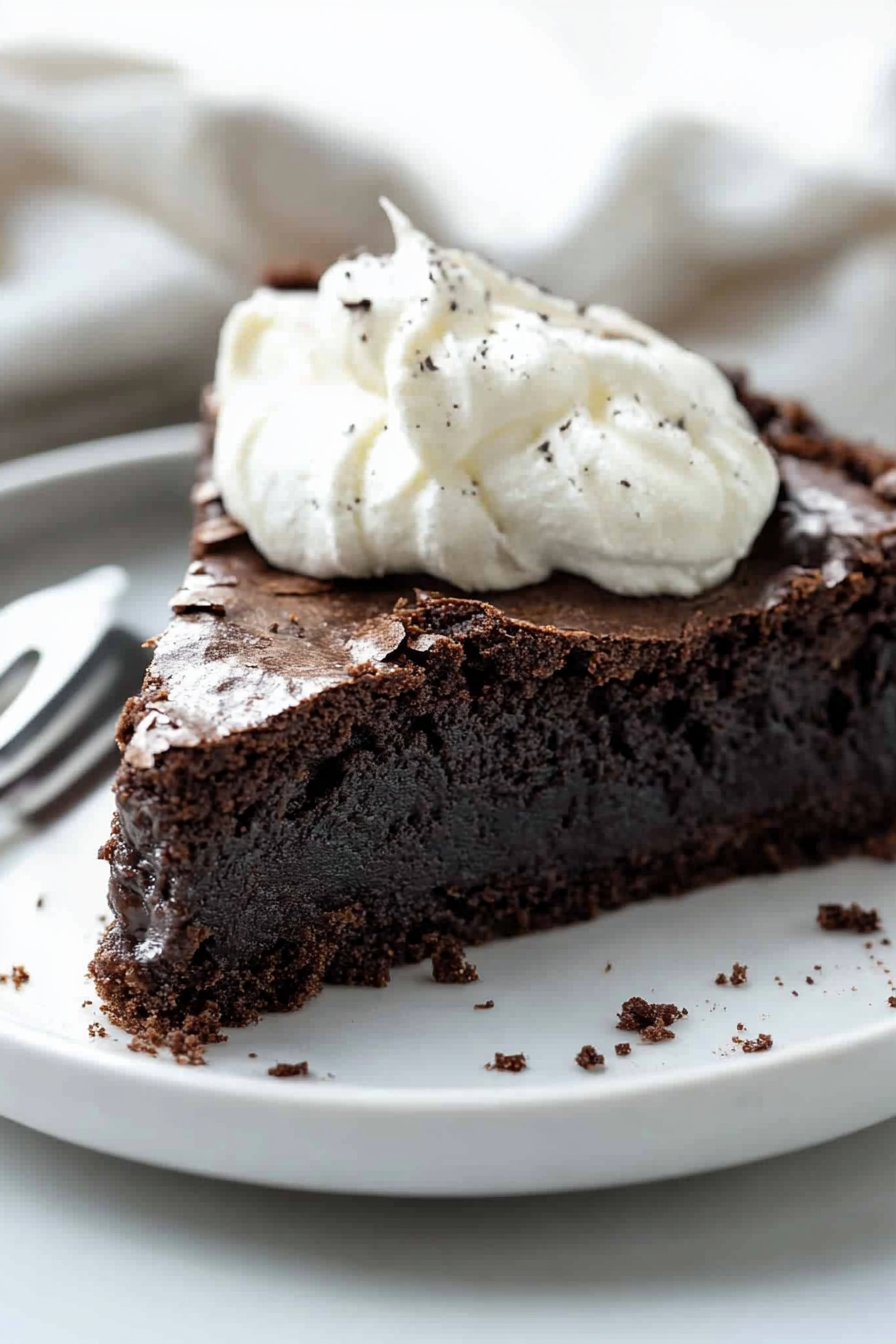
Brownie Pie
Ingredients
Method
- Preheat oven to 350°F (175°C).
- In a medium bowl, combine the crushed Oreo cookies with the melted butter. Mix well with a fork until every crumb is coated in butter.1.5 cups crushed Oreo cookies
- Pour the coated Oreo crumbs into an 8-inch pie dish. Press them flat with your hand, then use the bottom of a glass to press them even flatter and up the sides of the dish. Set aside.
- In a large bowl, whisk together the cocoa powder, all-purpose flour, baking powder, kosher salt, and espresso powder. Set aside.1.5 cups crushed Oreo cookies
- In a large saucepan over medium heat, melt the butter and sugar. Bring to a low boil and cook for 2 minutes, stirring occasionally, until it reaches 230°F (110°C) on an instant-read thermometer.1.5 cups crushed Oreo cookies
- Remove from heat and stir in the chocolate chips and vanilla extract until completely melted. The mixture may still be slightly grainy. Let cool for about 10 minutes.1.5 cups crushed Oreo cookies
- When the chocolate mixture has cooled slightly, add the eggs one at a time, stirring constantly until smooth after each addition.1.5 cups crushed Oreo cookies
- Pour the chocolate mixture into the dry ingredients and mix until just combined. The batter will be very thick.
- Spread the batter evenly into the prepared pie crust. Bake for 30-35 minutes, or until slightly puffed. Remove from oven and let cool completely.
- In a mixing bowl, add the heavy whipping cream. Start mixing at the lowest speed, gradually increasing to medium speed until the cream begins to thicken.1.5 cups crushed Oreo cookies
- Once the cream starts to thicken, stop the mixer. Slowly add the confectioners' sugar and resume mixing, starting on low speed and gradually increasing to medium-high speed until stiff peaks form.1.5 cups crushed Oreo cookies
- Store the whipped topping in the refrigerator if not using immediately. It can be stored for up to 10 hours.
- Top the cooled brownie pie with the homemade whipped topping. Drizzle with chocolate syrup, if desired.1.5 cups crushed Oreo cookies
- Cut into wedges and serve.