Easy Greek Easter Bread Recipe
There’s something I love about baking with zucchini—most folks think of it as just a savory vegetable, but if you use it right, zucchini can make your favorite sweet treats surprisingly moist and tender. This zucchini cinnamon swirl cake feels like a big warm hug on a chilly afternoon. I remember my grandma making a version of this when I was a kid; the smell of cinnamon and toasted walnuts wafting through the house is forever etched in my memory. It’s seriously one of those recipes I keep coming back to, especially when I want something that feels fancy but is actually super easy to throw together. Plus, my kids ask for this all the time—trust me, it disappears in minutes at my house! If you’re looking for a way to sneak veggies into a treat that everyone will love, this is it. And get this—it’s perfect when you’re craving something sweet at 10 pm but don’t want to bake a whole cake. That’s my kind of dessert!
What is a Zucchini cinnamon swirl cake?
Think of this as a cozy, spiced quick bread with a little twist. It’s essentially a moist vanilla batter with grated zucchini folded in, layered with a cinnamon sugar swirl, and topped with a sprinkle of crunchy nuts. The name might sound fancy, but it’s really just a slice of goodness that combines the health benefits of zucchini with the warm spice of cinnamon. The zucchini adds moisture and a little nutrition, but you won’t see or taste it; instead, it melts into the batter, leaving behind a tender crumb. The cinnamon swirl gives it that gorgeous marbled look and a burst of aromatic flavor in every bite. This isn’t just a quick snack or breakfast—it’s a dessert you’ll want to make over and over, especially when the pantry’s looking a little sparse but you still crave something sweet and satisfying. It’s the kind of recipe that feels like a little secret—so simple, yet so special.
Why you’ll love this recipe?
What I love most about this zucchini cinnamon swirl cake is how forgiving and adaptable it is. The flavor is a perfect balance of sweet and spice, with a touch of earthiness from the zucchini that makes it feel nourishing rather than just dessert. It’s incredibly moist—thanks to the zucchini—and stays tender for days, which is honestly rare for baked goods. Plus, it’s budget-friendly because it uses pantry staples—flour, sugar, eggs, and a small zucchini that’s probably already sitting in your produce drawer. My favorite part? The swirl! I always do this when I want a pretty cake that looks fancy without any stress. The cinnamon sugar layer isn’t just delicious—it’s visually appealing too, making each slice a little work of art.
This recipe is a lifesaver on busy nights when you want something homemade but don’t want to spend forever in the kitchen. You can whip up the batter in one bowl, swirl the cinnamon, and bake. I’ve tested this with almond milk, and it actually made it even creamier—so feel free to swap dairy if you prefer. And if you’re a nut lover? Toasted walnuts sprinkled on top are a must. My kids ask for this all the time, and honestly, it’s become a little Sunday tradition in my house. Plus, it’s versatile: serve it as a breakfast loaf, a cozy dessert, or even a midday snack with a cup of tea. It holds well in the fridge and makes for great to-go slices, so I consider it a well-rounded, all-day treat.
How do I make Zucchini Swirl Cake?
Quick Overview
This cake comes together quickly, mostly come down to mixing dry and wet ingredients separately, then folding everything gently. The secret to its texture is shredded zucchini—make sure you drain excess moisture so it doesn’t water down your batter! After pouring half the batter into your prepared pan, sprinkle that cinnamon sugar swirl, add the remaining batter, and swirl again for that pretty marbled effect. It’s a straightforward process—no complicated techniques, just good old-fashioned mixing and layering. Once baked, the aroma alone will draw people into the kitchen faster than you can say “dessert.” Trust me on this—once you try it, it’ll be a go-to for lazy weekends or when you need something sweet but don’t want to fuss too much.
Ingredients
For the Main Batter:
- 1 ½ cups all-purpose flour (I usually use unbleached for a richer flavor)
- 1 teaspoon baking powder
- ½ teaspoon baking soda
- 1 teaspoon ground cinnamon
- ½ teaspoon salt
- ½ cup granulated sugar (or coconut sugar for a bit healthier twist)
- ½ cup light brown sugar
- 2 large eggs
- ½ cup vegetable oil (or melted coconut oil)
- 1 teaspoon vanilla extract
- 1 cup grated zucchini, drained and squeezed of excess moisture
For the Filling:
- ¼ cup granulated sugar
- 1 tablespoon ground cinnamon
- A handful of chopped pecans or walnuts (optional but so good!)
For the Glaze:
- ½ cup powdered sugar
- 1-2 teaspoons milk or cream (adjust for desired consistency)
- ½ teaspoon vanilla (optional)
Step-by-Step Instructions
Step 1: Preheat & Prep Pan
Set your oven to 350°F (175°C). Grease a 9-inch loaf pan or line it with parchment paper—no sticking here! If you like, sprinkle a little flour or baking spray for extra non-stick insurance. Make sure your zucchini is grated ahead of time and squeeze out as much moisture as you can—that’s key to avoiding a soggy cake.
Step 2: Mix Dry Ingredients
In a large bowl, whisk together the flour, baking powder, baking soda, cinnamon, and salt. This step ensures even distribution of the leaveners and spices and helps prevent clumps. I always do this first—trust me, it’s the key to a fluffy crumb.
Step 3: Mix Wet Ingredients
In another bowl, beat the eggs with the sugars until smooth and slightly frothy. I usually do this with a whisk—no fancy mixer needed. Add in the oil and vanilla, stirring so everything’s combined and silky. Fold in the drained zucchini gently so it’s evenly dispersed without deflating those bubbles you just made.
Step 4: Combine
Dump the wet mixture into the dry ingredients and fold with a spatula until just combined—don’t overmix! It’s okay if there are a few streaks—overmixing can lead to dense cake. The batter will be thick but smooth.
Step 5: Prepare Filling
Mix sugar and cinnamon in a small bowl. If you’re feeling nutty, toss in chopped pecans or walnuts. This adds a lovely crunch and flavor contrast, but it’s totally optional.
Step 6: Layer & Swirl
Pour half the batter into your prepared pan. Sprinkle half of the cinnamon sugar evenly over the surface. Add the remaining batter on top, then gently swirl with a knife or skewer, creating a marbled look. Don’t overdo it—you want distinct ribbons of cinnamon swirl.
Step 7: Bake
Pop it into the oven and bake for about 50–60 minutes. To check for doneness, insert a toothpick in the center—if it comes out clean, you’re good! Ovens can vary, so start checking around 50 minutes. If the top is browning too quickly, tent it with foil to prevent burning.
Step 8: Cool & Glaze
Allow the cake to cool in the pan for about 15 minutes before transferring it to a wire rack. Once fully cooled, whisk together your glaze ingredients and drizzle over the top. This sticky-sweet finish makes each bite even more irresistible.
Step 9: Slice & Serve
Use a sharp serrated knife to cut slices, wiping it clean between cuts for neat pieces. Serve it slightly warm or at room temperature, with a cup of coffee or tea. I love a dollop of whipped cream or a splash of extra cinnamon for presentation, but honestly, it’s delicious plain too.
What to Serve It With
This cake is super versatile, so how you serve it depends on the mood. For breakfast, pair it with a strong cup of coffee and some fresh fruit—maybe a handful of blueberries or sliced strawberries. I actually love serving slices of this with Greek yogurt and a drizzle of honey for a quick brunch. It’s elegant enough for a cookie platter but hearty enough to start your day on a cozy note.
In the afternoon, a slice with a cup of warm tea or even a cold glass of milk feels just right. When I make this for dessert, I like to serve it with a dusting of powdered sugar or a scoop of vanilla ice cream—pure comfort. And for those casual weekends, it goes great with a mug of hot cider or a little herbal tea. Honestly, the possibilities are endless, but the best part? Everyone leaves the table smiling.
Top Tips for Perfecting Your Zucchini Cinnamon Swirl Cake
Making this cake is pretty straightforward, but I’ve picked up a few tricks over the years that make all the difference. First, squeeze out every drop of moisture from your zucchini—wet zucchini can make the batter too loose, and then your cake might fall apart. I usually grate it, then press it in a clean dish towel or paper towel—trust me, it’s worth the extra minute.
When mixing the wet and dry, fold gently rather than stirring vigorously. Overmixing is the enemy of a light, fluffy crumb. If you want your cinnamon swirl more vibrant, sprinkle a little extra cinnamon on top of the batter before swirling—visual cues help! For ingredient swaps, I’ve played around with almond flour, and while it makes the cake a little denser, it’s a great gluten-free option—just reduce the baking powder slightly.
Baking tips? If your oven runs hot, check the cake at 45 minutes to prevent over-browning. When the toothpick comes out with a few moist crumbs but no wet batter, you’re golden. For glaze variations, experimenting with mascarpone or cream cheese adds a rich tang that complements the cinnamon perfectly. And don’t forget—the swirl is supposed to look a little marbled, so don’t worry if it’s imperfect. That’s part of the homemade charm.
Storing and Reheating Tips
This cake keeps surprisingly well—probably because of the zucchini’s moisture. Cover it tightly with plastic wrap or store it in an airtight container. At room temperature, it’s good for about 2 days, but I find it tastes even better the next day, when the flavors settle and the cinnamon swirl gets a little gooey. Just keep it covered to prevent drying out.
In the fridge, it stays fresh for up to 4 days. I recommend slicing it first so you can grab what you need without exposing the entire loaf each time. To reheat, microwave a slice for about 15-20 seconds—so cozy! Or, warm it in a low oven (around 300°F) for 10 minutes if you prefer a more even heat. If you’ve added a cream cheese glaze, it’s best to reheat gently to keep everything intact. Freeze slices individually wrapped in foil or freezer bags—they’ll keep for about 2 months. Thaw at room temperature or gently in the microwave. The best part? It still tastes fresh, and that cinnamon swirl keeps its gorgeous flavor.
Frequently Asked Questions
Final Thoughts
I can’t stress enough how satisfying it is to have this cake in my recipe arsenal. It’s simple enough for a weekday treat but special enough to serve to guests. The aroma alone makes everyone in the house stop what they’re doing, and the first bite always gets a round of “Wow”—especially when the swirl hits that perfect cinnamon-browned layer. Plus, knowing I’ve snuck in some veggies makes me feel a little better about indulging. If you try this, I’d love to hear how it turned out! Share your variations or any tips you discover along the way. Remember, cooking is all about personal touches and stories—so don’t be shy to make it your own. Happy baking!

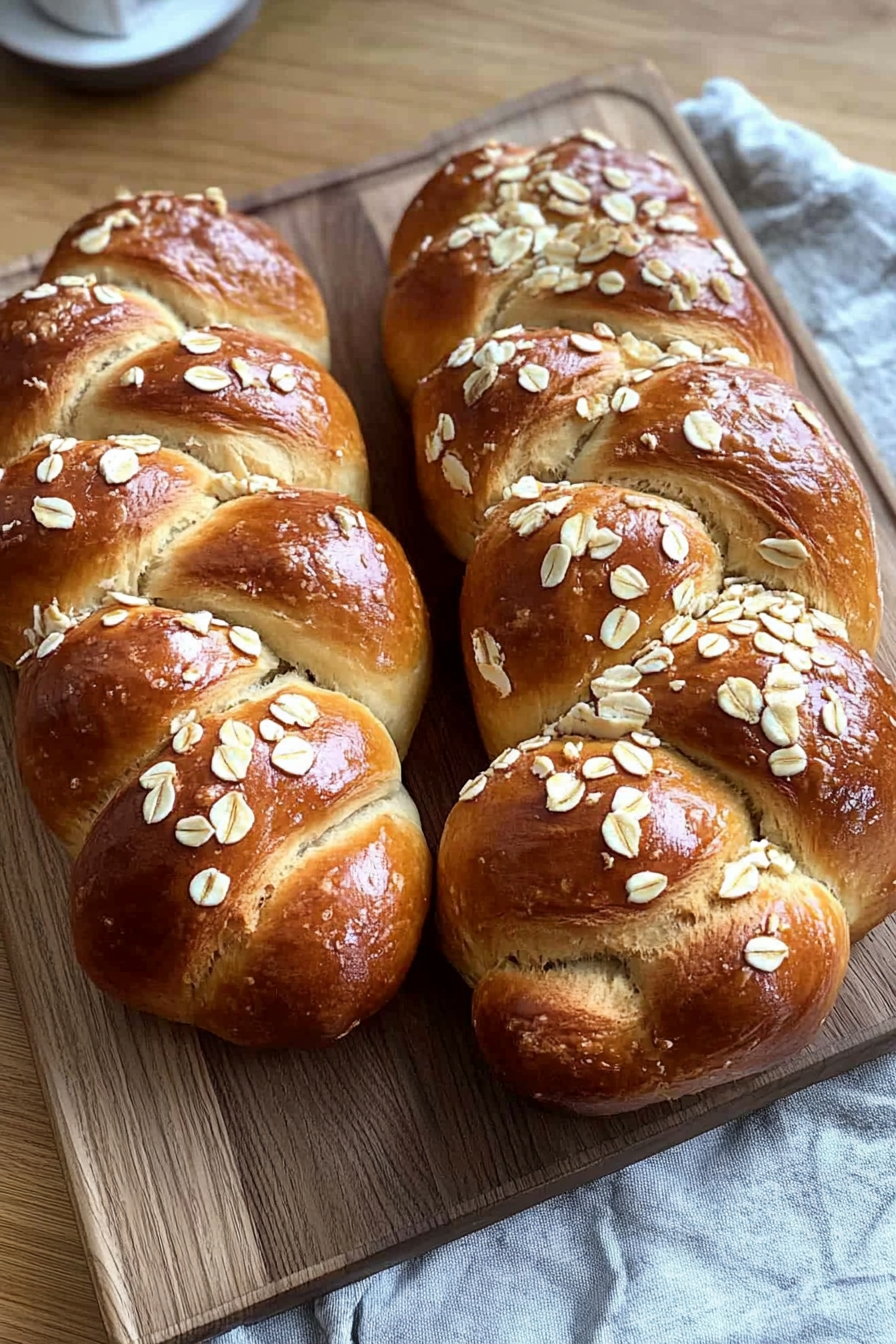
Greek Easter Bread
Ingredients
Method
- In a large bowl, combine warm milk, yeast, 1.5 cups flour, and sugar. Cover and let sit to activate the yeast, about 1 hour.
- Mix remaining flour, sugar, almond flour, anise seeds, salt, and orange zest. Create a well in the center and add the yeast mixture, eggs, yolk, and melted butter. Knead until smooth, about 5 minutes.
- Knead by hand or with a stand mixer until dough is slightly tacky and elastic, about 10 minutes by hand or 5 minutes in mixer.
- Shape the dough into a ball, place in oiled bowl, cover, and let rise until doubled, about 1.5 to 2 hours.
- Divide dough into two equal parts, then each into three portions. Roll each into long ropes, about 18 inches.
- Braid three ropes to form each loaf, pinch ends, and place on parchment-lined baking sheets.
- Cover the loaves and proof until doubled, about 1.5 to 2 hours.
- Preheat oven to 350°F. Brush loaves with egg white and sprinkle with sliced almonds.
- Bake for 25-30 minutes until golden brown. Cool on racks before slicing.