Dreamy Chocolate Marshmallow Delight
There’s something about the smell of cinnamon and warm sugar wafting through the kitchen that instantly makes me feel like everything’s gonna be okay. I remember sneaking into my grandma’s cozy kitchen as a kid, eyes wide with curiosity, watching her transform simple ingredients into this heavenly, tender coffee cake that everyone around here now calls “Zucchini Bliss.” Believe it or not, it’s one of those recipes that looks like a real show stopper but is actually super forgiving and easy—perfect for a busy morning or a lazy weekend brunch. And honestly? My kids ask for this all the time, whether it’s for breakfast or after school, and I always do this when I want to surprise them with something special that doesn’t take all day to make. Plus, it’s a sneaky way to get a vegetable into their diet without a battle. Trust me on this — once you make it, your whole house will smell like warm hug. And the best part? No fancy ingredients, just good stuff that you probably already have in your pantry. Let’s dive into making some zucchini magic!
What is Zucchini Bliss Coffee Cake?
Think of it as a tender, moist cake that’s packed with shredded zucchini and crowned with a cinnamon-sugar crumble. The name “Zucchini Bliss” honestly fits because it’s like a tiny slice of happiness—sweet, slightly spicy, and perfectly comforting. This cake isn’t just about the zucchini, though; it’s about that soft crumb soaked in warm vanilla and the crunchy topping that makes every bite a bit more special. It’s essentially a cross between your favorite coffee cake and that classic zucchini bread you secretly hide! The name might make you think it’s complicated, but nope — it’s an all-in-one bake that you’ll want to make all year round. I love how it’s versatile, too. Serve it warm with a dollop of whipped cream or a drizzle of glaze, or enjoy it as-is with your morning coffee. It’s a one-bowl wonder that’s become a staple in my house—proof that simple ingredients can turn into something truly memorable.
Why you’ll love this recipe?
First off, the flavor. Oh, the flavor! The cozy cinnamon mingles perfectly with the subtle sweetness, making every bite feel like a warm hug. It’s got that rich, buttery crumb that melts in your mouth, with just enough sweetness to satisfy your cravings without being overly sugary. What I love most about this is how easy it is to whip up—seriously, I’ve made this countless times, sometimes last minute when friends drop by or I’ve got leftover zucchini from the garden. It’s a lifesaver on busy nights because it’s all about simple mixing, no fancy equipment needed, and minimal mess. Plus, it’s budget-friendly—everything is pantry-staple ingredients, and you probably have everything already. And versatility? You bet. Want to add blueberries or chopped nuts? Go ahead! Or maybe swirl in some nut butter before baking for an extra indulgence. I’ve tested this with almond milk, and it made it even creamier—the subtle nuttiness just elevates the whole experience. Honestly, what keeps me coming back to this is how comforting and nostalgic it feels. It’s cozy, it’s flavorful, and it’s impossible not to get excited when the smell fills the house.
How do I make Zucchini Bliss Coffee Cake?
Quick Overview
This cake comes together in a flash—think one bowl, a few quick mixes, and a sprinkle of love. First, shred fresh zucchini and squeeze out any excess moisture. Then, mix your dry ingredients, followed by wet ingredients, and fold everything gently together. Pour half the batter into your prepared pan, spread a layer of cinnamon-sugar crumble or your favorite filling, then top with the remaining batter and swirl. Bake until golden and a toothpick inserted in the center comes out clean. The entire process takes about 45 minutes, and trust me—you’ll be greeted by an irresistible aroma that pulls everyone into the kitchen. What makes this special is how forgiving it is; even if you overmix a little, it still turns out moist and tender. Plus, the crumble topping is optional but highly recommended for that crunch that steals the show. Once out of the oven, let it cool just enough to slice—the smell alone is enough to make everyone’s day better.
Ingredients
For the Main Batter:
- 2 cups shredded zucchini (about 2 medium zucchinis; I always do this when I have extra from the garden)
- 1 1/2 cups all-purpose flour (or almond flour for a gluten-free twist)
- 1 cup granulated sugar (raw sugar works great too)
- 1 teaspoon baking powder
- 1/2 teaspoon baking soda
- 1/2 teaspoon salt
- 1 teaspoon ground cinnamon (more if you’re feeling extra cozy)
- 1/2 teaspoon vanilla extract
- 1/2 cup vegetable oil (or melted coconut oil for flavor)
- 2 large eggs
- 1/4 cup milk (I tested with almond milk and it actually made it even creamier!)
For the Filling:
- 1/4 cup packed brown sugar
- 1 teaspoon ground cinnamon
- Optional extras: chopped walnuts, blueberries, or a handful of chocolate chips
For the Glaze:
- 1/2 cup powdered sugar
- 1-2 teaspoons milk or cream
- A splash of vanilla (or try lemon zest for zing)
Step-by-Step Instructions
Step 1: Preheat & Prep Pan
Set your oven to 350°F (175°C). Grease a 9-inch round or square baking pan with butter or non-stick spray. I like lining mine with parchment paper for easy cleanup. Make sure to set that aside while you get everything else ready!
Step 2: Mix Dry Ingredients
In a large bowl, whisk together the flour, sugar, baking powder, baking soda, salt, and cinnamon. This step ensures everything is evenly distributed, and it’s my little secret for avoiding clumps later. You want the dry ingredients to be well combined so your cake bakes evenly.
Step 3: Mix Wet Ingredients
In a separate bowl, beat the eggs, then add the oil, vanilla, milk, and shredded zucchini. Mix until smooth—like a slight ripple of the ocean. I’ve learned that squeezing out excess moisture from the zucchini helps prevent sogginess, so I always give it a quick squeeze in a clean cloth.
Step 4: Combine
Pour the wet mixture into the dry ingredients and fold gently with a spatula. Avoid overmixing—stir just until no dry flour shows, and the batter looks thick but smooth. Overmixing can make it dense, so I always remind myself: gentle folds, not vigorous stirring!
Step 5: Prepare Filling
Mix together the brown sugar and cinnamon. If you’re feeling fancy, toss in some chopped walnuts or fresh berries at this stage for bursts of flavor. I love adding a few drops of almond extract to the filling—it gives a lovely aroma and taste.
Step 6: Layer & Swirl
Pour half of the batter into your pan, spreading it evenly. Then sprinkle half of the cinnamon-sugar mixture over the top. Add the rest of the batter, gently dolloping it on and smoothing out the surface. Finally, use a toothpick or skewer to swirl the filling into the batter for that beautiful marbled effect. Just a few zigzags—no need to be perfect, as this creates that lovely, homey look.
Step 7: Bake
Pop it into the oven and bake for about 40-45 minutes. The top should turn a warm golden, and a toothpick inserted in the center should come out clean. I’ve learned that oven times can vary, so start checking around the 38-minute mark. If the top is browning too fast, loosely tent it with foil to prevent burning.
Step 8: Cool & Glaze
Let the cake cool in the pan for about 15 minutes to settle. Then transfer to a wire rack and drizzle with your prepared glaze while still warm. The glaze kind of seeps into the cracks—trust me, this is the secret sauce that makes each bite stand out!
Step 9: Slice & Serve
Once cooled and glazed, slice it into squares or slices—however fancy you’re feeling. Serve warm or at room temperature, maybe with a dollop of whipped cream or a little extra cinnamon sprinkle. This cake’s best enjoyed fresh but also reheats beautifully.
What to Serve It With
This cake is such a versatile little gem. For breakfast, I often pair it with a hot mug of coffee or cold glass of milk—nothing fancy, just cozy. My family loves it as a brunch centerpiece—served with fresh fruit and maybe a drizzle of honey. As a dessert, it’s divine with a scoop of vanilla ice cream or a dusting of extra powdered sugar. And when I want a quick snack, I simply warm a slice for a few seconds in the microwave—trust me, that soft, steaming bite tastes like a little bit of heaven. Sometimes I fold in blueberries or chopped walnuts into the batter for extra texture; other times, I add a splash of lemon zest to the glaze for brightness. It’s become a family tradition to have this on lazy Sunday mornings, and I love seeing everyone indulge in that first warm mouthful. Plus, it’s so good with a cup of tea on chilly afternoons. Really, this cake always makes my house smell wonderful—and honestly, it’s impossible to keep around for long!
Top Tips for Perfecting Your Zucchini Bliss Coffee Cake
Like any good baking project, a few tips really make a difference. Firstly, always squeeze out excess moisture from your zucchini—wet zucchini can make your cake soggy or dense, and nobody wants that. I learned this trick after a few batches turned out a little too damp, so now I squeeze it in a clean dish towel for a minute or two; it really helps keep the crumb tender and perfect. When mixing the batter, gentle folding is key—overmixing leads to tough cakes, and nobody wants a heavy slice. For the swirl, I like to make random zigzags rather than trying to make perfect stripes—this adds a rustic charm and more marbled beauty when sliced. If you’re adding nuts or berries, fold them in gently so they’re evenly distributed. I also tested swapping half the flour with almond flour, and it turned out deliciously moist, and the nutty flavor complemented the cinnamon perfectly. When it comes to baking, oven differences can be tricky—start checking for doneness around 38 minutes, and if the top looks too brown, tent with foil. For the glaze, I prefer drizzling it while the cake is still warm because it soaks in beautifully, making every bite extra sweet. Trust me, these little tricks make a noticeable difference, and the results are consistently amazing. Honestly, I’ve made this so many times that it’s become my go-to comfort bake—just simple ingredients, approachable steps, and a smell that instantly lifts everyone’s mood. I’ve also experimented with adding a pinch of cardamom or swapping vanilla for a splash of orange zest—I encourage you to play with flavors! The key is to enjoy the process and savor every warm, cinnamon-spiced bite.
Storing and Reheating Tips
This cake is pretty hardy—once cooled, I keep leftovers in an airtight container at room temperature for a day or two, covered loosely with a clean towel to keep the crust crisp. If you want to make it last longer, pop it into the refrigerator—it’sthree to four days max. Just make sure it’s wrapped tightly or stored in an airtight container, as zucchini can make baked goods get a little rubbery if exposed to too much air. To reheat, microwave a slice for about 15-20 seconds, or warm it gently in the oven at 300°F (150°C) for about 10 minutes. If you’ve glazed it, I suggest waiting to add the glaze until just before serving, so it doesn’t get soggy during storage. For freezing, wrap individual slices tightly in plastic wrap or foil, then place inside a freezer bag. They’ll last about 2-3 months, and I find the best way to thaw is leaving it at room temp for about 30 minutes or giving it a gentle warm-up in the microwave. Just remember—if you add glaze after reheating, you’ll get that lovely fresh-from-the-oven feel all over again. Trust me, making a double batch keeps the house smelling like a bakery, and you’ll love having slices on hand when the craving strikes unexpectedly.
Frequently Asked Questions
Final Thoughts
This zucchini bliss coffee cake has truly become a favorite in my household—it’s cozy, versatile, and reminds me of lazy Sunday mornings wrapped in warmth and cinnamon. It’s one of those recipes you can throw together on a weekday and still feel like you’re baking something extraordinary. The fact that it sneaks in veggies for the little ones makes it even more special, and I love how adaptable it is—adding berries, nuts, or even a splash of citrus can tailor it to whatever mood strikes. Every time I bake this, I get a flood of nostalgic memories and compliments from my family. If you try it, I’d love to hear how yours turns out or if you’ve added your own twist. Grab a cup of coffee, a slice of this cozy cake, and enjoy the comfort of good, homemade food. Happy baking—and don’t forget to share your masterpieces in the comments below!

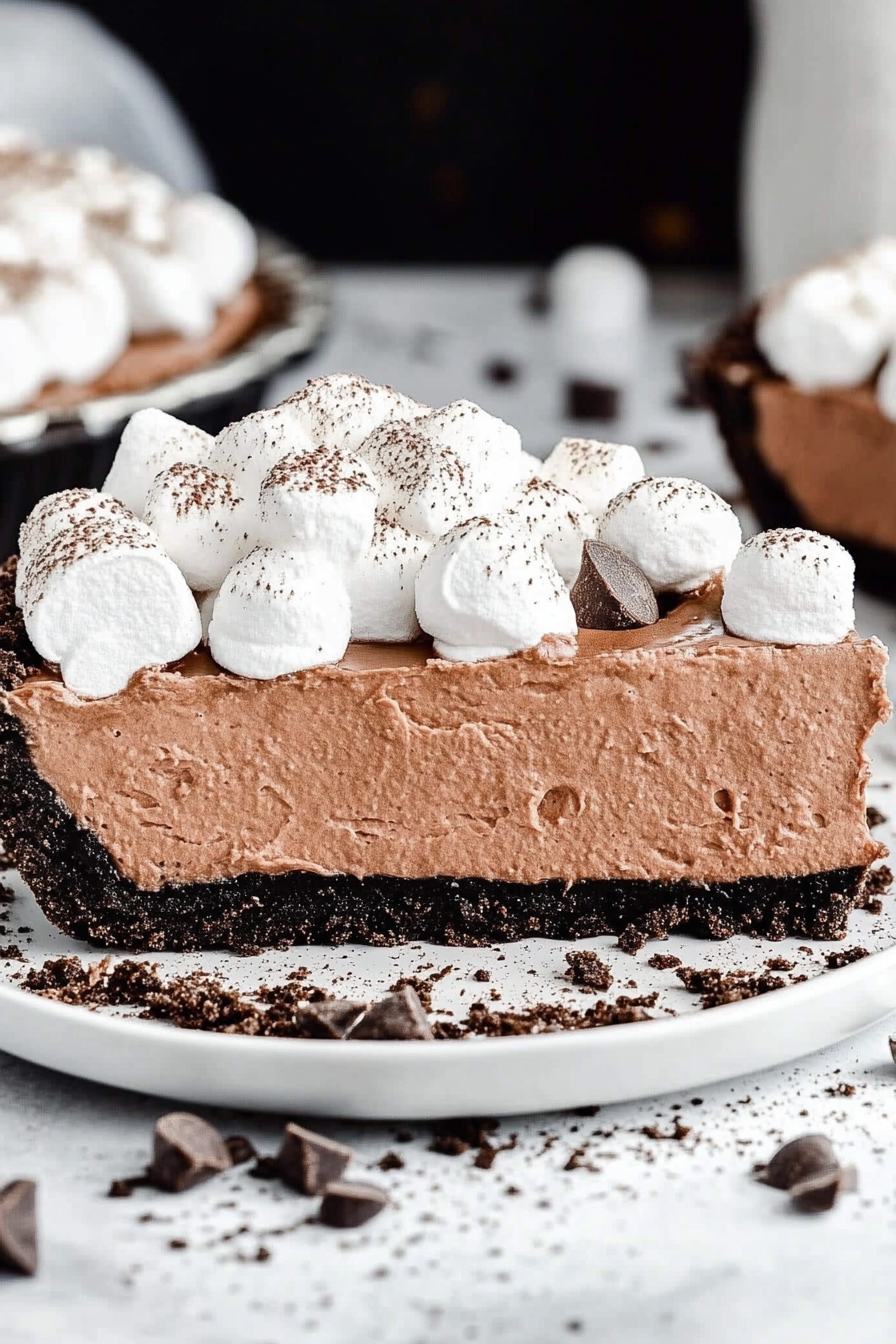
chocolate marshmallow pie
Ingredients
Method
- Finely crush the chocolate cookies in a food processor or blender. Mix in the melted butter until evenly combined. Press the mixture into the bottoms and up the sides of a deep dish pie plate (9.5"x 2") or a springform pan evenly and firmly. Chill the crust for at least 30 minutes.
- Meanwhile, over a double boiler melt the marshmallows and the milk together, stirring frequently. Once the marshmallows are all melted remove the bowl from the double boiler and stir in the chopped chocolate until it’s melted and smooth. Allow the chocolate mixture to cool to room temperature, stirring occasionally.
- Once the chocolate is cooled, place the heavy cream in the bowl of your stand mixer fitted with the whisk attachment. Beat the cream on medium high speed for 1-2 minutes until stiff peaks form. Fold the whipped cream into the cooled chocolate until it’s evenly combined.
- Pour the mixture into the chilled crust.
- Cover and chill the pie for at least 2 hours.
- When you’re ready to serve it you can garnish it with extra whipped cream, if desired.