How to Make Comforting Chicken Pie Soup
I remember the first time I made this zucchini coffee cake—it was on a lazy Sunday morning, and the smell alone drew my family out of bed faster than any alarm clock ever could. There’s something about the warmth of cinnamon, the subtle sweetness of the zucchini, and that velvety glaze that just feels like a hug in baked form. Honestly, I don’t think I’ve ever met anyone who didn’t ask for seconds—and my kids practically demand it every weekend now. It’s a recipe I’ve tested countless times, tweaking here and there, and I swear, it’s one of those dishes that feels fancy but is actually super forgiving. Plus, when you sneak in zucchini, it’s like you get a little extra vegetable love without anyone really noticing. This one’s a lifesaver on busy nights or when you want to impress guests with almost no effort. Trust me, once you try it, it’ll become a regular in your rotation too! And yes, I do make it even better with a splash of almond milk—I swear, it makes it even creamier. Now, let’s get to baking, shall we?
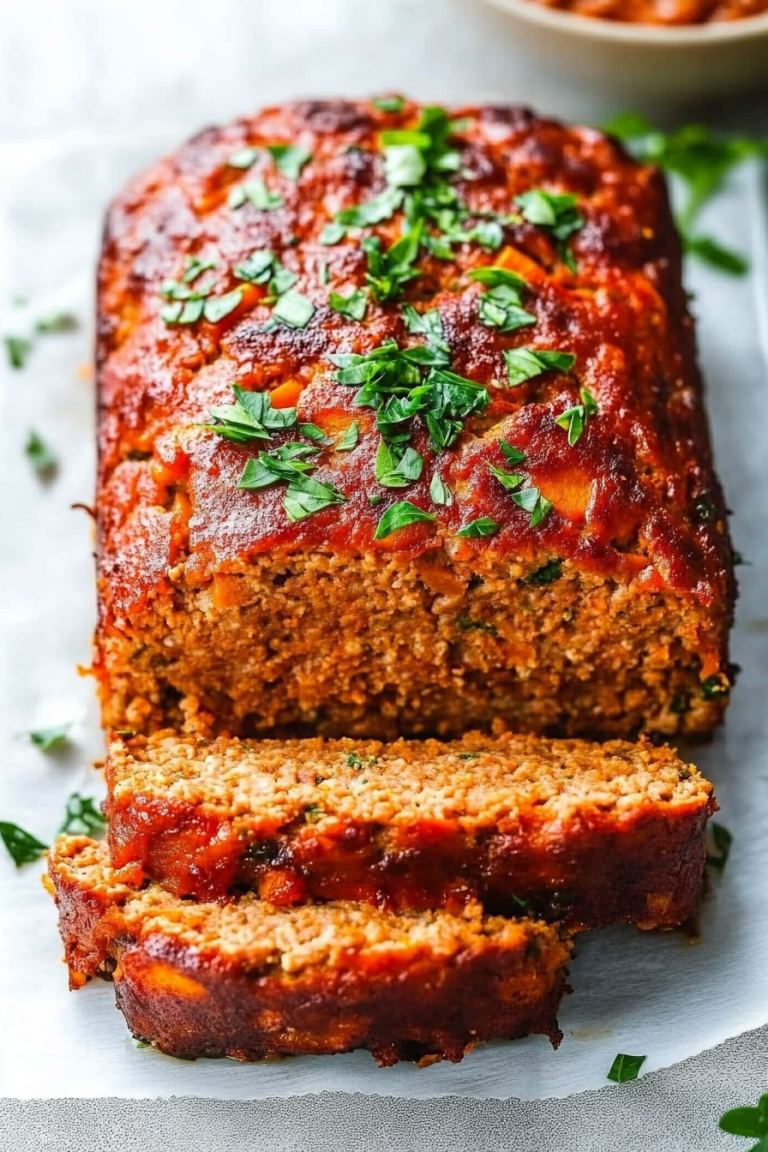
What is Zucchini cinnamon swirl coffee cake?
This is my take on a classic coffee cake, but with a sneaky vegetable twist—hello, zucchini! Think of it as a moist, tender crumb cake layered with a sweet cinnamon swirl, topped with a glossy glaze. It’s essentially a breakfast or brunch showstopper, but honestly, it’s so good that it rarely makes it past snack time. The name might sound a little fancy, but trust me, it’s a simple, humble cake with flavors that feel like a warm hug. The zucchini keeps everything moist and tender, while the cinnamon swirl adds that cozy, spicy note that makes every bite addictive. I love how versatile this cake is—it’s perfect for weekend mornings, potlucks, or even a quick treat to bring to a friend. The best part? It’s so forgiving that even if you’re a beginner, you’ll nail it on your first try and maybe even make it your signature dish!
Why you’ll love this recipe?
What I love most about this zucchini cinnamon swirl coffee cake is how it manages to combine comfort and sophistication in every slice. The flavor? Oh my, it’s like a cinnamon roll and a moist little quick bread had a delicious lovechild. The aroma alone will make your entire house smell like a bakery—warm, sugary, and just a hint of sweetness from the zucchini that no one even suspects. And the best part? It’s incredibly easy to make. I’ve tested this with just a whisk and a spoon—no fancy gadgets required. Plus, it’s budget-friendly with simple ingredients you probably already have in your pantry. My favorite thing? It’s versatile—serve it warm with coffee for breakfast, or cool down with a dollop of whipped cream as a cozy dessert. Honestly, this one’s a kitchen MVP. It’s moist, flavorful, and practically foolproof, which makes it a win for busy mornings or lazy weekends. And if you’re watching your budget, you’ll love how affordable the ingredients are—yet it tastes like a fancy bakery treat. I’ve made this countless times, and it never fails to bring a smile. Trust me on this: once you try it, you’ll keep coming back for more!
How do you make Zucchini Swirl Coffee Cake?
Quick Overview
This coffee cake is all about ease and flavor. You start by mixing a simple batter, then swirl in a cinnamon sugar mixture to create that beautiful marbled effect. After baking, you glaze it with a sweet, shiny topping that makes it irresistible. The whole process takes about an hour, from start to finish, but honestly, most of that is just waiting for it to bake. What makes this method special is how forgiving the batter is—you really can’t go wrong. Plus, the zucchini keeps everything moist and tender, so even if your batter isn’t perfect, your cake will be. The swirl gives it a lovely visual and flavor contrast, and the glaze takes it to the next level. It’s perfect for when you want something homemade, warm, and comforting without spending hours in the kitchen. Oh, and did I mention you can make it ahead? More on that later!
Ingredients
For the Main Batter:
– 2 cups all-purpose flour (I like to use unbleached for a richer flavor)
– 1 cup granulated sugar
– 1 teaspoon baking powder
– 1/2 teaspoon baking soda
– 1/2 teaspoon salt
– 1 teaspoon ground cinnamon
– 1/2 cup vegetable oil or melted butter
– 1 cup grated zucchini (squeeze out excess moisture so it’s not watery)
– 1/2 cup buttermilk or almond milk (I tested both, and almond milk made it extra creamy!)
– 2 large eggs
– 1 teaspoon vanilla extract
For the Filling:
– 1/4 cup brown sugar
– 1 teaspoon ground cinnamon
– 2 tablespoons melted butter (for mixing with the sugar and cinnamon)
For the Glaze:
– 1 cup powdered sugar
– 2-3 teaspoons milk or lemon juice (adjust for your desired consistency)
– A splash of vanilla or a dash of cinnamon (optional for extra flavor)
Step-by-Step Instructions
Step 1: Preheat & Prep Pan
Set your oven to 350°F (175°C). Grease a 9-inch round or square baking pan—no fancy tricks here; just butter or non-stick spray works fine. Line it with parchment paper if you’re feeling fancy, just to make cleanup even easier. Get your ingredients ready so everything’s within arm’s reach. I always do this when I bake—having everything prepped makes the process so much smoother and more fun.
Step 2: Mix Dry Ingredients
In a large bowl, whisk together the flour, sugar, baking powder, baking soda, salt, and cinnamon. This step is crucial because it evenly distributes those leavening agents and spices, ensuring every bite is perfect. I’ve learned to sift the dry ingredients a few times over the years, especially when I want a super tender crumb. Trust me, it makes a difference!
Step 3: Mix Wet Ingredients
In a separate bowl, beat the eggs, then add the oil, vanilla, and buttermilk (or almond milk). Whisk until everything’s nicely combined—glistening and smooth. The smell at this stage is just divine, like a cinnamon-pinese cloud right in your kitchen. I tested this with almond milk, and it actually made it even creamier, so totally worth trying if you’re dairy-free.
Step 4: Combine
Pour the wet ingredients into the dry, gently folding with a spatula until just combined. Do not overmix—this is key to keeping the cake light and fluffy. I’ve made the mistake of overmixing once or twice, and let me tell you, it turns dense. So, be gentle, and stop as soon as no streaks of flour remain.
Step 5: Prepare Filling
This is where the magic starts to happen! Mix the brown sugar, cinnamon, and melted butter together until crumbly. It doesn’t have to be perfect—if some larger chunks remain, that’s okay. I love adding a pinch of cardamom in this step once in a while for an extra fancy touch.
Step 6: Layer & Swirl
Pour half of the batter into your prepared pan, then sprinkle or dollop half of the cinnamon sugar mixture over it. Repeat with the remaining batter and cinnamon sugar. Using a fork or skewer, swirl gently through the batter to create beautiful ribbons. The goal is to get a marbled effect without overmixing—this takes a little practice, but honestly, once you get the hang of it, it’s super fun.
Step 7: Bake
Pop it in the oven for about 35-40 minutes. Check for doneness by inserting a toothpick in the center—if it comes out clean, you’re good to go. The edges should be golden, and the house will be filled with that lovely cinnamon aroma. Every oven is a little different—if your cake starts to brown too quickly, tent it with foil, and bake a few minutes extra if needed.
Step 8: Cool & Glaze
Once out of the oven, let the cake cool in the pan for about 15 minutes. This keeps it moist and prevents sticking. Then transfer to a wire rack (if you lined your pan with parchment, this part is super easy). Whisk together your glaze ingredients and drizzle lavishly over the warm cake. The glaze will melt into any crevices, creating that shiny, irresistible finish.
Step 9: Slice & Serve
Use a sharp serrated knife to cut clean slices. I love serving this warm with a dollop of whipped cream or a scoop of vanilla ice cream for an extra treat. It’s also stunning with a side of fresh fruit or a steaming cup of coffee—trust me, every bite feels like a little celebration in your mouth.
What to Serve It With
This zucchini coffee cake is so versatile, I always keep a stash in the fridge for quick breakfasts or late-night cravings. When I serve it for breakfast, I like pairing it with a strong cup of coffee—think French press or a rich espresso. My kids love it warm, smeared with a little butter or even Nutella—hey, why not indulge a little? For brunch, I slice it up and arrange it on a pretty platter with fresh berries and yogurt. It also makes a stunning dessert—serve it slightly cooled with a dusting of powdered sugar and a drizzle of caramel sauce. If you’re doing a casual snack, I like to cut thicker slices and toast them lightly—delicious with a smear of cream cheese or yogurt. Honestly, this cake has become a cornerstone of our weekend mornings and after-school snacks. It’s familiar, comforting, and a little bit special every single time.
Top Tips for Perfecting Your Zucchini Cinnamon Swirl Coffee Cake
Having made this countless times, I’ve learned a few tricks that make all the difference. First, always squeeze out as much moisture from your zucchini as possible—that keeps the cake from getting soggy and ensures it rises nicely. I use a clean kitchen towel to wring out the grated zucchini—scrunch and press until it’s fairly dry. Second, don’t overmix the batter—that’s the fastest way to turn it dense. Fold gently until just combined, and you’ll have a tender crumb every time. For the swirl, I love using a toothpick to create a nice marbled pattern—sometimes I swirl in a figure-eight or a spiral for fun. If you want to switch things up, try adding chopped nuts or mini chocolate chips to the cinnamon sugar filling—yum! With baking, oven variability is a thing—I’ve had to bake a few extra minutes sometimes, so keep an eye on it near the end. When it’s cooled slightly, I like to add the glaze—wait until it’s just warm enough to melt into all the nooks. A little tip: double the glaze recipe if you’re a sweet tooth and want that shiny, gooey finish.
My biggest lesson? Always let it cool completely before slicing—nothing worse than a messy, crumbling piece. Also, I tested this with almond milk, and honestly, it made it even creamier, so don’t hold back on trying dairy-free options. Oh, and don’t forget to store leftovers in an airtight container—they stay moist for days and actually taste better the next day after the flavors meld together. Trust me, patience is key for the perfect texture!
Storing and Reheating Tips
If you have leftovers, this cake keeps beautifully in an airtight container at room temperature for up to two days. After that, I pop it into the fridge—just cover it well to prevent it from drying out. It’s still delicious cold or gently warmed in the microwave for about 10-15 seconds. If you want to freeze portions, wrap slices tightly in plastic wrap, then foil, and they’ll keep for up to a month. When you’re ready to enjoy, just thaw at room temp or reheat in the microwave—trust me, it’s just as good as fresh. If you’re making it ahead, I recommend adding the glaze right before serving because it’s what gives that gorgeous shiny finish and adds a burst of sweetness. Either way, it’s a real time-saver and guarantees a cozy, delightful treat whenever the mood strikes.
Frequently Asked Questions
Final Thoughts
This zucchini cinnamon swirl coffee cake has truly become one of my go-to treats—it’s simple, forgiving, and endlessly adaptable. Whether I’m baking for a family brunch or just craving something sweet at midnight (don’t judge!), it hits the spot every single time. I love how it combines the everyday goodness of zucchini with the warm hug of cinnamon, topped with that shiny glaze that just makes everything feel extra special. The best part? It’s so easy to customize—try adding nuts, swapping out the glaze, or even embedding some mini chocolate chips for an indulgent surprise. Every time I bake this, I get a little nostalgic about my childhood mornings and the cozy weekends spent around the table. I hope you give it a try and see how simple, tasty, and satisfying real homemade baking can be. Don’t forget to come back and let me know how yours turns out—happy baking, my friend!

Chicken Pot Pie Soup
Ingredients
Method
- In a large pot, melt butter over medium high heat. Add onions, celery and broccoli and cook to soften about 3-5 minutes. Sprinkle with flour and cook an additional minute, stirring constantly. Slowly add broth, milk, cream, red pepper flakes, salt and pepper. Use a whisk to combine, then add in cooked chicken. Heat over medium heat until warm, about 10-15 minutes.
- To make crust strips, unroll thawed pie crust (for one crust). Cut into strips and lay on parchment paper lined baking sheet. Bake in a 450 degree oven for 6-8 minutes, until browned. Remove from oven.
- To assemble, pour soup into individual ramekins and top with shredded cheese and pieces of pie crust strips. Enjoy!