Easy Peanut Butter Cookie Dip Recipe
Honestly, there’s something about baking bread that feels like wrapping yourself in a warm hug. And this quick zucchini banana bread? It’s like my comfort food, but with a little twist of spring freshness from the zucchini and the mellow sweetness of ripe bananas. I first made this recipe on a lazy Sunday afternoon when my kids were asking what’s for dessert, and I remembered a bunch of zucchinis lurking in the fridge from my garden. I was skeptical at first—would it be moist enough? Would it taste like I threw in a veggie by mistake? Spoiler: it’s completely delicious, moist beyond belief, and honestly kinda addictive. It disappeared in minutes at my house. What I love most about this is how it’s a little healthier than regular banana bread but still so indulgent—plus, it’s a one-bowl wonder on busy nights. Trust me, once you try it, you’ll want it on repeat. And yes, even the pickiest eaters ask for seconds—even my husband, who swears he’s not a “zucchini person.”
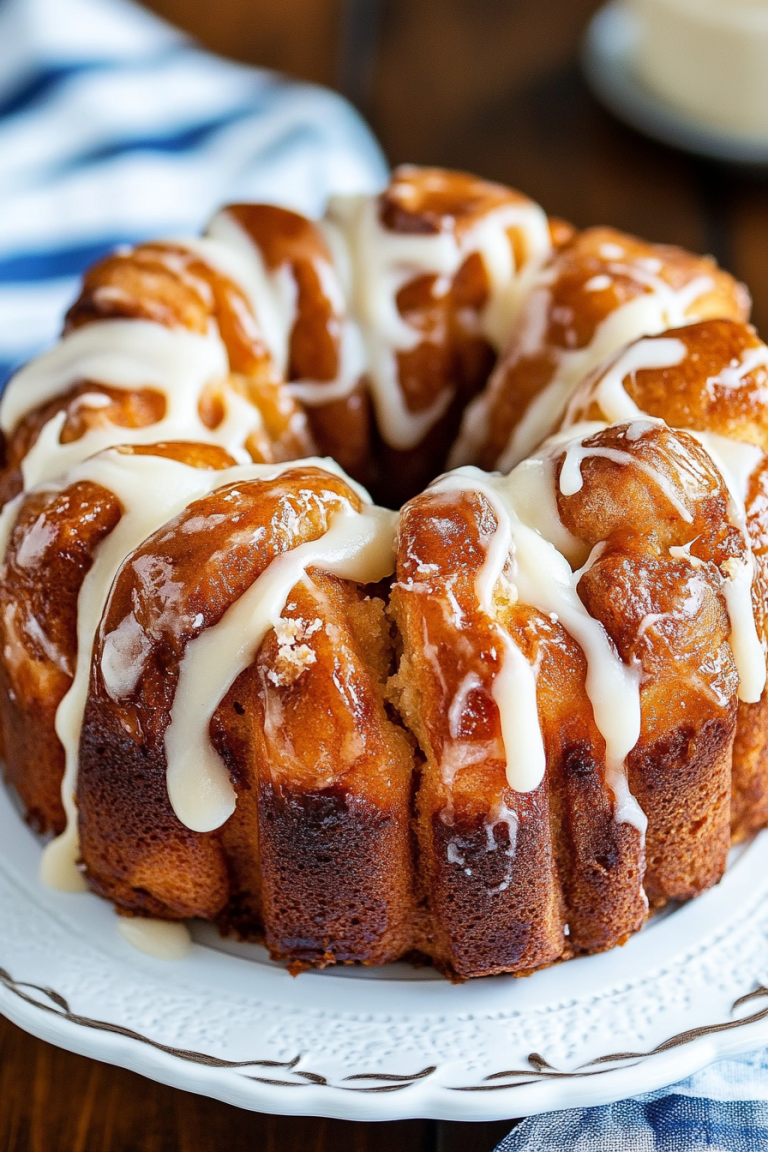
What is Moist Zucchini Banana Bread with a Sweet Glaze?
Think of this as a cozy, slightly healthier twist on classic banana bread, with the added goodness of grated zucchini. It’s essentially a moist, tender loaf that mixes the rich flavor of ripe bananas with the subtle, fresh notes of zucchini—kind of like a sneaky vegetable that everyone loves. The name might sound fancy, but it’s really just a shortcut to a big hug in bread form. The “moist” part is key here—thanks to the zucchini, every bite stays beautifully tender and fluffy, no dry patches in sight. After baking, I love to top it with a simple glaze that adds just a touch of sweetness and makes it feel special. It’s the kind of recipe I turn to when I want a homemade treat that’s effortless but feels like a warm gift for everyone around the table.
Why you’ll love this recipe?
What I love most about this zucchini banana bread is how it combines all the cozy flavors you crave—sweet bananas, warm spices, the soft, moist crumb, and a little crunch from the zucchini. It’s honestly like a love letter to home baking. And it’s so simple. I’ve tested this with everything from almond milk to coconut oil, and every version turns out just right. Plus, the ingredients are budget-friendly, which is a big win when you’re trying to stretch the grocery dollars. It’s incredibly versatile—I serve it for breakfast, but it’s equally perfect sliced and toasted as a snack or dressed up with whipped cream for dessert. My kids ask for this all the time, and I’ve even made mini muffins for school lunches. What I also love is how forgiving it is—overmixing doesn’t ruin it, and you can tweak the sugar level depending on your mood or what you have on hand. It’s truly a recipe you’ll keep coming back to, I promise.
How do you make Moist Zucchini Banana Bread with a Sweet Glaze?
Quick Overview
This bread starts with grabbing ripe bananas and grated zucchini (yes, the sneaky veggie!). You toss everything into one bowl—no complicated mixing bowls or tools needed—stir gently, pour into your loaf pan, and bake. The magic comes from the zucchini, which keeps the bread super moist without changing the flavor much, and the glaze, which rounds it out with a little extra sweetness. It’s a straightforward process that’s perfect for a lazy weekend, or even a quick weekday bake when the craving hits. Once out of the oven, you let it cool just enough to handle, then drizzle with a simple glaze. The result? A tender, flavorful loaf that makes the house smell incredible and everyone’s happy.
Ingredients
For the Main Batter:
– 2 cups all-purpose flour (I like unbleached for best flavor, but regular works fine)
– 1 teaspoon baking soda
– 1 teaspoon baking powder
– 1 teaspoon cinnamon (optional but adds a lovely warmth)
– 1/2 teaspoon salt
– 1/2 cup granulated sugar (raise or lower depending on how sweet you want it)
– 1/4 cup brown sugar for extra depth
– 1/2 cup neutral oil like vegetable or coconut
– 2 large eggs (or flax eggs for vegan variation)
– 1 teaspoon vanilla extract
– 2 ripe bananas, mashed (the browner, the better for sweetness)
– 1 cup grated zucchini (squeeze out excess moisture—trust me, too wet and it won’t bake properly)
For the Filling:
– Optional chopped walnuts or chocolate chips—add at the batter stage for a surprise crunch
For the Glaze:
– 1 cup powdered sugar
– 2-3 tablespoons milk (dairy or plant-based)
– 1/2 teaspoon vanilla (or lemon juice for a bright twist)
Step-by-Step Instructions
Step 1: Preheat & Prep Pan
Set your oven to 350°F (175°C). Line a standard loaf pan with parchment paper or lightly grease it with butter or non-stick spray. This step makes removing the bread so much easier—I learned this the hard way after a sticky-lipped loaf one too many times!
Step 2: Mix Dry Ingredients
In a big mixing bowl, whisk together the flour, baking soda, baking powder, cinnamon, and salt. Make sure everything’s well incorporated—nothing worse than biting into a chunk of baking soda or cinnamon clump. I always do this first to keep the dry ingredients from flying all over when I add the wet stuff.
Step 3: Mix Wet Ingredients
In another bowl, mash the bananas with a fork until smooth, then add the oil, vanilla, and eggs. Whisk until smooth. The bananas should be really ripe—that’s what gives the bread its rich, sweet flavor. I tested with a few slightly underripe bananas, and let’s just say, it’s not the same. The smell alone when they’re ripe is worth the wait!
Step 4: Combine
Pour the wet ingredients into the dry and fold gently—don’t overmix. I learned this after making it several times; overmixing makes the bread dense, and no one wants that. Just stir until everything’s just combined—lumps are okay.
Step 5: Prepare Filling
If you’re adding walnuts or chocolate chips, fold them in now. I love walnuts because they add a little nuttiness and crunch, but chocolate chips are a secret weakness of mine. You can also leave it plain if you prefer a more subtle flavor.
Step 6: Layer & Swirl
Pour a bit of the batter into the pan, then dollop a few spoonfuls of the grated zucchini and mashed banana mixture on top. Repeat layering, then use a butter knife or skewer to swirl gently—this creates a beautiful marbled look and distributes flavors evenly. Just don’t overdo it; you’re aiming for gentle swirls, not a messy whirlpool.
Step 7: Bake
Pop it into your preheated oven and bake for about 50–60 minutes. Check for doneness by inserting a toothpick—it should come out clean with a few moist crumbs attached. Every oven varies, so start checking at around 50 minutes. I once overbaked mine and it lost some of its tender moisture, so keep an eye out!
Step 8: Cool & Glaze
Let the bread cool in the pan for about 10 minutes, then transfer to a wire rack. When it’s just warm (not hot), drizzle over your glaze. The glaze should be pourable but not runny—thick enough to cling but smooth enough to spread easily. I like to wait until it’s just warm so the glaze melts into the top a bit.
Step 9: Slice & Serve
Use a serrated knife for clean slices—patience is key here! Serve slightly warm or at room temperature. I love it with a cup of coffee or tea. And if you’re feeling fancy, a little dollop of whipped cream or a scoop of vanilla ice cream pairs beautifully. It’s comfort food, elevated.
What to Serve It With
This zucchini banana bread is incredibly versatile. For breakfast, I like to toast a slice and spread a bit of butter or cream cheese. My kids think it’s dessert-level—so I often sneak in a second slice for them, especially when they’re just waking up on weekends. For brunch, it pairs beautifully with yogurt and fresh berries, making the table look cozy and colorful. Sometimes, I serve it as a little afternoon snack with a glass of milk or hot cocoa—especially on chilly days when everyone needs a little pick-me-up. It also makes a lovely dessert after dinner—warm slices with a drizzle of honey or berry compote make it feel special. Plus, this bread keeps well for a few days, especially if wrapped tightly or stored in an airtight container, and it’s just as good toasted the next day.
In my family, this has become a bit of a tradition—even grandma’s asked for the recipe! I love how it’s a hit with everyone, and honestly, I keep making it because it’s foolproof, friendly, and kind of addictive. Just the smell alone—from the bananas and spices baking—brings everyone running to the kitchen. And once you master it, I promise you’ll be making this on repeat. It’s a little slice of home in every bite.
Top Tips for Perfecting Your Moist Zucchini Banana Bread with a Sweet Glaze
Over the years, I’ve learned a few tricks to make this bread totally foolproof. Here are some boss tips I swear by:
- Zucchini Prep: Always squeeze out excess moisture after grating—wet zucchini can turn your batter soggy. Trust me, I’ve learned the hard way that too much water makes the bread dense and heavy. I keep a clean kitchen towel nearby, and I give it a good squeeze before folding it into the batter. Also, freshness counts—use zucchini that’s firm and bright green, not limp or browned.
- Mixing Advice: Gentle is the way to go. Overmixing ruins the tender crumb we’re aiming for. I fold in ingredients with a spatula just until combined. When the batter is lumpy, I know I got it right.
- Swirl Customization: Want more visual flair? Use a skewer or toothpick to swirl in different directions, creating a beautiful marbled effect. It’s surprisingly easy, and the wow factor is worth it!
- Ingredient Swaps: Tried coconut oil? Delicious. Switched brown sugar for honey? Works like a charm. I’ve also tested applesauce in place of oil—cuts down on fat but keeps it moist. Just remember, swaps might tweak baking times slightly, so stay flexible.
- Baking Tips: If your oven heats unevenly, rotate the loaf halfway through baking. Keep an eye on it after 50 minutes—every oven varies. The toothpick test is your best friend here.
- Glaze Variations: For a citrusy zing, add lemon juice to your glaze. Or sprinkle some coarse sugar on top before baking for a sweet crunch. Play around—sometimes I add a splash of vanilla extract or a pinch of cardamom for extra warmth.
Honestly, I’ve tested this recipe so many times, tweaking a little here and there, that I know each step by heart now. The key is patience and a little flexibility. And the reward? A stunning loaf that smells like heaven—crispy edges, tender center, and a sweet glaze that seals the deal. Making this bread is almost meditative now for me, and I hope you find the same joy in baking it. It’s a recipe I measure my weekends by, and I’m pretty certain once you try it, it’ll become yours too.
Storing and Reheating Tips
This bread is best enjoyed fresh, but it holds up surprisingly well. For short-term storage, wrap it tightly in plastic wrap or an airtight container at room temperature for about 2 days. After that, pop it into the fridge—just make sure it’s covered well so it doesn’t dry out. It’s recommended to eat it within 4-5 days for peak moisture and flavor. When reheating, I like to warm a slice in the microwave for 10 seconds or so, which makes it feel just-baked all over again. If you want to extend its life, slice it up and freeze individually—wrap each slice in plastic, then store in a zip-top bag. Thaw at room temp or quick-toast for an instant treat. Just remember, if your bread has a glaze, wait to add it until it’s fully thawed so it doesn’t get all soggy. This way, every slice stays moist, sweet, and inviting, just like the first day.
Frequently Asked Questions
Final Thoughts
If you’re anything like me, baking is a form of love—and this moist zucchini banana bread truly embodies that. It’s a recipe I keep in my back pocket because it’s forgiving, cozy, and feels like a warm embrace on busy mornings or when you need some comfort. From the first fragrant sniff in the oven to the last sweet drizzle of glaze, every step is a little act of kindness. Plus, it’s a sneaky way to get a little extra veggie into the kids’ diets without a fuss. Once you try making this, I bet it’ll become a staple in your home, too. Happy baking, and I can’t wait to hear how yours turns out! Remember, it’s all about enjoying the process and the delicious, comforting results—a sweet reminder of home, love, and good food. Don’t forget to leave a comment or share your variations—I’d love to hear your story in the kitchen!