Intricate Butter Cookies How to Braid Them
There’s something about the smell of baked goodies that instantly takes me back—for me, it’s that warm, sweet aroma that fills the house and wraps you up like a cozy blanket. I remember helping my grandma in her kitchen, sneaking tastes of batter and eagerly waiting for that first slice of cake. Over the years, I’ve made countless zucchini cakes, especially during harvest season when the garden’s overflowing with zucchinis. This recipe has become a staple in my family because it’s not only incredibly moist and flavorful but also surprisingly simple to throw together on a busy weeknight. It’s kind of like a cross between your favorite coffee cake and a quick bread—perfect for sneaking into breakfast, brunch, or even a casual dessert. My kids ask for this all the time, and honestly, I don’t mind. It’s a sneaky way to get veggies into them without hearing any protests. Plus, the lemon glaze adds a bright, tangy kick that perfectly balances the richness of the cake. Trust me, once you give this a try, it’ll become one of those recipes you make over and over—because it’s just that good.
What is Zucchini cake with lemon glaze?
Think of zucchini cake with lemon glaze as your all-star, make-everything-better kind of dessert. It’s essentially a moist, tender cake that’s packed with shredded zucchini—yes, the humble summer veggie—and infused with warm spices and a hint of vanilla. The name might sound fancy, but it’s actually super approachable. The zucchini adds moisture and a mild vegetal sweetness that keeps the cake from feeling too heavy or overly sweet. It’s kind of like a zucchini bread, but with a bit more decadence and a pretty finish with that zingy lemon glaze on top. The best part? The zucchini keeps the cake light as air while adding a subtly fresh flavor. It originated as a way to use up summer harvests, but honestly, it’s a year-round comfort that hits all the right buttons. Think of it as a cozy, homey kind of cake—great with a cup of coffee or tea—and one that’s often requested at my house when I want something sweet but also feel-good and nourishing.
Why you’ll love this recipe?
What I love most about this zucchini cake with lemon glaze is that it’s like a little hug in cake form—moist, tender, and bursting with flavor. The zucchini keeps it from feeling too sweet or dense; instead, it adds a subtle veggie richness that’s actually pretty unique in baked goods. This one’s a lifesaver on busy nights because I always do this when I need a quick dessert that feels fancy enough for guests but really only takes a few minutes of prep. Plus, it’s super budget-friendly—mostly pantry staples with a fresh zucchini, which farmers’ markets and grocery stores often have in abundance. I tested this with almond milk, and it made the cake even creamier—so feel free to swap for your favorite dairy or dairy-free option. My kids actually ask for seconds, and I love how versatile it is: breakfast, brunch, or a mid-afternoon treat. It’s perfect for sharing, and trust me, the lemon glaze is what elevates it from good to memorable. It’s bright, slightly tart, and gives that little extra “pop” that makes it hard to resist.
How do I make Zucchini cake with lemon glaze?
Quick Overview
This zucchini cake is a cinch to whip up—no fancy equipment needed. Mix the dry ingredients in one bowl, whisk together the wet ingredients in another, then fold everything together. The grated zucchini gets stirred in last, ensuring it stays moist and evenly dispersed. Pour the batter into a prepared pan, dollop your sweet filling if you like, swirl it for a marbled effect, bake until golden, and finally drizzle with a tangy lemon glaze. The result? A beautifully moist, sweetly scented loaf that’s got just enough zest to keep things interesting. Honestly, once I figured out how forgiving it is, I started making it all the time—it’s a stress-free, satisfying bake that always gets rave reviews.
Ingredients
For the Main Batter:
– 2 cups grated zucchini (about 2 medium zucchinis, grated and well-drained)
– 1 1/2 cups all-purpose flour (or gluten-free blend if you prefer)
– 1 teaspoon baking powder
– 1/2 teaspoon baking soda
– 1 teaspoon ground cinnamon
– 1/2 teaspoon ground nutmeg (optional but adds warmth)
– 1/4 teaspoon salt
– 1/2 cup granulated sugar
– 1/2 cup packed light brown sugar
– 1/2 cup vegetable oil or melted coconut oil
– 3 large eggs
– 1 teaspoon vanilla extract
For the Filling (optional but delicious):
– 1/2 cup chopped walnuts or pecans
– 1/4 cup sugar mixed with 1 teaspoon cinnamon (for sprinkling)
For the Lemon Glaze:
– 1 cup powdered sugar
– 2-3 tablespoons fresh lemon juice
– Zest of 1 lemon (for extra zing)
Step-by-Step Instructions
Step 1: Preheat & Prep Pan
First, set your oven to 350°F (175°C). Grease a loaf pan or line it with parchment paper—trust me, this cake is moist, so foil or ungreased pans stick! Prepare your zucchini—grate it using a box grater, then squeeze out as much excess moisture as possible using a clean kitchen towel. Moisture is the enemy here and can make the cake dense instead of fluffy.
Step 2: Mix Dry Ingredients
In a large bowl, whisk together the flour, baking powder, baking soda, cinnamon, nutmeg, and salt. This ensures everything’s evenly distributed and prevents clumping. Proper dry mixing is the key to a tender crumb, so don’t skip this step. When I do this, I always take a moment to smell the spices—it’s like having a little aromatherapy while I bake!
Step 3: Mix Wet Ingredients
In another bowl, whisk together the eggs, sugars, oil, and vanilla. I like to beat them until they’re smooth and a little frothy—that’s when I know I’ve combined everything well. I’ve learned that adding the eggs one at a time prevents curdling, especially if your eggs are cold. Once combined, the mixture should look light and slightly creamy.
Step 4: Combine
Gently fold the wet ingredients into the dry, using a spatula or wooden spoon. Mix just until no streaks of flour remain—that’s so important! Overmixing can develop gluten and make the cake rubbery. At this point, fold in the grated zucchini. The batter should be thick but pourable—if it’s too dense, loosen it with a splash of milk or dairy-free milk.
Step 5: Prepare Filling
If you’re adding nuts and cinnamon sugar, sprinkle and swirl them into the batter now. Honestly, I love a good swirl of cinnamon sugar—it creates little pockets of sweet spice that surprise your taste buds. Just dollop the filling on top, then use a knife to create a gentle swirl if you want a marbled effect.
Step 6: Layer & Swirl
Pour the batter into your prepared pan. If you’re making it layered, sprinkle the topping over the batter and use a skewer or knife to swirl it through. I do this when I want that beautiful marbled look—just a few zigzags and it’s perfect. This step is pure fun and makes the cake look as good as it tastes.
Step 7: Bake
Pop it into the oven and bake for about 50-60 minutes. I always start checking around 50 minutes—insert a toothpick in the center, and if it comes out clean, you’re good to go. If it’s still wet, give it a few more minutes, but don’t overbake or it’ll dry out. Every oven is different, so I’ve learned to trust my nose and the toothpick test more than the clock.
Step 8: Cool & Glaze
Let the cake cool in the pan for about 15 minutes, then gently transfer it to a wire rack. While it cools, mix your lemon glaze—powdered sugar, lemon juice, and zest—adding a little more lemon juice if you want a thinner glaze. When the cake is just warm or completely cool, drizzle on the glaze. I love the way the tartness of the lemon cuts through the sweetness of the cake—it’s like a flavor party in every bite.
Step 9: Slice & Serve
Slice with a serrated knife for clean cuts, and make sure to give the glaze a few minutes to set before serving. This cake is best enjoyed slightly warm or at room temperature. Serve it with a cup of coffee or a glass of cold milk, and watch everyone go back for seconds. It’s a real crowd-pleaser, and the leftovers are just as good the next day—trust me, this disappears in minutes at my house!
What to Serve It With
This zucchini cake with lemon glaze is pretty versatile. In the mornings, I’ll slice a piece and pair it with my favorite dark roast coffee—nothing beats that aroma waking up the house. It also makes a lovely brunch centerpiece, especially when you serve it with fresh berries or a dollop of sour cream—the tangy contrast is divine. As a dessert, I love adding a scoop of vanilla ice cream or a drizzle of extra lemon syrup for extra zing. And for a casual snack, I cut thick slices and enjoy with a glass of iced tea or a cold glass of milk. Sometimes, I even sprinkle a little extra lemon zest on top just before serving for that fresh, citrus kick. It’s one of those recipes that feel fancy but are honestly comfort in every bite.
Top Tips for Perfecting Your Zucchini Cake with Lemon Glaze
Over the years, I’ve picked up some tricks to ensure this cake always turns out perfect. First, make sure to drain your zucchini really well—moisture is the enemy here. I usually squeeze out any excess water after grating, and sometimes I pat it dry with a paper towel. That way, the batter isn’t too wet, and the cake stays fluffy. When mixing, I always fold gently—overmixing will develop gluten and make it dense. As for the swirl, I like to use a skewer or a chopstick to create pretty marbled patterns—trust me, it’s worth the extra minute for a beautiful presentation. Substituting ingredients can be fun too—I’ve tested different oils and sugars, and while the result is always delicious, I do recommend sticking to real vanilla extract for the best flavor. For the glaze, I like to start with less lemon juice and add more as needed—sometimes, I want it thicker for a more defined drizzle or thinner for a lovely pour-over effect. Since I’ve made this so many times, I’ve learned that room temperature cake is much easier to glaze, and patience pays off—wait for the glaze to set before slicing so it doesn’t ooze all over the plate.
Storing and Reheating Tips
This cake keeps quite well, which is a blessing during busy weeks. If I’m not serving it right away, I cover it tightly with plastic wrap or store it in an airtight container at room temperature—up to two days without drying out. If I want to keep it longer, I pop it in the refrigerator for up to five days. Just know that refrigeration can sometimes make it a little denser, so I recommend bringing slices back to room temp before serving. For freezing, I wrap individual slices tightly in plastic wrap, then place them in a freezer-safe bag. They’ll keep for up to three months. Thaw slices at room temperature or gently warm them in the microwave for about 20 seconds if you want that fresh-baked feel. Keep in mind—if you plan to glaze again, do so after reheating, as the glaze sets best on cooled or slightly warm cake. I’ve learned the hard way that applying glaze to a cold cake can be tricky—it seems to just sit there instead of dripping beautifully. Trust me on this—patience is key!
Frequently Asked Questions
Final Thoughts
This zucchini cake with lemon glaze has become one of my favorites, especially because it’s so forgiving and versatile. It’s a wonderful way to enjoy zucchini beyond just savory dishes, turning it into a moist, flavorful treat that’s perfect any time of day. The aroma alone will have your family coming running into the kitchen—mine do, every single time. I love how the simple ingredients come together to create something that tastes like sunshine and home rolled into one slice. If you give it a try, I’d love to hear how it turns out! Tell me about your tweaks or any fun variations you discover—baking is all about experimenting and making it yours. Happy baking, friends—enjoy every bite of this bright, cheerful cake!
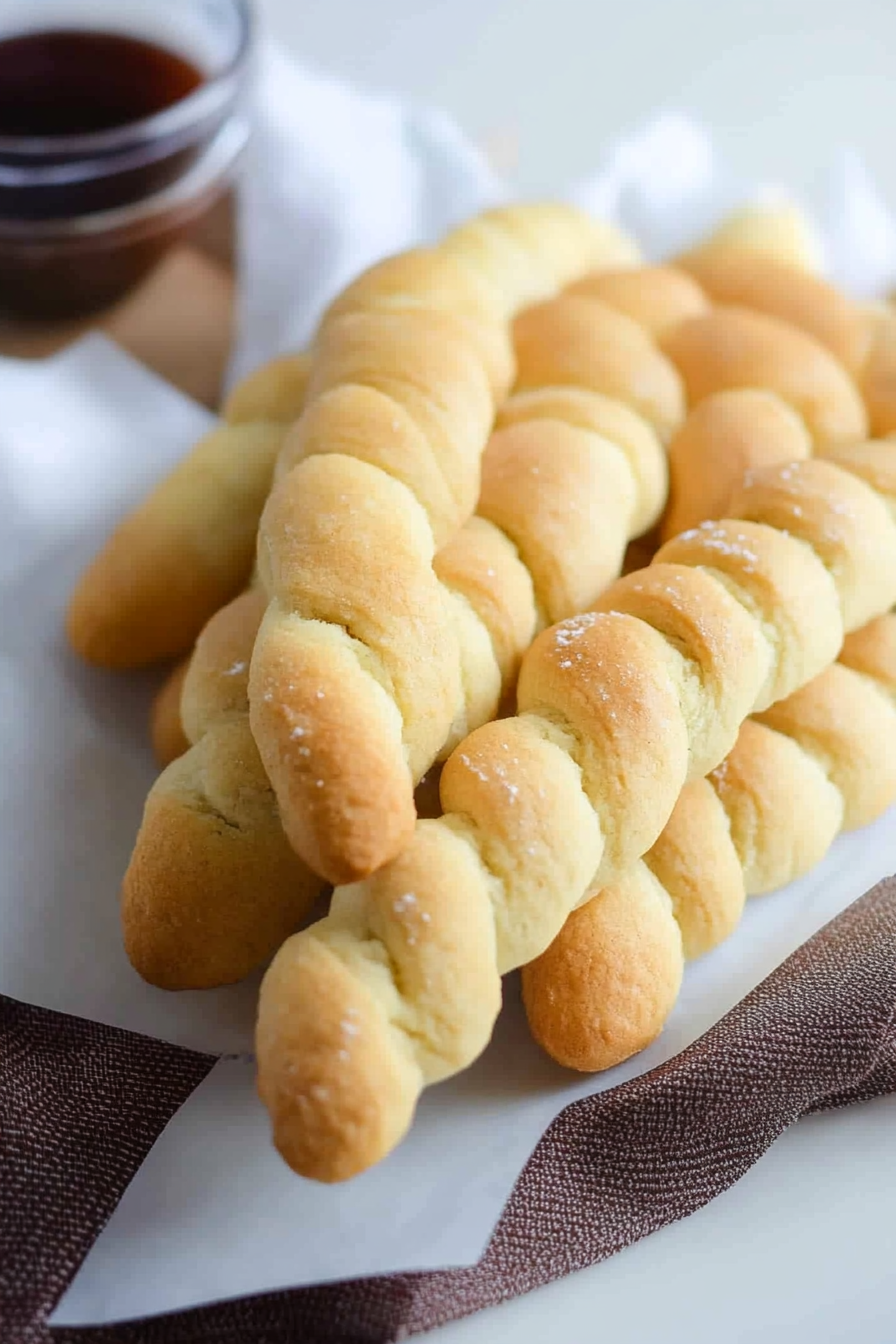
Braided Butter Cookies
Ingredients
Method
- Using a stand mixer with the paddle attachment (or electric mixer), beat the butter and sugar until fluffy. Add the vanilla extract and orange zest, and keep beating while adding the 4 eggs plus 2 egg yolks, one at a time.
- In a mixing bowl, whisk together the flour, baking powder, and salt. Whisk together the orange juice and baking soda in a separate bowl or measuring cup. With the mixer on low, add the flour mixture to the butter mixture, one cup at a time, alternating with orange juice and milk. Beat until well combined.
- Check the dough, and if it's too sticky, add 0.25 to 0.5 cup more flour.
- Cover the dough with a clean towel or cling wrap and let rest at room temperature for 30 minutes.
- Preheat the oven to 400°F. Line 2 large baking sheets with parchment paper.
- Form the dough into golf ball-sized rounds. Roll each round out into about 8-inch ropes. Fold it in a U-shape and twist the arms to form a braid, pressing the ends together at the end. Transfer the cookies to the baking sheets. Continue until all of the cookies are formed.
- To make the egg wash, combine the egg yolks with water and whisk until completely combined. Brush each cookie with the egg wash.
- Bake the cookies for 20 to 30 minutes, or until they are golden brown. Halfway through baking, rotate the trays by placing the bottom baking sheet on top and the top baking sheet on the bottom.
- Remove from the oven and let the butter cookies cool completely before serving or storing.