Hearty Bean Pasta Soup Recipe
There’s something so nostalgic about baking with zucchini—maybe it’s the way it sneaks sweetness into every bite or how it reminds me of lazy summer afternoons at Grandma’s house. I always do this when I want a treat that’s moist, flavorful, and a little fancy but still totally doable on a weeknight. It’s kind of like a cross between a coffee cake and a layered surprise—think of it as a cozy, personalized cake that my kids ask for all the time. And trust me, this zucchini swirl cake disappears in minutes at my house, especially when I top it with a sweet glaze that’s just the right balance of shiny and indulgent. It’s honestly become a family favorite because it’s easy to make, costs almost nothing, and always gets rave reviews. The best part? You don’t even need fancy equipment — just a few bowls, a whisk, and your oven. I love how this recipe can be tweaked with different fillings or sprinkles, making it a perfect rainy-day project or a special breakfast treat. Believe me, once you try it, it’ll become one of those recipes you turn to again and again—comfort food with a little twist!
What is Zucchini Swirl Cake?
Think of this zucchini swirl cake as a charming little layered dessert that’s more about fun than fuss. It’s essentially a moist cake made with grated zucchini, which adds tenderness and a delicate veggie sweetness that balances out the sugary layers. The “swirl” part? That’s where the magic happens — a swirl of cinnamon-spiced cream cheese or ricotta filling runs through the batter, giving each slice a gorgeous marbled effect and a flavor boost. The name might sound fancy, but it’s really just a cozy, homey baked good that feels like a hug in cake form. The concept came from my grandma’s quick zucchini bread, but I took my favorite ingredients and added that swirl to make it feel extra special. It’s like a homemade, slightly healthier dessert or breakfast treat that makes everyone at the table smile. And if you’re ever in a pinch but want to impress, just whip this up — it’s foolproof and totally adaptable.
Why you’ll love this recipe?
Honestly, what I love most about this zucchini swirl cake is how effortlessly it balances flavor and simplicity. The moment you bake it, your whole kitchen fills with that warm cinnamon smell—my kids say it’s like a snuggle in cake form. The cake itself is super moist and tender thanks to the zucchini, which keeps it from feeling dense or heavy, even with that luscious filling swirled inside. And speaking of the filling, it’s creamy, slightly tangy, and adds a luxurious layer that takes this from simple to special with almost no extra effort. Plus, this recipe is budget-friendly — most ingredients are staples I keep in my pantry or fridge anyway. I’ve even tested this with almond milk and it made it even creamier, so it’s versatile for whatever’s in your fridge. What I really appreciate is how forgiving it is, whether I’m rushing or taking my time. It’s a one-pan party—no fancy equipment needed—and it always turns out picture-perfect. It’s also so adaptable—you can swap the filling for fruit preserves or sprinkle nuts on top if you like. My favorite part? The smell alone can turn a regular Tuesday into a celebration. It’s perfect when you’re craving something sweet but don’t want to stay in the kitchen all afternoon. Once baked, slicing it reveals that beautiful swirl pattern—like a little work of edible art. Trust me, this one’s a lifesaver on busy nights or when you want to bring a smile to your loved ones’ faces.
How do I make Zucchini Swirl Cake?
Quick Overview
This cake comes together faster than you might think, and it’s mostly about mixing, layering, and baking. I love that the batter is quick to whip up, especially if you’re in a hurry or need a last-minute dessert. The key is to grate the zucchini, squeeze out some moisture, and fold it into the batter. Then, you spread half of the batter into a prepared pan, dollop the filling in the center, and swirl a little with a knife for that beautiful marbled look. A quick bake turns everything into a fragrant, golden cake topped with a glossy glaze. It’s honestly a surprisingly forgiving process—once you get the feel of the batter and swirl, you’ll want to make this all the time. This method makes the most tender cake and lets the filling really shine, all without fussing over complicated layering or extra pans. Just a few simple steps, and you’ve got a bakery-worthy treat right at home.
Ingredients
For the Main Batter:
– 2 cups grated zucchini (about 2 medium zucchinis, grated and squeezed dry)
– 2 ½ cups all-purpose flour (or gluten-free blend, if you prefer)
– 1 cup sugar (or just half because I like it less sweet sometimes)
– 1 teaspoon baking powder
– ½ teaspoon baking soda
– ½ teaspoon salt
– 1 teaspoon ground cinnamon (because who doesn’t love a hint of warmth?)
– ⅓ cup vegetable oil or melted butter
– 3 large eggs
– 1 teaspoon vanilla extract
For the Filling:
– 8 oz cream cheese, softened (or ricotta for a lighter version)
– ½ cup powdered sugar (adjust to taste)
– ½ teaspoon vanilla extract
– Optional: a pinch of cinnamon or lemon zest for extra flavor
For the Glaze:
– 1 cup powdered sugar
– 2-3 tablespoons milk or almond milk
– ½ teaspoon vanilla extract
– Optional: a splash of lemon juice or a sprinkle of cinnamon for variation
Step-by-Step Instructions
Step 1: Preheat & Prep Pan
First things first, I always preheat my oven to 350°F (175°C). Grease a 9-inch round cake pan or line it with parchment paper — trust me, this makes a huge difference when it’s time to lift the cake out. I like to set out my ingredients beforehand so I don’t scramble once I start mixing. Squeeze out as much moisture as possible from the grated zucchini with a clean dish towel or paper towels—moisture is the enemy here if you want a fluffy cake that holds its swirl.
Step 2: Mix Dry Ingredients
In a big bowl, whisk together the flour, sugar, baking powder, baking soda, salt, and cinnamon. I do this first so everything is evenly distributed — no clumps here! It’s important to get these nicely combined so your cake bakes evenly and stays super tender.
Step 3: Mix Wet Ingredients
In another bowl, beat the eggs, oil (or melted butter), and vanilla together until smooth. I like to do this with a whisk for a minute—makes everything nice and airy. Then, gently fold in the grated zucchini. I’ve tested this with different zucchinis, and honestly, the fresher the better—it makes the cake taste vibrant and fresh.
Step 4: Combine
Pour the wet mixture into the dry ingredients and fold gently until just combined. Be careful not to overmix — that’s how you get a dense cake instead of a fluffy one. When it’s just combined with a few lumps, you’re good to go. A few streaks of flour are okay—that’s what keeps it tender.
Step 5: Prepare Filling
In a small bowl, beat the softened cream cheese, powdered sugar, and vanilla until smooth and creamy—kind of like thick frosting. If you want more flavor, feel free to add a spice dash or lemon zest. I usually keep it sweet but not overly so, because the glaze will add the final touch.
Step 6: Layer & Swirl
Pour half of the batter into your prepared pan, spreading it out evenly. Dollop spoonfuls of the cream cheese filling over the batter—about 3-4 big spoonfuls. Then pour the remaining batter on top, carefully spreading to cover the filling. Now, take a knife or skewer and swirl through the batter a few times — don’t overdo it, just enough to create a marbled effect that looks pretty when sliced. My kids love watching it come together—they think it’s like magic!
Step 7: Bake
Pop the pan into the oven and bake for about 40-45 minutes. Check for doneness with a toothpick inserted in the center—if it comes out clean, you’re golden. Every oven is different, so mine sometimes takes a few extra minutes. The top should be golden and slightly pulling away from the edges. If it starts to brown too fast, tent it loosely with foil.
Step 8: Cool & Glaze
Let the cake cool in the pan for at least 20 minutes — patience is key here, or it might fall apart when you slice. Once slightly cooled, transfer to a wire rack if you used parchment, or just leave it in the pan if you’re in a hurry. Mix up your glaze ingredients, adding enough milk to get a pourable consistency—thick but pourable. Drizzle evenly over the cake while it’s still just a little warm so it soaks in a bit and sets with that shiny finish.
Step 9: Slice & Serve
Wait at least 15 minutes for the glaze to set, then slice with a sharp knife — I find using a wet knife helps keep the slices clean. Serve with a cup of tea or coffee, or even for breakfast if you’re feeling festive. I love how the swirl pattern looks like a work of art, and the taste? Let’s just say it’s worth every crumb.
What to Serve It With
This cake is so versatile that I’ve served it in all kinds of ways. For breakfast, a chunky coffee or a latte pairs perfectly—nothing beats starting the day with something homemade and comforting. On brunch days, I like to serve it with fresh berries or a dollop of whipped cream. As a dessert, it’s gorgeous on a cake stand with a dusting of powdered sugar or chopped nuts for added crunch. My favorite way? Just a simple cup of brewed coffee, a cozy blanket, and a slice on lazy Sunday mornings. When I bake this for visitors, I often add a few extra sprinkles of cinnamon on top or serve it with vanilla ice cream—they love watching it melt into the warm cake. It also works well as an afternoon snack—especially when you want something sweet but don’t want all the guilt. Honestly, it’s become our family’s go-to treat because it makes everyone feel like they’re getting a little homemade magic every time.
Top Tips for Perfecting Your Zucchini Swirl Cake
Having baked this countless times, I’ve fine-tuned some tricks to make sure yours turns out just as good as mine. First, always squeeze out the zucchini well—moisture is the enemy of fluffy cake. I use a clean dish towel and give it a good press; excess water can make the batter too runny and the cake dense. When mixing, avoid overworking the batter—stir until just combined. Overmixing can make the cake chewy and tough. For the swirl, I recommend using a skewer or toothpick to make gentle circles; this creates that beautiful marbled look without blending the filling too much into the batter. Feel free to adjust the amount of filling—more means a richer swirl, but too much can weigh the batter down. As for substitutions, I’ve tested Greek yogurt instead of some of the oil, and it gives a slightly tangier flavor with extra moisture. Baking wise, I always position my rack in the middle to get even heat, and I check for doneness starting after 35 minutes — every oven varies. For the glaze, I like to add lemon zest sometimes—it brightens the sweetness and adds a fresh kick. A little patience during cooling really pays off—tightening the glaze and preventing that messy run-off. My biggest lesson? Always let it cool completely before slicing, or the swirl pattern might smudge. Trust me on this, the prettier the slice, the more everyone will want seconds.
Storing and Reheating Tips
This cake actually keeps well, which is great when I want to prep ahead. At room temperature, wrapped tightly in plastic or kept in an airtight container, it stays moist and fresh for 2 days. I don’t usually leave it out longer than that because of the glaze, but if your kitchen is cool, a day or so is still fine. For longer storage, I refrigerate it—just cover tightly, and it’ll last up to 4 days. The fridge keeps it fresh but can dry out the cake slightly, so I recommend letting it sit at room temp for 20 minutes before serving. Freezing works beautifully too—wrap slices individually in plastic wrap and store for up to a month. Thaw in the fridge overnight, then serve at room temp. The glaze might need a quick reheat or fresh drizzle to look its best again. I tested this with holiday leftovers, and honestly, it still tastes amazing. If you plan to reheat, I suggest warming slices gently in the microwave for about 15-20 seconds—nothing too hot, just enough to restore that moist, fluffy texture. Keep in mind, the glaze can crack if you reheat too aggressively, so a gentle approach is best. Overall, this cake is pretty giftable—great for making ahead or sharing, and it still keeps that homemade charm even days later.
Frequently Asked Questions
Final Thoughts
This zucchini swirl cake is a perfect example of how simple ingredients and a little love can turn into something extraordinary. I’ve tested it so many times that I feel confident it’ll win over your family or friends too. The secret is in the moist zucchini, the fragrant cinnamon swirl, and that touch of sweetness from the glaze. It’s a comforting, beautiful cake that feels like a warm hug—great for breakfast, dessert, or a cozy afternoon snack. Plus, it’s flexible enough to adapt to your tastes—swap the filling, tweak the sweetness, or play with toppings. I hope you love making this as much as I do, and I can’t wait to hear how yours turns out! If you try it, leave a comment or share your own variations. Happy baking, friend—I think you’re going to love this one. And remember, a little bit of love in the kitchen always makes the best memories.
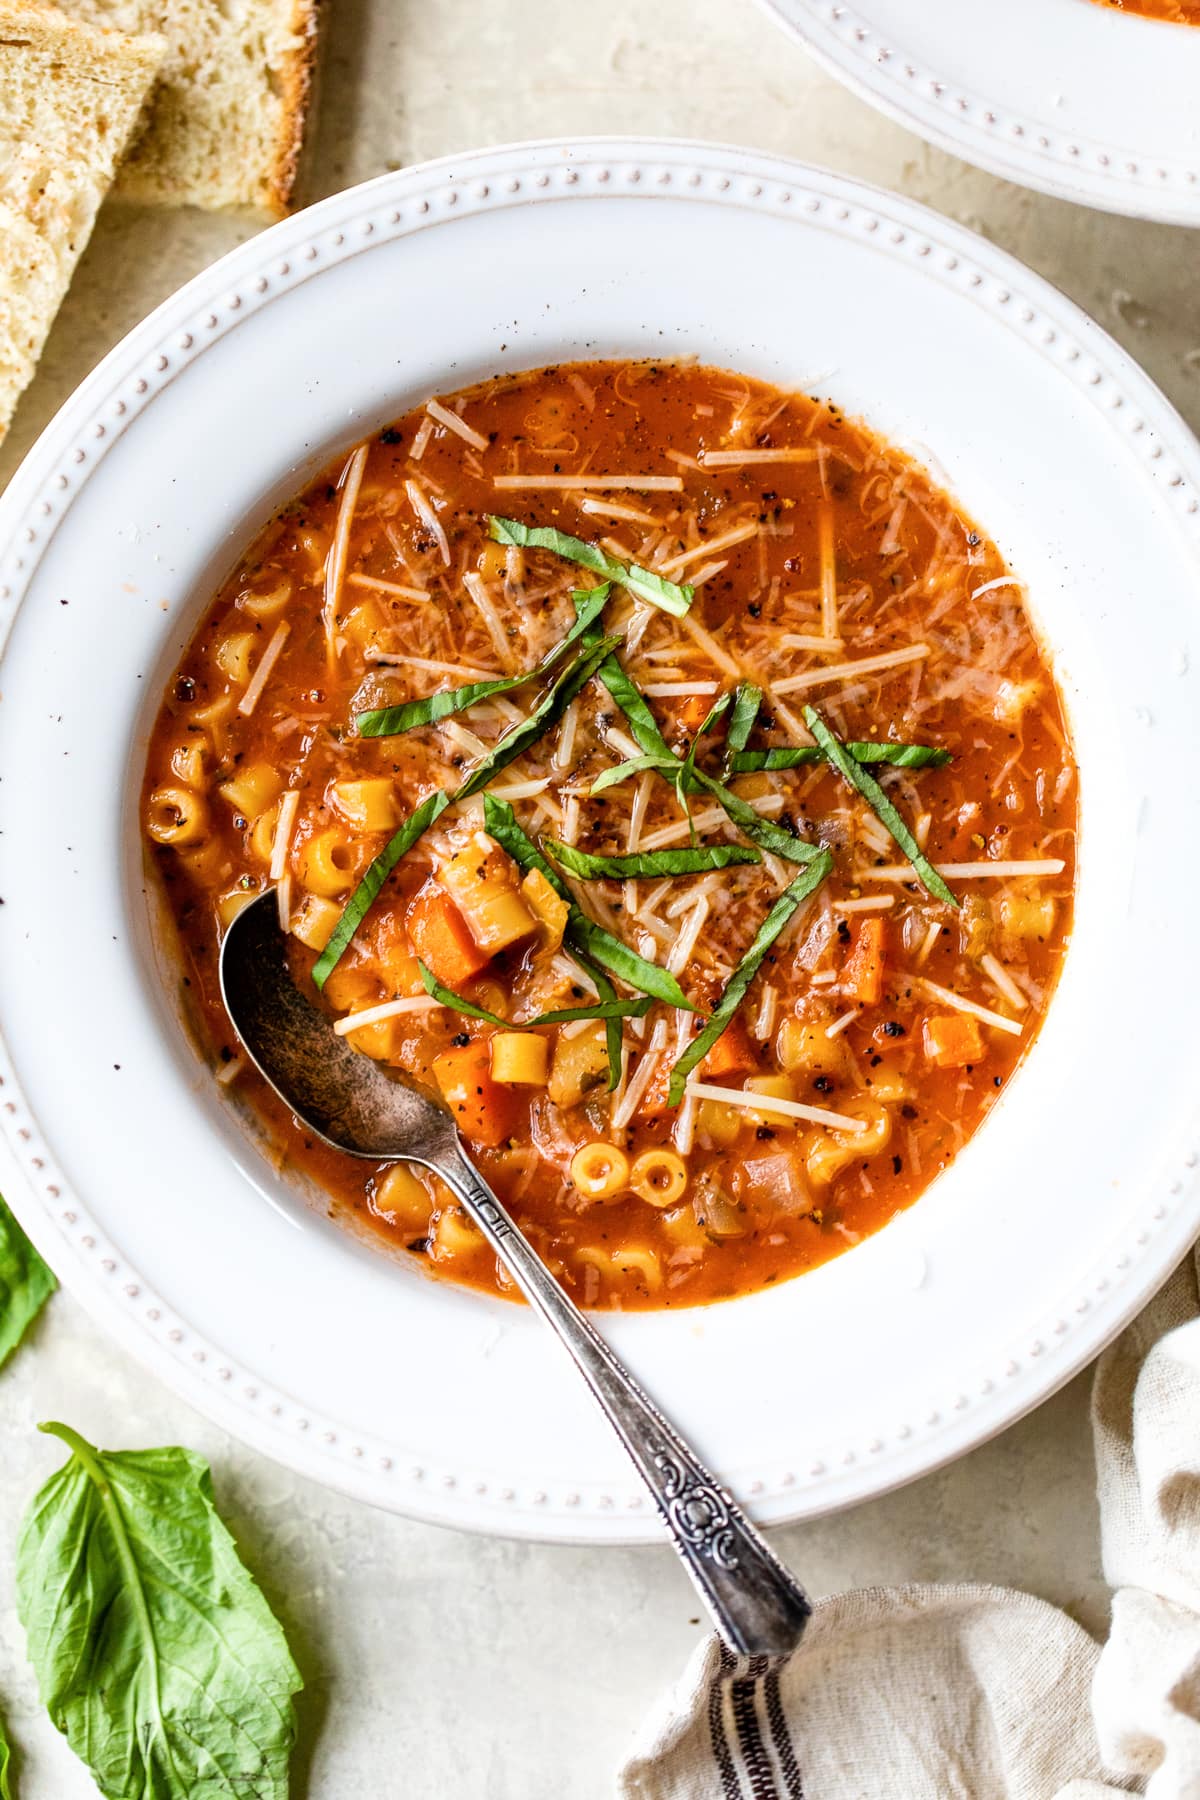
Pasta Fagioli
Ingredients
Method
- In a large heavy pot or Dutch oven, sauté the onion and garlic in olive oil over medium heat.
- Blend the beans with one cup water in an electric blender until almost smooth.
- Add blended beans to pan, then add the can of tomato sauce, celery, carrots, chicken broth, basil, bay leaf, parsley, oregano, salt, and pepper.
- Add 1 cup water and bring to a boil. Simmer, covered, for 20 minutes, stirring occasionally.
- Add pasta and cook uncovered until pasta is al dente, according to pasta directions.
- Ladle soup into bowls and top with grated cheese (extra), if desired.