Easy Chocolate Pudding Dessert Magic
If you’ve ever had that sudden craving at 10pm for something sweet but didn’t want to go all-in with a big, complicated dessert, you’re gonna love this one. I’ve made it countless times, tweaking the swirl and filling just until it felt right, and it’s honestly become a household favorite. The smell alone—like fresh chocolate, toasted coconut, and a hint of zucchini—fills the kitchen and has everyone asking, “What’s baking?” It’s got that cozy, homemade vibe, but trust me, it’s surprisingly simple—and so adaptable. My kids ask for this all the time, especially when they want a treat that feels a little fancy but is really just a mix-and-pour kind of deal. Plus, it’s loaded with hidden veggies and good-for-you ingredients, so I don’t feel bad giving them a slice. This is the kind of recipe you’ll keep on hand for those moments when everyone’s craving a cozy, chocolatey hug—because, honestly, what “human” really means here is sharing comfort food that’s made with love, and this cake hits all those notes.
What is Zucchini & Coconut Chocolate Swirl Cake?
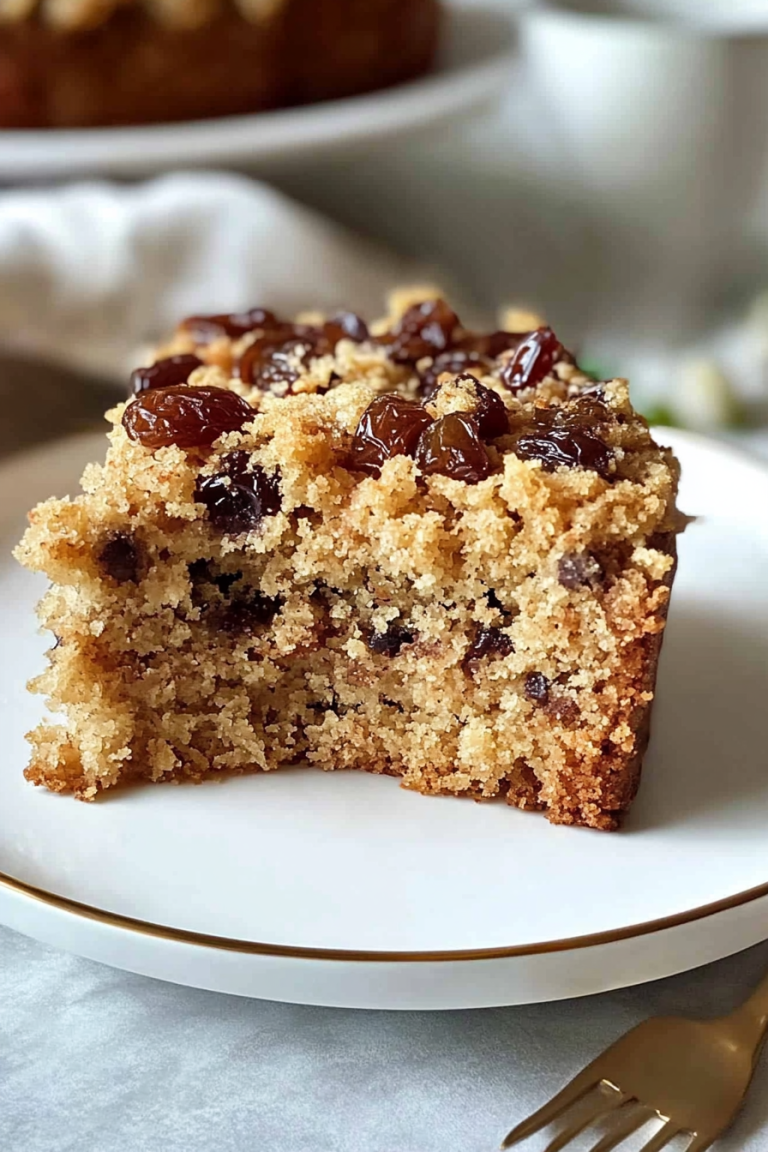
This is a wonderfully moist, tender cake that’s packed with grated zucchini, toasted coconut, and swirls of rich chocolate within every slice. Think of it as a mash-up between a classic zucchini bread and a decadent chocolate cake—only better, because it’s finished with a glossy coconut glaze that just ties everything together. It’s essentially a feel-good dessert that sneaks in some vegetables, making it feel a little healthier without sacrificing any flavor. The ‘swirl’ part is what makes it special—you pour the batter in, add a layer of melted chocolate, and then swirl it through with a toothpick or a skewer, creating beautiful ribbons of cocoa goodness. The name might sound fancy, but this cake is as laid-back as a Sunday morning, perfect for sharing with friends or family and oh-so satisfying with a cup of coffee or tea. Think of it as that one dessert that feels just fancy enough to impress, but is so easy you’ll want to make it every week.
Why you’ll love this recipe?
What I love most about this is how it manages to be both indulgent and wholesome all at once. The aroma alone—coconut toasting, chocolate melting—will have everyone racing to the kitchen. The flavor profile? Think layers of sweet, nutty coconut, tender zucchini that adds moisture without any fuss, and that luscious chocolate swirl that makes every bite feel a little special. And yes, it’s really easy to whip up; I’ve tested this with everything from almond milk to regular cow’s milk, and it works beautifully. It’s budget-friendly, too—most ingredients are staples in my pantry, and you probably already have what you need! Multiply a batch for a family gathering or keep it small for cozy nights by the fire. Plus, it’s so versatile. Want to make it gluten-free? Swap in some almond flour—trust me on this. Looking for vegan? Use coconut oil and dairy-free chocolate, and you’re good to go. What truly makes this recipe stand out is how forgiving it is—overmix, underbake slightly, and it still comes out perfect. I’ve made this countless times, and it almost always disappears in minutes. That, my friend, is the sign of a keeper.
How do I make Zucchini & Coconut Chocolate Swirl Cake?
Quick Overview
This cake is a breeze. First, you’ll grate your zucchini and toast the coconut to make your kitchen smell like a tropical bounty. While that cools, mix your dry ingredients in one bowl and your wet ingredients in another. Combine them gently—no overmixing here—to keep everything tender. Melt some chocolate (or your favorite chocolate chips), swirl it into the batter, and then gently spoon everything into a prepared pan. After a quick bake, cool it off, then pour on a glossy coconut glaze. It’s all about layering flavors and textures—moist, crumbly, gooey, with that beautiful marbled swirl of cocoa. The secret? Don’t skip the swirl step—it makes the cake look as spectacular as it tastes, and it’s surprisingly fun to do. The whole process takes about an hour from start to finish. Totally doable even on a busy weeknight, especially once you get into the rhythm!
Ingredients
For the Main Batter:
– 2 cups grated zucchini (about 2 small zucchinis, excess water squeezed out)
– 1 1/2 cups all-purpose flour (or gluten-free blend)
– 1 cup shredded toasted coconut (don’t skip toasting—it brings out flavor)
– 1 cup sugar (can adjust to taste, or substitute with honey for a natural sweetness)
– 1/2 teaspoon baking powder
– 1/2 teaspoon baking soda
– 1/4 teaspoon salt
– 1/2 cup melted coconut oil (or vegetable oil)
– 3 large eggs (or flax eggs for vegan version)
– 1 teaspoon vanilla extract
For the Filling & Swirl:
– 1/2 cup good-quality dark chocolate or chocolate chips, melted
– Optional: a pinch of espresso powder to intensify chocolate flavor
For the Glaze:
– 1/2 cup sweetened shredded coconut (preferably toasted)
– 3 tablespoons coconut milk (or heavy cream for non-vegan)
– 1 tablespoon honey or maple syrup for sweetness
– A splash of vanilla extract
Step-by-Step Instructions
Step 1: Preheat & Prep Pan
Set your oven to 350°F (175°C). Lightly grease your baking pan—9-inch round or square works best—and line the bottom with parchment paper. Toast your shredded coconut in a dry skillet over medium heat until golden and fragrant—this step really elevates the flavor. Let it cool while you prep the zucchini. Squeeze out all excess moisture from the grated zucchini using a clean kitchen towel—you want it moist but not watery, or your cake might turn out too dense or greasy. Trust me, I learned this from countless soggy cakes!
Step 2: Mix Dry Ingredients
In a large bowl, whisk together your flour, baking powder, baking soda, salt, and shredded toasted coconut. Mix until evenly combined. This ensures the leavening is evenly distributed, so the cake rises nicely. Set aside.
Step 3: Mix Wet Ingredients
In a separate bowl, beat your eggs, sugar, vanilla, and melted coconut oil until well combined. Add the grated zucchini last and stir gently—try not to overmix here to keep the batter tender. The zucchini will introduce moisture and a little natural sweetness, which balances the deep, rich chocolate swirl later.
Step 4: Combine
Pour wet ingredients into dry and fold gently just until no streaks remain—don’t overmix. Overmixing can make the cake tough, and we want a light crumb. If the batter feels too thick, add a splash of milk; if too runny, sprinkle in a little extra flour. The consistency should be like thick pancake batter.
Step 5: Prepare Filling
Melt your chocolate chips slowly in a microwave or over a double boiler, stirring until smooth. Add a splash of espresso powder if you’re feeling adventurous—this deepens the chocolate flavor without making it bitter. Let it cool just slightly so it doesn’t totally melt into the batter when added.
Step 6: Layer & Swirl
Pour half of the batter into your pan, then spread the melted chocolate evenly over the top. Add the remaining batter on top, smoothing it out. Then, take a toothpick or a skewer and gently zig-zag through the batter, creating beautiful marbled swirls. Don’t overdo it—you want nice ribbon-like streaks, not an even mix. If your chocolate starts to set, just rewarm it slightly.
Step 7: Bake
Pop your cake into the preheated oven. Bake for 40-45 minutes, or until a toothpick inserted in the center comes out with a few moist crumbs—no runny batter! Keep an eye in the last 10 minutes. Every oven’s a little different, so I suggest starting to check at 40 minutes.
Step 8: Cool & Glaze
Let your cake cool in the pan for about 15 minutes, then transfer to a wire rack. While it cools, make your coconut glaze: toast shredded coconut just until golden; warm coconut milk with honey and vanilla, then stir in the toasted coconut. Pour over the cooled cake—this will soak in a little, adding sweetness and texture. If the glaze feels too thick, add a splash more coconut milk. It should be shiny and just pourable.
Step 9: Slice & Serve
Use a serrated knife for the neatest slices—wait until it’s completely cooled to avoid messy crumbs. I love serving this with a dollop of whipped cream or a scoop of vanilla ice cream for an extra treat. It’s great warm or at room temperature, and if you have leftovers, store them covered in the fridge for up to three days. Just warm slices slightly in the microwave before serving—trust me, it’s like fresh out of the oven all over again.
What to Serve It With
This cake is so versatile, I always have a few ideas up my sleeve. For breakfast, just a cup of really good coffee—trust me, a strong brew makes this cake sing. I love slicing it into tiny squares for a brunch table alongside fresh fruit and some Greek yogurt; the coconut and chocolate make it feel fancy but approachable. When dinner’s done and you want something sweet, this cake pairs beautifully with a glass of cold almond milk or a warm cup of tea. My family’s favorite is serving it with a drizzle of extra coconut glaze and a dusting of powdered sugar. It’s a comfort dessert that can dress up or down, depending on mood and occasion. Plus, I’ve learned that this keeps well in the fridge for days—sometimes I cut a big slice, and my kids come back for seconds later that day. It’s truly that good.
Top Tips for Perfecting Your Zucchini & Coconut Chocolate Swirl Cake
Over the years, I’ve picked up some tricks that help this cake come out just right every time. First, always squeeze out as much moisture from the zucchini as possible—wet zucchini can turn your batter gummy. I’ve tested with grated carrot, and it works beautifully too—just adds a different twist! When mixing, fold gently; don’t beat vigorously, or you’ll lose the airy crumb. If you’re swirling chocolate, warm it slightly first, or it will rigidify too fast. I used to not swirl enough, but now I do a quick zig-zag with a skewer—visuals matter, and the prettier the pattern, the more everyone gladly devours. If you want to swap ingredients, try coconut sugar instead of white to make it slightly healthier; for vegan, swap eggs for flax eggs and use vegan chocolate chips. As for baking, every oven’s a little different—so start checking at 40 minutes, and remember: the toothpick test isn’t perfect—it should come out with moist crumbs, not wet batter. Lastly, don’t skip the toasting of coconut. That step unlocks a depth of flavor that, frankly, makes this cake irresistible. Trust me, I’ve learned this the hard way—dry coconut just doesn’t taste as good!
Storing and Reheating Tips
This cake keeps surprisingly well. If you’re planning to eat it within a day or two, cover it tightly with plastic wrap and keep it at room temperature—up to 2 days. After that, it’s best to store in the fridge—they say it’s good for up to 3 days, but I find it’s even better the next day since the flavors meld. Wrap the whole cake or individual slices in foil or an airtight container. When you’re ready for seconds or leftovers, warm a slice in the microwave for about 15 seconds; the chocolate swirl will get gooey, and the coconut will smell even more incredible. If freezing, wrap it tightly in plastic wrap and then foil. It’s best eaten within a month—just thaw in the fridge overnight and warm slightly. Remember, if you glazed your cake, it’s better to add the glaze after reheating, so it stays shiny and fresh. A quick reheat keeps it moist and tender, almost like just out of the oven.
Frequently Asked Questions
Final Thoughts
If you’re anything like me, baking is all about creating those warm, cozy moments—whether it’s sharing a slice with loved ones or sneaking one for yourself after a long day. This zucchini & coconut chocolate swirl cake is a testament to that. It’s simple but packed with flavor—moist, tender, with that perfect swirl of gooey chocolate. Every time I make it, I’m reminded that the best recipes are the ones that feel like home. No fancy ingredients or complicated techniques, just honest, satisfying baking from the heart. Plus, it’s an excellent way to get a little sneaky veggie into your family’s diet without a fuss. So go ahead, give it a try—I’d love to hear how yours turns out! And don’t forget, baking is personal—feel free to tweak it, add your favorite nuts or fruit, or swap ingredients to make it truly yours. Happy baking!
Dirt Cake
Ingredients
Method
- Preheat oven to 300°F (148°C). Prepare three 8-inch cake pans with parchment paper circles in the bottom, and grease the sides.
- In a large bowl, combine all dry ingredients: flour, sugar, cocoa powder, baking soda, and salt.
- Add eggs, milk, vegetable oil, and vanilla extract to the dry ingredients and mix well.
- Slowly add water and mix until the batter is well combined.
- Divide the batter evenly between the prepared cake pans and bake for 30-33 minutes, or until a toothpick inserted into the center comes out with a few moist crumbs.
- Let the cakes cool in the pans for 3-4 minutes, then invert them onto wire racks to cool completely.
- In a large mixer bowl, beat together the softened butter and shortening until well combined.
- Add about half of the powdered sugar and the Oreo crumbs. Beat until well combined.
- Stir in the vanilla extract and 3 tablespoons of water or milk. Mix until well combined.
- Add the remaining powdered sugar and Oreo crumbs. Mix until smooth and well combined.
- Add additional milk or water, one tablespoon at a time, until the frosting reaches your desired consistency.
- Use a large serrated knife to carefully level the domes off the tops of the cooled cake layers.
- Place the first cake layer on your serving plate or cake board. Spread about 3/4 cup of the Oreo Dirt Frosting evenly over the top.
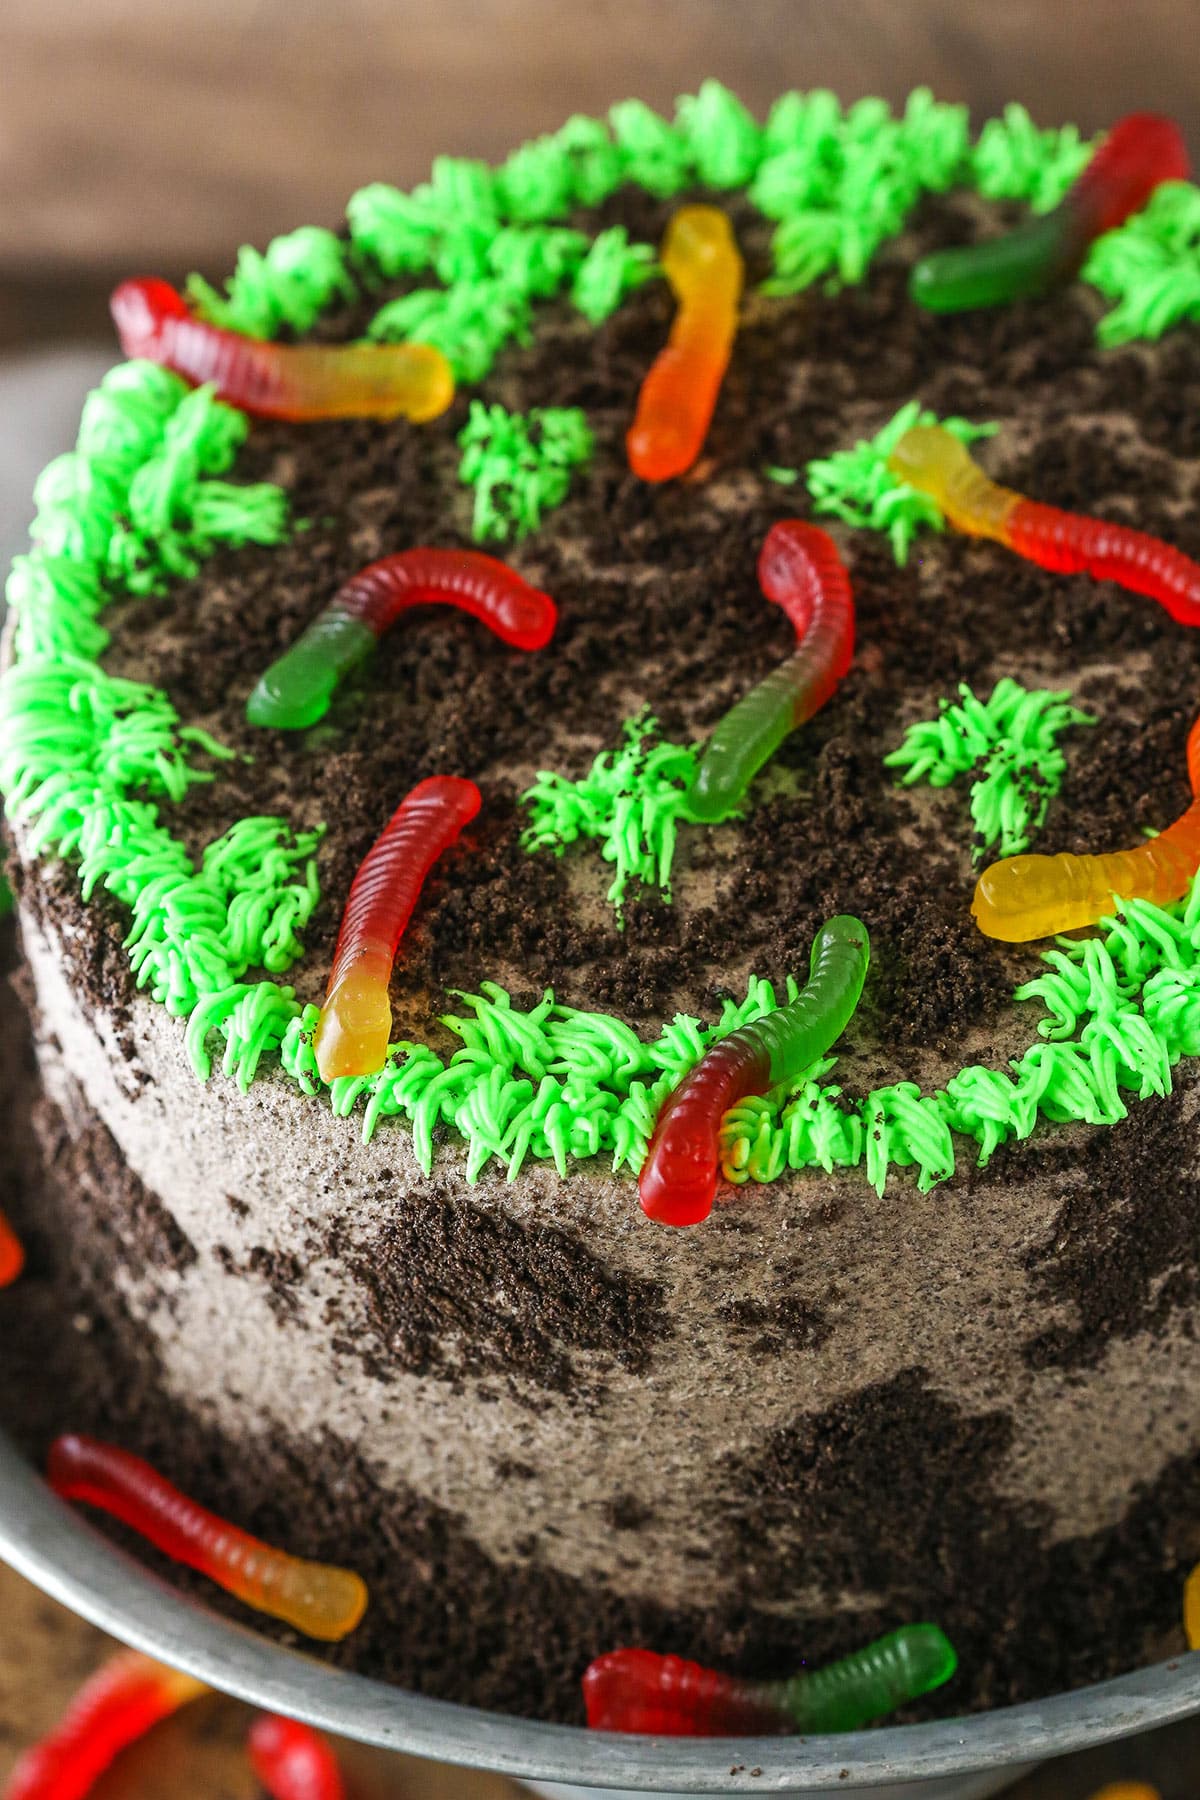
- Pipe a small dam of frosting around the outer edge of the frosted layer. Sprinkle about 1/2 cup of Oreo crumbs inside the dam. Arrange 6-8 gummy worms around the crumbs and gently press them down.
- Place the second cake layer on top of the first. Spread another 3/4 cup of Oreo Dirt Frosting over it.
- Repeat step 14: pipe a frosting dam, add Oreo crumbs, and place gummy worms.
- Top the cake with the final cake layer. Frost the entire outside of the cake with the remaining Oreo Dirt Frosting.
- Press the remaining Oreo crumbs into some areas around the outside of the cake to create a 'dirty' effect.
- For the green frosting: In a small mixer bowl, beat the softened butter until smooth.
- Add the powdered sugar and mix until well combined and smooth.
- Stir in the vanilla extract and 1 tablespoon of water or milk. Beat until smooth. Add more liquid, if needed, to reach the right consistency.
- Add green gel icing color and mix until the frosting is a vibrant green.
- Using a grass piping tip (like Wilton tip 233), pipe grass around the top edge of the cake and in scattered patches on top.
- Place a few more gummy worms around the top of the cake and finish by scattering the remaining Oreo crumbs over the top.