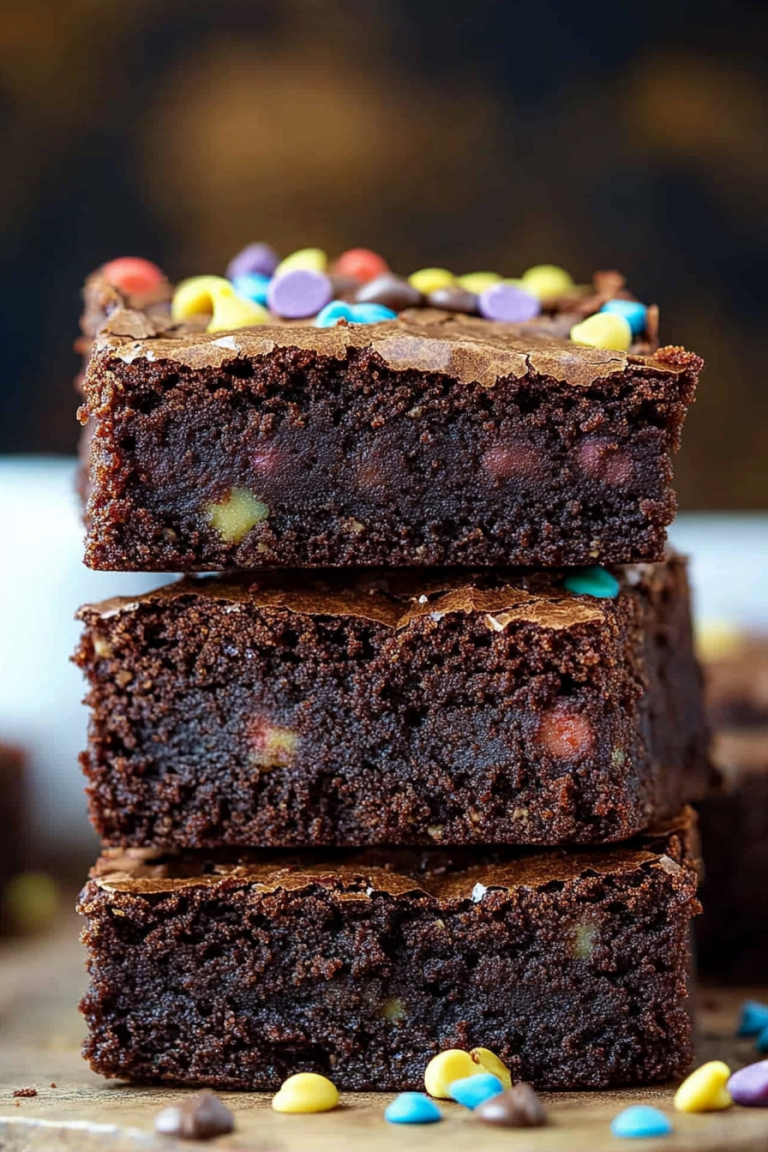
Sweet Little Debbie Cake Bites How To
If you’re anything like me, there’s something about baking that feels like a warm hug—especially on those busy mornings when you need something cozy but don’t want to spend hours in the kitchen. I remember the first time I made this zucchini swirl coffee cake—my kids were skeptical at first, but one bite and they were hooked. The smell alone brings everyone to the kitchen: warm, cinnamon-y, with just a hint of zucchini’s subtle sweetness. It’s honestly become our go-to morning treat, and I always do this when I want to indulge a little without feeling guilty. Plus, it’s ridiculously easy to make, even on a rushed weekend. Trust me, this one’s a lifesaver on busy nights, or carb-loading for that early-morning hike. Every time I make it, I get nostalgic, thinking about lazy Sunday mornings baking with my grandma. Now, I’m sharing it with you because I know how much comfort good food can bring—so grab a mug of coffee and let’s get started on your new favorite recipe.
What is Zucchini Swirl Coffee Cake?
This zucchini swirl coffee cake is like a sweet, moist ribbon cake infused with warm spices and topped with a rich cinnamon swirl. Think of it as a cross between a crumb cake and bread pudding, all wrapped up in one cozy package. The name’s pretty straightforward: it’s a coffee cake, but with a hidden veggie twist—zucchini. I love that it sneaks in some vegetables, which makes it a little healthier but still totally indulgent. The batter’s soft and tender, with hidden bursts of cinnamon-sugar swirls running through it, creating a gorgeous marbled effect when you slice into it. It’s essentially breakfast meets dessert, perfect for mornings with a splash of cream or an afternoon coffee break. And honestly, once you see how easy it is to whip up, you’ll want to keep a batch in the fridge—and the freezer too, just in case.
Why you’ll love this recipe?
What I love most about this zucchini swirl coffee cake is how versatile and forgiving it really is. It’s a picture-perfect treat that looks fancy enough for guests but is simple enough to make on a weekday. The aroma alone—cinnamon, vanilla, and that freshly baked smell—will make your whole house feel like a bakery. The flavor? Oh, it’s got a delicate sweetness with a hint of earthiness from the zucchini, balanced perfectly by that cinnamon swirl. Trust me, the first time I made this, I was worried the zucchini would be too watery or bland, but I learned a few tricks—like squeezing out excess moisture and choosing the right zucchini—that make all the difference. And it’s budget-friendly too; most of the ingredients are pantry staples. Plus, you can switch up the flavor with nuts, berries, or even swap the cinnamon for other warm spices. It’s a recipe I always come back to because it’s cozy, forgiving, and utterly delicious—my kids ask for this all the time, and I can see why.
How do I make Zucchini Swirl Coffee Cake?
Quick Overview
This coffee cake starts with a simple batter made from basic pantry ingredients—flour, sugar, eggs, and butter—that’s mixed until just combined. While it’s baking, you prepare a cinnamon-sugar swirl that gets layered into the batter for that beautiful marbled effect. The secret is not overmixing the batter to keep it tender. After layering in the swirl, it goes into the oven until golden brown and a toothpick comes out clean. Once baked, I love to drizzle it with a quick glaze—or skip it if I want something less sweet. It’s a straightforward process that’s foolproof even for beginner bakers, but results in something so pretty and inviting, you’ll want to serve it all week long.
Ingredients
For the Main Batter:
– 2 cups all-purpose flour (preferably unbleached for richer flavor)
– 3/4 cup granulated sugar
– 1 teaspoon baking powder
– 1/2 teaspoon baking soda
– 1/2 teaspoon salt
– 1 teaspoon ground cinnamon (smells divine when fresh)
– 1/2 cup unsalted butter (melted for richness, but softened works too)
– 2 large eggs
– 1 teaspoon vanilla extract
– 1 cup grated zucchini (rooms temp—squeeze out excess moisture so it’s not watery)
For the Filling:
– 1/2 cup brown sugar
– 1 tablespoon ground cinnamon
– 2 teaspoons melted butter
– Optional: chopped nuts, chocolate chips, or berries for variation
For the Glaze:
– 1/2 cup powdered sugar
– 1-2 teaspoons milk or cream
– 1/4 teaspoon vanilla (for flavor)
Step-by-Step Instructions
Step 1: Preheat & Prep Pan
I always start by heating my oven to 350°F (175°C) and greasing a 9-inch square pan or a similar-sized baking dish with butter or non-stick spray. Lining it with parchment paper makes life even easier when you’re ready to serve. I also like to set out my ingredients so I can work smoothly—no last-minute scrambling!
Step 2: Mix Dry Ingredients
In a big bowl, whisk together the flour, sugar, baking powder, baking soda, salt, and cinnamon until well combined. Mixing the dry ingredients first prevents clumping and ensures even distribution of leavening agents—trust me, this tiny step makes all the difference in the fluffiness.
Step 3: Mix Wet Ingredients
In a separate bowl, beat the eggs with the vanilla and melted butter until smooth. Then, fold in the grated zucchini—it might look a little watery, but that’s okay as long as you’ve squeezed out as much moisture as possible. The zucchini keeps the cake moist and adds a gentle sweetness, but I’ve tested this with a little almond milk in the batter, and it actually made it even creamier!
Step 4: Combine
Add the wet ingredients to the dry and mix gently until just combined—don’t overdo it or the cake may turn dense. You want a soft, slightly thick batter. If it’s too stiff, a splash of milk can loosen it up, but don’t go overboard!
Step 5: Prepare Filling
In a small bowl, combine the brown sugar, cinnamon, and melted butter. Mix until crumbly but still moist. Feel free to toss in walnuts or chocolate chips if you want to switch things up. This sweet cinnamon swirl is what makes this coffee cake so irresistible, so don’t skip it!
Step 6: Layer & Swirl
Spread half of the batter into your prepared pan. Spoon about half of the cinnamon-sugar mixture over it, then spread the rest of the batter on top. Finish with the remaining cinnamon mixture. Using a butter knife or a skewer, gently swirl through the batter—this creates those gorgeous marbled ribbons. I’ve learned it’s best to do a gentle, broad swirl, so it looks pretty but doesn’t turn the whole thing into a cinnamon mess.
Step 7: Bake
Pop it into the oven for about 35-40 minutes. Keep an eye on it; you want a deep golden color, and a toothpick inserted in the center should come out clean. Every oven is different, so start checking around the 33-minute mark. If the top browns too quickly, tent it with foil to prevent burning while the inside finishes baking.
Step 8: Cool & Glaze
Let the cake cool in the pan for about 15 minutes before transferring it to a wire rack. While it’s still slightly warm, drizzle with your glaze—powdered sugar mixed with milk and vanilla. If you want a more dramatic finish, sprinkle chopped nuts or coconut flakes over the glaze for extra crunch.
Step 9: Slice & Serve
Use a sharp serrated knife to cut even slices—serrated blades work best to keep the swirl pattern intact. Serve warm or at room temperature with a cup of coffee or tea. Honestly, this cake disappears in minutes at my house—my kids actually ask for seconds, and I don’t blame them. It’s the perfect balance of moistness, spice, and that little swirl of sweetness making every bite special.
What to Serve It With
This zucchini swirl coffee cake is so versatile that it works anytime—breakfast, brunch, or even a quick dessert. For breakfast, pair it with a bold, dark coffee or a frothy cappuccino. I love slicing a warm piece and topping it with a dollop of whipped cream or a smear of butter—simply divine. On weekends, I serve it as part of a brunch spread with fresh fruit, yogurt, and maybe a mimosa or two—that’s my kind of celebration! If you’re craving something more indulgent, add a scoop of vanilla ice cream or a drizzle of caramel for an extra treat. It’s the kind of comforting, nostalgic dish that makes even the busiest mornings feel special. Plus, it’s a hit with all ages—my kids are convinced it’s a cake, and honestly, I’m happy to let them think that.
Top Tips for Perfecting Your Zucchini Swirl Coffee Cake
Over the years, I’ve learned a few tricks to make this cake trulyshine:
- Zucchini Prep: Always squeeze out as much moisture as you can from the grated zucchini. If it’s too watery, the batter might be runny, and the cake won’t hold together well. I keep a clean kitchen towel nearby—just press and wring out the zucchini until it’s dry-ish.
- Mixing Advice: Handle the batter gently—overmixing can result in a dense cake. A few lumps are okay! The key is just combining everything until it’s uniformly moist.
- Swirl Tips: To get an attractive marbled look, don’t overdo the swirling. A broad, swirling motion helps keep the cinnamon visible and prevents it from sinking entirely to the bottom.
- Ingredient Swaps: I’ve played around with different sugars—brown, coconut, or even honey—and they all work nicely. Just adjust the liquids if you’re using honey or syrup to keep the batter from getting too wet.
- Baking Adjustments: Every oven heats a little differently. Keep an eye on your cake starting around 33 minutes. If it’s browning quickly, tent with foil. Don’t rely solely on time—use visual cues and toothpick tests.
- Glaze Variations: For a richer glaze, add a splash of bourbon or vanilla extract. For a dairy-free version, replace milk with almond or coconut milk.
This recipe has been a labor of love, and every tweak I make just makes it better. I’ve learned to double the cinnamon swirl because, honestly, more cinnamon never hurts, right? I also tested to see what happens if I add a handful of oats on top—I loved the crunch it added. When you try it, don’t be afraid to experiment—food’s all about fun and flavor, after all.
Storing and Reheating Tips
This cake is best enjoyed within a couple of days, but if you want to keep it fresh, here’s how I do it:
Room Temperature: Wrap it tightly with foil or store in an airtight container. It stays good for about 1-2 days—just enough time to enjoy it with your morning coffee.
Refrigerator Storage: In a sealed container, it stays moist and fresh for about 4 days. I love to warm up slices gently in the microwave—about 15 seconds does the trick—so it’s just as tasty as when it’s fresh out of the oven.
Freezer Instructions: Wrap slices individually with plastic wrap, then place them in a freezer bag for up to 3 months. To reheat, thaw overnight in the fridge and warm in the microwave or oven. The texture remains tender, and the flavor is just as good—plus, having a frozen stash is the ultimate lifesaver!
For the best glazed finish, I like to add the drizzle after reheating, so it stays sticky and fresh-looking instead of soaking in during storage.
Frequently Asked Questions
Final Thoughts
This zucchini swirl coffee cake has become a staple in my baking repertoire, and I honestly think it might become yours too. It’s the kind of recipe that makes you feel warm and accomplished—like a little bit of love baked into every slice. The tender crumb, cinnamon swirl, and sneaky veggies make it a crowd-pleaser for family gatherings or just a treat for yourself. Plus, it’s endlessly adaptable: swap in blueberries, walnuts, or even swap out the cinnamon for nutmeg or allspice. I encourage you to experiment and make it your own. After all, baking is as much about fun as it is about flavor. I hope you try this soon—happy baking, and I can’t wait to hear how yours turns out! Don’t forget to comment below or share your tweaks—I love hearing about how others make their favorite recipes come to life.
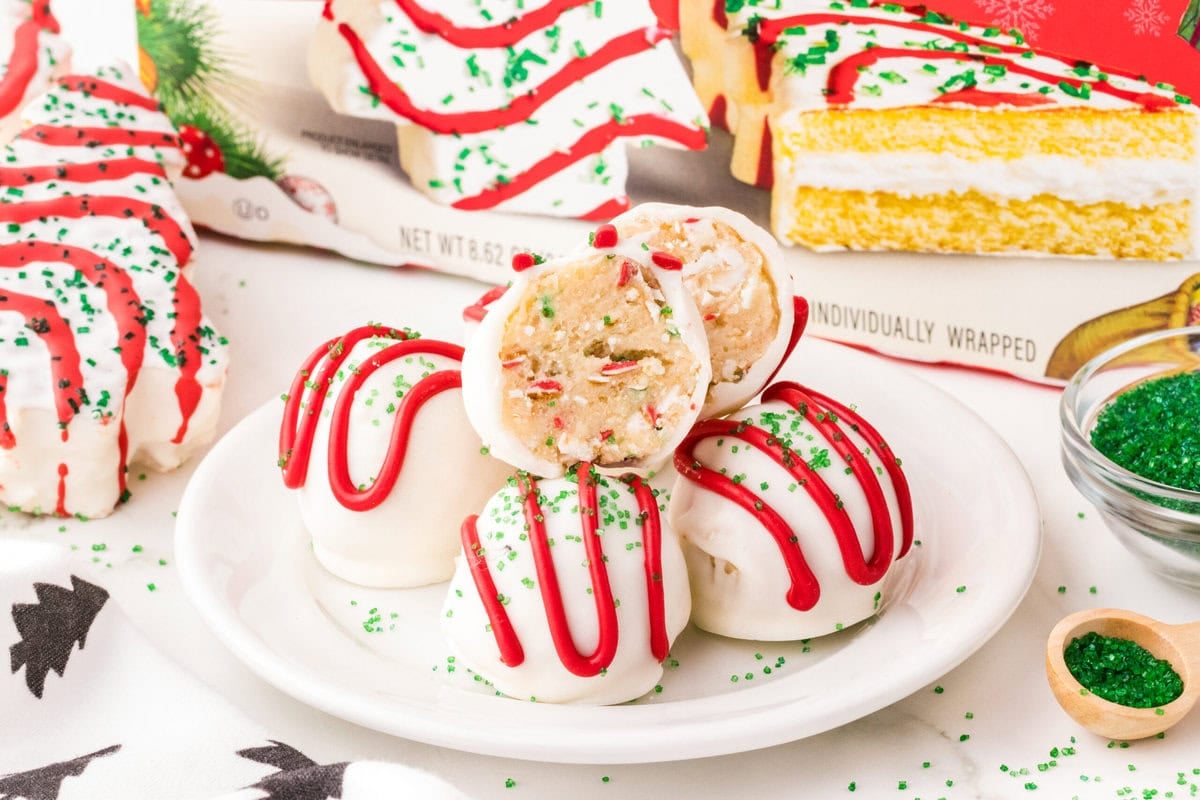
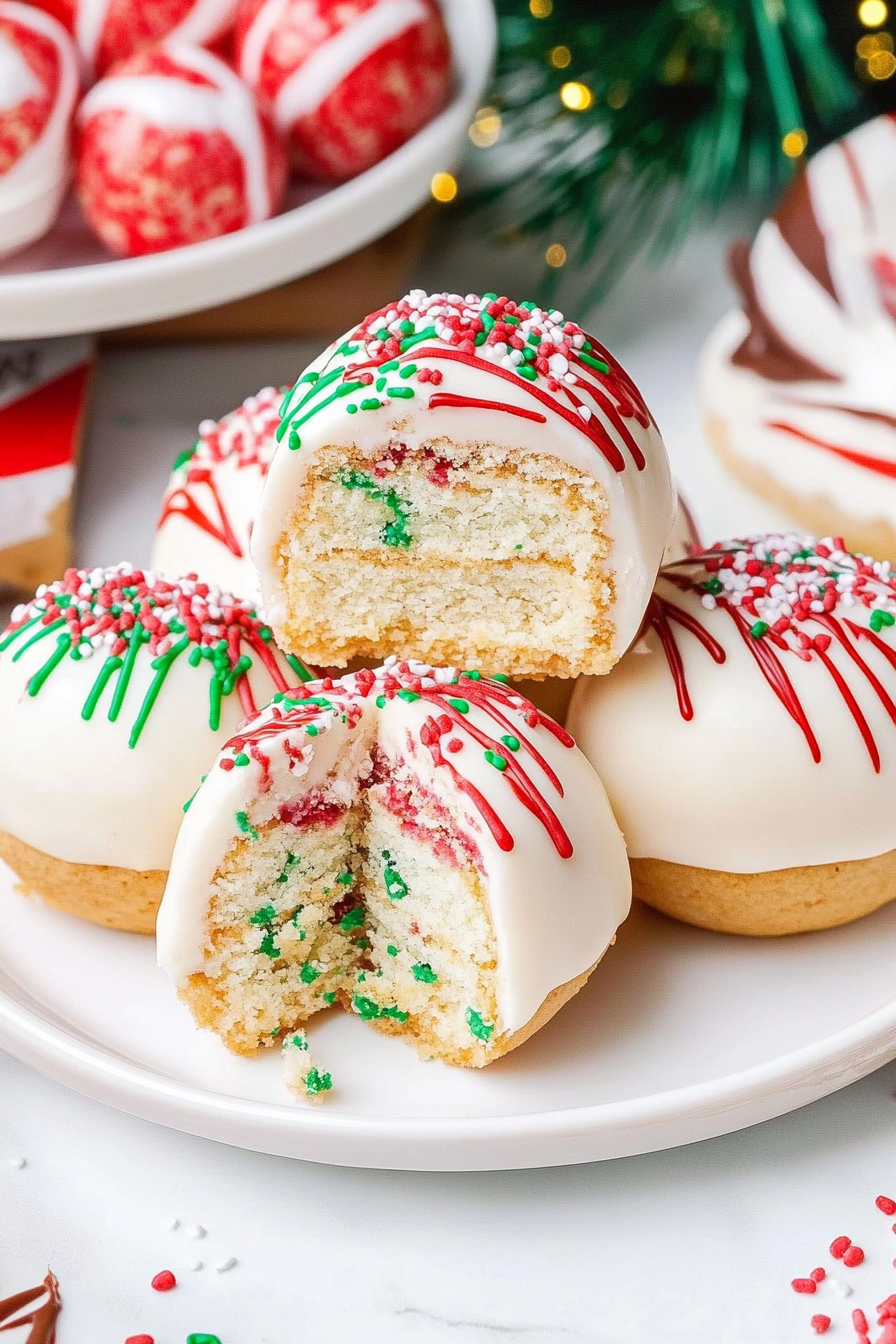
Little Debbie Cake Balls
Ingredients
Method
- Line two large baking sheets with parchment paper or a silicone mat and set aside.
- To a large mixing bowl, add the softened cream cheese and beat on medium speed, using a handheld mixer, for 1-2 minutes or until fluffy and smooth.
- Break the Little Debbie vanilla Christmas tree Snack Cakes into smaller pieces and add to the bowl of beaten cream cheese. Mix on low speed just until fully combined. You may still have some small pieces of the vanilla coating from the snack cakes remaining in the mixture however the mixture should be relatively smooth.
- Using a small cookie scoop, scoop out a 1 tablespoon sized portion of cake ball mixture and place into the palm of your hand. Gently roll to form a smooth ball.
- Place the Little Debbie Christmas tree cake ball onto one of the prepared baking sheets. Repeat with the remaining mixture until all the cake balls have been formed and placed onto the prepared baking sheet.
- Freeze the cake balls for 30-45 minutes, or until completely solid. This will make it easier to coat the cake balls in the melted white chocolate.
- Melt the white chocolate wafers in a medium bowl according to package directions and stir to a smooth consistency.
- In a separate small bowl, melt the red vanilla flavored candy wafers according to package directions and stir until smooth. Transfer the melted red candy wafers into a small piping bag with the tip cut off.
- Place a single cake ball into the melted white chocolate, being sure to coat all sides. Using a fork, lift the coated cake ball out of the melted white chocolate and gently tap the fork on the side of the bowl allowing the excess melted white chocolate to drip back into the bowl.
- Place the white chocolate coated Little Debbie Christmas tree cake ball onto the second prepared baking sheet. Pipe a decorative ziz-zag pattern across the top of the white chocolate coated cake ball and sprinkle with a pinch of the green sanding sugar sprinkles. Try to mimic the look of the original Little Debbie Christmas tree snack cakes. Repeat until all the cake balls have been coated and decorated.
- Let the Little Debbie Christmas tree cake balls set for 15-20 minutes until the white chocolate coating is completely firm before plating and serving.