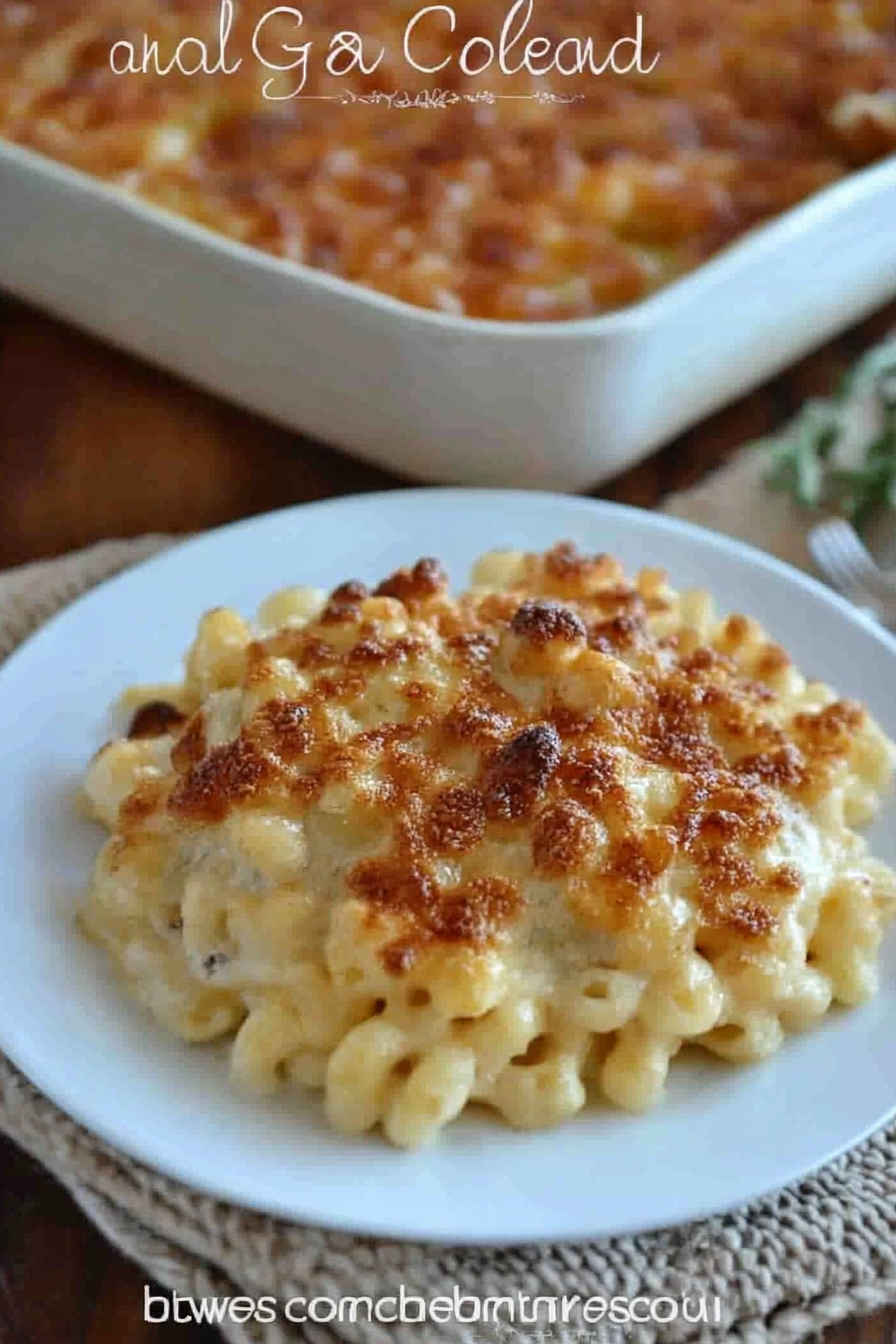
Savory Mac and Cheese with Gouda and Bacon
If there’s one thing I’ve learned over the years, it’s that coffee cake isn’t just for breakfast — it’s a love affair in every crumb and swirl. I still remember the smell of my grandma’s oven wafting through the house every Saturday morning, filling the kitchen with a warm, inviting aroma that promised sweet, spicy comfort. That memory is what led me to perfect this zucchini swirl coffee cake. It’s a recipe I always keep in my back pocket when I need something homemade, cozy, and just a little bit special. Trust me, this one’s a lifesaver on busy nights when you want something sweet but don’t have the time or energy to bake a whole batch of cookies. Plus, it’s sneakily healthy with zucchini hidden inside—so, guilt-free in my book! My kids ask for this all the time, and honestly, I never get tired of how pretty the marbled swirl looks when I cut into it. It’s like a little edible art piece that tastes just as beautiful as it looks. So, grab some zucchini and let’s get baking—your kitchen’s about to smell like happiness.
What is Zucchini Swirl Coffee Cake?
This zucchini swirl coffee cake is my twist on the classic cinnamon-spiced dessert that’s perfect with a cup of coffee or tea. Think of it as a tender, buttery cake layered with a cinnamon-sugar zucchini filling, all topped with a shiny glaze that makes every bite irresistible. The “swirl” part is what makes it so fun—those beautiful marbled lines of zucchini and cinnamon that run through every slice. The name is pretty straightforward: it’s a coffee cake, so it’s meant to be enjoyed at breakfast or brunch, but honestly, it tastes just as good as an afternoon treat or even a late-night snack. The fact that it’s loaded with zucchini makes me feel good about indulging, since those little guys are packed with moisture, fiber, and a touch of green goodness. It’s essentially a cake that feels like a hug on a plate—warm, comforting, and a little indulgent without going overboard. Plus, I love how versatile it is—serve it plain or with a dollop of whipped cream. It’s a crowd-pleaser in every sense of the word!
Why you’ll love this recipe?
What I love most about this zucchini swirl coffee cake is how incredibly easy it is to throw together, yet it looks and tastes fancy enough for guests. The batter comes together in one bowl, no fancy equipment required, and the zucchini filling is basically a quick mash-up of shredded zucchini with cinnamon and sugar—easy peasy! The aroma alone is enough to make your house smell like a bakery, and I swear, the first time I made this, my whole family followed their noses straight into the kitchen. It’s a big win on busy mornings, because while it bakes, I get to relax or prep for the day, and then I have this stunning, moist cake ready to go. Plus, it’s budget-friendly. Zucchini is super affordable and readily available in the summer, but I’ve also frozen it for year-round snacking. What I love most about this is how customizable it is—swap out the cinnamon for cardamom or add chopped nuts to the batter for extra crunch. And don’t be surprised if this disappears in minutes at my house—I always do this when I want a little treat that’s not overly sweet, but totally satisfying. It’s honestly become a family favorite—my kids ask for it on weekends, and I can’t blame them. I think every home cook needs a recipe like this that makes everyone smile without a mountain of effort.
How do I make Zucchini Swirl Coffee Cake?
Quick Overview
This recipe is as straightforward as it gets. You mix a simple buttery batter, prepare a cinnamon-spiked zucchini filling, layer and swirl the two together, and then bake until golden. The magic is in the swirl—don’t skip the step of gently marbling the batter and filling, because those beautiful streaks make each slice so pleasing to look at. While it’s baking, your kitchen will fill with warm cinnamon and the aroma of freshly baked cake—trust me, you’ll want to sneak a quick taste straight from the oven. When it’s done, drizzle on the glaze, let it cool just enough to set, and then slice. Easy, impressive, satisfying—that’s this coffee cake in a nutshell.
Ingredients
For the Main Batter:
- 2 cups all-purpose flour (I always use unbleached for a more rustic flavor)
- 1 cup granulated sugar (you can cut this down or swap with honey or maple syrup)
- 1 teaspoon baking powder
- ½ teaspoon baking soda
- ¼ teaspoon salt
- 1 teaspoon ground cinnamon (because, yum!)
- ½ cup unsalted butter, softened (trust me, don’t skip the butter—makes everything better)
- 2 large eggs
- ¾ cup buttermilk (or whole milk with a splash of lemon juice if you don’t have buttermilk)
- 1 teaspoon vanilla extract
For the Filling:
- 1 ½ cups shredded zucchini (make sure to squeeze out excess moisture)
- ⅓ cup brown sugar (adds warmth and richness)
- 1 teaspoon ground cinnamon
- ½ teaspoon nutmeg (optional, but oh so good!)
For the Glaze:
- ½ cup powdered sugar
- 1-2 tablespoons milk (or cream, for extra creaminess)
- ½ teaspoon vanilla (or lemon zest for a citrus zing)
Step-by-Step Instructions
Step 1: Preheat & Prep Pan
Set your oven to 350°F (175°C). Grease a 9-inch round or square baking pan with butter or cooking spray and line the bottom with parchment paper if you like for easy removal. I always do this because cleanup is a breeze! Once the oven is warm, set it aside.
Step 2: Mix Dry Ingredients
In a large bowl, whisk together the flour, sugar, baking powder, baking soda, salt, and cinnamon. This step is important because it ensures all your leaveners are evenly distributed, giving the cake a light, tender crumb. I’ve learned from past mistakes that skipping this step can lead to uneven rising, and nobody wants dense spots in their beautiful swirl!
Step 3: Mix Wet Ingredients
In a separate bowl, beat the softened butter, eggs, buttermilk, and vanilla until smooth. I usually do this with a hand mixer, but a whisk works fine too—just make sure everything’s well combined and smooth. The batter will look a bit lumpy at first, but that’s normal. If you’re using almond milk, I tested it with that once, and it actually made the cake even creamier—so feel free to experiment!
Step 4: Combine
Carefully pour the wet mixture into the dry ingredients. Using a spatula or a spoon, fold until just combined—don’t overmix! Overmixing can lead to a tougher cake, so mix gently and stop when there’s no streak of flour remaining. The batter will be thick but pourable.
Step 5: Prepare Filling
Take your shredded zucchini and squeeze out as much moisture as possible with a clean kitchen towel or paper towels. This is a little step that makes a huge difference—moisture can turn your filling into a soggy mess, and we want tender, flavorful swirls. Mix the zucchini with brown sugar, cinnamon, and nutmeg until evenly coated. I like to taste a tiny bit to make sure the sweetness is just right—sometimes I add a pinch more cinnamon if I’m feeling extra indulgent.
Step 6: Layer & Swirl
Spread about half of your batter into the prepared pan. Dot with spoonfuls of zucchini filling, then spread the remaining batter on top. Using a knife or a skewer, swirl through the layers to create those pretty marbled lines. Be gentle—you don’t want to mix everything into a muddy mess, just enough to get beautiful streaks of zucchini and cinnamon.
Step 7: Bake
Pop your cake into the oven and bake for about 40-45 minutes, or until a toothpick inserted in the center comes out clean. Oven times can vary, so start checking around the 38-minute mark. The top should be golden, and your house will smell irresistible. If it starts to brown too quickly, tent it loosely with foil.
Step 8: Cool & Glaze
Let the cake cool in the pan for about 15 minutes, then transfer to a wire rack. I like to wait until it’s just warm enough so the glaze melts into the top but doesn’t slide off. Mix powdered sugar with milk and vanilla until smooth—add more milk if it’s too thick or more powdered sugar if it’s too runny. Drizzle generously—the glaze gives it that pretty, glossy finish.
Step 9: Slice & Serve
Once the glaze is set, slice and serve. I love a slightly warm slice with a dollop of whipped cream or a scoop of vanilla ice cream. For breakfast, it’s perfect plain or with a splash of coffee on the side. Honestly, this cake stays moist for a couple of days, but it rarely lasts that long at my house—I tend to cut big squares and hide the rest for myself!
What to Serve It With
This cake is so versatile; it pairs beautifully with all sorts of accompaniments depending on the occasion. For breakfast, I love serving it with strong black coffee, a little whipped cream on the side, or even a drizzle of honey for extra sweetness. It’s great for brunch buffet tables—bright, pretty, and addictive. As a dessert, it’s a showstopper with a scoop of vanilla ice cream or a dusting of powdered sugar, especially when topped with fresh berries or a sprig of mint. On cozy afternoons, I’ll warm a slice in the microwave and enjoy it with a cup of herbal tea. I’ve also taken it to potlucks and have yet to see anyone leave without a second slice—the lady at the grocery store even asked me for the recipe last time I brought it. Honestly, I think everyone should have a go-to coffee cake like this in their repertoire—it’s comfort food that feels like a hug, but with a little green twist.
Top Tips for Perfecting Your Zucchini Swirl Coffee Cake
If you want your coffee cake to turn out perfect every time, here are some of my best tips based on years of testing and tasting:
- Zucchini Prep: Always squeeze out the moisture. Moisture is the enemy of the perfect swirl—too wet and the filling will slip or turn soggy. I shred the zucchini on the coarse side of the grater for a nice texture, then squeeze with a clean towel until almost dry.
- Mixing Advice: Gently fold the wet and dry ingredients to keep the batter tender. Overmixing leads to dense, rubbery texture, so treat it like a delicate dance—just enough to combine.
- Swirl Technique: Use a skewer or a butter knife to make gentle, wide strokes. The goal is to create pretty streaks, not to fully blend the layers—think of it as a watercolor painting instead of mixing paint into mud.
- Ingredient Swaps: Want more crunch? Toss some chopped nuts into the batter or the filling. For an extra flavor boost, add a teaspoon of orange zest to the glaze or filling—brightens everything up!
- Baking Tips: Every oven is different. If your cake starts browning too fast, tent it with foil. Check doneness by inserting a toothpick in the center—it should come out with a few moist crumbs, but no wet batter.
- Glaze Variations: Feel free to swap vanilla extract for a splash of lemon juice or bourbon for a grown-up twist. If you prefer a cream cheese glaze instead of sugar glaze, mix softened cream cheese with powdered sugar and a splash of milk until smooth—deliciously tangy!
My biggest lesson? Be patient. Let the cake cool slightly before glazing or slicing. Warm cake can be a little tricky—it might be gooey, but that’s part of the charm. Once set, the flavors meld beautifully, and it’s pure bliss with every bite. I’ve tested different zucchini types, experimented with sugar levels, and even tried a gluten-free version—trust me, it’s just as wonderful, and I’ll tell you all about those tweaks in the FAQ section below.
Storing and Reheating Tips
I usually make this cake on a Sunday afternoon, and it’s just as tasty on Tuesday if stored properly. Here’s what I do:
- Room Temperature: Keep it covered with a kitchen towel or loosely wrapped in foil for up to 2 days. After that, it’s best to refrigerate to prevent it from drying out—more on that below.
- Refrigerator Storage: Transfer to an airtight container or cover tightly with plastic wrap. It’ll stay fresh for about 4 days. Before serving, I like to microwave a slice for 10 seconds—it warms up without drying out the cake.
- Freezer Instructions: Wrap individual slices in plastic wrap and then foil, or use a vacuum-seal if you have one. It keeps well for up to 3 months. To reheat, simply leave it at room temp for 30 minutes or microwave until warm—trust me, it’s just as delicious after freezing!
- Glaze Timing: If you like that fresh-glaze shine, I recommend adding the glaze just before serving. If you freeze and reheat, you can add a fresh drizzle later for that glossy, tempting finish.
The key is to keep moisture inside—don’t over-wrap the cake tightly for too long, or it might get soggy. I’ve found that wrapping with a paper towel plus a loose plastic bag allows the cake to breathe while staying moist. And the smell—oh, that cinnamon and butter—will just make you smile every time you open the fridge.
Frequently Asked Questions
Final Thoughts
Honestly, this zucchini swirl coffee cake has become a staple in my home because it’s like a warm hug in every slice. It’s the kind of dessert that makes your house smell incredible, and every bite is just the right combo of moist, spicy, and sweet. I love how adaptable it is—whether you’re making it for a weekend brunch, a quick breakfast, or a cozy afternoon snack, it never fails to bring smiles. It’s also a sneaky way to get some extra greens into your day without anyone batting an eye! If you’re new to baking or just want a recipe that’s both forgiving and impressive, give this a try. I promise, once you taste it, you’ll be hooked. Remember, the best part of baking is making it your own—so don’t be afraid to experiment with flavors or add your personal touch. I can’t wait to hear how yours turns out, so make sure to leave a comment or share your tweaks. Happy baking, friends! And don’t forget to tag me if you post a photo—I want to see your gorgeous results!
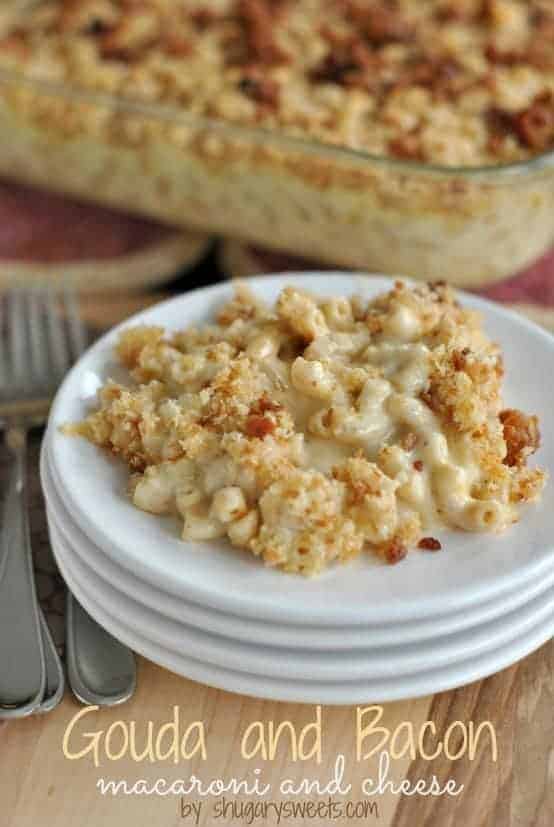
mac and cheese
Ingredients
Method
- Prepare macaroni according to package directions. Set aside.
- In large pot, melt butter over medium high heat. Add milk and bring to near boiling. Reduce heat to medium and sprinkle in flour. Whisk vigorously for 1-2 minutes. Slowly add cream, whisking continuously. Add salt, pepper, mustard, and worcestershire. Reduce heat to low and stir for about 5 minutes.
- In food processor, shred gouda and cheddar cheese. Stir into the sauce until thoroughly combined.
- Add cooked macaroni to cheese mixture. Pour into a 13x9 inch dish.
- In the same food processor (no need to wash after shredding cheese), process bread slices to a fine crumb. Mix with melted butter and sprinkle over macaroni. Top with crumbled bacon.
- Bake uncovered at 375°F for 20 minutes until bubbly and golden on top. Serve hot and enjoy!