Spooky Chocolate Pudding Cups Are Easy
There’s something so nostalgic about baking a cake, isn’t there? The way the kitchen fills with that warm, sweet aroma—that’s always been my favorite part. But lately, I’ve been craving a bit of a twist on the classic, and this zucchini swirl cake hits every note. It’s super moist, packed with subtle veggie goodness, and most importantly, it’s downright delicious with its gorgeous marbled swirls. Honestly, I was a little skeptical at first—thinking, “Does zucchini really belong in a cake?”—but wow, this one’s a lifesaver on busy nights or when you want something sweet without all the fuss. My kids ask for this all the time, especially when I sneak in some extra zucchini—they can’t tell, but I know! If you’re looking for a recipe that combines comfort and novelty, trust me on this one—you’ll be making it again and again.
What is Zucchini Swirl Cake?
Think of this as a tender, fluffy cake that’s got a secret ingredient—zucchini! It’s essentially a marble cake, but with a bit more heart and a lot less guilt. The name comes from the swirling of the bright green zucchini batter through a richer, darker cocoa or cinnamon mixture, creating beautiful marbled ribbons. This cake is friends and family-approved because it’s not overly sweet, has a subtle veggie boost, and stays moist for days. It’s so versatile that I’ve made variations with different chocolates, added nuts, or even a hint of orange zest. The best part? It’s super forgiving—perfect for bakers of all skill levels, and it’s a great way to get kids excited about eating vegetables without fuss. It’s honestly like a cozy hug in cake form—warm, familiar, but with a little fun surprise inside.
Why you’ll love this recipe?
What I love most about this zucchini swirl cake is how effortlessly it combines beauty and flavor. The marbling isn’t just for show; it adds a lovely contrast of tastes. The lightness of the batter makes each slice feel delicate, yet it packs a satisfying sweetness that hits just right. This cake is a real crowd-pleaser, especially because it’s so simple to whip up—no complicated frosting or fancy techniques needed. Plus, it’s budget-friendly: basic pantry ingredients like flour, sugar, eggs, zucchini, and cocoa or cinnamon. I’ve tested this with almond milk during dairy shortages, and it actually made it even creamier! It’s perfect when you want a cozy treat that doubles as a slightly healthier dessert—you get that sneaky veggie boost while still indulging. I also love that it’s versatile—serve it for brunch, afternoon tea, or as a quick dessert after dinner. I swear, once you try making this, it’ll become a go-to in your baking rotation.
How do I make Zucchini Swirl Cake?
Quick Overview
This cake starts with a simple batter that’s whipped together in minutes. You make two versions: a plain vanilla or cinnamon base, and then a rich cocoa or spiced mixture. You pour dollops of each into your pan and swirl gently to create gorgeous marbled effects. Baking is straightforward—just watch for a golden top and a toothpick test. Once cooled, a quick glaze or dusting makes it look even more inviting. Honestly, it’s a low-stress process that results in a show-stopping dessert your entire family will love. My secret? Don’t overmix after adding the zucchini, or the batter can get dense. And I always do this when baking zucchini cakes: I squeeze out as much excess moisture as I can from the grated zucchini—it keeps the cake moist but prevents it from getting soggy.
Ingredients
For the Main Batter:
– 2 cups all-purpose flour (I like using unbleached for a richer flavor)
– 1 ½ cups granulated sugar
– 1 teaspoon baking powder
– ½ teaspoon baking soda
– ½ teaspoon salt
– 1 teaspoon ground cinnamon or vanilla extract
– 3 large eggs (room temperature is best)
– ½ cup vegetable oil or melted butter
– 1 cup grated zucchini (squeezed of excess water)
– ½ cup buttermilk or almond milk
For the Filling:
– ½ cup cocoa powder (for the chocolate swirl) or cinnamon (for spice swirl)
– 2 tablespoons sugar
– 2 tablespoons hot water or milk
– Optional: ½ cup chopped nuts or chocolate chips
For the Glaze:
– ½ cup powdered sugar
– 1-2 teaspoons milk or lemon juice
– A sprinkle of cinnamon or cocoa for extra flair
Step-by-Step Instructions
Step 1: Preheat & Prep Pan
Heat your oven to 350°F (175°C). Grease a bundt pan, loaf, or springform equally, and line it with parchment if needed. I always do this when I want a clean release later—it saves a lot of stress!
Step 2: Mix Dry Ingredients
In a big bowl, whisk together the flour, sugar, baking powder, baking soda, salt, and cinnamon (if using). This step ensures even distribution of leavening agents and spices. Trust me, it makes a difference in how evenly your cake bakes.
Step 3: Mix Wet Ingredients
In another bowl, beat the eggs, oil, and vanilla until combined. Stir in the zucchini and buttermilk, and do a quick taste test—sometimes I add a splash more vanilla here for extra warmth.
Step 4: Combine
Pour the wet ingredients into the dry and fold gently until just combined. Be careful not to overmix; otherwise, the cake can turn out dense. Plus, the zucchini adds moisture, so no need for excessive mixing. If you see lumps, that’s okay—happy little accidents!
Step 5: Prepare Filling
Mix cocoa powder or cinnamon with the sugar and hot water until smooth. If you’re adding nuts or chocolate chips, fold those in now. This mixture will be layered and swirled in the batter for that pretty marbled effect.
Step 6: Layer & Swirl
Pour half of the plain batter into your pan, then dollop spoonfuls of the chocolate or cinnamon mixture on top. Repeat with the remaining plain batter and filling. Use a skewer or knife to swirl gently—think of it as making a beautiful marble painting. Take your time, and don’t overdo it—the goal is a gentle swirl, not a marbled mess.
Step 7: Bake
Pop it into the oven for about 45-55 minutes. Check for doneness with a toothpick inserted in the center—if it comes out clean, you’re good. Every oven’s a little different—I’ve had this take longer if my zucchini was extra watery. Keep an eye out for a golden top and edges pulling away slightly from the pan.
Step 8: Cool & Glaze
Allow the cake to cool in the pan for 15 minutes, then transfer to a wire rack. When fully cooled, whisk up your glaze and drizzle generously. I like to add a pinch of cinnamon or cocoa to the glaze for an extra flavor boost. The smell alone when the glaze hits the slightly warm cake? Pure magic.
Step 9: Slice & Serve
Use a sharp serrated knife to cut clean slices—this cake is delicate, so gentle moves are best. Serve slightly warm or at room temperature. A dollop of whipped cream or a scoop of vanilla ice cream turns this into an even more decadent treat. Trust me, a little goes a long way—especially if you’ve added extra nuts or chocolate chunks.
What to Serve It With
This cake is pretty versatile. For breakfast, pair it with a hot cup of coffee or tea—think of it as a slightly sweet, veggie-packed muffin that’s perfect for a lazy Sunday morning. It’s also lovely at brunch—try slicing it thin and serving with fresh fruit or a smear of nut butter. If you’re craving something richer after dinner, serve it a la mode with vanilla ice cream and a drizzle of caramel. And honestly, on a cozy afternoon, it makes a fantastic snack paired with a big mug of tea or hot chocolate. I often sneak a slice for myself during quiet mornings—there’s just something comforting about that first bite. Plus, it’s a hit at picnics or school bake sales. My family always asks for seconds, and no one suspects the secret zucchini—shhh! I keep this recipe on regular rotation because it’s so adaptable and always gets rave reviews.
Top Tips for Perfecting Your Zucchini Swirl Cake
Every time I make this cake, I learn a little more—baking is all about the small details. Here are some tips I swear by:
Zucchini Prep: Always squeeze out as much moisture as you can from the grated zucchini. If it’s too wet, your batter can turn soggy or dense, and nobody wants a gummy cake. I do this by wrapping the grated zucchini in a clean kitchen towel and giving a firm squeeze—trust me, it makes a difference.
Mixing Advice: Once you add the zucchini, fold it gently into your batter. Overmixing can develop gluten, making the cake heavy instead of light. If your batter feels thick, add a splash more milk or buttermilk—this can help keep it tender.
Swirl Customization: Play with the pattern—try a figure-eight swirl or just random dollops. For Instagram-worthy photos, I recommend adding some chopped nuts or chocolate chips in the plain batter and reserving some for the swirl. It adds texture and visual interest.
Ingredient Swaps: Want a healthier spin? Swap half the flour for whole wheat or almond flour. Keep in mind, this may slightly alter the texture. For a dairy-free version, use coconut oil and almond milk. The flavor’s different but just as tasty!
Baking Tips: Place your pan in the center of the oven—hot spots can cause uneven baking. Keep an eye on the cake after 40 minutes—ovens vary! And remember, the toothpick test is your best friend. If it comes out moist but with no batter residue, you’re all set.
Glaze Variations: Play around with the glaze—add a touch of lemon zest for brightness or a splash of bourbon for depth. If you prefer a non-glazed look, dust with powdered sugar right before serving. Keep the glaze thick enough to stay on, but not so runny you drown the cake.
I’ve tested all these tricks over the years, and honestly, the secret is patience and tasting as you go. This recipe is forgiving, so don’t stress if it’s not perfect the first time. With a little practice, you’ll master the swirl and the flavor, and I’ll bet it will become one of your family favorites too.
Storing and Reheating Tips
This cake stays fresh for a couple of days if stored correctly. I wrap it tightly in plastic wrap or keep it in an airtight container. If your kitchen is warm, pop it in the fridge—especially if it’s hot out or if you’ve added dairy-based glaze or toppings. Reheat slices gently in the microwave for about 20 seconds if you want it warm. To freeze, wrap slice portions tightly with plastic wrap and foil—this way, you can enjoy them later without freezer burn. Thaw at room temperature or warm in the microwave. The flavor and texture stay pretty much intact—just give it a quick warm-up and a drizzle of fresh glaze for that just-baked feel.
Frequently Asked Questions
Final Thoughts
Honestly, making this zucchini swirl cake has become a little family tradition. It’s one of those recipes that’s humble but elegant, familiar but with a fun twist. Every time I bake it, I think about my grandma’s kitchen, the smell of fresh baking, and those childhood birthdays when cake was the star. What makes this special is its simplicity and the little surprise inside—a marbled swirl that’s almost too pretty to eat. But don’t worry, once you taste it, you’ll want to gobble up every slice. I encourage you to try different fillings—maybe toss in some berries or chopped nuts for added texture. Most of all, have fun with it and don’t stress about perfection. Baking should be joyful, just like sharing a homemade cake with loved ones. Happy baking! And I can’t wait to hear how yours turns out or see your creative twists. Drop me a comment below—I love hearing your stories!
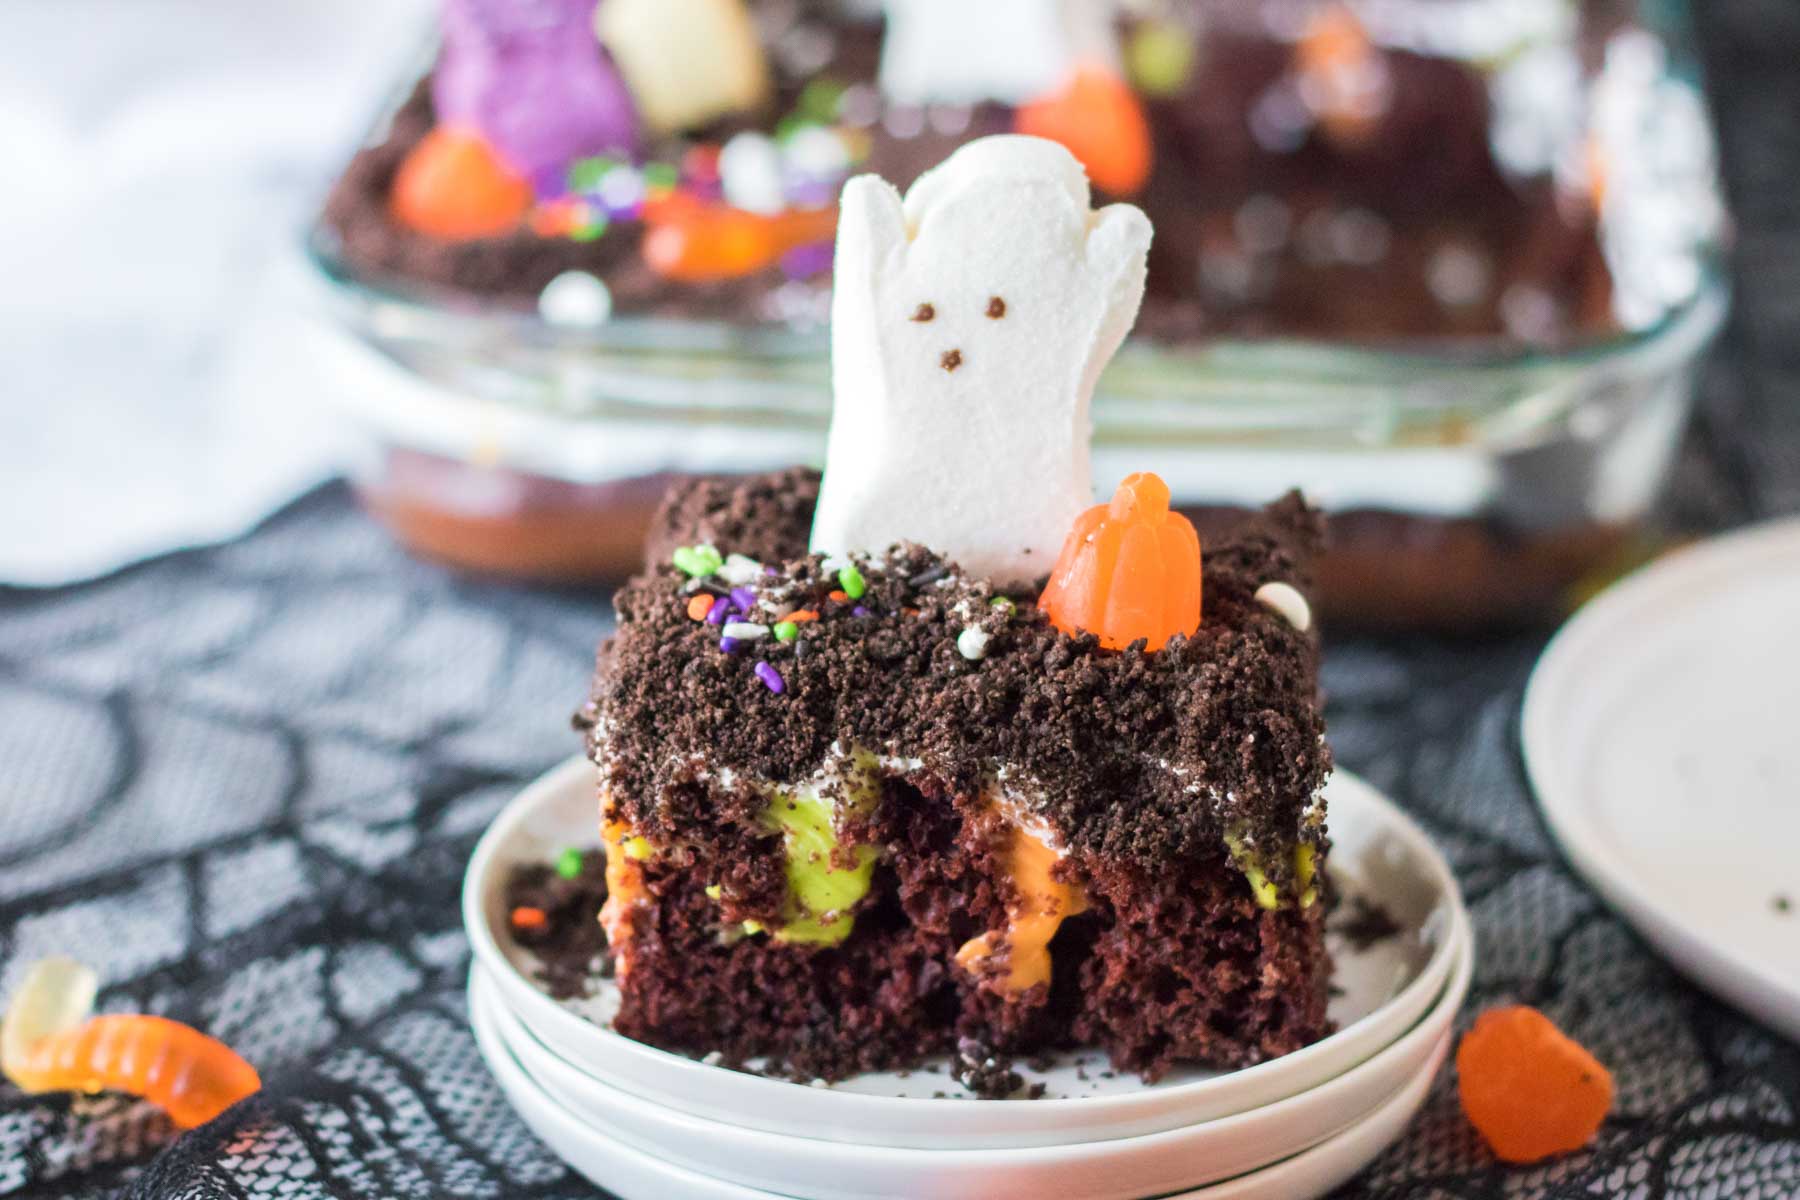
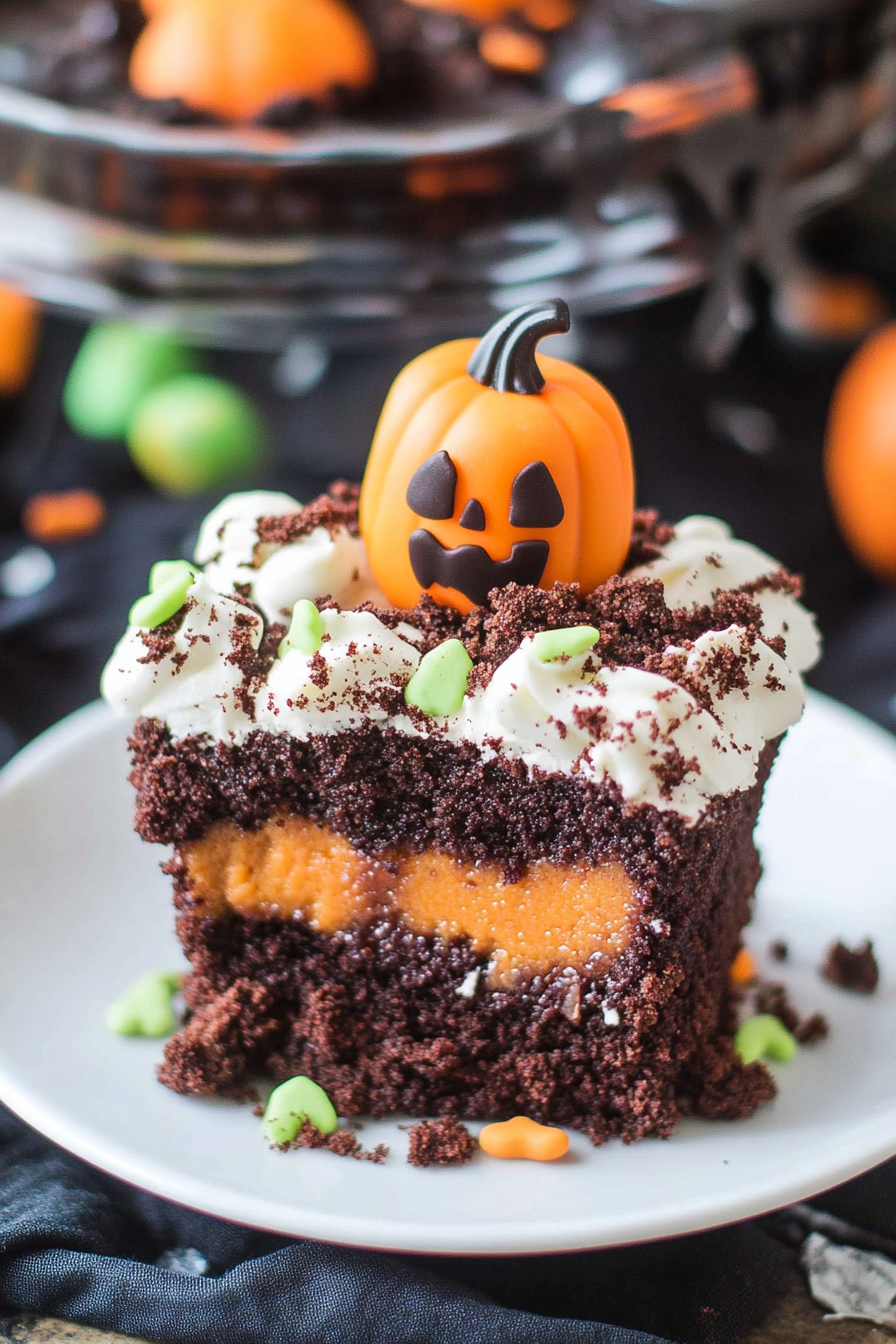
Halloween Dirt Cake
Ingredients
Method
- Preheat oven to 350°F (175°C). Lightly grease a 9x13 inch baking dish.
- Prepare the cake according to the package directions. Combine the cake mix with water, oil, and eggs. Mix well with a whisk until smooth.
- Pour the cake batter into the prepared baking dish.
- Bake for 30-35 minutes, or until a toothpick inserted into the center comes out clean. Let the cake cool completely.
- In a medium bowl, combine the instant pudding mix and milk. Whisk until smooth. Refrigerate until the cake is cool.
- Once the cake is cool, divide the pudding into two separate bowls. Add green food coloring to one bowl and orange food coloring to the other. Stir until evenly colored.
- Using the end of a wooden spoon or a chopstick, poke holes all over the cooled cake, leaving a little space between each hole.
- Carefully use a spoon or a clean cooking syringe to fill the holes with the green and orange puddings. Alternate colors for a marbled effect.
- Place all Oreo cookies, including the cream filling, in a food processor. Pulse until you have fine Oreo crumbs.
- Spread an even layer of whipped topping over the pudding-filled cake.
- Generously sprinkle the Oreo crumbs over the whipped topping, ensuring the entire layer is covered to resemble dirt.
- Break off the bottoms of the Milano cookies to create flat tombstone shapes.
- Melt the chocolate chips in a microwave-safe bowl in 30-second intervals, stirring in between, until completely melted.
- Place the melted chocolate into a piping bag or a plastic bag with a tiny corner cut off. Write sayings and dates on the Milano cookies to create tombstones.
- Decorate the cake to look like a spooky graveyard. Arrange the Milano cookie tombstones, gummy worms, candy pumpkins, Peeps ghosts and cats, and any other Halloween candies. Finish with Halloween sprinkles.
- Chill the cake in the refrigerator for at least 2 hours before slicing and serving.