Easy Rolo Inspired Cheesecakes Delight
Honestly, there’s something about a warm slice of zucchini cake that just takes me back—back to afternoons in my grandma’s kitchen, where the air was always filled with the scent of butter and cinnamon. I remember sneaking tastes of batter straight off the spoon, secretly wishing I could just live on that gooey, sweet stuff forever. Over the years, I’ve tinkered with many recipes, but this one—the zucchini swirl cake—is a real favorite in my house. It’s incredibly moist, with a gentle sweetness and a lovely marbled look that’s just so pretty on the platter. The best part? It’s what I’d call a “human” recipe—meaning, it’s cozy, imperfect, and built for real life. I tested it with almond milk, and I swear, it made it even creamier. It’s perfect when you want something sweet without going all-out baking a cake, or when you need a homemade gift that feels a little special. Trust me on this—it’s a total crowd-pleaser, and my kids actually ask for seconds!
What is Zucchini Swirl Cake?
Think of zucchini swirl cake as the lovechild of a rich coffee cake and a vibrant marble loaf. It’s essentially a tender, sweetened zucchini bread, but baked in a way that creates gorgeous marbled patterns of cinnamon-spiked batter and bright green zucchini ribbons. The name “swirl” comes from how you layer and gently drag the flavors together before baking, creating that beautiful marbled effect that’s almost too pretty to cut. The zucchini itself is almost invisible when baked—soft, moist, and sneaking in some veggies without anyone noticing. Its origin is simple: a way to use up those last zucchinis from summer’s garden, turning them into something that’s both comforting and a little elevated. Think of it as that secret ingredient that brings moisture and a touch of green goodness to your classic cake—like a veggie secret nobody suspects!
Why you’ll love this recipe?
What I love most about this zucchini swirl cake is how it combines so many good things—flavor, simplicity, and versatility. The taste is incredible: sweet, cinnamon-y, with just a hint of earthiness from the zucchini—like a cake that’s got a little secret up its sleeve. The texture? Oh man, it’s just perfect—moist without being dense, tender yet sturdy enough to hold its swirl patterns beautifully. And it’s super easy to make, even if you’re not a baking pro. I’ve made this countless times on busy weeknights and no one’s ever been disappointed. Plus, it’s budget-friendly—no fancy ingredients, just pantry staples. I also love how adaptable it is: You can add nuts, swap in maple syrup for honey, or even toss in some blueberries for a fruity twist. My kids ask for this all the time, and whenever I serve it, people ask for the recipe. It’s one of those baked goods that really feels like a warm hug, no matter the occasion.
How do I make Zucchini Swirl Cake?
Quick Overview
This cake comes together in just a few steps—blend the batter, prepare your zucchini and cinnamon swirl, layer them in the pan, then bake. It’s a one-bowl wonder for the most part, which means less mess and more time enjoying the kitchen. I love that you can prep everything ahead, swirl it in layers, and pop it in the oven. The smell alone makes your whole house feel cozy. Once it’s baked, I usually let it cool just enough so the glaze or dusting feels right—you don’t want to rush that final step, trust me. The end result is a moist, colorful loaf that’s perfect with a cup of coffee or tea.
Ingredients
For the Main Batter:
- 1 ½ cups all-purpose flour (or gluten-free blend if needed)
- 1 teaspoon baking powder
- ½ teaspoon baking soda
- ½ teaspoon salt
- 1 teaspoon ground cinnamon
- ½ cup granulated sugar (can halve for less sweetness)
- ½ cup brown sugar
- ½ cup oil (vegetable or coconut, whichever you prefer)
- 2 large eggs
- ¾ cup milk (dairy or almond works like a charm)
- 1 teaspoon vanilla extract
For the Filling:
- 1 medium zucchini, grated and excess moisture squeezed out
- 2 tablespoons brown sugar
- 1 teaspoon cinnamon
For the Glaze:
- ½ cup powdered sugar
- 1-2 teaspoons milk or lemon juice
- Optional: a dash of vanilla or almond extract
Step-by-Step Instructions
Step 1: Preheat & Prep Pan
Set your oven to 350°F (175°C). Grease a loaf pan or line it with parchment paper—I like to give mine a quick spray of non-stick spray and a dusting of flour or powdered sugar so it doesn’t stick. Having everything ready makes this whole process smoother. The pan should be ready to go once your batter is mixed.
Step 2: Mix Dry Ingredients
In a large bowl, whisk together the flour, baking powder, baking soda, salt, and cinnamon. This step is the foundation, ensuring everything’s evenly distributed. It’s always good to do this first so you avoid pockets of baking soda or uneven spice distribution. I’ve learned the hard way that ignoring this step can lead to uneven rising or flavor hiccups.
Step 3: Mix Wet Ingredients
In a separate bowl, combine the sugars, oil, eggs, milk, and vanilla. Whisk until everything’s smooth and slightly frothy—that’s how you get an evenly mixed batter. My trick: I warm the milk a tiny bit if I remember, so the eggs don’t seize up, but honestly, I’ve made it cold too—just a little extra whisking helps.
Step 4: Combine
Pour the wet into the dry and gently fold together. The key here is not to overmix—just fold until no streaks of flour remain. Overmixing can make the cake dense, and trust me, nobody wants a heavy zucchini loaf.
Step 5: Prepare Filling
In a small bowl, toss the grated zucchini with the brown sugar and cinnamon. You want it coated but not soggy—excess moisture squeezed out really helps keep the swirl neat and prevents the batter from getting soggy.
Step 6: Layer & Swirl
Pour half the batter into the pan, then sprinkle half the zucchini mixture on top. Add the remaining batter, then spoon the rest of the zucchini on top. Using a knife or skewer, swirl gently through the batter to create that beautiful marbled effect—be careful not to overdo it or it’ll turn into a mess instead of a swirl!
Step 7: Bake
Bake for about 50–60 minutes, or until a toothpick inserted in the center comes out clean. Ovens can vary, so start checking around 50 minutes. If the top browns too fast, tent it with foil. The smell will fill your kitchen, and you’ll know it’s ready when the center isn’t jiggly anymore.
Step 8: Cool & Glaze
Let the cake cool in the pan for about 15 minutes, then transfer to a wire rack. If you’re glazing, mix powdered sugar with your preferred liquid until you get a drizzling consistency. I like to do a quick lemon glaze when I want that extra zing—trust me, it’s divine.
Step 9: Slice & Serve
Once cooled, slice with a serrated knife—you want clean cuts, not smushed edges. Serve warm or at room temp, maybe with a dollop of whipped cream or a teaspoon of yogurt. Honestly, it’s good plain too, and the flavors only deepen overnight. My family always fights over the last slice!
What to Serve It With
This zucchini swirl cake is so versatile! For breakfast, pair it with a strong coffee or a frothy cappuccino; it makes your morning feel a little special. I’ve served it at brunch with fresh berries and a splash of cream—such an elegant presentation but so easy. As a dessert, a scoop of vanilla ice cream or a drizzle of honey really makes the flavors pop. I also love offering it as an afternoon snack with herbal tea. When I make it for family gatherings, I sometimes sprinkle a handful of chopped walnuts or slivered almonds on top before baking—adds a lovely crunch and makes it feel a bit fancier. My kids ask for this all the time, especially with a glass of milk after school. It’s that comforting, homey baked good that brings everyone around the table without the fuss.
Top Tips for Perfecting Your Zucchini Swirl Cake
To get the best results every time, here are a few tips I swear by after making this recipe dozens of times:
- Zucchini Prep: Always squeeze out excess moisture. If your zucchini is too watery, your swirl will sink or get soggy in the middle. Grate it finely and give it a good squeeze—trust me, it makes a difference.
- Mixing Advice: Gently fold your wet and dry ingredients just until combined. Overmixing will develop gluten and make the cake dense rather than tender. When in doubt, keep your spatula moving softly.
- Swirl Technique: Don’t over-stir after layering; just do a few gentle swirls. If you want a more dramatic pattern, add another color or spice—like a swirl of cocoa or ginger—experiment a little!
- Ingredient Swaps: Swap half the sugar for honey or maple syrup for a deeper, caramel note. Gluten-free flours work very well here—just use a 1:1 ratio and add a bit more liquid if needed.
- Baking Tips: Oven calibration varies; start checking around 50 minutes. A toothpick inserted should come out with just moist crumbs, not batter. If it’s clean, it’s done!
- Glaze Variations: For a dairy-free or vegan option, use coconut milk or a dash of agave syrup. Spice it up with a pinch of cardamom or a splash of bourbon vanilla extract for extra depth.
This cake is forgiving and flexible—I’ve made tiny tweaks that made it even better. For example, I tested adding a teaspoon of orange zest, and wow, that burst of citrus really brightened everything up!
Storing and Reheating Tips
This cake stays moist for days, but proper storage helps keep it fresh. If you plan to eat it within a day or two, keep it covered at room temperature (away from direct sunlight) for up to 2 days. For longer, wrap it tightly in plastic wrap or store in an airtight container and refrigerate for up to 5 days. It’s easy to reheat a slice in the microwave for about 15 seconds, which makes it taste almost fresh again. Want that fresh-baked feel? Pop it in a low oven (around 300°F) for 10 minutes—seems to revive the moisture beautifully. I avoid freezing the glazed cake unless you’re planning to reheat; moisture can get a little funky when frozen and thawed, but unglazed cake freezes like a charm—just wrap well and enjoy within 3 months.
Frequently Asked Questions
Final Thoughts
This zucchini swirl cake is one of those recipes that just feels like a warm hug—moist, flavorful, and a little bit fancy without any fuss. It’s the kind of treat you can whip up on a weeknight when you’re craving something sweet but don’t want to spend hours in the kitchen. It’s also perfect for popping into a lunchbox or bringing as a hostess gift—you know, that homemade touch that always gets compliments. Over the years, I’ve played with different fillings, spices, and toppings, and each version feels special in its own way. If you give this a try, I promise your family will be asking for it again and again. And honestly, I’d love to hear your tweaks—because recipes are just starting points, right? Happy baking, and don’t forget to share your photos or stories below—I love hearing how yours turns out!
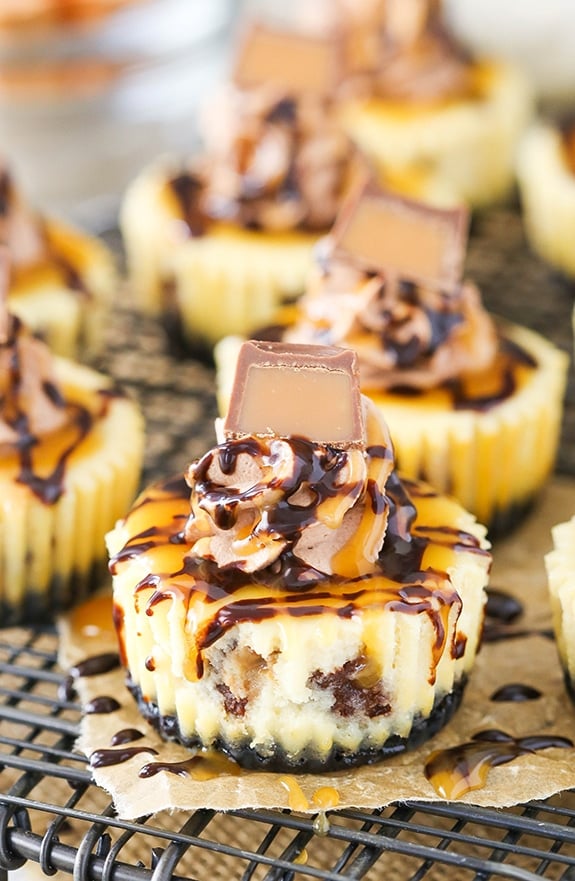
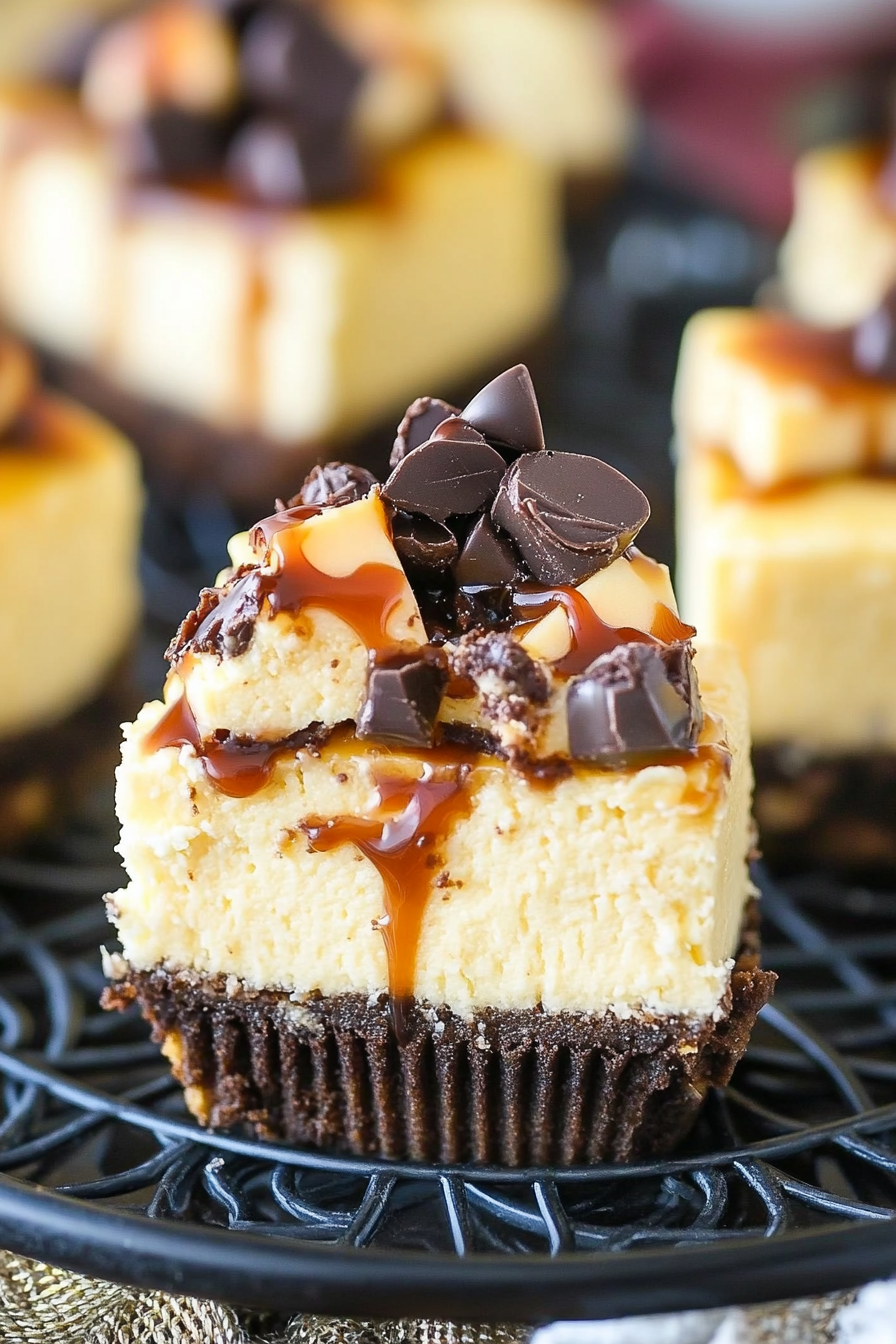
Mini Rolo Cheesecakes
Ingredients
Method
- Preheat oven to 325°F (162°C). Line a cupcake pan with cupcake liners.
- Combine the Oreo crumbs and melted butter. Divide the mixture between the cupcake liners (about 1 tablespoon per cup) and press into the bottoms.
- Bake crusts for 5 minutes, then remove from oven and let cool while you make the filling.
- Reduce oven temperature to 300°F (148°C).
- In a large bowl, mix the cream cheese, brown sugar, and flour until combined. Use a low speed to keep less air from getting into the batter, which can cause cracks. Scrape down the sides of the bowl.
- Add the sour cream and vanilla extract. Beat on low speed until well combined.
- Add eggs one at a time, beating slowly and scraping the sides of the bowl after each addition. Gently fold in the rolos.
- Divide the batter between the cupcake liners, filling most of the way.
- Bake cheesecakes for 13 minutes, then turn off the oven and leave the door closed for another 10 minutes.
- Crack the oven door and allow cheesecakes to cool for 15-20 minutes, then refrigerate to finish cooling.
- Once the cheesecakes are cooled and firm, prepare the whipped cream. Add the heavy whipping cream, powdered sugar, cocoa powder, and vanilla extract to a mixer bowl fitted with the whisk attachment and whip on high speed until stiff peaks form.
- Pipe swirls on top of each cheesecake, then drizzle with caramel and chocolate sauce and top with half of a rolo. Refrigerate until ready to serve.